How to embroider a peacock feather with beads. Beaded feather
An interesting element and quite versatile. Firstly, such a feather can be made in any color of beads, and secondly, it can become part of almost any jewelry. All you need is to pick up good beads, even and of the same shape.
To weave a feather, you need to take:
- Japanese or Czech beads No. 10 (No. 11-12 is possible), 2 shades A and B, more can be
- kapron or any other strong thread
- needle for beading No. 12
- fasteners
- scissors
Scheme of weaving earrings

This pen element consists of two halves, identical, but in mirror image. You need to weave starting from the left side, moving from top to bottom, and then we begin to weave the right side, but from the bottom up. Weaving technique used
We start weaving a feather.
1 row. Dial 5 A beads on the thread, then return through four beads,
2 row, dial 2 B, 1 A, make a loop passing through the very first bead A, then return through the one you just dialed and dial 5 A again, return through five beads A, the sixth remains at the end, fixing the branch.
3 row. We collect 2 B, then weave 2 beads A with a straight dense weave, passing through those beads that are above them and returning through the newly dialed one (each separately). We collect 5 more A and return through six beads.
4 row. Again we collect 2 B, weave 2 A, we collect 6 A, 5 row, weave the bottom row with a straight weave, weave all 7 beads A, dial 2 B, make a turn, catching on the previous row to secure.
5 row, again we collect 2 B and weave all the rows according to the scheme up to the 10th row with a straight dense weave.
The right side is exactly the same, but in the opposite direction. As you can see, in the diagram all the rows are numbered and the beads are marked with arrows, on the right in the diagram there is a clear explanation of what these loops mean, the movement that you need to do with the needle.
Source of all images BeadWork magazine
Gorgeous beaded peacock! The author is agnes. 1. At the base of the torso is a papier-mâché egg. Using adhesive tape, I glued a wire folded in half, in the middle of a bead, to it. it seemed convenient, so I braid the second naala from the middle of the egg (girdle), it weaves much faster, but then it’s hard to weave the eyes symmetrically and shape the head in general. In the first case, according to the diagrams from the candy forum (I didn’t have the diagrams). In the second, I myself invented something using the French weaving technique, something like two separate halves of the leaf, then attached it to the body. As for the wings, I want to say that I didn’t like neither the 1st nor the 2nd methods, I will think more. 2. Next, we begin to weave feathers. We take a wire (I took a thicker 0.8 mm for the base of the feather) a few cm longer than the planned size of the feather and, as at the beginning of the leaf with French weaving, we collect a few beads, then a sewn-on rhinestone, then again a few beads of 3 -4 pcs on each side we bend the end of the wire so that the typed does not fly off. Beads are needed here in order to cover the holes through which the wire passed, and they also help to fix the rhinestones so that they do not turn later on the wire around the axis. Then we take a thinner wire and wind it under the beads below. This is a working wire, it needs to start weaving, bending around the rhinestone quite tightly (otherwise it will hang out) Well, as you can see in the photo, I took several types of beads to get a pattern of a peacock feather. Then we also bring the pen to the desired size with the main color of the beads. I made five feathers in those sizes. You can see it in the photo. One of the longest and two of the shorter ones, which would be nice to lay. 3. For me, the most difficult stage is Assembly. I took a dry branch of a tree, quite thick. I wrapped it with a branch of beaded flowers. I filled everything with plaster. I tried to match the beaded branch with a natural color. .And already I attached the torso to the tail. It’s hard to explain this process more precisely. I can say one thing before I started attaching it all together, I didn’t know that I had such a rich supply of profanity, though I cursed mentally, but still. I also screwed the tail to the branch in several places so that it would not hang out. That's all, it seems. Good luck.
Beaded peacock: do-it-yourself weaving of a three-dimensional figurine (diagram)Beaded peacock: do-it-yourself weaving of a three-dimensional figurine (diagram)
The peacock is truly a royal bird. This craft, made of beads, will add charm to the room. In order for the beaded peacock to turn out neat, you need to have some beading skills. We will try to describe the master class in great detail so that even novice craftswomen can understand. 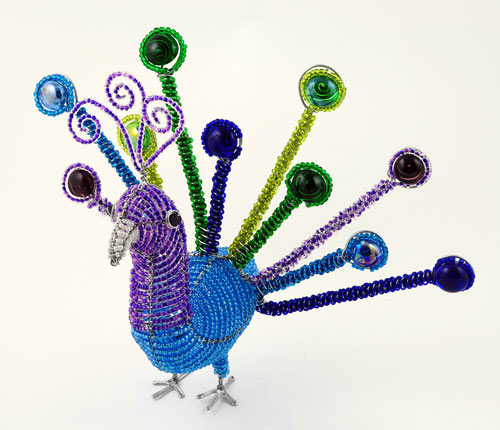


Master class of weaving a peacock from beads
First you need to prepare the following material:
- blue, red, black, white, yellow, green beads;
- blue beads;
- beaded wire;
- wire cutters;
- pliers.
When buying beads, you should not save. As a result, the appearance of the product will depend on it. If you take low-quality material, then the work will be dull. Yes, and paint from low-quality beads can begin to peel off quite quickly.
If everything is ready, then you can start creating a miracle - a bird. A peacock consists of a head, neck, body, wings and tail. Let's start the master class with a description of the execution of the head.
Head We start by weaving the peacock's beak. We need red beads, a wire 5 centimeters long.

We cut the workpiece into 2 equal pieces (2.5 centimeters each);
Similarly, we perform the lower side of the beak. Only in the course of work, it is attached to the top. This part of the work requires special care. Otherwise, the joints will look rough.
When this detail of the peacock is ready, you need to make the eyes. We need two blue beads, black, white and blue beads. The eyes of the peacock are made using the French weaving technique.

Similarly, you need to make the second eye of the peacock. Only the work is mirrored.
It remains to connect the eyes with the beak, for this:
- we pass a piece of wire into the last row of the beak and into one end of the rim of the peacock's right eye. We repeat the same action with the left eye;
- we pierce the blue beads that will connect the eyes of the bird with wire on both sides. We pass it through the beads of the rim of the eye. We string and connect it with the eyes of a peacock. Thus, we weave the entire head of the peacock. The amount of material used depends on the size of the completed elements, wishes regarding the size of the peacock. However, do not forget to follow the proportions.
Neck 
When the eyes are fully connected, we make the neck. It is performed in exactly the same way as the beak. The number of beads from top to bottom increases by 3-4 pieces. The length of this peacock element depends on your vision of the craft and should not be too long or short.
Body In order to make the body you need blue beads. The body is an extension of the neck. The method of weaving is similar to the neck. Only the number of beads in the first half of the body increases (in each row, you need to add 1-2 pieces). The second half of the body is narrowed. We gradually remove the same number of elements as we added. The bottom of the body should be slightly larger than the top.
Wings To make the wings you need to take the material of five different colors. The wing weaving scheme is performed by the French method. For the main row, we collect blue beads (7–10 pieces). Then, at your discretion, weave the following multi-colored arcs. The finished peacock wings must be carefully attached to the body. They should be adjacent to the body of the peacock. 

Tail The peacock is famous for its tail. Each peacock feather is iridescent. It is performed in mixed media. The tip of the peacock feather is woven using the French method. The main row consists of beads and 2 beads. Then you need to weave 4-5 multi-colored rows.
The peacock feather is completed in needle technique. The weaving pattern in this way is simple. In order for the peacock feathers not to fall, a frame is needed. It should be rigid and pass through the center of the pen. Copper will do. The length of the tail of a peacock is 13–15 centimeters. 


It remains to attach the tail, the paws made in the needle technique and you can admire your creation. You can decorate the bird's head with short feathers. They can be made in needle technique.
This concludes our master class. Beads do not have to take those colors that we took. You can take any other combination. This also applies to the main color. The main thing is that it should be bright. After all, a beaded peacock should “burn” when sunlight hits it. This craft will always please the eye!
Video: Lessons for weaving peacock elements from beads
Comments
related posts:
 Beaded turtle scheme for creating a three-dimensional figurine (video)
 Christmas balls from beads: do-it-yourself decor options (diagram)
Some time ago, mainly children were engaged in the creation of various crafts from beads, since such leisure activities develop fine motor skills and broaden their horizons. And at present, adults are also fond of such activities, this is a fairly popular direction. From such material as beads, you can create a lot of gizmos - figures of various types, flower arrangements, it is quite possible even to embroider entire pictures. They decorate the house, they create comfort, and such a thing will be an unusual gift. Of the many compositions that can be created, various birds are quite common. For example, a beaded peacock will definitely conquer everyone.
The peacock is rightfully considered a royal bird, since since ancient times it has been present only in the chic gardens of sheikhs, as well as representatives of exceptionally noble and high dynasties. In the modern world, the peacock remains a very popular bird, and not only among ornithologists. Needlewomen also really like this majestic bird, they embroider it with threads and make masterpieces from beads.
Statuette of a beaded peacock
To create a peacock with your own hands, you will need materials that every lover of bead crafts definitely has:
- beads of the following colors: blue, black, red, white, green and yellow;
- blue beads;
- thin wire;
- wire cutters (pliers).
When choosing beads, you should take into account what quality they will be, it is better not to save. In needlework stores, they will definitely tell you which beads to choose. The final appearance of the figurine depends on this.
When all the materials are prepared, you can start weaving.

We start weaving
A step-by-step master class on creating an original volumetric peacock begins with the creation of a beak and head. To do this, you need to use red beads, as well as a wire of about 5 cm. The main material must be cut into 2 parts, each of which will be 2.5 centimeters long. Now we pass 2 segments through one bead.
We will weave the upper part on the first, and the lower part will be located on the second. The upper and lower sections of the beak are made using the parallel weaving technique. We collect 2 pieces of glass on one edge, and thread the second from the opposite side. We repeat the same action 3 times. Each new row should be 1 more bead. There should be 5 rows in total.

The workpiece of the lower part is done in a similar way. At the very end, it will need to be attached directly to the top.
At this stage, you should be very careful not to make a mistake in the connection, since then it will be very noticeable.
After weaving this part of the body is completed, you can begin to create eyes. This will require 2 blue beads and beads of white, black and blue. This part of the bird is best weaved with French technique.

We collect blue glass and a bead, which should be in the center. We fix it with a loop, it will mean the pupil. Now we string dark beads and make an arc, while fixing it. Next, you need to string dark elements again and perform the next arc in the same place. After that, it should be white, blue and white again. Next, weave the arc on the opposite side and fix everything. The result should be the eyes of a bird. Now we take blue and white beads. We perform an arc from above, and then one dark frame on each side. For the second eye, we use the same scheme, only in a mirror image.
Next, attach the eyes to the beak. To do this, we thread the wire into the last strip and into one edge of the frame of the right eye. We do the same with the other eye. Beads of blue color need to be pierced from both sides of the wire. Now we pass it through the glass of the rim, and then we connect it with the eyes.
The neck of the bird must be woven in the same way as the beak was woven. However, one should not forget that the number of beads must be increased to the bottom by 3 or 4 things. The length of the neck can be adjusted to your liking, but we must remember that it must be proportional to the torso.

Next, we take blue beads - we make the torso. This part of the figurine should directly continue the neck, and it is weaved in the same way. The number of elements must first be increased, and then gradually reduced. The bottom should look a little wider than the top.
Peacock wings are created from beads of different shades using the French weaving technique. It is necessary to collect 7 pieces of glass, after that weave, as it were, colored stripes of the rainbow. When the wings are ready, they need to be attached tightly to the body, as shown in the photo.


At the end of the craft, weave the tail. Each feather on it should also be like a rainbow. The edges of the feathers are woven in the same French technique. The most important strip consists of one bead and two beads. Next weave 5 colored rows. The workpiece ends with a needle method, as shown in the photo. After the tail is finished, we attach it to the body of the bird.


Bead - a project dedicated to beads and beaded needlework. Our users are novice beadmakers who need tips and support, and experienced craftsmen who cannot imagine their life without creativity. The community will be useful to anyone who has an irresistible desire to spend their entire salary on bags of coveted beads, rhinestones, beautiful stones and Swarovski components in a bead shop.
We will teach you how to weave very simple jewelry, and help you understand the intricacies of creating real masterpieces. Here you will find diagrams, master classes, video tutorials, and you can also directly ask for advice from famous bead makers.
Do you know how to create beautiful things from beads, beads and stones, and do you have a solid school of students? Yesterday you bought the first bag of beads, and now you want to weave a bauble? Or maybe you are the head of a reputable printed publication dedicated to beads? We all need you!
Write, tell about yourself and your work, comment on the entries, express your opinion, share tricks and tricks when creating the next masterpiece, share your impressions. Together we will find answers to any questions related to beads and bead art.