An original craft made from matches for February 23rd. New Year's crafts from cups
Crafts from cups are a great way to spend your time. Their advantages are the simplicity and availability of the source material. This is also a good way to decorate a room for a special event. In addition, according to pediatricians, such homemade products, made by a child, develop fine motor skills of the hands and develop perseverance.
Benefits of making crafts from cups
Making easy crafts from cups for children has many advantages. Children, engaged in this type of creativity, become more:
- attentive;
- independent;
- diligent;
- neat;
- patient.

By collecting such trinkets, they acquire skills in working with glue and scissors, which will undoubtedly be useful for them in kindergarten or school. The completed crafts will remain a pleasant reminder of childhood.

We should also not forget that children who engage in handicrafts develop their brains much better than their peers who are not engaged in such work.

As a result, if your little one has difficulty communicating with peers or has poorly developed logical thinking, then without a doubt you need to start creating original crafts from cups with him.


Here are other advantages of such homemade products:
- low cost;
- ease of manufacture;
- beautiful appearance;
- no need for special knowledge and complex tools.

Variations of using crafts from cups in practice
As you can see in the photographs of crafts made from cups, such things are usually created for different purposes. For example, they can be used to decorate a dining table if any celebration is planned. Moreover, this applies to both the dishes and the dishes served. The scope for imagination here is enormous.

By studying various ideas and instructions for making crafts, which are full on the Internet, you can make various types of flowers, garlands and balls. Cups are also the main material for making many funny figures. In addition, the uniqueness of the cups lies in the possibility of creating lighting elements from them, be it lanterns, miniature lamps or glowing garlands.

Such accessories can be used to decorate the same table to add romance to the setting. They will look especially impressive in the evening.

What else can you make from plastic cups? Together with your child, you can make a variety of figures, from animals and birds to fairy-tale characters, and then give them to your loved ones. Such a gift will definitely be remembered for a long time.

Another area for using homemade plastic cups is room decoration. For your child, you can create a thematic composition, for example, an island where pirates live or a house for a fairy-tale man. You can place such beauty not only in the nursery, but also in other rooms where the little ones are.

Types of handmade plastic products
All crafts made from cups are divided depending on the method of execution into the following groups:
- Products cut with scissors. This group includes balls, coasters, flowers, garlands, etc.
- Figurines. Most often, a wire frame or glue is used here. You can make fairy tale characters, representatives of flora and fauna, and toy houses.
- Application. This method involves gluing different parts onto a cup. Even five-year-olds can do this.
- Combined trinkets. For example, glasses made of plastic can be combined with bottles made of the same material. The result will be a Christmas tree. Some of these crafts boast movable parts, which makes them even more attractive to children.


Materials and tools
After watching several master classes on crafts from cups, you can easily make sure that nothing particularly complicated is required for such creativity. All you need is:
- cups (plastic or paper - to your taste);
- stationery scissors;
- stapler;
- glue.

You may also need plasticine, textiles, colored paper, paints, markers, varnish, decorative details (beads, feathers, beads, rhinestones, etc.). All listed materials and tools are available to everyone.

As a conclusion
Crafts made from glasses can be very different. From such affordable material you can make both decor for a festive event and spectacular souvenirs for friends. In general, experiment, bring your creative potential to life, involve your child in such activities and get great pleasure from it all.

Photos of crafts made from cups


Note! 


Note! 


Crafts for February 23. DIY gift for dad and grandpa
Summary: DIY crafts for February 23rd. Children's crafts for February 23 in the garden. Holiday February 23 in kindergarten. DIY gift for dad and grandpa.

The easiest option is to make a boat out of paper. Read how to fold a paper boat on our website using the link.

You can attach flags to the finished paper boat. The mast will be replaced by a regular toothpick.

An interesting craft for February 23rd that any dad will love is a paper boat filled with sweets.

If you make waves from strips of paper, you will get not just a paper boat, but a paper boat on the waves. This is a great gift for any dad or grandfather on February 23rd.

On our website you will find detailed instructions on how to fold a paper steamer. See link. If you make a seascape from colored paper and cardboard, you will get a wonderful DIY craft for February 23rd.


Dad or grandpa will definitely love this homemade airplane. In this article we want to offer you three simple options for making this craft for February 23rd.
Matchbox airplane

DIY airplane
From a regular clothespin and wooden ice cream sticks (or medical spatulas) you can make a craft airplane by February 23rd. When making this craft, we recommend using acrylic paints and a glue gun.

If you make a lot of these airplanes, you can actually make a whole suspended mobile. Please note that the photo below shows that the tail of the airplane can be made from cardboard.


Cardboard airplane

Airplane made from a plastic bottle
There is a special article on our website dedicated to crafts made from plastic bottles. See link. In it you will find instructions on how to make an airplane from a plastic bottle using the papier mache technique.

Here is another suitable DIY craft for February 23rd - a tank made from matchboxes. To make it you will need: a piece of wallpaper (or a notebook cover), matchboxes (3 pieces), magazine paper, corrugated cardboard, a plastic bottle cap. When preparing with your children for February 23 in kindergarten, you can make such a cute tank as a gift for dad or grandfather. For a detailed master class on making this craft from matchboxes, see the link.

Another version of a matchbox tank. This tank's cannon barrel is made of a cotton swab, its tracks are made of corrugated cardboard, and its rollers are made of buttons.

From corrugated cardboard you can make not only tracks for a tank, but the entire tank. Look what an unusual craft we made for February 23rd!

A small child will also be happy to give a gift to dad on February 23rd. Children cannot make complex crafts, so we are specially publishing here a very simple DIY craft for February 23rd - a cardboard car. You will need a cardboard toilet paper roll, cardboard, paints, glue. See instructions.

Very beautiful, but at the same time complex paper crafts are offered on the Creative Park website from Canon. Here you will find paper ships, airplanes, helicopters, all kinds of paper car models, as well as architectural buildings. Making such a craft on February 23 will be interesting for schoolchildren and adults.

You will find paper crafts for February 23rd from the Creative Park website using the links:
From the topic of transport we move on to robots. You can make cute robots from cans, plastic bottle caps, cogs, nuts, screws, dishwashing sponges and other things. Making such a gift for dad with your own hands is not at all difficult, especially if you have a glue gun (so-called “liquid nails”) on hand. But what scope opens up for the flight of children’s imagination and the development of creative thinking and imagination! Rest assured, dads will appreciate such a gift!


You can make a pencil holder in the shape of a robot.

Here is another interesting option for a stand for pencils and pens, made by yourself. How to make such a gift for grandfather or father on February 23rd, see.

An original pencil holder can be made from Lego Duplo.


If you want to make a pencil holder decorated with a photograph, then to make this craft by February 23 you will need such a designer part as a transparent door. The photo is inserted into the free space between the wall and the door.

Do you want to surprise your dad or grandfather with an original gift for February 23? Then make these beautiful cups for them. For this craft for February 23, you will need: cardboard, pasta of various shapes, gold spray paint in a can, glue (glue gun), as well as all kinds of jewelry. Cut out a cup from cardboard and make a stand for it. Now glue different shapes of pasta onto the cardboard. The most convenient way to do this is with a glue gun. When the glue is dry, paint the craft with gold spray paint. Finally, decorate the cup with family photo clippings and jewelry. For detailed instructions on how to make this craft for February 23rd with your own hands, see and read the link. By the way, it would be appropriate to give such a cup to your dad or grandfather not only on February 23, but also on his birthday. Don't forget to write: "To the best dad from loving children" or "To the best grandfather from loving grandchildren."

If your dad goes to work in a business suit and tie, then the following gift for February 23 would be appropriate for him. Help your child make a paper tie for dad as a gift. You can simply cut out a tie from thick paper and then decorate it.


Here is another detailed diagram of how to fold an origami tie from paper. Pay attention to the numbering of the photo on the origami tie diagram.

And these are ready-made origami ties.

Make a mobile made of paper airplanes for your dad as a gift for Defender of the Fatherland Day. Such a gift for February 23 will help create a festive mood. To make this craft on February 23rd with your own hands, you need to fold a lot of airplanes from colored paper or special paper for scrapbooking. And then hang them on strings from the chandelier. Read how to fold a paper airplane on our website using the link.

Concluding our article on children's crafts for February 23, we will tell you about one interesting craft made from waste material - a deer head made from a plastic bottle and plastic bottle caps. If your dad or grandfather is interested in hunting, then such a craft will be especially relevant for him.

Material prepared by: Anna Ponomarenko
Other publications on the topic of this article:
Original and attractive crafts made from cups are always a great way to have fun while decorating your room. If you use your imagination, it is quite possible to create a bright craft whose appearance will be incomparable.
Photos of crafts made from cups on the Internet will allow you to understand that if you wish, you can create something interesting and unusual, exclusive.

Also, parents should learn a simple thing, many psychologists say that by creating such crafts, doing work together with children, you can not only get closer to them, showing your love, but this is also a great way to develop fine motor skills and perseverance.

How to make a craft from cups?
In order to make interesting crafts from cups, first of all, you need to understand what exactly you want to get as a result, for what purpose you are doing this. For example, it is quite possible to decorate a holiday table with such products, and if desired, it is quite possible to make one or another figurine that may interest you.


The main materials for such accessories can be flashlights, a mini-lamp, and various figures can also be included here. The result will be a romantic atmosphere.
Know that the most relevant and popular are considered to be certain products that will be cut with scissors. For example, it is possible to create artificial flowers, balls, certain objects.

Don’t forget about creation and applique, but in this case, you just need to stick certain elements on the glass; even a child aged five or six years can make such a composition.

Simple crafts made from cups for children, created with your own hands, will always bring only joy and bright emotions.

Pencil cup
If you decide to make such a craft with your children, then know that you can teach kids to use plasticine, to see even simple, ordinary objects with new uses, which is important.

To work, you will need to prepare a plastic bottle, and it can be from milk, kefir, plasticine, scissors, but also, of course, flowers, everything here is at your discretion. For example, if there are no specialized flowers, you can use artificial ones, even those made of paper.

You need to prepare the top part of the bottle in advance, cutting it off so that the glass is no lower than 15 cm; if you ignore this practical advice, the glass will not be stable at all.


Next, it is important to take plasticine, starting to glue thick sausages from it, distinguished by their green color. This is due to the fact that it combines perfectly with plant stems. As for the top strip, the plasticine is attached to it, the bottom strip is intended for attaching large flowers.


As soon as the glass is ready, you can safely put both pencils and brushes in it. This step-by-step process of making crafts with your own hands will allow you to easily implement such an idea, turning it into reality.

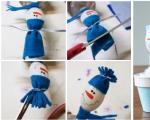
Snowman made from plastic glasses
To implement this idea, you will need to carefully watch the master class on fake cups, and then you will be able to make a snowman without unnecessary difficulties or problems.

Instructions for making a snowman
At the very beginning you need to build the first level; plastic cups are used for this purpose. You decide for yourself how many of them you will need, since much will depend on the goal you are pursuing, that is, on the desired size of the craft. The glasses can be fastened together using a stapler.


Now start building the next system, keep in mind that this is done strictly in a checkerboard pattern, after the glasses are correctly placed, they are fastened with a stapler.

This is how you need to build levels, doing so until a closed ball is formed; the second ball differs in size, which is known even to children. Don't forget, the largest ball acts as the body, the smaller ball is the head, so you can easily calculate the number of cups intended for the middle basic level.


Now you can move on to decorating, adding your taste to this process.

Thus, after spending a little time, you can always make a beautiful, original and attractive snowman with your own hands using plastic glasses, everything is extremely easy and simple.

If the desire arises, then know that you can make a unique, bright and attractive Christmas tree, again, using plastic cups for these purposes. As for the work in general, it follows the same principle as actually creating a snowman; no problems will arise.

All this leads to the fact that if you add a little patience and imagination to this process, you can always create real masterpieces that will impress everyone around you.

Know that bright and unique ideas and instructions on how to make crafts from cups will help you realize any ideas that interest you.


Now everything depends only on you, do not forget to involve your children in this process so that it becomes even more interesting, there is a great opportunity to get closer to children, and in general there is nothing more beautiful when you create something with your own hands.

Photos of crafts made from cups


Hi all! On the agenda today are crafts that everyone will soon have to do with their children, because February 23 is a holiday that is celebrated in every family. Of course, our beloved men should be fed a very tasty gala dinner, made with hot dishes and, of course, salads. But what about gifts, you can’t live without them, so take ideas and implement them.
Even if it is a very small and modest souvenir, it will be made with your own hands, which will definitely conquer your dad or grandfather. Therefore, sit back and look, choose, and then get to work).
I remember when I was in school, we made keychains from artificial leather during labor lessons, now you can make them from felt or foamiran.
There is nothing easier than taking a sheet of paper and making funny and amusing little people out of it. This is me and such a famous technique as origami, such a creative work is suitable for the senior or preparatory group of the garden, look at this diagram and repeat all the steps. The result is something that looks like a rocket, and your dad is sitting in it))).

You can also cut out a rocket out of cardboard with your children, and then glue the windows, you will get a simple application that children of the middle or younger group can handle.

All men love tea and coffee, so why don't we take advantage of it.

But, as a teacher, you will have to make blanks from thick cardboard. Moreover, one part of the mug should be slightly smaller.

Fold in half using the accordion method.

Glue a tea bag tag onto a string.

And then decorate it by gluing stripes that symbolize our flag.
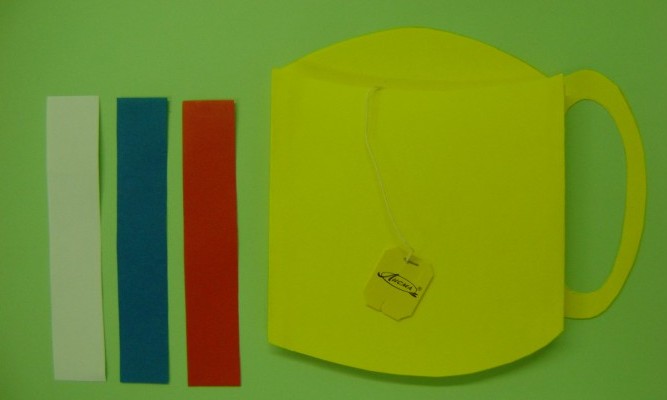
It turned out easy and beautiful.

And most importantly, the children liked it and gave them great pleasure.

An interesting option would be a craft in the form of a train.


We make gifts for dads with schoolchildren
Of course, there will be congratulations and wishes on this day, so I suggest elementary school students make a postcard out of paper, using interesting material. For example, you can tastefully decorate a disposable paper plate.

Or create a real masterpiece postcard from very unusual materials in the plasticine style.

We will need:
- white paper A4 - 1 pc.
- printed text in the form of poems
- pencil, ruler, plasticine
- cocktail straws
- fireworks or sparkles
- PVA glue

Stages of work:
1. Fold a sheet of white paper in half. Draw a vertical line like this.

2. Then cut along its contour with special decorative scissors.


4. Lay out a flag from plasticine and decorate the numbers.

5. Then cut the tubes of different colors finely and stick them into the plasticine. Glue the fireworks, and then let the glue dry. This is such a wonderful postcard, one might say it turned out to be a souvenir, all that remains is to include congratulatory wishes.

You can also, if you didn’t like the previous option, use the art of quilling for high school students.

Crafts made from CDs, the most ordinary CDs with holiday symbols, look very bright and impressive.

Impressive, simple and looks quite creative.

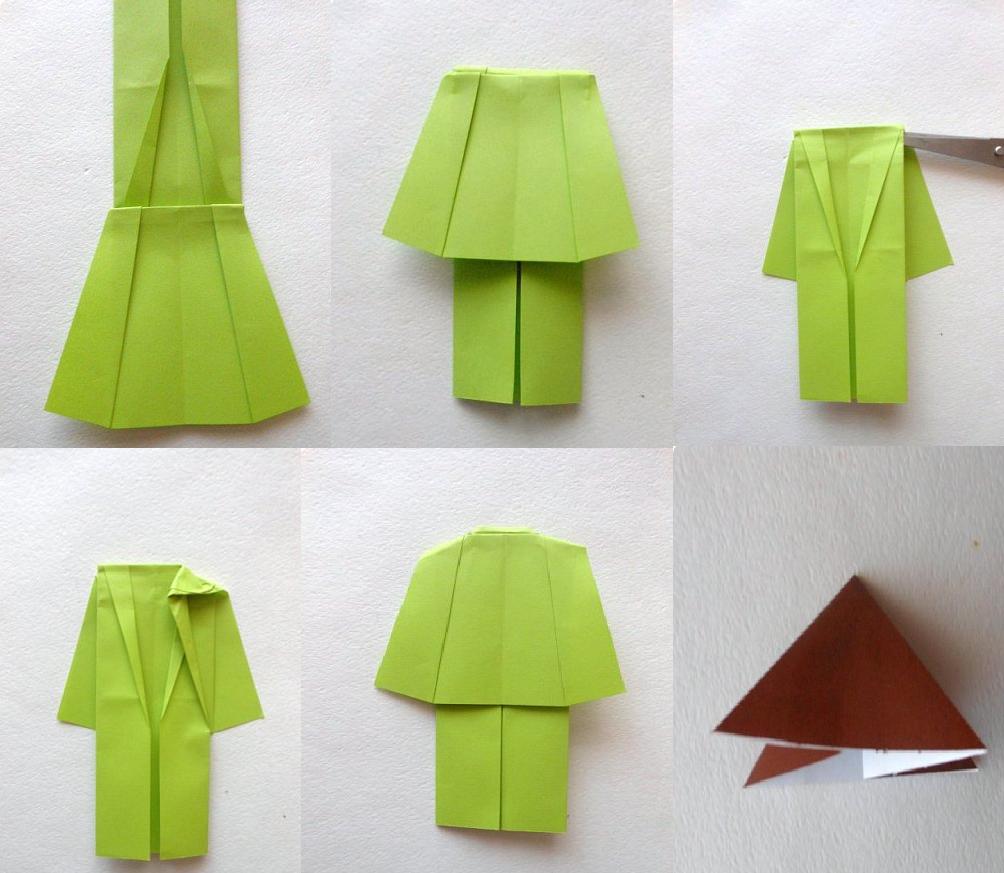
You can resort to this method, it is more suitable for children aged 5-10 years, you will need glue, paper and scissors. This is the well-known shirt and tie.


You can complicate the task a little and make an origami style tie.

A popular school children's craft can be a boat made of cardboard and paper.

An original gift would be a photo frame, and you need to cut out a frame from an ordinary hard box, and then use woolen threads to decorate it and decorate it with stars. You can use stickers, rhinestones and scrapbooking materials.

You can make a medal for your grandfathers from plasticine balls.

Master class of a paper soldier for the little ones
The simplest and easiest craft is considered to be made from plasticine. You can find a lot of variations, because the symbols of the upcoming men's holiday will be all kinds of cars and road transport.
In the first place, as always, is the tank, the majority do it, I don’t know why, but it happened this way by tradition, probably this is one of the symbols of victory.

You can make it exclusively from modeling dough or plasticine, as well as using matchboxes.

There is another option, use all sorts of things like nuts, dowels and other working delights.

Second place goes to airplanes.

If you have never made them, then here are step-by-step instructions for you.

Or build a helicopter, just make sure you don’t fly away).

For older children, you can make a gang of soldiers.

Do you want to know the features of their manufacture? Then look further at all the step-by-step steps and repeat all the steps of folding and folding the paper.
This is the set you will need for work:

Now, as for actions, move from right to left, and then everything will work out for you.


In general, then you can make a wall newspaper and decorate your group or class. Looks fun and funny, doesn't it?

Learn how to make gifts for dad on Defenders of the Fatherland Day
The first option that students use is the cutting method, when squares are cut out of corrugated paper, then wound onto a stick or pencil and glued to a sheet.


Or a real picture, but of course you’ll have to tinker with it a little longer.

For younger children, the ball rolling technique works well.

Well, the most difficult option is a photo frame, made with your own hands from a special material, like ball plasticine.

If your children are still very young, then you can invite them to make such a boat from a dish sponge and a stick; this is just for kids).

In addition to everything, you can learn a poem.

Master class on crafts for preschoolers

We will need:
- ice cream sticks - 8 pcs.
- juice tube - 1 pc.
- PVA glue
- gouache and brush
- scissors
Stages of work:
1. Make a base, so to speak, a rod on which the wings will rest. Take 5 sticks and glue them together with PVA glue.

2. Then glue one stick perpendicularly, but step back a little from the edge, as shown in this picture.

3. After this, glue the pieces of tubes on the sides.

4. It should look something like this: If you do too, move on to the next step.

5. At this stage, you need to glue the second one parallel to the first stick, you will get a wing.

6. Make the tail of the plane from another stick, just halve it.

7. The most awaited moment is the design, take brushes and gouache and paint the body.

8. And here he is, such a funny and super airplane. By the way, you also need a propeller, don’t forget to glue it along with a button or bead.

Or you can do almost the same thing from clothespins.

I also really liked the option of a regular plastic bottle and straws.

If you also liked this work, take note of it, here are the steps to complete it.

We make toys from various available materials
In most cases, men like all kinds of equipment, including military equipment, so you can make the following from paper napkins and matchboxes: a tank:

Or an ordinary car.

Using dishwashing sponges, create a small tank.

Or create a delicious gift using a mountain of candy you can ask your mom for.

Or you can make an applique.

In general, surprise your loved ones with something, I gave you ideas to think about, so think and recreate. Good luck.

If among your friends there are people who are fond of hunting, for example, a grandfather, then you can give him such a junk souvenir in the form of deer antlers from a plastic bottle and caps.

You can use your Lego constructor and make a stand for pencils, pens, and writing instruments.

You can build a racer from a toilet paper roll; take a man from a construction set.

Of course, they also make toys from papier mache, but it’s a little complicated.

Or this little masterpiece made from cotton pads - a postcard.

And that's all I have. I wish you that everything you have planned will succeed, patience and perseverance, as well as inspiration and creative ideas. Bye everyone, see you!
Sincerely, Ekaterina Mantsurova
The long-awaited month of February has arrived. It is at the end of winter that Defender of the Fatherland Day is celebrated. All children congratulate their fathers and grandfathers.
DIY crafts are the most popular gifts for children. After all, this is how they show how much they love and value their family.
Crafts from little inventors can be made from a variety of materials. The simplest ones: made of colored paper and cardboard. More complex: from the most unexpected materials. For example, a plane made of popsicle sticks or a tank made of kitchen sponges for washing dishes.
In our article, you will learn some interesting ideas for DIY crafts for Defender of the Fatherland Day.
DIY craft for children from plastic bottles
You can make an excellent airplane from paper of different colors and a plastic bottle. Older children can master it on their own. For kids who have recently learned how to make simple paper crafts, their mothers will help them.

We will need:
- plastic bottle (transparent, 0.5 liter volume);
- ruler;
- pencil;
- scissors;
- PVA paper glue;
- colored paper or non-hard cardboard: white, green and juicy green.
Stages of work:
1. First, let's move on to the body of the aircraft. It will be white. To do this, take a sheet of A4. Let's put it vertically. Place the bottle across the white paper. So that its bottom is exactly along the edge of the paper, and the neck protrudes beyond.
2. Now we determine the place where the bottle narrows - the beginning of the neck. We put a mark, in pencil, on a white sheet. We remove the bottle and draw a vertical line across the sheet, in the place where we left the mark.
3. Take scissors and divide the A4 sheet into two equal parts, exactly along our line. We throw out the left part, and the right one will become the main part of the aircraft.
4. Fold the remaining piece of paper in half. We draw the tail part of the plane, precisely the one that does not adhere to the plastic bottle, but rises upward in the form of a tail.
5. Next, cut out according to your drawing on the side that will be closer to the bottom of the bottle. We wrap the “white body” around the bottle. We stack them on top of each other and glue them together. We fold the two parts of the tail and glue them together.
6. Cut out two trapezoids from bright green - these will be the wings of the airplane. And two rectangles for the engines of our “aircraft”. Bend the bases of the two trapezoids by one centimeter. We roll the rectangles into tubes and glue their edges.

7. Glue the wings to the sides of the white fuselage. At the bottom, using glue, we secure the pipes.
8. We only have green paper left. Let's cut out eight circles from it. They will be the airplane's windows.

9. Now we glue four windows on each side of the plane.
10. Our “air machine” is almost ready. All that remains is to cut out the dark green propeller. It is shaped like a bow. Cut a large hole in the middle of the propeller. So that the propeller can be put on the neck. And we push the neck of the bottle through the hole so that the propeller is next to the plastic ring on the neck. Now we tighten the plug.

The tone of the cork and the main colors of the aircraft must match. In this case, a green cap is suitable. If the shade of the cork is different, we advise you to match the aircraft with other paper tones.
11. And finally, from the remnants of green paper we cut out two small wings of the tail of the plane. We bend the base and attach it to the white tail using glue.

Our gift for Defender of the Fatherland Day is ready.
But the idea is more complicated, here you need to cover the plane with paper and decorate it, but it also turns out very cool

Here, for example, is a simple version of a pirate ship that even kids can handle:

You can even make a rocket:

Or this beautiful ship that you can take with your dad on a long voyage, if, of course, there is a body of water nearby.

And look at these binoculars, you just need to cut off the bottom of 2 bottles and connect them with electrical tape and tie a rope:

But this is how you can build a helicopter:

To make such a helicopter you need 1 PET bottle with a capacity of 0.5 liters. 1 ping pong ball, 3 straws, hairpin. stapler and scissors, here's the whole simple set:

I won’t describe how to make such a helicopter, and everything is clearly visible in the picture.
These are the kind of crafts you can make with your children and present them to your dad and grandfather. They will be touched by such a gift, because they were made by little beloved hands.
Making a gift for dad from paper and cardboard
The easiest thing you can make from paper and cardboard is a postcard. But we will not dwell on this, but will offer you to build such a tank.

We will need:
- sheet of brown cardboard;
- colored double-sided paper: green and red;
- ruler;
- a simple pencil;
- scissors;
- PVA glue.
Stages of work:
1. Cut out two strips of green paper. Size: length - 20 cm, width - 2 cm. Such strips will serve as tank tracks. Glue the ends of the strips together. As a result, we get two rings.
2. For the main part of the tank, cut out a rectangle. Size: length - 12 cm, width - 7 cm. We measure 5 mm from the shorter sides and draw lines. Next, count another 2.5 cm from each edge. And we also draw two lines.

3. Now we bend the paper along the lines. As it shown on the picture.

4. Let's start making the tank turret. It is similar to the main part, but smaller in size. Let's cut out a rectangle. Size: length - 8 cm, width - 6 cm. Also measure from the edges: 5 mm. - at both sides. We draw lines. And another 2 cm - draw lines. After that, we bend the lines exactly as we did with the bends on the tank body.

5. Now let's make the barrel. Cut out a small rectangle. Size: length - 8 cm, width - 4 cm. Bend the resulting figure in half. This must be done along the length of the rectangle. As a result, we get a paper quadrangle consisting of four parts. The width of each is 1 cm, respectively the length is 8 cm.

6. Glue the two edges of this sheet together to create a triangular barrel. Before this, we make three small cuts. In the picture they are shown with green lines. We bend the strips a little. This will be needed so that we can glue the future barrel to the tower.
7. Now we connect all the parts of the tank: glue the barrel to the tank turret, as shown in the picture.

8. We install the tower on the hull. Glue will also help with this. Now we glue all the parts to the sheet and add a red star to its body.
The festive tank is ready.
It is worth noting that such a tank can also be made from non-solid cardboard.
- You can make a fake in the form of a car and glue the face of dad and son, in my opinion it’s very original:

- Frame

- Cap made of colored cardboard

Crafts for school from plasticine for Defender of the Fatherland Day
This is not a complicated craft that fits perfectly with the holiday theme. The only materials we need are plasticine. In our case: blue, red and green shades. But, you can take other, matching colors.

Stages of work:
We make a sausage from blue plasticine. One side will be much thicker than the other. We attach the tail of the airplane to the thin end of the sausage.

Now we sculpt the wings and attach them to the main part of our “flying machine”.

We decorate the front part of the plane with green plasticine. And the wings are red stars.
Our plane is ready.
You can also make a tank from plasticine, here are several options:


And now you can make a submarine, it’s not difficult at all:

Either fighter:

And here’s a beautiful photo frame made from plastic plasticine:

Master class on making figurines from salt dough
Maybe some people may find sculpting with salt dough difficult, but this is not the case at all. Try it at least once and see how easy the craft is.

We will need:
- frame;
- glue moment;
- salty dough;
- gouache or watercolor and brush;
- a rectangle of white paper (the size of the inside of the frame) and a file.
To start modeling, we need to knead the dough. Mix a glass of flour and a tablespoon of salt. For elasticity, add a tablespoon of vegetable oil and hot water. Mix everything to a homogeneous plastic consistency.
If the dough comes out a little liquid, add flour and mix the mixture again.
Now put the dough in the refrigerator for three hours. After which, you can start making a cat soldier. Place a paper rectangle on the table and cover it with a file.
Let's start making the body of the cat. From a piece of suitable size, roll into a ball.

Let's make a drop out of it. And flatten it between your palms. Place the cat's body on the file in the right place. Press the top of the droplet with your finger. This is where we will place the bottom of our cat's head.

For the head we will need a piece of a slightly larger size than we used on the body. We roll the ball in the same way, but now we flatten it right away. The approximate thickness of the head is 7-8 mm. We make ears on the sides: stretch the dough out a little and press it with your fingers.

We put the remaining dough in a plastic bag each time, otherwise it will simply dry out. A plastic container with a lid will also work.
We wet the pressed part of the droplet body with water. For this you will need a brush. Glue the head to the body. Using a plasticine knife, we make indentations in the ears. We draw the fur of the cat along the edges of the craft - using scratching movements.

Using our fingers we determine the location of the future eyes. We will get two indentations in the middle of the face.

Mark the nose with a knife.
Twist a small ball for the spout. Now we make a drop out of it and flatten it a little. This is exactly how we did the torso. Next, flatten the droplet from below. We get a real cat nose.
We wet with a brush the place where our nose will be located. And glue it on.

For the mouth, visually divide the head into two equal parts - with a horizontal line. We put two lines, almost near the edges of the cheeks. And cut the dough from the bottom of the nose to each of the cheeks.

Open the mouth and draw the lower lip.

Now let's add some brightness to the cat.
Both watercolor and gouache are suitable for coloring. If you use acrylic paints, it is better to wait until the work dries.
We completely color the cat orange (don’t touch only his nose). Using white watercolors we paint the cheeks, tips of the ears, lower lip and the middle of the tummy. We tint the cat's nose with a soft pink shade.

Roll a small piece of dough into a sausage. Use a knife to separate the edge and cut off two small (equal in size) pieces.

From each plate we form a ball (slightly oval in shape). These will be the eyes.
If the paint has dried, moisten the eye holes with water. But usually, the watercolor does not have time to dry yet. Next, glue the eyes and slightly flatten them on top.
Let's start making the cat's eyebrows. To do this, take a small piece of salt dough. Roll into an oval ball and cut in the middle. We get two even halves. Roll each into small balls. We make elongated droplets out of them.
Glue the eyebrows just above the eyes. The wide side is inward and the narrow side is outward.

Now let's make a cap. To do this, we need to roll a ball from a small piece of dough. After that, we make a drop out of it and flatten it. Cut a small triangle into the base of the droplet. We shape the cap with our fingers and glue it between the ears of our “mustachioed soldier.” The narrow side of the drop will be between the eyebrows, and the cut out triangle will be on top.
From the top of the triangle, use a knife to press a small groove in the form of a continuation of the top of the triangle.

Next we make an army belt with a large buckle. We will need a small piece of dough. Roll it into a ball and flatten it into a thin pancake (about 3 mm thick). We spread the resulting layer on the table and cut out a strip 1 cm wide in the middle. We attach the belt to the cat’s belly. We cut off the excess edges of the strip.
Now let's color the new parts of the cat. Draw the eyes with dark green color. For the cap, mix green and yellow-brown colors. As a result, we get a swamp shade or khaki color. We paint their cap. Paint the eyebrows white. Paint the belt with black paint.
We make a buckle from a small piece of dough. Roll into a ball and flatten with your fingers. Place the plastic on the table and cut out a rectangle. Glue the buckle to the belt and press through a small star.

Now color the buckle yellow.
Let's start making the cat's paws. Roll the dough into a sausage as thick as your index finger. Cut off the rounded ends and divide it into two equal parts. Roll each piece into a ball. Then we bring it into an elongated drop-shaped shape. Using a knife, we form three fingers. We push through one claw on each one.

When one paw of the soldier cat is ready, try it on. If it turns out to be too big, separate a small part of the dough from it and roll a new one.
You can check whether the paws are similar in size by rolling each piece into a ball and visually comparing them.
We wet the foot with water and glue it to the body. We do the same with the second paw. The only difference is their location. One lies on the belt, the second is raised to the head.
We make boots. Roll a piece of dough into a ball. Then we bring it into an oval shape. Divide with a knife into two equal parts. Roll each into a ball. We bring it into the shape of a droplet. We press the bottom of the drop - this will be the sole of the boot. Squeeze it a little on the sides and glue it to the right place. We also make the second one. As a result, the boots turn out to be glued to the cat’s belly and to each other.

Press the boots well, otherwise they will simply fall off when the picture is in a vertical position.
Now let's start painting the new parts. The paws are orange, like the body, and the boots are black. We also draw black pupils and dots for the mustache. Draw a star in red on the belt buckle and cap. Use brown paint to highlight the mouth, the inside of the ears, the folds between the fingers and the claws.
When the black paint dries on the pupils, paint small highlights on the eyes, buckle and middle of the cap. We will also draw two white stripes on the paws and white fur at the bottom of the face. Without removing the cat from the cardboard, place it on the radiator and let it dry completely.
If desired, you can decorate the main background of the picture. We are waiting for the paint to dry.
When everything is dry, insert the background into the frame (under the glass). And we will glue the cat to the glass with Moment glue. Apply glue to the back side of the “mustachioed defender”. Gently press it against the glass. The mother can help with this so that the child does not get glue on his hands.

At the beginning and end of the craft we showed different backgrounds for our gift. Which is better? You decide.
Here are some more interesting ideas from this material:
- Painting

- Star

- Figurines

- Portrait

Learn how to make a gift from matches with your own hands
We can make a wonderful panel from matches.

We will need:
- holiday themed postcard;
- matches - several boxes;
- thick cardboard;
- universal transparent glue “Moment-Gel”;
- clear nail polish;
- PVA glue;
- scissors.
Stages of work:
We make the base of the gift panel. Apply PVA glue to cardboard. Now we glue the matches vertically. Starting from the corner. The first will be positioned with the cerumen head up, and the second - down. We continue this way until we get a square. It will take about 17-18 matches.
Nearby we make the same square from horizontally arranged matches. This is how we alternate vertical and horizontal squares. As a result, we will have an applique measuring 3 by 3 squares. To make the parquet made of matches dense, we lubricate it again with PVA glue. We are waiting for the base of the panel to dry completely.
Then we cover the matches with colorless nail polish. We also wait until everything is completely dry.
If there is excess cardboard left, carefully trim the edges.
Now let's start decorating. We cut out the necessary details of an old postcard for Defender of the Fatherland Day. And glue them to the matches with “Moment” universal glue.
Our holiday applique is ready!
What do you think of this craft option?

Look at this wonderful helicopter, I think it’s very original...

Interesting ideas from napkins and cotton pads for kindergarten
You can make a good craft from such simple materials.
- in the junior group:
Let's make a card from napkin balls.

We will need:
- sheet of A4 colored cardboard;
- PVA glue;
- scissors;
- napkins of different colors.
Stages of work:
Let's draw a boat. All its parts must be large.
Cut the napkins into small squares (about 2 by 2 cm). Take a square and roll it into a ball with your fingers. I think all kids will enjoy this activity. In addition, it develops hand motor skills well.
Apply PVA glue to the design and glue each ball.
If desired, you can make the inscription “To your beloved dad.” The holiday card is ready.
Here are a few more examples:


- in the senior group:
With older children we will make a bouquet like this.

We will need:
- three cotton pads;
- a sheet of green and blue paper;
- PVA glue;
- scissors;
- two cotton swabs;
- yellow felt-tip pen.
Stages of work:
We make a square from a rectangular blue sheet. To do this, bend the sheet diagonally.

We get a triangle, an unnecessary rectangle on the left side, cut it off. We expand the triangle and we get a square.
We place the sheet on the table surface - in the form of a diamond. And we make an envelope from the bottom sides. First we bend the right edge, then the left. We bend the corners of the front side of the envelope.

Now coat the left edge with PVA glue. The envelope is ready.
Let's start making flowers. To do this, color three cotton heads with a yellow felt-tip pen. Cut the sticks in half. The half with the white cotton head is thrown away.
We bend the cotton pad, just like an envelope for flowers. Insert a cotton swab into the middle. We glue the front part of the flower. We do the same with the remaining disks and sticks.
Next we make the leaves. Cut out a rectangle of green paper (6 cm wide, about 5 cm long). Fold the rectangle in half and cut out an oval edge. We unfold the paper and get a leaf for the koala. We will need three of these.
We attach all the details to the blue envelope. There we will see which arrangement of flowers and leaves will look best. Now we glue everything with PVA glue.
You should not glue all the details completely, this will make the card more voluminous and more beautiful.
What do you think of this greeting card idea?

A few more ideas:
- Fish


Video on how to make a postcard for Defender of the Fatherland Day using quilling technique
I suggest you learn the basics of quilling and make a postcard for your beloved fathers and grandfathers; even preschoolers can handle this technique, and the craft will come out beautiful and original.
These are some interesting gift ideas for February 23rd for fathers and grandfathers, choose a craft and make it with your children.
If you liked the ideas, bookmark the article, share it on social networks and write in the comments which craft did you choose?
And I wish you creative inspiration and perseverance for your children!