Paper dragons. DIY paper origami dragon for beginners
The dragon is one of the favorite children's fairy tale characters. He came to us from Eastern culture, where it is also very popular. Every Chinese child knows for sure more than one way to make a dragon out of paper. There are several of them - from the simplest, where the figure vaguely resembles a mythical character, to the "live", which are more difficult to fold, but the result will please not only a child, but also an adult.
Method number 1Thanks to the instructions, you can make the most realistic dragon out of paper with wings, a tail, a long neck and an open mouth. To do this, you will need a large sheet of any color: red, yellow, green, white, brown, and so on - to your taste.
- Make an origami bird base out of paper, then fold the opposite corners of the rhombus, as shown in the picture.
- Now fold the back flap down and attach it to the opposite edge.
- Flip the figurine. Bend one sharp corner down and do the same with corner B.
- Next, fold corner C from left to right, along the dotted line.
- Now fold corner D back to make it the same as in the picture. Making the wings: fold the EF side and leave it upright.
- Repeat the same with the opposite side.
- We make the dragon's neck. Make two bends at the base and use it to lower the neck down, then bend the neck up. The end needs to be bent at an angle of 90 degrees to make a head.
- The mouth of the dragon. Now you need to make two folds that would imitate the dragon's mouth.
- We continue to work with the tail. Make two bends in the middle of the first half of the tail (which is closer to the body). Please note that each wall should have a fold outward, as shown in the picture.
- We're done with the wings. First we bend the wings out and down, and then up.
 |
 |
 |
 |
 |
 |
 |
 |
 |
As a result, you have an almost real dragon with an open mouth, a ribbed tail and large wings. A paper dragon can not only please a child, but also act as a decoration for the interior of a room.
 Method number 2
 Such a Chinese dragon will surely please all family members. Its flexible body and moving tail makes it come alive. To create a dragon you will need:
- Paper in yellow, white, green, orange and red.
- Glue.
- Scissors.
- Pencil.
- Sequins.
Step 1. Cut out a 8 cm x 8 cm dragon head from red paper.

Step 2 Take a green rectangle 3 cm x 8 cm and make cuts 7.5 cm long across the entire width of the sheet. This will be the dragon's beard. It must be glued to the chin.

Step 3 We make teeth. Cut out a rectangle with rounded edges from white paper and cut it so that you get teeth. Glue them above the beard. Also cut out eyes from this paper. Then make a nose out of green paper, and a mustache and eyebrows out of red and orange. Sequins - pupils and nostrils. You can do as in the picture or make your own changes.

Step 4 Torso. Take two long strips 2 cm wide of red and yellow, glue their ends at a right angle.

Step 5 We make an accordion. Alternately fold the yellow strip over the red and the red over the yellow so that you get the same accordion as in the picture.

Step 6 Glue the body to the head.

Step 7 Cut strips of 4 ml × 8 cm from red and yellow paper - this is the tail, glue it to the body.

Your dragon is ready. This dragon is even suitable as a decoration for a children's holiday. In addition, during its creation, the child can show imagination and come up with something of his own. For example, by changing the technique a little, you can get another wonderful craft - the main thing is a little imagination!
Dragons are mythical creatures from Chinese and Japanese legends. Dragons are cruel, scary, terrifying to everyone, sowing destruction around. There are wise, kind dragons that help everyone around. In Russian fairy tales there is the Serpent Gorynych, which looks like a dragon with three heads. Serpents Gorynychi Dinosaurs are very common. Their appearance combines the features of a snake, bird, lizard, deer.
In China, dragons are made from paper of various sizes: from huge ones that are carried and controlled by dozens of people, to small souvenir ones. In China and Japan they are made using the origami technique.
Master class "How to make a paper dragon"
Origami crafts are difficult to make. For starters, it's worth trying to make a dragon in an easy way for those who have no experience in origami.
Simple baby dragon
You will need:
- Paper plate.
- Two sheets of double-sided colored paper. Preferably blue and gray or red and orange.
Step-by-step instruction.
- Fold the paper plate in half. We draw parts of the toy on paper.
- From blue paper we cut out the head, wings, parts of the tail; of a gray crest on the head, neck and part of the tail. Three piece tail. Wing like a trapezoid. Cut out two trapeziums and cut out the back side of it with a wavy line to resemble the wings of a lizard.
- With the help of movable fasteners we connect all the parts. Mounts need to buy in store.
- Eyes can be glued ready or drawn.
Kids will be happy to play with a ready-made dragon.
Volumetric paper dragon
 For its manufacture you need: a computer with a color printer, scissors and glue.
- Find on the Internet and print parts of the dragon on a printer, cut it out.
- Glue the body by folding along the lines. Fold and glue the head.
- Glue the body and head together. Glue wings on top.
- After drying, the craft is ready.
The process is very simple, the student can easily cope without the help of adults.
Movable Chinese dragon
 A similar dragon, only very large, decorates festive processions in China.
Preschoolers love these moving toys. They will be happy to help you make them.
What do you need:
- a computer;
- felt-tip pens, paints, pencils;
- colored paper, scissors;
- glue.
Manufacturing:
- From colored paper we make a flat accordion in duplicate so that the dragon is two-sided. If you can, make a voluminous accordion, then the dragon will look even more natural.
- Now you need to draw a head and tail or print from the Internet. Cut and glue the tail, body, head.
- Attach the sticks and the paper dragon will come to life. Such a toy can be used in a puppet show.
flying dinosaur
For its manufacture you need:
- A sheet of paper with a snake or dragon skin pattern, you can color it yourself.
- Ruler.
- Markers.
The creation process is as follows:
- We bend the sheet in half, draw or copy half of the body. Cut and straighten. With a ruler and a pencil, we draw lines along which we will bend, distinguishing them by color. On black we will bend outward, on red - inward.
- We bend the figure, clearly marking the folds. We bend the head in the form of the letter "G", bend the tail up. Wings make a fan.
- Draw or glue eyes.
The finished craft looks like a character from the cartoon How to Train Your Dragon.
Origami Dragon Workshop
 Making origami requires skill, experience, a lot of patience and time. First you need to explain how to make a dragon out of paper.
Need to cook:
- At least 10 squares of multi-colored double-sided paper with a side of 15 cm;
- Ready eyes.
Step-by-step instruction:
- Fold the square in half, unfold, fold in half on the other side. Fold it twice diagonally. It should have 8 folds.
- Turn the opposite straight folds inward, from above you get an equilateral triangle. put it in front of you with a rectangular top up. Bend two sharp corners to the center in turn so that their sides touch each other.
- Turn over, on the underside, bend the sharp corners in half so that their tips close in the middle. The figure will become hexagonal.
- Turn it over, push the lower corners to the sides, like paws. Bend the top corners like ears. Glue eyes near their base.
- From the rest of the squares, make the same origami modules, but without eyes. Connect all modules one by one without glue.
- The easiest origami dragon is ready.
 Modules are easy to make. Difficulties lie in wait when connecting them into crafts. Origami masters know how, Gorynych or Ender from Minecraft. To create them, you first need to make a module:
- Rectangular sheet fold in half horizontally, then vertically. Now you need to straighten it.
- Fold the rectangle into a triangle so that parts of it protrude beyond the edge. Turn over, tuck the small corners, tuck the protruding part to make an even triangle.
- Bend along the center line.
You need to make several hundred modules, then proceed to connect them. How to make a paper dragon Beginning craftsmen need to start with simple figurines of Chinese dragons that look like a snake and have a long tail. The modules are connected without glue. The master himself comes up with separate schemes for the head, torso, paws. For convenience, you need to have a sheet in a box and mark the layout of the modules on it.
Only adult craftsmen with creative imagination can handle the manufacture of modular dragons and dinosaurs with their own hands.
On the Internet, in children's books and coloring books, there are many drawings of the dragon. Choose your favorite and copy. Now make an application for a panel in the nursery with your child. From colored paper, cut out and paste the image with the children. Insert into a frame or stick on a strong cardboard so that its edges protrude beyond the application, like a frame.
Draw the silhouette of the dragon and cut it out. Fold a fan out of colored double-sided rectangular paper. From it you can make wings, a tail, a crest of a head for a lizard.
From wire and papier-mâché, you can make a figurine of a three-dimensional dinosaur.
These mythical creatures do not exist in nature, therefore, when making them, you can give free rein to your creative imagination, fiction and imagination. You can decorate paper heroes with beads, pieces of foil, shiny threads. The more fabulous and unusual the result will look, the more the audience will admire.
Attention, only TODAY!
The art of origami, which came from ancient China, is associated with the manufacture of a variety of paper crafts. Especially in this country, mythical dragons are revered, which bring prosperity to the family. Beginners will have to spend time so that the correct origami dragon comes out of paper, and with a great desire to make their own masterpiece. Modern craftsmen use various assembly schemes and techniques to make such figures.


To create a paper dragon you will need:
- colored paper of medium density, a thin sheet is also possible;
- scissors, pencil, ruler.
For beginners, there is a lot of literature, assembly diagrams, step-by-step instructions that will first help you deal with the technique.

Step by step description. The scheme by which the dragon will be assembled is taken from the example of making a paper crane. First, prepare a square sheet of paper. Or a regular A4 sheet, fold in such a way that when cutting off the excess, a square comes out.
Fold its ends so that you get a triangle. The photo below shows a detailed diagram that will clearly help every beginner to understand.
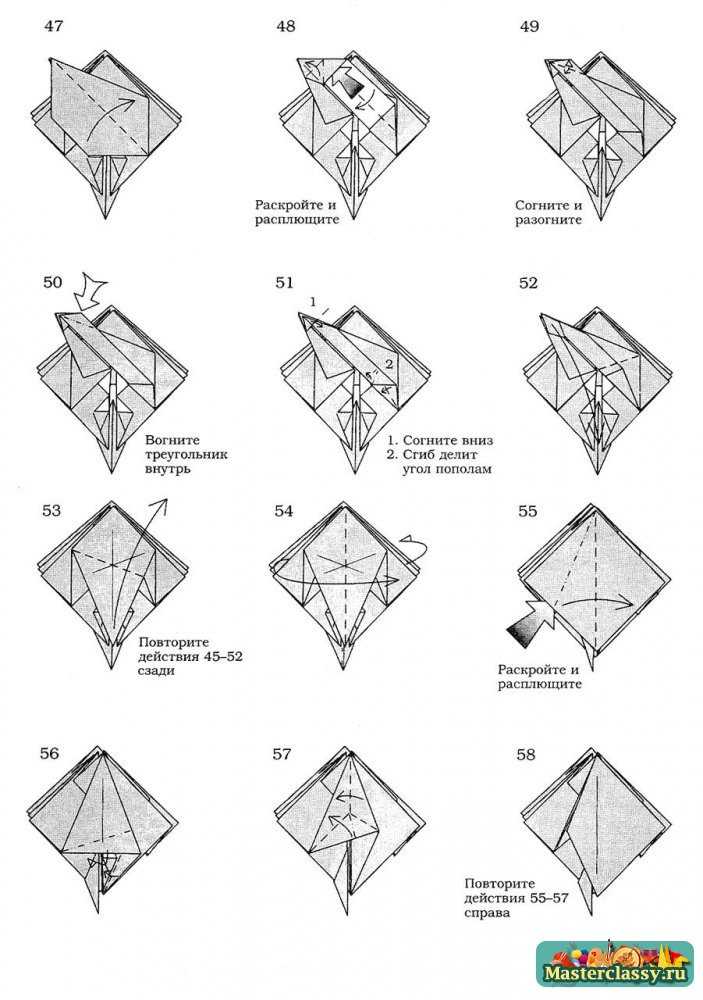
Fold the triangle in half as shown. We make all folds or eversion according to the dotted lines that are marked on the drawings of the figure. At the third stage, we turn the folded triangle outward in the middle, as shown by the arrow. You should get a square with a triangle on the side. If the result is an elongated figure, and not a square, then a mistake has been made. Start doing everything all over again until there is a visual figure, as in the figure. A properly made product can be deployed from below. Having reached the fifth stage, turn the figure over and bend it along the dotted line, a square should form. Bend the corners of the figure inward, open the wings on the other side. On the one hand, you should get a triangle folded inward, on the other, wings outward. Turn the figurine over and lift its end as shown in the picture. On the opposite side, do the same.
After the performed operations, the product should come out with a slit at the bottom, as in the picture. If there is no click, then repeat attempts until this origami dragon figure comes out.
Bend the sides of the product inward on one side, according to the drawn arrows. It will look like the photo. Repeat the same operation on the opposite side of the dragon craft. Lift up one long corner, which will serve as the head of the dragon. Lock it in place with your fingers. Repeat the operation with the second corner to create the tail. Form the dragon's head by lightly pinching the top of the folded corner. Spread your wings out to the side. The master class is over. The paper dragon is ready.
What to do if not everything works out on your own? For beginners, there are many video tutorials that will help you navigate when creating such crafts from paper.
Video instruction “Assembling an origami dragon”
Video lesson "Modular origami dragon"
Modular origami has gained wide popularity, with the help of which they create the most intricate voluminous, curved dragon figures. How to make an origami dragon using this technique using modular triangles, this master class will tell. The main principle is that the finished modules are subsequently assembled according to a special scheme to create an origami dragon. Using such modular techniques, you can realize the most daring ideas.
Description. Beginners will have to work hard and make modules according to the origami dragon diagram below.
Decide on the color of the origami dragon, prepare the required number of modules, and assemble. Give the dragon the desired shape by carefully bending its torso. It will take several hours to fold such a figure.
A video with step-by-step instructions, as well as ready-made templates that are sold in specialized stores, will help you assemble the paper dragon yourself.
The dragon is a mythical creature. He can be both good and evil. It is very interesting to fold origami paper dragon. There are many different schemes for creating mythical creatures. They can be assembled from several modules, or solid. Some schemes are quite simple, others are complex. Particularly noteworthy are techniques for beginners.
It is very important to choose a quality material for the product. It depends on how easy it will be to fold origami and how well the finished craft will keep its shape. Types of paper that can be used there are several:
- colored;
- thick, designed for printing on a printer;
- corrugated.
Corrugated paper is sometimes used in the torsion technique. You can make a small paper dragon out of it by twisting it into a flagellum with wet hands.
However, this version of the craft will look more like a snake. Anyone can do this in ten minutes.
For classic origami, they use special paper, which can be purchased at art stores. You can also use office or colored paper products. To make the craft more interesting, you should listen to some tips:
- When choosing colored paper, it is better to give preference to double-sided or metallized. So it will be possible to achieve a greater resemblance to the skin of an animal.
- If office paper is taken, then on it you can first print a pattern similar to dragon scales. So the dragon will look more natural and will look like a real mythical creature.

If the craft is made from plain white paper, then after it is ready, it can be painted. This activity is very popular with children. They can make all their fantasies come true.
Dragon Creation Techniques
For crafts, you will need a few things that are best prepared in advance. First of all, this is a sheet of paper (it is better to take a colored double-sided one). If you take white, then you can then paint with paints or pencils. You will also need scissors, a ruler and a simple pencil. Make an origami dragon possible by the following steps:

It remains only to give the wings and tail a curved shape. Here the dragon is ready.
Modular version
A paper dragon assembled from modules also belongs to the origami technique. These are rather complex schemes, therefore, those masters who have long been fond of this art can assemble such a dragon. It will be quite difficult for a beginner to cope with the task. With this technique, you can recreate a copy of the popular Ender, Toothless, or any dragon. The work is quite painstaking, so the whole family can be involved in this activity, and even the smallest family members can be entrusted with folding individual modules.

Adding modules is a fairly easy process. For this you need:

The modules are very easy to put together. However, a large number of them may be required.
For different figures, you may need from seven hundred to a thousand individual elements. Modules need to be inserted into each other and in this case rows should be obtained. You don't need to glue them together. The author himself must come up with a scheme for assembling according to his taste and preferences.
To prepare the scheme, you need to take a sheet in a cage. On it it will be necessary to mark the location of the elements with squares. You can make separate schemes for paws, tail, head, torso. In this case, it is necessary to take into account where the attachment points are needed.
For beginners in this business, it will be useful to listen to some advice. For example:

At first, it is better to practice on the most simple figures. Only then can you move on to more complex ones.
To make the dragon beautiful, it is better to have several sheets of foil or metallized paper on hand. Some elements will turn out well from it, for example, eyes, spines on the body, horns or mustaches, and it is also suitable for making dragon claws out of paper.
Assembling the structure can be entrusted to older children. And you can do it yourself. It will be difficult for kids under the age of seven to cope with such a task, so they can be entrusted with assembling individual modules.
The easiest option
Young children are also very fond of making various crafts, so parents are often interested in how to make a dragon out of paper, only light. For crafts you will need the following materials:
- disposable paper plate;
- double-sided colored paper;
- felt-tip pen to draw eyes (or you can take special ones - self-adhesive);
- mounts for the mobility of the joints (available at art stores).

Then you can engage in the creative process. From colored paper, cut out all the parts that will be attached to the body of the dragon: neck, head, tail, wings, paws. The plate should be folded in half and the cut parts should be attached to it with a fastener. If there are no fasteners, you can glue it with glue, but then the figure will be motionless. It remains only to glue the eyes or just draw them. That's all, the dragon with movable wings is ready to fly and delight the kids.
The figure of the dragon is quite complex, so only adults and teenagers can cope with it.
Making modular origami or classic requires great care and concentration. The first time to make an origami figure is always difficult. However, after a while this activity will become easier and easier. Then you can move on from assembling simple figures to more complex ones.
Let's learn how to make a three-dimensional origami - a dragon according to the scheme!
Origami (in Japanese: "Orientalism" - bending and "kami" - paper, literally meaning "folded paper") is a traditional Japanese art that consists of creating figurines folded from sheets of paper. The figures obtained in this way are called origami.
The art of making paper figures originated over 2,000 years ago in China and then brought to Japan, where it has evolved into a traditional art that knows no boundaries and is accessible to all ages. In ancient times, origami was not only an art, but also a science of teaching precision and patience. In the East, origami has always symbolized peace, tranquility and family harmony.
Dragons are fantastic creatures that look like huge flying lizards and breathe fire. Western mythology usually presents them as dangerous predators, acting on the side of evil, against man. The Eastern, on the contrary, presents dragons as wise creatures with special knowledge and secrets; patrons and helpers of people. How different opinions are about the essence of dragons, and when depicting them, opinions differ. Dragons are depicted with one or three heads, with or without an arrow-shaped tail, with a body covered with scales or long hair ... So origami art presents several options for folding dragons.
There are two main groups of how to make Dragon paper origami: simple origami or modular. Modular (three-dimensional) requires a lot of experience in folding, certain skills and qualifications. Only a skilled origamist can handle such a craft. The scheme of classic (simple) origami is also not for beginners. It belongs to the medium level of difficulty. But still, if desired, everyone can handle it.
Paper origami "Dragon" - a model consisting of two colors. Therefore, it is preferable for her to pick up sheets painted in different colors on both sides. The figurine is folded from a square paper sheet. And in order to make the head and wings contrast, it is better to place a sheet of paper at the beginning of folding with the lighter side up. In addition to paper, for the "Dragon" you will need a pencil and a ruler. 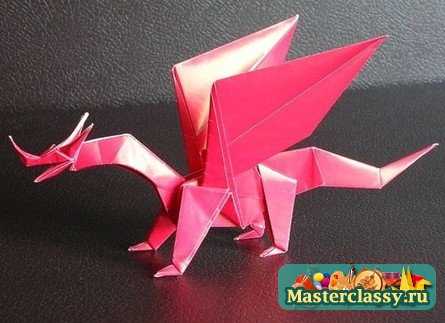
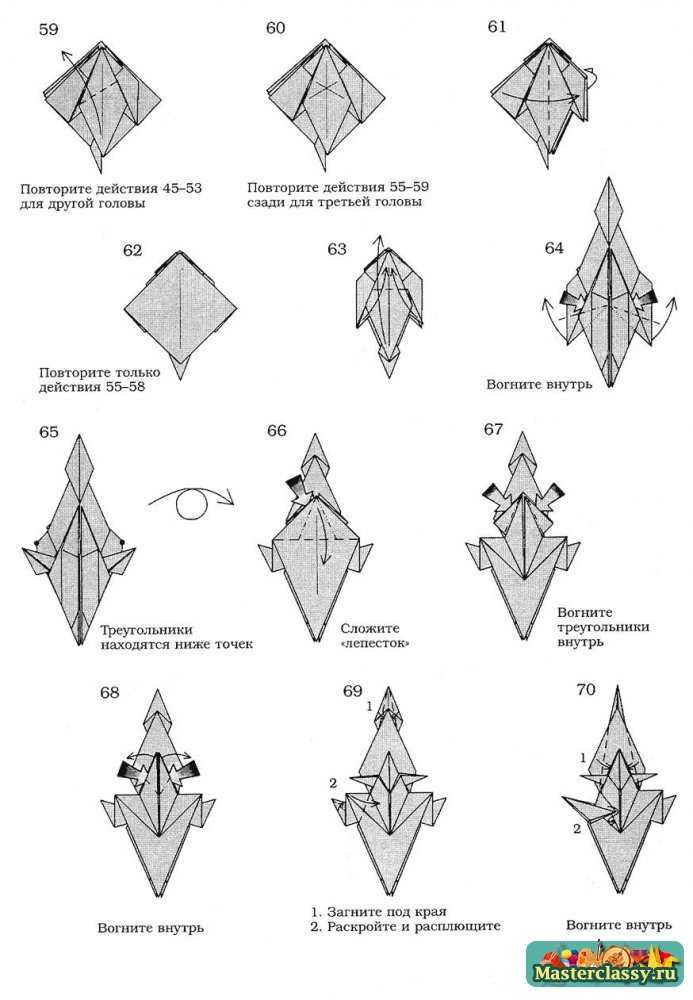
First, prepare the paper. A square is cut from a rectangular sheet. And on it a fitting rhombus is drawn with a pencil, with vertices in the middle of each side of the square. Then the corners of the square are bent up along the drawn lines of the rhombus. The corners should converge in the center. The structure is flipped. Now pencils again draw lines from two opposite side corners to points, 2-3 cm below the upper corner. From the intersection of the drawn lines, a segment is drawn up to the end, and kinks are made along these lines. From the angle obtained from above, a small beak for the dragon is bent.
And again, diagonals are drawn on the workpiece with a pencil between opposite corners, and then two lines from the middle of the sides to the center. Opposite corners are folded over to meet at the center. The figure is also bent diagonally.
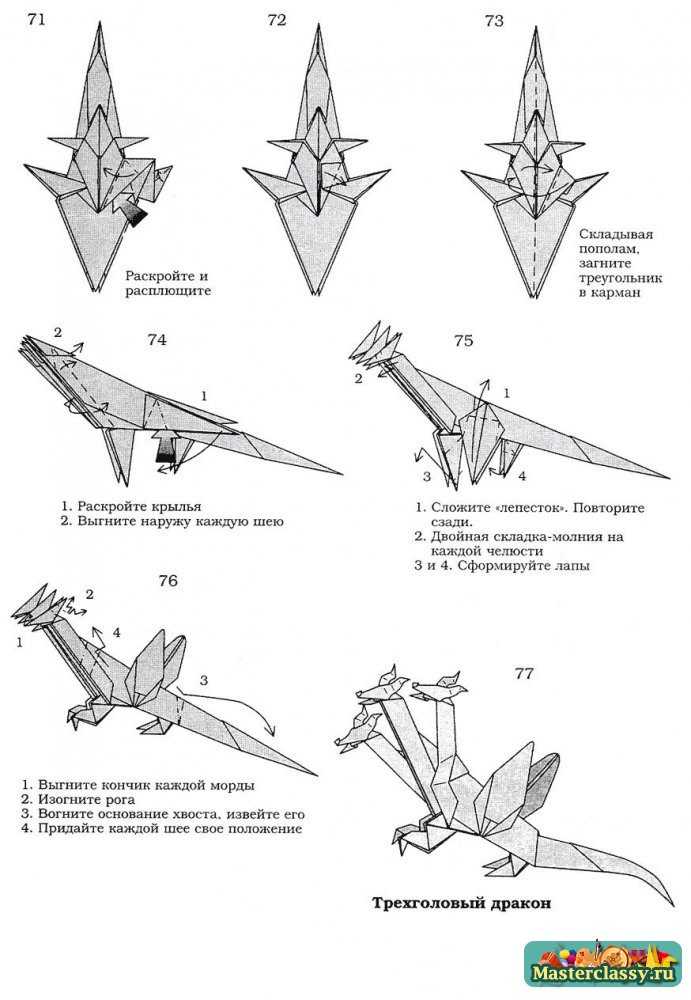
On the resulting structure, the corners are bent in different directions (up and on the sides). The top is unfolded and at the same time the free part of the paper is pulled out. The ears are then bent back and front. Bends of two wings (front and back) are made behind the ears. The result is a rhombus with a dissected one of the sides. From the point of dissection to the obtuse nearest corners, lines are drawn, and a deflection of the bifurcated parts is made inward to form a "bird". On one of the bifurcations, a head with a beak arches.
Sharp protrusions on the wings must be bent inward. And bend the wings themselves up. Paws are formed from the bifurcated lower corners. Several folds are made on the wings and tail, and after that the wings are neatly straightened.
Having completed the origami "How to make a dragon", you can proceed to its artistic design: paint the curves of the wings and tail, finish drawing the eyes, make dotted scales on the body ... 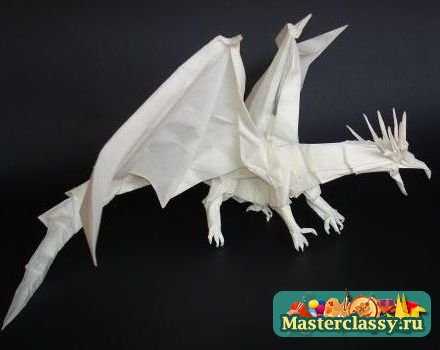
The origami dragon assembly scheme is multi-stage. It becomes more complicated if the figurine is made from a double-sided colored sheet. Paper for the product is taken in a square shape and placed with the light side up so that the dragon's wings are colored.
Step-by-step diagrams will help you cope with the task and create your favorite paper figure, which will become an unusual interior decoration.
Origami. Three-headed dragon. Scheme 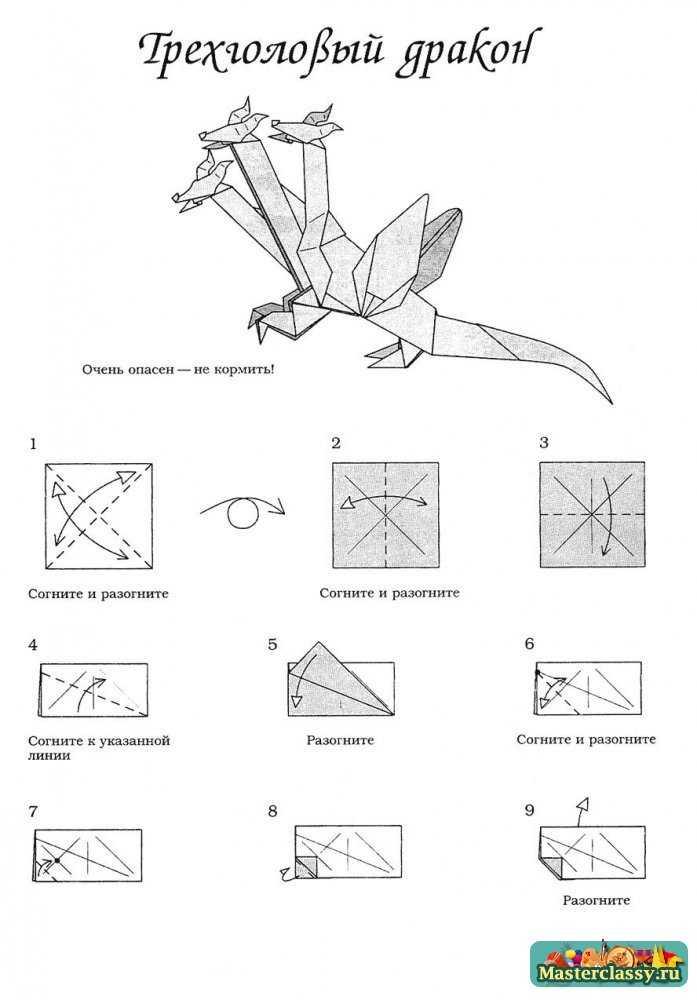


Here is another video of the dragon simpler
Or here's another handsome dragon
Good luck with dragons!