Patterns of soft bunny toys made of fabric. Tilda hare: different tailoring options
DIY toys: simple master classes, the best patterns, interesting ideas.
As the great Coco Chanel said, “Handmade things are a luxury. It is not necessary for everyone to have them. Anyone who wants to have them makes them himself or pays the master for his work.
Soft toy is the first association of plush baby bear. But there is much more to the concept of a soft toy. This is an interior toy Tilda, and funny toys in a car, and much more. This article contains a variety of types of soft toys, as well as techniques for their implementation and step-by-step master classes.

DIY soft toys
Such toys can be divided into several subspecies: for children and adults, interior toys, with practical use (for example, needle beds).


Also, toys can be divided according to the type of material used: fur, from cotton or linen fabrics, from felt, from fantasy fabrics.


Folk toys, as well as soft toys made in national needlework techniques, have regained particular popularity.
DIY soft fur toy
A fur toy created by one's own hands is especially warm and beautiful. For its tailoring, you can use both natural and artificial fur. Of course, it is much easier to work with artificial fur, but if you decide to sew a toy from natural fur, you will get a unique author's toy! First you need to decide on the pattern of the toy, the larger the finished product, the easier it will be to work. Small details are especially difficult for beginners.

Circle the details and cut out with a margin of 0.5 cm per seam. Unlike fabric, it is best not to use scissors when working with fur. If you don't have a special tailor's knife, use a sharp utility knife. Cut with sharp short strokes, do not drive the knife deep so as not to cut off the fur.


To sew the fur, it is necessary to apply two front sides to each other and straighten the fur outward. After sewing the toy, it is necessary to leave a small hole through which the toy is turned inside out and stuffed with filler. Previously, toys were stuffed with cotton wool, pieces of leftover fabric.
But such stuffing dries for a very long time when washing, and often after cleaning the toy was thrown away only because the stuffing did not dry out and mold appeared inside. Modern fillers are made of synthetic materials (synthetic winterizer and others), which dry quickly and well, do not stray and retain their shape. Having stuffed, it remains to sew with a hidden seam.


The final touch is the eyes, nose and mouth. You can embroider yourself, or you can buy ready-made accessories in the store.


Video: OFFENDED CAT / Do-it-yourself soft TOY
Video: Warm cats toy, master class soft toy
DIY soft toy made of felt
Today, felt toys are the most popular at children's master classes and needlework circles. But they appeared not so long ago, and there is even an exact date of their appearance.

 Margaret Steiff and her first dolls
 Enterprising German woman Margarethe Steiff came up with the idea in a housewives magazine to sew a soft toy with her own hands from felt. In the magazine, absolutely free of charge, Margaret published a pattern and a detailed master class. But in the note she said where exactly you can buy felt for such toys.
Such a move in 1879 made it possible to establish a toy empire in just a few years. The nuance was that the toys were both sewn at the factory, and they sold blanks for toys that could be sewn on their own. She left the empire to her children and grandchildren, and gave the world fashion for a soft toy.


Master class felt dog


For work you will need: brown, white and black felt, scissors, a needle and thread, beads or eyes for toys and a hot glue gun.


We print out the pattern, cut and sew each piece step by step.


Depending on the type of seam, you can create completely different textures of the toy.


If the parts are glued together, the toy can only be cleaned in a dry way. When wet, the parts will separate.


DIY soft toys made of fabric
Fabric toys appeared much earlier than felt ones. But with the advent of fur and plush toys, they were unfairly forgotten for some time. With the advent of plastic, even children's toys made of fabric fell out of use. But today, with a new wave of popularity for handmade, the popularity of a fabric toy has been revived again. The most popular interior toy today is Tilda.


When looking at the Tilda doll, one gets the feeling that the roots of this toy go far back to the Middle Ages. Not at all. The appearance of Tilda was in the 90s of the last century by a young designer Tony Finnanger. The girl was full of ideas and one of the many ideas was Tilda. Today, without it, it is impossible to imagine a gentle, homely interior. And craftswomen from all over the world are simply in love with Tony's idea and create prototypes to their taste.

 Tilda Angels
 Video: Tilda Master Class
DIY soft toys animals: chicken, fox, horse, penguin, pig and others
With the advent of the crumbs, you want to change the world for the better, create a special atmosphere at home. And the child is perfection itself, and I so want him to play with unique toys filled with mother's love.
DIY toys are easy. We have collected master classes of various animal toys from a variety of materials. Note that children under 2 years old put everything in their mouths. Therefore, the material must be natural, preferably lint-free. Wonderful fur toys are best given in the third year of life.


Pattern of a chicken, it can be sewn as for a baby and insert testicle toys. And you can create a miracle basket for Easter.
Video: Learning to sew the author's soft textile toy Elephant


Video: How to Sew a Penguin Finger Toy
Aleftinka pig pattern.


Pattern of a giraffe and his company.
 Pattern Cheerful Giraffe
  Flower Elephant Pattern


Since the release of Despicable Me, the world of toys has changed forever. Yes, everyone still loves bears, but at the sight of cute minions, kids and adults are delighted. Minions toys are the first to sell at exhibitions. Do you want to sew for your child? Easy peasy! It remains to choose a favorite character for your baby.
Video: Master class sew minion
DIY simple soft toys


For beginners, many details may seem too complicated and the desire to create will gradually disappear. For beginners, we have selected simple patterns, the connection of which even children can handle. These patterns are especially relevant in creativity lessons in schools.


Do-it-yourself bouquets of soft toys photo
 Bouquets of soft toys Bears
 Conservationists have been fighting the sale of fresh flowers for a long time, until someone brought bouquets of sweets or toys into fashion. Now this global trend is so popular that in some countries the sale of fresh flowers has been halved.

 Bouquets of soft toys Kitty
 Gathered for a holiday? Make a bouquet of soft toys yourself! This is a unique gift that will take pride of place in the bedroom of the birthday girl for a long time to come.
Video: Bouquet of toys. Master class for beginners
DIY soft toys pillows
 Garfield pillow toy
 Well, having touched the world of toys, it is impossible not to remember the pillow toys that fill the sofas of all needlewomen. These are favorite things for both families and guests. Please note that sitting on the sofa, few people can resist not to stretch out their hands and touch the half-toy. And children are happy to travel with their favorite soft toys, falling asleep to the noise of the roads.


Video: Owl pillow toy
Video: Patchwork "Toy-Pillow"

Flat toys are the easiest to make, most often made with felt. But there are various variations. Such toys attract with simple and concise cut, interesting textures and the ability to take with you everywhere.
Video: DIY soft toys. Master class, sew cats
DIY soft toys patterns for beginners
Beginning needlewomen do not have to spend a lot of money on patches and tools. Sometimes simple tights or socks are enough to create beauty.
We also collected the simplest patterns for beginners.

 The simplest patterns of toys for beginners Kitten
 The simplest patterns of toys for beginners Monkey Pattern Smeshariki
 Video: Soft toy "Bunny from a sock"
It is important for every child to have a cute and cute bunny in his toy collection.
Indeed, for almost every child, a bunny is associated with kindness. Seeing such a toy, the heart overflows with love for this tiny creature.
Today in stores you can find various bunnies - Mi, Teddy, and others.
Make this toy for your baby or babies is easy. The main thing is to prepare all the necessary materials, tools and a bunny pattern.
We sew Mi bunny
 For this type of toy, you can use any plain or not too colorful fabric.
As a filler you can take sintepuh, sintepon, synthetic wool.
In addition to the main material, we will need such devices as:
- buttons, they will be used to secure the arms and legs of the toy;
- sewing accessories;
- tailor's scissors.
Before you get started, you need to find a toy pattern. It is easy to do, it is presented just below, print it on and cut out every detail.

Download the pattern to your computer, print and cut
You should get the following details:
- half head - 2 pcs.;
- on the neck - 1 pc.;
- ear - 4 pcs.;
- shoulder - 2 pcs.;
- hand - 4 pcs.;
- tail - 1 pc.;
- leg - 4 pcs.
The finished bunny pattern must be cut out of paper. We put each of the details on the fabric and carefully outline, then cut out. Do not forget to leave 3 - 5 mm from each edge for seam processing.
 Now we add each of them in pairs and sew. Parts must be folded with the right side inward..
The main thing is to leave a small distance through which we will turn the parts on the front side, and also fill them with filler.
As soon as all the components of the Mi Bunny (the pattern above in the article) are completely ready, they must be filled with the filler that you choose. For this action, it is best to use a pencil or any plastic stick.
It is necessary to fill the parts carefully from the far ends.

The main thing is that the filler does not crumple in one place, but is evenly distributed throughout the part, including in the corners themselves.
As you remember, we left a place in order to be able to easy to stuff bunny details and turn out.
Now the places through which the stuffing was carried out must be sewn up with a secret seam.
The arms and legs of the bunny are attached to the body with a button. Thus, the bunny is easy to plant in a certain position. We combine all the details into a single toy. That's all, the do-it-yourself bunny is completely ready.
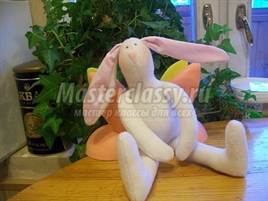
Hare Tilda
 To sew a hare, we transfer the pattern to the base fabric (see below). We cut out all the details, not forgetting about the additional space of half a centimeter for processing seams.
Some types of fabric fray a lot, in order to prevent this, it is recommended to treat the edges with a special solution.
To do this, you need to mix simple PVA glue and clean cold water in a ratio of one to one. Moreover, no traces of the composition will be visible, and the fabric will become harder.

To make a Tilda bunny on your own, we need:
- body fabric - linen;
- choose the fabric for clothes yourself based on your taste preferences;
- sewing accessories;
- simple pencil;
- scissors;
- printed pattern of a soft toy;
- sintepon.
Manufacturing steps:
- Finished parts need to be sewn with a machine seam, trim a little excess fabric by 2 millimeters. Remember that you need to leave a little space for eversion and stuffing parts.

- Using a pencil, carefully turn inside out and straighten the seams with your own hands. We iron and fill with filler, we do it tightly so that there are no voids left. That's all, the components of the hare are ready.
- At the body of the toy, slightly bend the remaining fabric and sew it with your own hands with a basting seam. Then carefully insert the legs and sew them together with the body, remove the extra threads. The main thing is that the limbs of the hare are the same.

- The paws must be sewn by hand, and the seam must be hidden. We sew the ears in the same way, and only then we attach them to the head of a soft hare.
- The soft toy is almost ready, there is very little left - to sew a nose, make eyes and a mouth. For a more expressive look, it is recommended to make rosy cheeks for the animal. We use simple blush and a large brush.

- Now you need clothes for the finished soft bunny. If your toy is large, then we measure it and make a pattern of pants, blouses. If it is small, then in this case you can use the Internet and download the finished pattern.

Pants for a bunny
- We cut out all the details from a suitable material, not forgetting to leave additional space for seam processing. First of all, we sew the pants. It would be better if it was a jumpsuit. Only then we sew a blouse, and if possible, you can make a beautiful hat.

Ready bunny Tilda will certainly please any kid
- You can decorate the bunny's clothes with various decorative elements. It can be buttons, beads, rhinestones and so on. That's all, the toy is completely ready.
Everyone in childhood had their favorite plush hare, which was always there: in a cozy bed, in a briefcase or just at hand. For most people, the symbol of a hare is associated with something sweet, cozy, kind, homely and clean. Now you can make this beautiful toy with your own hands. This article has a pattern of a teddy hare, as well as patterns of other types of bunnies. Such toys will be a great gift for children for the New Year or Birthday.


cute teddy
The features of Teddy toys are a thoughtful and sad look. To make such a bunny, you will need:
- paper;
- a simple pencil;
- synthetic winterizer or fluff;
- buttons (2 pcs.).
First you need to draw a pattern of hares with a pencil on paper. Before that, decide on the size of the future toy.
Transfer the pattern to the fabric. Cut out the silhouettes of the future Teddy hare.

How to sew a hare with your own hands with patterns? Fold them right sides up and sew each piece. Leave a small hole in the body in order to fill it with padding polyester. Just leave it in the paws and head.
Turn the future hare on the front side. Stuff with synthetic winterizer. Sew the resulting parts together.

Sew on eyes - buttons, make a nose and mouth with threads. Decorate with accessories if desired.
Bunny Teddy is ready! Such a bunny can become a cute home decoration or a good friend for a child.

in tilde style
Making a pattern and sewing such a hare with long ears is much more difficult than a teddy. But this master class will help you make a cute Tilda bunny with your own hands in a short line.
Necessary materials:
- cotton fabric or calico;
- sintepuh or holofiber for filling;
- fabric for clothes;
- copper wire (20 cm);
- threads in the color of a hare;
- small buttons;
- braid;
Work begins with the correct construction of the pattern. Draw patterns for the details of the body, paws, ears and clothing. Cut along the contour and transfer the details to the prepared fabric. Duplicate all parts for the back of the product.

The highlight of Tilda toys is that they are made exclusively from natural materials. It is best to use cotton, linen, flannel, calico, fine wool or fleece.
Knitwear is not suitable, as it can stretch during hand sewing. You can also use a sewing machine for sewing.

There are two methods for sewing tildes:
- Transfer the patterns to the fabric with a washable marker, remnant or chalk. Tailor the details with allowances of 5-10 mm, sew by hand or on a typewriter;
- Transfer the details of the pattern to the fabric folded in half, sew along the drawn lines. Then cut them out and turn them inside out.
Large parts can be sewn by any method. And when working with small and complex parts, it is better to use the second method.
Two types of fabrics are needed for the ears: dark is suitable for the outside, with a light shade for the inside. Sew these cut out parts for the ear along the edges, folding them with the inside out. Then turn the parts through the left unsewn place. Insert a wire into the ear 2-2.5 times longer than the length of the hare's ear itself. Insert the ends of the wire into the finished head and sew. Do the same for the other ear. The wire is necessary in order for the ears to keep the desired shape.

For the body of the toy, you need to fold the fabric in half and lay a seam along the entire pattern of the doll. For paws, prepare two symmetrical parts. Fill the body and paws with filler. Then insert the paws into the unsewn places of the body and hem with a hidden seam.

The muzzle is allowed to be drawn arbitrarily. The connecting seam should run vertically down the middle, forming a curve for the nose. Sew the nose, eyes and mouth with colored threads.
Many needlewomen who have small children are concerned about the question of how to sew a hare. This article introduces several sewing techniques. Let's talk about what fabrics are better to use for making a soft toy with your own hands. A detailed master class on sewing fur toys will be presented here, as well as the technology for making an eared friend from a sock.
Materials and tools
Cardboard or polyethylene for patterns. The most convenient material for patterns is dense polyethylene. The material is perfectly visible through it, and it is impossible to make a mistake in the location of the pattern. This is especially important for fabrics with a pattern. Patterns from polyethylene are not torn and do not crumple. You can store them in a file for documents. If you do not have the opportunity to purchase such polyethylene, then replace it with cardboard.
Marker for marking material. The best choice is a disappearing marker. As the alcohol evaporates, the image disappears. There is no need to wash anything and worry that the marks will spoil the appearance of the product that you have been poring over so much. The only negative of the disappearing marker is the high price. It's still a professional tool. If you are not sure what you will sew in the future, then you can get by with a small or graphite pencil.
Professional tools: roller knife, ruler, mat. At first, it is enough for you to have a school ruler, a centimeter tape and ordinary scissors in your arsenal (you can use stationery). If you want to sew soft toys in the future, you can purchase professional sewing tools:
- tailor's scissors;
- zigzag scissors (so that the edges do not crumble);
- roller knife (for quickly cutting circles and ovals).
Threads
It is important that they are of high quality: strong and do not shed. Since we will be sewing a stuffed toy, the seams will stretch when stuffed. Seams should be strong but flexible. For sewing a hare, purchase durable polyester thread for machine stitching.
How to sew a hare and how to fill it
A soft toy will need to be filled with something. Consider the main types of fillers. We conditionally divide them into two groups: natural and synthetic. Take care of this in advance.
natural fillers
Cotton wool. The most affordable and cheapest type of filler. In addition, it is completely natural, and nothing terrible will happen if the child even swallows a small part. A huge disadvantage is that the cotton material absorbs moisture. Over time, mold may appear in the toy, which is absolutely unacceptable for children's things.
You can find significant disadvantages when stuffing. Experienced craftswomen are well aware of them, but they can spoil the mood for beginner needlewomen.
It is hard to fill with cotton wool a toy with a complex design: elbow bends, hard-to-reach and narrow places. After washing, a thing stuffed with cotton looks terrible, the natural material gets lumpy. It will not be possible to fluff it inside the toy - you will have to rip the product apart.
Wool. This is a good look sewn from a dense dark fabric, or a knitted item. Through a thin light fabric, all the irregularities on the body of a soft friend will be visible. Many needlewomen use the remains of woolen threads for this purpose. Fluff them up and stuff products.
High-quality, but expensive filler - sliver. It is pure sheep's wool. A huge disadvantage is that it is sold in rolls. It is unprofitable to purchase it for the manufacture of one toy. Buy a sliver if you want to put the production of expensive and high-quality products on stream.
Slider is not easy to work with. First you need to fluff the material. You need to fill the toy slowly, gently pushing the filler with a stick. The product cannot be washed. Can be dry cleaned or frozen for disinfection in the freezer. You can put the toy in a bag of soda, shake it well, take out the product and vacuum it.
Herbs. If you want to sew a toy for sleep, then herbal stuffing is a great choice. You can collect them yourself or buy them at a pharmacy.
Synthetic fillers
Sintepukh. With this filler you can achieve a perfectly flat surface. It is very light and soft. The material was invented specifically for stuffing toys, so it has practically no disadvantages, and it is easy to work with it.
Sintepon. An inexpensive filler that can be found in any craft store, it is sold in rolls. Before work, you need to tear it with your hands. The material is not suitable for filling tilde dolls with thin legs and handles. Puppet girls will develop "cellulite" from this material.
Before sewing a hare, you need to choose a harmonious combination of fabric colors. If you are using multiple colors, you can use the color wheel. Try not to combine cold and warm tones. Focus on how “delicious” the combination looks. Remember that the right palette should be pleasing to the eye and evoke emotions and a desire to touch the thing.
How to sew a hare from fur
The most "cute" toys are obtained from the Bunny is very easy to manufacture. Here we will take a step-by-step look at how to sew a hare. The master class is designed for beginners.
For work you will need:
- fabric (faux fur);
- a small piece of white fleece;
- beads for eyes;
- brown paint (pastel chalk);
- cardboard for patterns;
- threads.
Redraw the hare pattern, which is shown in the photo below. Cut out pieces of fabric, stitch them, leaving a hole for stuffing. Make cuts in rounded places. Turn out the toy.

From white or cream fleece, make a circle for the muzzle. Embroider the nose with black thread. Make a scarf out of ribbon for a toy. Decorate it with an artificial flower.

Tint the eyes, nose, paws, ears So we figured out how to sew a hare. The soft toy will become your baby's best friend!

Bunny made of felt or fleece
Below is a simple one. With its help, the question of how to sew a hare from fabric will be resolved. For these purposes, felt or fleece is preferable.

The tail can be made from a filament pom-pom or a felted piece of wool.

sock bunny
In the photos below, you will see an easy way to create a sock toy in 20 minutes. You will quickly figure out how to sew a hare from a sock.
For sewing you will need:
- sock;
- filler;
- needles and threads;
- marker.
Turn the sock inside out, cut in the area of \u200b\u200bthe fingers - these will be the ears. Sew them.

Stuff the toy with filler and stitch from below.

Sew the ears at the base and connect together. Embroider eyes and nose. Draw blush. Make a ponytail out of the pom-pom. Decorate the toy with a ribbon or artificial flower.

Now you know how to sew a hare. You can involve a child in making toys from a sock. Joint creativity is a great opportunity to spend time with your baby.
Among craftswomen who sew soft toys with their own hands, various animals are quite popular: hares, owls, cats and cubs. These animals not only look cute, but also give room for creativity. Tilda dolls, knitted amigurumi figurines, textile products that combine both a toy and a soft pillow - all these options have their fans and are in great demand. For the manufacture of hares and other animals, you will need patterns.
This type of toys got its name because of the ease of implementation. This is feasible work even for a child (of course, under the supervision of an adult). There are many options for simple dolls, and all of them are distinguished by a simple form of toys and the absence of complex elements both in work and in a pattern.
In the culture of some countries of Western Europe, Canada and the USA, a rabbit hiding and laying out colored eggs is an integral symbol of Easter. Children are waiting for this character no less than Santa for Christmas, they are happy to look for hidden eggs (not so much chicken as chocolate ones, really).
A handmade Easter bunny can be a great addition to traditional decor this holiday. Required to work:
A plump oval body and two ears - that's the whole Easter Bunny. You can draw a pattern yourself, or you can use a ready-made template. The pattern for the body of a hare looks like an oval, in the upper part of which a triangle is cut. This is necessary for a more regular and rounded shape of the toy. The bunny ears are elongated rounded triangles, and the tail is made from a small circle of fabric.
Fold the fabric in half face to face and fasten with pins. Cut the pattern out of paper and transfer to the wrong side of the material. Cut off excess material, departing from the contours by 1-1.5 cm. Sew the main part of the body along the drawn line, not reaching the sharp edges by 2 cm. Turn inside out and stuff with holofiber. Sew up the opening with a hidden seam.
From non-woven fabric, cut out two parts of the ears, put on the corresponding fragments of fabric on the wrong side, glue side down. Iron with a hot iron through a thin, damp cloth. Sew the details along the lines and turn inside out. It is not necessary to fill the ears with filler. To give the ears a more interesting shape, you need the lower part, through which the ear was turned inside out, folded in half and fixed with hand stitches.

Sew the finished parts to the top of the hare with neat stitches. The tail for the rabbit is made quite simply - you need to sew the prepared circle of fabric around the circumference with stitches, stepping back from the edge of 1 cm. Pull the thread, tighten the fabric to the assembly. Fill the resulting part with holofiber and finally pull the thread, fixing it on a knot. Sew the finished tail to the bottom of the hare.
Sew on button eyes and brown the cheeks. With a pink thread, you can embroider a small triangle of the spout and lay a small vertical line down from it. Such a muzzle will look cute and funny. Rabbit is ready!
Simple with a bow
Such a pattern of a hare made of fabric consists of three main parts: a single piece of the body, head and hind legs, front legs and ears. The natural size of such a toy is 30 cm (excluding ears). What is required for work:

Transfer the patterns to the fabric - 2 parts of the body, 4 parts of the paws, 4 parts of the ears and 1 part of the tail. Pin the material with pins and cut with seam allowances. Cut out 2 pieces for the ears from non-woven fabric. Iron the interlining from the wrong side of the parts through a damp cloth.
Sew the details on a typewriter, leaving slots for eversion on the front side. Turn out and fill with holofiber. Close the slots with a hidden seam, not forgetting to tuck the allowances inside the toy.
Sew the front paws to the main part of the toy. Fold the ears in the lower part in half and sew with a hand seam, then sew them to the crown of the hare. Sew black beads to the head with a few stitches as eyes, and embroider the nose with pink or red threads.

Next, you need to make a neckerchief with a flower for a bunny. Wrap a wide satin ribbon around the neck and tie a knot at the side. If necessary, shorten the ends of the tape, give them a triangular shape and set them on fire over the candle so that they do not crumble.
To make a flower, you need to cut 6 circles from organza or chiffon in 3 different sizes in descending order. It is necessary to singe their edges over the candle, and then hold the material a little at a safe distance from the fire. No holes should form, but the fabric should take on a slightly concave shape. Assemble the flower from the largest circle to the smallest. Sew with a few stitches, and sew beads and beads in the middle.
Sew the flower to the knot of the ribbon, fasten the thread and hide the knot. If you need to pair a cavalier with a bunny, instead of a neckerchief with a flower, you can sew a top hat for him.
Not only simple toys are popular. Teddy bunnies, tildes and bunnies with long ears are loved by many - not only by children, but also by adults. And handmade Piglet bunnies are a collector's item from people all over the world.
This is a collectible type of toys that have a number of some characteristic features. First of all, it should be noted that real teddies are never sewn from artificial materials. Plush toys of this type are stuffed not with holofiber or padding polyester, but with sawdust or straw, where fragrant herbs are added. All parts of the body of toys, as a rule, are movable due to special disk-pin devices.
To sew a cute teddy bunny yourself, you will need:

Transfer the details of the pattern of a hare with long ears to the material and cut it out taking into account the allowances. In addition, if you are using material with a long pile, you need to take into account its direction when laying out the parts. Heels and details of patches are cut from fleece or suede.
After the details are cut out, they need to be swept in pairs. Sour cream parts can be sewn with a machine seam, leaving 4–5 cm sections not closed. Turn the parts from the wrong side through these slots and fill them with sawdust or holofiber. After filling, tuck the allowances of the cuts inside the parts and sew them up with small, neat stitches by hand.
Sew the head to the body. In order for the fastening to be as stable and reliable as possible, you need to lay the first seam in one direction, fix it. Lay the seam in the opposite direction with the other thread. The stitches should be the same size and evenly spaced.
Sew the hind legs to the body with buttons. This, of course, will not replace special hinged mechanisms, but will provide some mobility for the legs. Comb the bunny fur with a brush, lift the crumpled pile.
Sew a dress. To do this, cut out a rectangle 15 by 40 cm (or another size that would match the size of the hare). Finish the edges with a closed cut. Fold the fabric in half, topstitch along the short side. Put the future dress on the bunny, pick it up on a thread around the neck. Fix the assembly, sew a sarafan to the body with a few inconspicuous stitches.
Sew the front paws to the body over the button-down sundress. Attach the ears to the head and pin them with pins, fixing the location. With the same pins, mark the location of the eyes. Insert a needle with a thread under the eye, bring it out in the place where the eye will be, put on a bead, take the needle back, stitching the head. Make a small tightening so that the muzzle is more prominent. Sew the second eye in the same way. Attention: the stitches should not capture the ears themselves, only bead eyes are sewn on.
Embroider the front surface of the nose and outline the mouth with stitches. You can use ready-made spouts, but with an embroidered toy it will be cuter.
Before sewing on the ears, tuck the raw sections inside the parts and secure with stitches with a thin thread along the edge. Sew on the ears with a hidden seam.
You can add multiple patch details. To do this, you need to thin out the pile a little with tweezers and sew on patches with two or three stitches on each side. At the same time, the thread with which the patch is sewn can even be contrasting. On the patch itself, you can embroider a primitive pattern or sew on a rhinestone. The teddy bunny is ready!
The Mi Bunny pattern with long ears differs just in the size of these very ears. In length, they are equal to the length of the entire body. In addition, these toys are sewn from soft materials: plush, fleece, faux fur, etc. The head and muzzle of the Mi bunnies are quite embossed, so they have tucks, like paw details.
The seams connecting the two parts of one part are located in the middle, they are not trying to hide or disguise them, this is the similarity between Mi bunnies and tilde dolls. Just like the tilde, such toys are usually dressed in dresses and berets, which press long ears to the head. The paws can be either strictly fixed in one position or be movable, but not due to buttons or special mechanisms, but due to loose filling. Because of this, the part at the junction is hollow, providing mobility.
As a filler, standard materials are used for this: holofiber, sintepuh, cotton wool, etc. Sometimes anti-stress balls are used as a supplement, filling the paw tips and the loin of a soft toy with them.
sleeping Beauty
Despite the fact that the Internet and gadgets have firmly entered the life of modern children from a very early age, soft plush toys still remain in high esteem, especially when it's time to hang up. Splyushka bunny, with which it is not at all scary to fall asleep and without a night light is sewn quite simply. The pattern can be drawn by hand directly on the fabric. For work you will need:
- Base material of two types.
- Fabric marker or pencil.
- Cardboard and scissors, pins.
- Two buttons.
- Threads to match the fabric and black and pink threads.
- Sewing machine.
- Filler.
 Such a toy belongs to the category of primitive dolls. However, due to its specificity, it is more suitable for the category of “spy”, that is, toys that supposedly sleep.
Draw a pattern on paper or fabric. Leave allowances of 1 cm and cut out the body part. The ears should be thin (narrow), and in length - even more than the body. The front and back halves are cut from different materials.
On the front side of the material, draw a muzzle - closed eyes, nose and mouth. Embroider with thick threads.
Sew the details of the ears and turn on the face. Pin to the front side of the main part, aligning the cuts. You get a “sandwich”: base-ears-base, which must be securely fixed with pins or a basting. Sew details along the drawn line and turn right side out. Fill with filler and sew up the cut. Sleeping beauty is ready!
The beauty of these toys is that you can draw the pattern yourself, and it can be of different sizes - from the smallest to the largest, in the height of the child. Among such a variety of options, everyone can find something to their liking!
Attention, only TODAY!


