Christmas crafts snowman made of plastic cups. Snowman from disposable cups
The most spectacular New Year's attributes are large. And website wants to show how to make a big snowman out of various improvised or even junk materials, which can live in a house or in the yard and become its decoration.
Do-it-yourself snowman from plastic cups step by step
Plastic cups are one of the most affordable craft materials that will make a wonderful big DIY snowman. Inside such a snowman, you can put an electric LED garland and a funny snowman will be illuminated in the evenings and show the way home. Or maybe he will become a magical friend for your child? In any case, you should learn how to make a snowman from plastic cups with your own hands step by step.
Necessary materials:
- plastic white glasses 3 packs of 100 pieces;
- stapler;
- glue;
- decorative materials for creating and Christmas garland.
How to do step by step:
- To make such a snowman, you need to create two large balls of plastic white glasses. We begin to “roll” the balls from the bottom row - lay out 25 white cups in a circle and fasten the cups to each other with a stapler.
- The second row is laid between the cups of the first row. The cups should go a little inside the ball to get a hemisphere. An ideal ball is unstable, so you need to strive for a hemisphere. For the second row, you will also need 25 plastic cups.
- Lay the next rows. For the bottom ball, you need to lay 7 rows of glasses. With each row, less and less cups will be required, since they are cone-shaped and your craft will take the form of a ball. The workpiece must remain open, we will install the next ball on it.
- To make a snowman's head out of plastic cups, you will need 18 pieces. Smaller head. We also spread them in a circle, until a finished head is obtained. If it was not possible to finish the ball from above, then it will be possible to put a hat or cap on his head and thus cover the hole.
- Install a small ball on a large one, check how stable such a craft is and fasten it together.
- Decorate your head - create eyes from fabric or plasticine, a nose - a cone of orange colored paper, hang tinsel around your neck, and put a Christmas tree garland inside for illumination.
- If a snowman made of plastic cups is made of 3 balls, it will turn out to be very unstable.
A detailed explanation of how to make a funny snowman out of plastic cups with your own hands, if you want to please your children and guests with something unusual. It takes a little financial costs and time to create it, and the arrival of a magical New Year's mood is guaranteed!
Do-it-yourself snowman from threads step by step.
You can also make a fairly large snowman out of thread, the advantage of this craft is that it can be made classic - from three balls. It is lighter, more elegant, it can be hung from the ceiling and it will not take up space.
Will need:
- 3 balloons;
- 1 skein of white b/w threads;
- PVA glue, glue gun;
- scissors;
- some felt;
- sticks and twigs;
- colored buttons and beads.
How to make a snowman from threads step by step:
- From threads and glue we make 3 balls of different diameters. To do this, we inflate a ball of the size we want to make a ball of thread for a snowman.
- Next, you need to wrap the ball with a thread dipped in glue. This can be done in two ways. First, spread the thread on paper and smear it with glue. The second method is more convenient - you need to thread a needle and pierce a tube of PVA glue with this thread. The thread passing through a jar of glue will itself be wetted in glue.
- We wrap the ball with glue thread through the center, creating a pattern. If it seems to you that the ball is not completely saturated with glue, then you can additionally coat it with glue on top.
- Let's make two more balls of smaller sizes in this way.
- We leave the balls to dry for 10 - 12 hours? then pierce the balloon and remove it.
- After drying, glue the balls to each other with a glue gun. To make them better stick to each other, you need to make a small indentation at one of the glued balls.
- We will make the hands of the snowman from twigs and glue them to the body with a glue gun.
- You can also make a broom out of branches.
- To create a snowman's face from threads, you can use buttons or beads that are glued with a glue gun. The nose and mouth are made of felt, colored paper or plasticine. Let's draw cheeks.
- Cut out a strip of fabric from felt and make a scarf for the snowman.
- A hat can be made from a small bucket or a felt cap.
- It turns out here is such a cute snowman made of threads with your own hands to decorate the Christmas tree.

Master class on creating a New Year's snowman from threads with your own hands:
How to make a snowman with your own hands from improvised materials.
There are improvised materials literally created in order to make snowmen out of them, these are:
- cotton wool and cotton pads,
- skeins with white threads,
- socks,
- paper and paper plates,
- felt.
Making a snowman out of cotton pads is easy! This is a great craft for kindergarten kids. 2 cotton pads are glued to each other on thick cardboard, and then they are decorated. From such decorative elements you can make very cute New Year cards.

How to make a snowman from a sock with your own hands. Master Class.
A do-it-yourself snowman from a sock is also not difficult and quick to make. For this you will need:
- 2 white thick socks;
- semolina for filling;
- rope, thread and scissors;
- buttons, beads, felt or fabric for decoration.
How to make a New Year's snowman with your own hands:
- Fill the sock halfway with semolina.
- Tie tightly with thread.
- We pour semolina into the second part of the sock, without filling it to the end, so that the snowman is easily tied.
- We sew or glue buttons - eyes, tie a scarf. From the second sock we make a hat and the New Year's craft is ready!

How to make a paper snowman
The easiest thing is to make a paper application in the form of a snowman in the form of a poster to decorate your house or porch. On a large colored sheet of drawing paper, 3 circles of different diameters are glued and painted.
More interesting is the snowman made of paper plates. To do this, you need to glue cotton on the rim on top of the plate, it will be hair, stick a hat and a nose - a carrot, draw a face.

The most interesting crafts made from waste materials are toilet roll snowmen.
- They need to be pasted over with white paper.
- Make circles out of shiny paper with a hole punch, glue them in place of the mouth and eyes.
- Make hands and headphones out of wire for children's creativity.
- Tie scarves for them and place such snowmen on the balcony.
Happy first day of winter, friends! And what is winter without a snowman. Today I will show you, a master class, how to make a snowman out of plastic cups with step-by-step photos and detailed instructions, I will tell you what you can’t believe, how many cups it took and how to avoid mistakes.
On the eve of the New Year, parents have added chores, they need to have time to make crafts for kindergarten and school. Again I go to your aid, sharing all sorts of fictions, ideas and fantasies. Very soon I will tell and show the ideas of simple and original cards for the New Year, but for now I’m returning to the snowman.
Do-it-yourself snowman from plastic cups - step by step
This idea haunted me for a long time, because on the Internet everything is so beautifully depicted in the photo, everything is shown in the video simply and clearly. I also decided to try to realize this idea, to make crafts in kindergarten for the competition. The job description is honest, it makes no sense to say that it is easy and simple, no, it is not, the work is complex and painstaking.
To make a big snowman from cups, you will need:
- 400 plastic white glasses.
- Stapler regular size.
- Stapler staple pack.
- Scarf or piece of cloth.
- Colored paper.
- Red sheet of cardboard.
- Glue gun.
- Santa's hat.
How to make a snowman out of plastic cups step by step
You need to start work with the preparation of materials, remove the excess, leave only cups and a stapler. Choose a wide space so that no one disturbs or distracts you. The floor in my apartment served as this place, I also advise you to sit in the same way.
For this craft, only white cups are needed, transparent ones will not work.
- Lay out the cups singly, fill the stapler with staples and get to work. Take two glasses, connect them together with a bracket. I advise you to stick the stapler as deep as possible into the glass, connecting each other in a circle. The number of plastic containers will appear by itself when you form a circle. No need to tighten, save glasses, they will break, the design will turn out to be uneven. I needed 26 white cups for the first round, but not transparent ones. Look at the photo carefully, each subsequent attached should go behind the previous one with a rim.

- The second row will be more difficult. Here it is important not only to fasten in a circle, but also to fix them together. We put a plastic cup on top, between the two previous ones, so that the side is shifted inward. We fix it with a stapler, put another one next to it and fix it too. Here it will not be possible to lay the dishes exactly between the previous two, so be careful, put them just next to each other and fasten them together, as shown in the photo.

My step-by-step description will help you make an even and beautiful snowman for the New Year. We continue friends in the same direction. All subsequent rings from disposable cups are made like the previous ones. You should get such a half of the ball.

- Then follow the same step-by-step instructions as in the first case. The only thing is that you constantly have to either crush the bottom of the white glass, or stretch it, or insert an extra one. Here you have to tinker and ruin more than one plastic.
Follow the same pattern, do not finish one side of the ball, it will be attached to the first ball. Look, the two parts of the DIY Christmas snowman are ready. You need to connect them together.
I didn’t get a small snowman made of plastic cups, which means that the mount must be strong.
How to make a snowman out of plastic cups
You can make a snowman with your own hands from plastic cups in half a day, just follow my instructions and repeat the step-by-step description. It is necessary to fasten two balls together with the help of segments from disposable white glasses. Cut off such pieces, staple one edge to the upper ball for the lower cup, the second edge for the base and also for the upper cup. So in several places. We take care of the appearance. We roll a cone from colored red cardboard, glue the edges with superglue, it will fix it firmly and instantly. From orange paper we cut out eyes, a bit like droplets, inside we draw pupils. The mouth was cut out in the form of a smile from red colored paper. All this must be fixed with a hot gun. Do not forget about the buttons, they can be cut from any color you like.
 We tie a scarf to our big snowman from disposable cups, fasten the cap and can be taken to the competition in a kindergarten or school. You can put a garland inside, then there will be a luminous snowman made of glasses.
How many plastic cups do you need for a snowman
This question interests, most likely, many, however, like me once. I tried to find reliable information and instructions in the articles, but I came to the conclusion that everyone is copying each other and you should not trust anyone.
Friends for a snowman made of plastic cups, you need 385 white glasses. Of these, I ruined 8, which means I need a total of 377. Do not forget that the diameter of your snowman may be slightly smaller or slightly larger, so I advise you to buy 4 packs of 100 pieces.
Snowman from plastic cups - video
Friends, I got such a big snowman from plastic cups, I made it with my own hands for kindergarten. My step-by-step instructions should help you repeat this craft, because you know how many cups you need for it and how to collect it correctly, thanks to my step-by-step photos. Share your work on social networks and I congratulate you on the first holiday of winter.
Yours Nina Kuzmenko.
How to decorate a large room in the new year? Of course, you need an elegant Christmas tree. But that's not all. There are a few more must-have New Year's characters. One of them is a snowman. The snowman is generally a symbol of winter and favorite children's, and not only children's, fun. Therefore, if space allows, you can build a snowman indoors. This snowman will never melt. And we will use ordinary plastic disposable cups to create a snowman.

For work, you need a lot of white or, in extreme cases, transparent plastic cups, approximately 350 - 370 pieces and one red cup instead of a carrot, a stapler and a sufficient number of brackets. And someone else's scarf, a children's colored bucket or a New Year's cap, a few plain colored napkins in order to depict eyes and buttons.
.jpg)
As you know, a real snowman consists of three snow balls. Big bottom, then middle and smallest top. The cup snowman has a slightly different design. Since it is very light and will not stand in the yard, but at home, it must be assembled from two balls, and the lower lump is not made in the form of a ball, but in the form of 2/3 of a sphere or hemisphere. Then he will get a convenient size and a stable base. If the cups are wrinkled during delivery or work, do not worry, this will not be noticeable in the finished snowman. The main thing is that they more or less keep their shape and the plastic is intact, without holes.

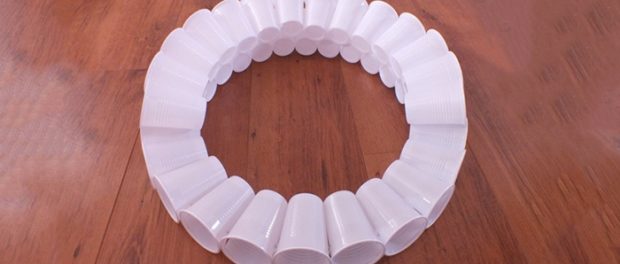
We start the assembly from the bottom. We lay out the cups in a circle, bottoms inward, from 25 - 26 cups, successively fastening each other with a stapler. The stapler is very convenient and fast to operate. But, if suddenly there is a problem with this tool, the cups can be connected using adhesive tape or quick-drying glue, but this will significantly slow down the process.


Then, on top of the bottom row, we form the second one, also fastening the cups with a stapler, now in three places: with the bottom row and with two adjacent cups. Since the cups expand at the top, each subsequent row becomes smaller than the previous one, gradually forming a hemisphere.

We form the head of a snowman according to the same principle, only, like a regular snowman, the second ball should be smaller. If in the first case we took 25-26 cups, then for the top ball we will take 17-18. In the same way, we lay out the circle from the cups turned with the bottoms inward. We fasten thin-walled containers row by row with a stapler until we get a half of the ball. After that, turn it over with the bottom row up and begin to fasten the rows of cups of the second hemisphere.
We also do not add the second half of the ball to the end. We leave a gap of 7 or 15 cups. This will be the junction of the upper and lower balls. We fix the stapler brackets to the edges of the cups.

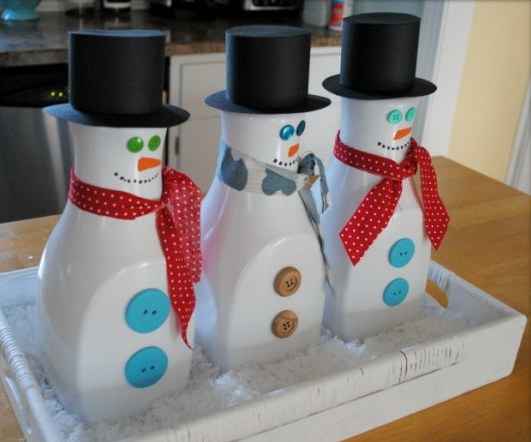
A pair of cups of the upper ball turns into eyes if dark blue or dark green napkins crumpled into a ball are placed in them. We attach a red cup instead of a nose, or we fold a cone of orange or red paper, as you guessed it, this will be the same carrot that a decent snowman is supposed to have. We cut out an arc from colored paper and glue the mouth, we get a smiling face.
Napkins of red or orange color, placed in cups on the lower ball, imitate buttons. Bright Christmas balls will also look beautiful as buttons. It remains to tie a scarf and put on a red cap with a pompom.

Instead of a scarf, you can use colored corrugated paper or Christmas tree tinsel. And replace the cap not only with a colored bucket, but also with a hat-cylinder glued from cardboard.

Each snowman turns out to be special, with its own New Year's appearance and character. And if you put a Christmas tree garland inside it, it will glow and delight you with iridescent radiance on New Year's Eve.
Photo source for assembling a snowman from plastic cups: http://cenorez.ru/
Content
Winter is coming, New Year holidays, matinee time, time to decorate your home. Already now you can practice creating several interesting New Year items, you won’t notice how time flies and the child will demand crafts for school or kindergarten. Yes, and decorate your home will be something. So, get the kids involved. In this article, we will consider several options for creating a snowman from cups.
The easiest option
Let's start with a simple option. To do this, we need a couple, or even more disposable paper cups, felt-tip pens, threads, sparkles, shiny glue, paints, wire. This set of items can vary, it all depends on how exactly you want to decorate the snowmen.
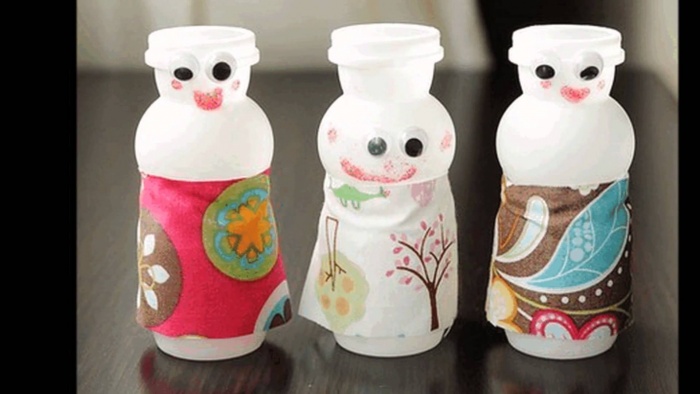
Turn the cups upside down. And start creating: draw eyes, nose-carrots, mouth-buttons with paints or felt-tip pens. Knit a kind of scarf for a snowman from woolen threads, you can put on a knitted small hat on top. You can make a kind of bezel with guns for the ears. Use glitter glue or glitter polish to decorate your snowmen.
By the way, instead of disposable cups? you can also use plastic bottles for yogurt, detergents, decorating it all with buttons, colored paper, paints and bright varnishes.

New Year's toy from a plastic glass
Another fairly simple but interesting way to create a New Year's toy. We will need a transparent plastic cup, polystyrene foam, cardboard, a bell, a snowman figurine, a Christmas tree.
From the cardboard you need to cut a circle that will be slightly larger than the top of the glass. We attach a snowman figurine, a Christmas tree to it, we decorate all this with grains of foam. We cover the composition with a glass and fasten it with glue. The protruding part of the cardboard can then be carefully cut off or also decorated with small grains of foam. You can glue a bell on top, the souvenir is ready!
As an internal filling, you can use any figures. Small figurines of angels, deer or favorite children's characters will do.


Snowman from plastic cups: lamp
A do-it-yourself snowman made of plastic cups can turn out to be very multifunctional: firstly, it will decorate the house and please the eye, and secondly, it can become an excellent night light or a lamp for reading a book or doing needlework. What we need:
- somewhere around 200-300 pieces of plastic disposable cups (yes, here you have to go broke a little, just a little bit);
- stapler with paper clips or glue;
- colored paper for decoration;
- scarf or piece of red fabric;
- light bulb or garland.
To begin with, lay out the bases inside 25-30 pieces of cups and fasten them with a stapler or glue. We lay out another row upstairs, but with fewer glasses and in a checkerboard pattern. And so you need to lay out somewhere around 6-7 rows, do not completely close the structure so that you can attach your head.
Now we are preparing the head of the snowman. For the head, fasten 18 glasses to start, as in the version with the body. Next, lay out several rows, and you should have a small hole left, which then you just need to close with a hat.

Please note: glasses must be connected with glasses from the previous row.
Now you can decorate the face of the snowman. To do this, use colored paper, cut out eyes, mouth, create a voluminous nose. For the eyes, you can use tennis balls, pre-painted in black or dark blue. The nose can also be molded from plasticine and attached to one of the cups, many use foil for the nose.
Docking between the torso and head can be covered with a scarf. The craft will look spectacular if you place a light bulb or a whole garland in the middle.

To create such a snowman, you can use both frosted and transparent disposable cups, it all depends on what effect you want to achieve.

As a decor, you can also use colored plastic cups, you can make buttons for a snowman from them, and blue glasses can be used as eyes.

In addition, such crafts can be a good decoration for a wall or a door to a classroom. To do this, you do not need to make a full circle of glasses, but leave a semicircle so that the product is easier to attach to a flat surface.
Use a garland to highlight the body and head separately, it looks very original and at first glance you can’t even tell that the snowman is made of disposable tableware.

By the way, not only plastic cups can be used. Also use plastic water bottles that are clear or can be painted white. The assembly principle is similar, only it is better to use not a stapler, but a serious glue.


It looks amazing, and, most importantly, teaches children, and adults, too, to reuse plastic products.
And here is a variant of such a hybrid of a snowman and Santa Claus. Please note that the use of materials of different colors is being accepted.

For the manufacture of children's crafts dedicated to the celebration of the New Year, the most unexpected materials are sometimes used. In particular, boys and girls can make original New Year's accessories from plastic cups. In our article you will find some interesting ideas.
How to make a New Year's craft from cups?
One of the most common ones that you can make with your own hands from disposable plastic cups is a snowman. Making this character is not at all difficult, so even a child can handle this task. The following master class will help you create this original interior decoration:
 How to make a garland from disposable cups?
Crafts for the New Year can be made not only from plastic disposable cups, but also paper ones. So, from this material you can make a beautiful garland to decorate the room for the holiday. The following step-by-step instructions will help you do this:
- Prepare the necessary materials. You will need disposable paper cups, tinsel, scissors, a stapler, paper, and foil.
- Using a stapler, attach the tinsel to the bottom edge of the glass.
- Similarly - to the upper edge of the glass.
- Roll a small ball out of a sheet of white paper.
- Wrap it in foil.
- Thread the thread from the rain into the needle and pierce the bottom of the glass with it in its very center.
- Pull the needle through the glass.
- Attach a balloon to the rain.
- You have a bright New Year's bell.
- Make some more bells using different colors of materials.
- Collect all the resulting bells on tinsel and hang the garland in the desired place.


You will find other ideas for creating New Year's crafts from disposable cups in our photo gallery:


