Make flowers from felt. Felt flowers: fashionable DIY decorations (master classes from handicraft masters)
DIY felt roses are great option For decoration. You can decorate not only clothes or bags with these flowers, but also create incredibly beautiful hair hoops.
And how delightful roses look in bouquets. After completing the master class, you can change your appearance, home interior, and also give charming bouquets to loved ones.
Felt rosette for decorating things
Not everyone knows how to make roses from felt beautifully with their own hands, so a master class on making such products will come in handy. Only the most important stages of work are presented here; with a little imagination you can decorate finished goods at your own discretion.
Materials:
- felt burgundy color(you can take any other color if you wish);
- green;
- thread corresponding to the color of the selected felt;
- scissors;
- needle.
- A burgundy strip measuring 20x6 cm is cut out. The strip is folded lengthwise and one of the diagonal ends is cut off. The folded strip is stitched with a basting stitch.
- From the end of the strip where the diagonal was cut, the material is rolled into a roll, making a rosette. To prevent the resulting rose from falling apart, you need to sew the base of the flower with threads. You must remember to sew each new “petals” together.
- Once the entire strip has been wound, the rose is secured with tight stitches at the base. You need to try so that the threads are not visible.
- Now we take green material and cut out the petals; there is no need to make teeth on them. Using a green thread, the petal is sewn to ready flower seam over the edge. Thanks to this seam, teeth will appear.
For any needlewoman, such a rose will be a godsend. After all, you can create a beautiful brooch with your own hands by simply sewing it to the back of the clasp.
Simple felt rose
Felt is a wonderful base for creativity and imagination; with its help you can create a lot of interesting things, and even a variety of different flowers. Felt rose is the most simple idea, and the master class is very simple and clear. Anyone can make such flowers with their own hands, without any special skills.
MORE ABOUT: How to embroider a necklace from felt

Materials:
- felt material Pink colour(small strip);
- bead;
- threads;
- needle.
- A small felt strip is cut out and the edges are wavy. The strip should gradually taper towards one edge.
- The strip is rolled up from the narrow part to the wide one. To secure the base of the rose, it is sewn together with threads.
- You can sew a small bead on top of the rose.
Felt roses in two colors
By creating a two-color rose with your own hands you can get a lot of pleasure, because it is very realistic, although more complicated than the previous master class.

Materials:
- felt material two different colors;
- thread;
- needle;
- bead.
- Using any object round shape Press the contours of the circles onto the felt material, after which they need to be cut out. It is necessary to make circles of different sizes from different felt. Next, each circle is cut in half.
- You need to work with each semicircle separately. To begin with, take the smallest one and fold it, then take a semicircle of a different color and continue working in this way. The petals should curl from smallest to largest.
- Each petal must be secured with thread. When the product is ready, you can sew a bead in the middle.
Following the master class, you can easily make such a rose with your own hands, involving children in this activity. These flowers look great in bouquets.
Felt brooch
Handmade decorations are unique and original; you won’t see them at someone’s party. A master class on creating a rose from felt will help you create a brooch pattern, for which it is very simple.

Materials:
- pink material;
- green;
- thread;
- needle.
- Take pink material and cut out five circles, four of which should have wavy edges.
- Green material is taken and two petals are made.
- Petals are sewn to an even circle. The remaining circles must be folded in four and sewn one by one to the middle of an even circle. The product is ready!
Content
Not only are felt made from beautiful toys, but also no less beautiful picturesque flowers. Such products can be used to decorate women's or children's clothing, or to make them out of flowers. beautiful brooch or a hairpin. Whole bouquets of felt flowers look very beautiful.
The felt rose looks absolutely stunning. This is a textile decoration that always attracts attention, causing everyone's admiration. Making it won't amount to a lot of work, but still, you need to know some nuances. Detailed master classes on making roses from felt will help us understand all the intricacies.
Tender rose
This rosette will complement spring look any woman or girl. It can be used as a brooch, attached to a hairpin or hair hoop.
For work we will need:
- Felt in pink and green colors;
- Needle;
- Scissors;
- Pink and green threads.
Manufacturing process
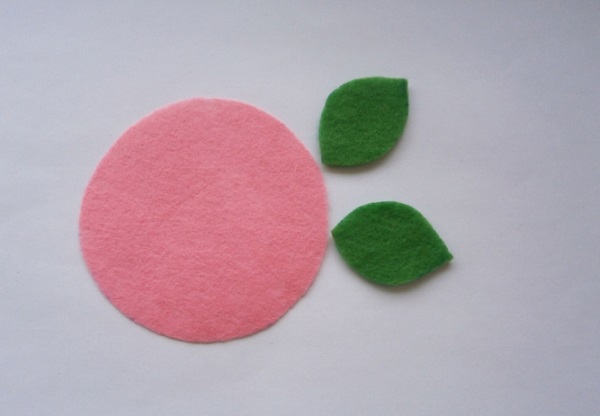
To begin, cut out a circle with a diameter of 10 cm and a leaf 5 cm long from paper.

We transfer the patterns to the material. We cut out a circle from the pink one, and two leaves from the green one.
Now cut the circle with sharp scissors in a spiral. For convenience, it is better to first mark the circle with a pen or pencil and then cut it.
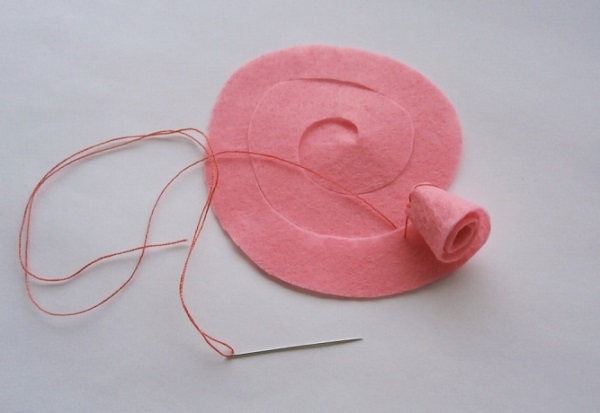
Starting from the outer edge, we slowly twist the workpiece into a tube, securing it with small stitches so that it does not unfold back.

The result is a small but very realistic pink bud, which we additionally secure from below with a few more stitches.
Now we sew two leaves to the base of the flower, squeezing them a little in the center.
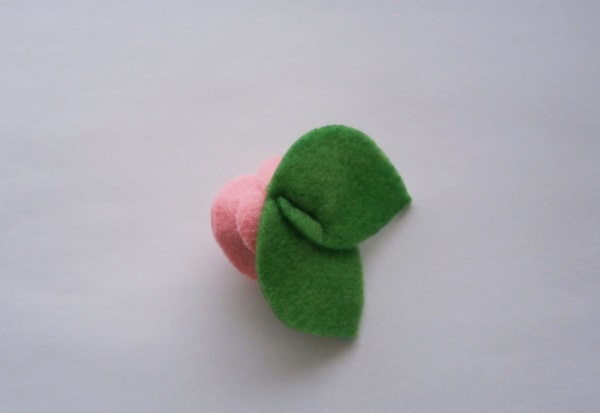
This makes a beautiful little rose that can be sewn onto a hair tie or glued to a hairpin.

Rose made of thick felt
Here is another option for creating a rose. To make it you will need burgundy or pink dense material. You can also use black or any other color.
To work you will need:
- Felt;
- Pins;
- Threads with a needle;
- Scissors.
Manufacturing process
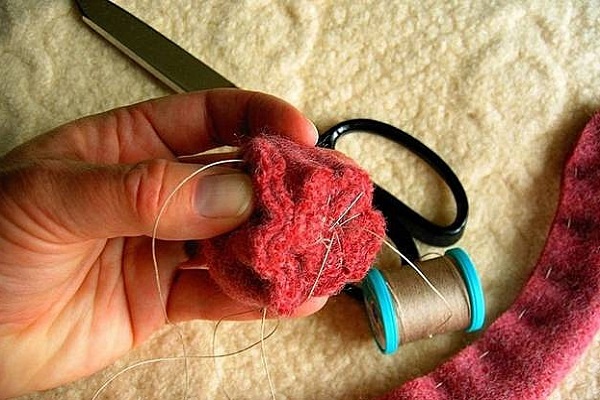
From burgundy material, cut out a rectangular piece 20 cm long and 6 cm wide. Fold it in half lengthwise. Cut one of the corners diagonally. To prevent our workpiece from unfolding, we sew it manually with a basting stitch.

Now, starting from the cut edge, we twist the workpiece into a tube. In this case, the basting seam should be at the bottom. While rolling, it is important to hold the bud firmly with your hand so that it maintains the desired shape. During the twisting process, we fasten the turns with stitches of matching threads so that they are less noticeable.
When the base of the flower has already been twisted, you need to give it characteristic splendor. This is easy to do by pulling the edge of the basting thread laid along the edge of the workpiece. This simple procedure will make the flower more attractive and realistic.
Now all that remains is to twist the rest of the workpiece around the base. We fasten the flower with tight stitches. They will help strengthen the product, give it desired shape. It is better to pull the threads harder so that they sink into the felt. Then they will practically not be visible.
Now we take some green material and wrap it around the base of the rose, imitating sepals. In this case, no additional processing is necessary, because the resulting leaves will fit harmoniously into the composition.
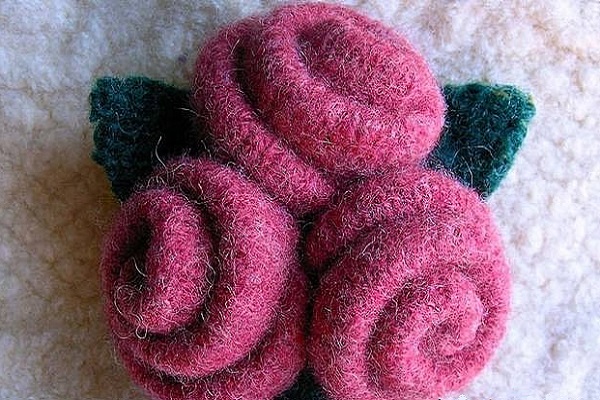
Having made three such products, you can assemble beautiful bouquet. It will become a spectacular decoration for clothes or hair.
Two-tone rose
Working on such a delicate two-color rose will bring a lot of pleasure. The highlight of this product lies in the very delicate shades of felt that are in harmony with each other, the realism and beautiful shape flower.

To work you will need:
- Felt in pink and coral colors;
- Needle and thread;
- Scissors;
- Large mother of pearl bead.
Manufacturing process
For the rose we need to cut out 8 circles (4 pink, 4 coral). Four mugs bigger size, two medium, two small diameter.
To quickly mark felt, you need to pick up any three round-shaped objects and different diameters. Plastic or iron jar lids are ideal.
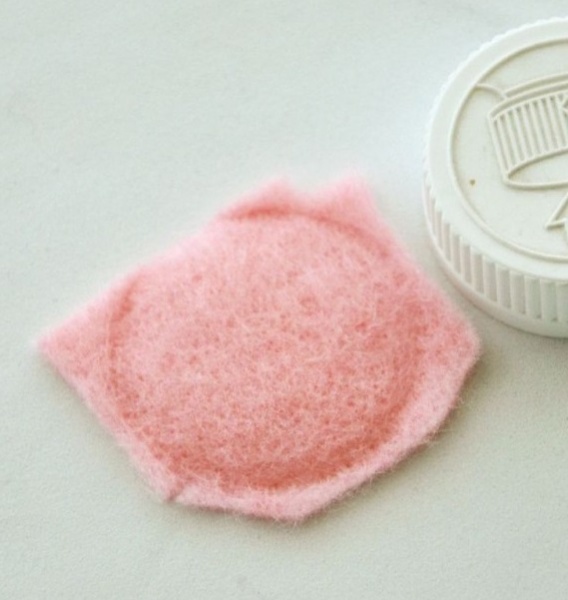
It is enough to press the lid firmly onto the felt and a clear imprint of a circle will appear on it. All we have to do is cut out the blanks with sharp scissors.
Cut each circle in half into two equal parts. Now the petals are ready for the future two-color rose.

Now let's start collecting the bud. We put together the two smallest petals of different colors and begin to roll it into a spiral. Next, take a semicircle of the same size, but of a different color, apply it and continue to roll.

To ensure that the flower is durable and does not lose its shape, we secure each new petal with a needle and thread, making several stitches.

Thus, alternating colors and moving from petals of smaller diameter to larger ones, we roll up a two-color rose.
When all the petals are collected, sew a bead coated with mother-of-pearl into the middle.

This concludes the work of making a flower. Then we use our imagination and find a worthy use for the product.
Rose brooch
Felt jewelry looks very feminine and elegant. Brooch with beautiful rose will add femininity and charm to the image. But, it is not necessary to overpay a lot of money for exclusive handmade items. You can make such a brooch with your own hands, spending very little time, effort and money.
Roses and other handmade felt flowers
1. FELT. WE MAKE ARTIFICIAL FLOWERS EASY AND FAST!
In this article you will find master classes with photos and video lessons for beginners on making elegant flowers from such interesting material With amazing properties like felt. Even a completely inexperienced master can easily make any craft from this type of felt! You will learn how to make felt flowers with your own hands, such as roses, tulips, chrysanthemums, lilies and other options.
Traditionally, felt was made from the finest down of goats and rabbits. This material is a type of felt and is successfully used for making hats (they look especially elegant women's hats With wide brim), shoes (for example, very comfortable and wearable slippers), children's educational toys (rugs, books for babies ). In needlework, felt is often used to decorate handbags and to create small beautiful gifts ( pincushions, valentines for February 14, wedding bouquets and decorations, women's hair accessories, jewelry boxes).
IN Lately sheets of felt made from artificial fibers have increasingly begun to appear on the shelves of specialized stores, which successfully compete with felt made from natural fibers in quality, durability, and other important properties. Semi-synthetic felt (wool + synthetic) is also found.
The production of this type of felt is very similar to the method of making paper. made of cellulose and many of the properties of felt fabric are similar to those of paper - it is easy to cut with scissors, holds its shape well, and sticks well with glue. The edges of parts cut out of felt don’t even need to be processed and volumetric crafts easy to fold individual elements. Therefore, needlewomen often use this material for making. Brooches and hair clips decorated with felt flowers look especially chic. satin ribbons, organza.
Felt elements are often used to create elegant appliques and scrapbooking. . Flowers cut from felt look great on scrapbook greeting cards.
You can make absolutely any petals from felt, from which large dahlias, bright poppies, and sophisticated lilies are very easily formed , romantic forget-me-nots.
Creating flowers from different types felt, it is important to pay attention to the color, shape, texture of each element of the type you have chosen. If possible, make a template for each petal or download it already ready-made templates different types of flowers. Try to cut each piece of material very carefully so that the assembled flower looks realistic.
The edges of felt blanks do not need to be processed, but if necessary sew the edges with thread , then try to adhere to a certain technique so that appearance the future flower turned out impeccable.
Before sewing the edge of the workpiece, you must secure the thread correctly. This is done as follows: we pass a needle through part of the inner layer of felt from the inside. After the edge is neatly hemmed, we make several turns around the needle and bring the needle out through inner layer felt.
You can connect the elements of a flower using threads or glue gun, as well as glue, which you use to connect the parts of three-dimensional paper crafts .
collected flower you can decorate with sequins, beads, rhinestones, bugles. Additionally, you can embroider patterns on the petals.
You can make it very beautiful soft toy in the form of a flower for a little girl. To do this, you need to cut out two identical flower blanks with petals from felt. , sew with an overcast stitch (threads of the same color) not completely to fill the shell with padding polyester, and then sew until the end.
2. INSTRUCTIONS FOR BEGINNERS. SIMPLE FELT FLOWER
Templates of flower parts can be downloaded and the patterns of the desired flower can be cut out of cardboard along the contour. Please note that some petals may look exactly alike at first glance, but in reality be slightly different in size or shape. Each petal is needed for its location in the bud;
DOWNLOAD PATTERNS IN DIFFERENT COLORS .
Then you can process the edges of the felt leaves and petals. You can trim the edges with a simple thread or floss to match the workpiece;
We arrange the petals in accordance with the pattern (usually from largest to smallest), sew tightly (or glue) so that a recess for the core appears in the middle of the flower;
We cut out the core from felt of a darker color in the shape of a circle and glue it to the center of the flower;
All that remains is to decorate the felt flower with accessories or embroider an ornament on the petals;
The craft can be sewn (glued) to a hair band, headband, or brooch base. Or you can make a lot of flowers and form a bouquet with your own hands.
3. MASTER CLASSES. WE MAKE FLOWERS FROM FELT WITH YOUR OWN HANDS
Master class No. 1:
HOW TO QUICKLY MAKE A BEAUTIFUL FLOWER FROM FELT OF MULTI-COLORED THREADS. LESSON WITH PHOTO.
Master class No. 2:
WE MAKE A LARGE FLOWER WITH YOUR OWN HANDS TO DECORATE A HAIR CLIPPER OR HAIR ELASTIC TYPE.
Master class No. 3:
ROSES FROM FELT. STEP-BY-STEP MK WITH PHOTO FOR BEGINNERS.
Master class No. 4:
TULIP .
Master class No. 5:
BEAUTIFUL ROSE FROM TEXTILE FABRIC. WITH SUCH TEXTILE FLOWERS YOU CAN DECORATE CLOTHES, WOMEN'S HAIR ACCESSORIES, HANDBAGS, BOUTONNIERS.
Master class No. 6:
HOW TO MAKE BRIGHT MULTI-COLORED FLOWERS FROM FELT WITH YOUR OWN HANDS. STEP-BY-STEP LESSON WITH PHOTO.
Master class No. 7:
The beauty of flowers delights everyone, which is probably why it is so often copied using various materials. There are flowers made of cold porcelain, which are very difficult to distinguish from real ones, flowers made of plastic, salt dough, and lace. Today we will talk about flowers made from felt.
The peculiarity of this material is that it holds its shape and volume well, does not wrinkle, has a beautiful fleecy surface and is easy to work with. Therefore, creating decorations and toys from felt is quite convenient.
Today we will offer you two completely different techniques creating flowers from felt.
DIY felt flowers - option No. 1
What you will need:
- felt,
- scissors,
- pencil,
- glue or thread with a needle.

First, you need to cut a circle out of a piece of felt. You can make it absolutely any size. The larger the intended flower, the larger the circle should be. It is not necessary to cut it perfectly straight; small bends will only make your flower look like natural, fresh flowers.

Draw a spiral on the felt with a pencil and cut the material with scissors, moving along the spiral.

The middle of the material must be carefully rolled and secured. You can use glue or sew the core with thread.


Carefully glue the end under the base of the flower.


This flower can be used to create a brooch or beautiful hairpin. If you take curly scissors, you will get a flower with an unusual edge.

You can decorate the headband with several similar flowers. Look what beauty can be made from these felt flowers.

DIY felt flowers - option No. 2
What you will need:
- felt (size 25x20),
- cup,
- padding polyester,
- threads with a needle,
- Super glue,
- scissors,
- scissors.
First you need to cut out 5 circles using a glass. You can choose absolutely any size. We got circles with a diameter of 6 centimeters.

Take the first circle and fold it in half. You need to sew the petal along the edge with an even stitch.

Don't cut the thread. You need to tighten it so that it doesn't tear. You will get a beautiful petal.

We also fold the next circles and stitch them with the same thread, without tearing or cutting it. We collect all the petals in one circle and sew the first and last petals at the very base.

Now you need to make one more blank. Cut parts out a little smaller size. If the main circles were 6 centimeters in diameter, then the second circles should be about 4 centimeters in diameter. Each of them also needs to be folded in half and swept. Form a petal by pulling the thread. Do the same with all the petals. Then form a circle of petals and secure it with threads.
You will also need another circle. Its diameter should be about three and a half centimeters. This circle will become the center of the flower. It needs to be swept around the perimeter.

Pull the thread lightly. You want the circle to curl up, but leave a small space. It is through this hole that you insert the padding polyester into the core of the flower (very little of it will be needed). Tighten the circle and sew tightly with thread.

Now you need to connect all the parts. First, sew the center to the circle of small petals. Then we attach the resulting part to a circle of large petals.

Your flower is ready.

You can create completely different flowers by adjusting the thread tension and the number of petals. You can combine colors and sizes of petals. Some people prefer to copy natural flowers, and someone invents absolutely incredible and fantastic plants.
This flower will make an excellent brooch. Felt flowers can also be used to decorate clothes and accessories. You can do beautiful picture using these flowers.
DIY felt flowers - video
Original decorative decoration in Handmade style - felt flowers. It’s easy and fairly quick to do, but it turns out very unusual and beautiful.
Felt flowers look original on handbags, hairpins, as decoration for hairbands, as well as in the design of any gift souvenirs.


Materials for felt flowers
- felt
- scissors
- glue for working with fabric
- pins
- thread and needle
- all kinds of beads, beads and buttons different sizes for decorating flower cores;
- floss threads, the shades of which should differ by several tones in one direction or another from the original felt color. They are used to decorate the edges of future flowers.
Felt flowers, patterns of which can be found in large quantities in catalogs of online magazines, are usually very simply designed. A regular chamomile template can be used as a base. But the work, made in several layers of contrasting or monochrome colors, takes on a completely different concept. Cut out paper petals. This will be the template. Here are a few ready-made patterns for felt flowers:


Let's look at the assembly process using the example of a flower made using this pattern:

First you need to recreate the pattern design directly on the fabric.


Then the edge of each petal is trimmed with a skillful seam using floss or not processed at all.
We place the petals on top of each other from largest to smallest (or vice versa) and sew them in the center to form a recess for the future flower (you need to sew it tightly). And let's move on to creating the core. Place a circle cut out of felt on glue and place it in the middle of the flower.

Sequins, pre-prepared beads, beautiful beads will add originality to the resulting work of art.
Depending on the intended purpose of the product, we attach a pin or sew an elastic band to its reverse side.

We are posting a few more photos of flowers that inspire new creations. Each of these flowers is used as an additional decoration.french knots :


The felt flowers presented below are master classes from handicraft masters. These works will help beginners master the simple creativity of creating decorative floral elements.
Felt rose (master class)
This amazing accessory is ready to "settle" on evening dress or the coat of its resourceful owner.


Let's start from the base of the flower. To do this, we will prepare a circle whose diameter will be 10 cm. We cut out semicircular petals along the edges of the circle, gradually moving from the outer edge inward.

The central part is rolled up, thereby forming the core of the future rose.

It needs to be secured with a pin and filled with a layer of glue. After the glue has dried, you need to wrap the rest of the felt around the resulting bud and close the cut from the bottom side.


This is such a wonderful rose that you will end up with!

If you make several roses, glue them to a piece of fabric and sew on a metal clasp, you will get a wonderful brooch!

For clarity, a few more roses made according to a similar principle:


Felt violet (master class)

Materials for work:
- felt (sheets of two different colors: lilac - for petals, green - for leaves)
- scissors
- threads, the color of which should match the color of the violet
- needle

Let's prepare 5 templates for future petals (diameter - 4 cm):

We take one of the petals in our hands and fold it in half twice. We get a petal in the form of a corner:

Using a couple of stitches we attach the corner to one of the blanks:

We repeat the steps for the remaining petal corners. To achieve the desired neat effect, carefully monitor the direction of the petals (they should be directed in one direction):


At the end of the work, the flower should be thoroughly straightened:

Let's move on to cutting out the leaves:

Sew them together:

Lifting the petal, we fasten the leaves to the base:

We enjoy the result!
For example, you can decorate a headband with such flowers:

Felt chrysanthemum (master class)

The felt strip must be folded in half (widthwise). For reliability, fasten with sewing pins.

On the side where the fold was made, we form identical cuts.

Using matching threads, we sew the strip with large stitches and roll it into a roll, forming petals. We secure it by sewing the layers together in several places.

All that remains is to straighten the felt and form a beautiful flower!
This flower will consist of large quantity petals

Having cut out rectangles from felt, make a fringe on one edge and round the other. There should be about 20 petals. They should all be different sizes.

We pinch the edge that was rounded and fix the petal with glue.

Forming a flower:

Cut it out yellow color stripe. We cut it on one side. Then we roll it up and fix it with glue. We get the finished core.

To use a flower as a brooch, you must wrong side attach a small piece of felt to the base, and then pin everything together with a pin or metal fastener.
Felt hydrangea (master class)

Materials for the flower:
- felt
- scissors
- glue gun
You need to cut out 13 felt circles following sizes: 1 piece - with a diameter of 3 cm, 12 pieces - with a diameter of 2 cm.

We apply hot glue to the center of each circle and thus form future petals.