Fake rooster made of colored paper. To make a heating pad you will need
The symbol of 2017 is the Rooster and it should be in every home. It will not only decorate the room, but will additionally serve a good gift for family and friends. This is a difficult symbol, he loves comfort and cannot stand dull everyday life. You can make it at home yourself or with the help of your children. Working together with your child will allow you to become even closer to each other and help you develop faster. Let's figure out how to make a rooster craft with your own hands from a variety of available materials - for yourself, for New Year's decor at home or with children for school or kindergarten.

1. Pillow in the shape of a rooster
A hand-sewn cockerel will be a good gift and decoration for your own interior. This pillow can be used in the living room, bedroom, and kitchen. By choosing materials by color, you can add coziness to any room. You can update an already sewn toy and add various applications, beads If you have even minor sewing skills, you can make such a toy yourself.

First, take sheets of A4 paper or old unnecessary wallpaper. Draw details on it. Pick up special fabric. You can make the pillow a single color, or vice versa. For example, the wings are one color, the body is another, the beak and crest are a third. For the pillow, fabric from which pillows or duvet covers were previously sewn is suitable. If desired, you can make not only a rooster, but also additional chickens.


2. Postcard with a cockerel
It’s always nice to congratulate family and friends, but giving something else and a handmade craft is much nicer. For example, it could be a postcard with a rooster - the symbol of the New Year. For this you will need very little.

You will need:
- Colored paper.
- PVA glue, but a glue stick will also work.
- Scotch tape, preferably double-sided.
- Scissors.
Add a little of your imagination.
Layouts with the image of a cockerel can be found very a large number of in the Internet. But if you can draw, then you can draw the image of this symbol yourself. If this is a New Year's gift, then blue will do background. You can draw snowflakes on it.


You will need two more cockerel figures. You can do more - the postcard will turn out more voluminous. On reverse side Each card needs to be glued with double-sided tape and glued to the center of the card. Under the picture, write an inscription with a congratulation, For example, “Congratulations,” “Happy New Year,” or “Merry Christmas.”
Open the card and write your wish beautifully inside. Or choose a wish on the Internet, print it, cut it out and stick the wish on double-sided tape. Such voluminous postcard with a rooster will definitely please your family and friends. You can prepare such a congratulation together with your child.
3. We crochet and knit a cockerel
For women who know how to knit, this will be ideal option make a cockerel. Such knitted rooster It will decorate your kitchen or bedroom, and is also suitable for a gift.

To make this craft you will need:
- 4 black buttons.
- Textile. An old sheet or other one may come in handy thick fabric. You can choose the color you like best.
- The hooks are small.
- Threads 4 colors. You can recycle old sweaters that are no longer needed. These can be wool or cotton threads.
You can make a symbol as follows:
- First of all, make a pattern of a cockerel on paper or old wallpaper. Cut it carefully with scissors.
- Transfer it to the fabric, keeping a slight margin of 5 millimeters for the seam.
- Now tie the cockerel's head and body. Gray threads are suitable for this.
- Knit the tummy in brown.
- Make the comb and beak red.


You can knit individual parts or make the entire cockerel. Fill the toy with padding polyester, cotton wool or pieces of fabric that need to be finely cut. Sew buttons instead of an eye to the symbol of 2017. You can replace the buttons with beads from an old necklace. The craft is ready.
4. Rooster made of multi-colored scraps
This toy is ideal for decorating the Christmas tree, lifting the mood and just for decoration. home interior. You can do it at home yourself. During bad mood You can crush it in your hands and it quickly lifts your mood. Or put it on the window to look at it in the morning after waking up.

You will need pieces of multi-colored bright fabric. The best fabric is bright with beautiful design. Additionally, you will need threads to match the color of the fabric, small buttons or black beads.
In order to make a bright, beautiful cockerel, you will need to do the following:
- Cut out a square from bright fabric. It can be small, medium or large, depending on the size of the toy you want to make.
- Separately, take red fabric. Any other color will not work as you will be making the beak and scallop.
- The details need to be sewn into the corner of the square. You need to put padding polyester or cotton wool inside the symbol's body. You can use the filling from an old jacket instead.
- The edges of the figure need to be sewn together to form a pyramid.
- You can sew long legs on the cockerel and place it on the refrigerator.
- The tail can be made from thin strips of the same fabric. For a brighter, more cheerful betta, a multi-colored tail works well.


5. Plasticine cockerel
You can make this craft with your own hands, together with your child. This will help develop hand motor skills. For this symbol you will need play dough or plasticine different colors, a special board for this lesson.

Take plasticine of any color except red (this will be the beak and comb).
- Make three balls different diameters. The head should be small, just like the head. The torso is the largest circle.
- Make a comb and beak from red plasticine; of white and black - eyes.
- The tail and wings can be made from several colors at once. The wings can be made specifically in the form of a droplet. They can be made simply from paper or thick cardboard.
- The place where the wings will be inserted must first be prepared. Make a mark with a knife and secure it with plasticine.


6. DIY paper rooster
Just as easily as using plasticine, you can make a rooster out of paper with your own hands. All you need is colored paper or regular paints or felt-tip pens and a little imagination. You can draw the cockerel yourself, or you can find ready-made stencils. It can also be either voluminous or flat. With children, you can make a cockerel from a yellow cone - look at the photo, and find some more complex and naturalistic solution as a New Year's souvenir.


7. Rooster made of ball and thread
Another very easy way to make a symbol of 2017 is to make a cockerel from a ball and thread. All you need is one or two balloons, bright yellow, orange or red threads, PVA glue, as well as buttons and scraps of fabric or colored paper to decorate the toy and give it a finished look.

How to do:
First we inflate to the right size ball. Then we dip the threads in glue and wrap our ball - tightly or not too tightly, as you like - there we will prepare the frame for our future toy. There is nothing complicated, so this craft can be done for the New Year with your children. By the way, this can be not only a cockerel, but also any other animal.

After the glue has dried, simply pierce the ball with a needle and pull out the remains from the frame. We have the body of the rooster and his head - if you decide to use two balls. Now we take the buttons and make eyes out of them, gluing them to the frame in the right place. We make wings and a tail from scraps or colored paper and also glue them on. Paws can be made from felt, paper or wire and scraps. Here's what you might end up with:


8. Craft a rooster from felt

You can sew a cockerel not only from fabric or multi-colored scraps, but also from felt. By the way, this is almost the most popular idea, since felt does not crumble and does not need edge processing, which means it will be very easy to make figurines and toys. Simple crafts for roosters are made from multi-colored sheets of felt: just cut out the necessary parts and stick them on top of each other - you get an easy one. flat craft. But more complex ones three-dimensional figures You will have to sew from felt, and here it is better to use ideas already created by someone. Here are four ready-made diagrams on how to make a felt rooster yourself, all you have to do is download, print, apply to fabric and cut out:
Felt cockerel - ready-made diagram


And if you think that this is too difficult, then look at the photos of other figures made from this material, perhaps you will like some idea more. By the way, good does not mean difficult. There are very simple solutions for such crafts, which look very cute and are quite suitable for New Year's souvenirs. For example, pay attention to the heart-shaped cockerel.


9. Rooster made from plastic bottles
Plastic bottles are a very popular material for country and children's crafts. Here we have already written about what to make from bottles for your dacha, and today we will tell you how to make a rooster out of them. Most easy option crafts is to take one bottle and using colored paper, buttons, disposable tableware and any other available materials to decorate it with the symbol of the New Year.

More complex options are creating voluminous cocks, with which you can decorate your cottage. Here you can no longer do without abstract imagination, the ability to create necessary forms and combine different colors, because ready-made schemes There are simply no such figures. You will have to cut out the “feathers” for the tail and plumage yourself, make a comb and assemble it all into single form. But for some, these birds look just like life-like ones - look at the photo for yourself:


10. Crafts from salt dough - rooster
Another popular material for children's crafts is salty dough. It’s not difficult to make, sculpting is as simple as using plasticine, but the figures are stronger and more durable—you don’t have to worry that your child will break everything just because he squeezed his fingers on the toy a little tighter than necessary.

Salt dough cockerel recipe:

Mix 200-250 grams of flour and half a glass or a little more fine sea or regular table salt in a bowl. Add about 150 grams of water and mix everything thoroughly. At the end, pour in 20-30 grams of glue - it is better to use PVA so that the dough holds its shape better and the figures do not fall apart.

Next, we begin to sculpt the figure - we make a body, add a head, attach wings and a tail to it, and also do not forget about the comb and beak. Afterwards we paint with gouache or some special paints. We make all the parts separately, and then glue them together with glue or water. To make small parts and shape them, use a scalpen or thin and sharp knife, when working with children, it is better to take safe plastic tools - a spatula or something that will help you make cuts and create the necessary elements.


Video: DIY Christmas rooster craft
Craft - fire rooster
Everyone remembers that 2017 is the year of the fiery rooster, which means that if you are going to make a figurine, then you should focus on these bright colors. It could be a red rooster, orange, yellow, or you can combine all these shades in one toy. You can make such rooster crafts from different materials- from felt and shreds, from fabric and paper, from plastic bottles, cups and other disposable tableware. You can also make a fiery rooster for the New Year from ribbons, tinsel and Christmas tree balls to decorate with such figures christmas tree or use as a craft for kindergarten.


Volume craft rooster with children
If flat figurine you don't like it, why not do it volumetric crafts in the shape of a rooster, which can be given to children in kindergarten and given to friends for the New Year? We have already talked about how to knit a cockerel with hooks or sew scraps or fabric - this is the most popular way to do voluminous toys. Crafts for the garden for the year of the rooster are easiest to make from paper, napkins or plasticine, and if everything is clear with plasticine, then with paper you can use various ways, for example, first make a cone out of colored paper, and only then turn it into a cockerel. You can also use techniques such as volumetric quilling or regular or corrugated paper, origami, papier mache and the use of complex patterns and patterns. Does anyone even manage to make a rooster out of cotton pads and sticks, and for the Christmas tree - from Christmas balls, cereals, pasta, coffee beans, cones, chestnuts, acorns and other natural materials.


Bonus: rooster made from cereals for kindergarten
And another bonus craft is a cockerel made from cereals, which can be made for both kindergarten and primary school. You can use a wide variety of cereals; this composition can be made from millet and buckwheat, peas and beans, semolina, rice and other cereals. How more options you have, the more interesting the craft will be - you have a chance to win the competition with your child.

The technology is simple: draw a cockerel on a piece of paper - parents can do this, and if it’s difficult to draw yourself, you can always download ready stencil, print and use for decoration. Next, use a brush to apply glue to the entire surface that you will fill. natural material. All that remains is to pour in the cereal and let the glue dry. After that, just shake off the extra grains and get ready-made craft. Cunning: if you use several different grains, then so that they do not mix, it is better to apply layers one by one, “painting” with glue only the areas of the picture that are needed now. But laying out a panel of beans or peas is more difficult - here you will have to place the beans in even rows to each other, having also first applied glue to the paper. Here's what you might end up with:


Photos of rooster crafts
What else can a cockerel be made from? Yes, from anything, from buttons or plastic bottles (you can decorate a garden at your dacha with such a craft). It can be made of wood or thread, from old things or some other improvised materials, for example, disposable plates. A painting using the quilling technique with a cockerel - the symbol of 2017 - can also be a great gift. From satin ribbons, feathers and beads, you can make decorations for a cockerel from paper or fabric.


Master class: “Cockerel - a golden comb.” Craft from waste material
Snezik Alena AlexandrovnaPlace of work: MBDOU "Anniversary kindergarten No. 19 "Zhuravushka" Totemsky district, Vologda region
Description of work: This material may be useful in the work of educators, both in direct educational activities, and to decorate the subject-development environment in a group or on walking area, as well as in play activity children; will be useful for parents to spend their child's leisure time.
Target: Making a toy - a cockerel from waste material.
Tasks:
- introduce an option for making a cockerel from waste material.
- develop fine motor skills.
- cultivate perseverance, accuracy, patience, love for the world around us.
Materials:
- a large or small capsule from a kinder surprise;
- multi-colored shreds of leatherette,
- multi-colored tape,
- sponge for washing dishes,
- a pair of ready-made eyes,
- super glue and New Year's tinsel.
Material options: Instead of a Kinder Surprise capsule, you can use a Chupa Chups capsule, or another waste item of an oval, cylindrical shape. I had a camera from a broken water pistol. The production is similar. Instead of tape, you can use multi-colored electrical tape or the same leatherette. The eyes are sold in stores, but you can make them yourself from the materials mentioned above. You also don’t have to use a sponge if you make the rooster’s legs from leatherette. To decorate the cockerel, you can take feathers, multi-colored paper, self-adhesive paper. I took materials that would not get wet, since I was making a craft to decorate the area.
Tools: scissors, pencil or pen for tracing patterns. I cut out the pieces without using templates, so I didn't use a pencil.
Petya, Petya, cockerel!
Golden comb!
Come quickly to our garden
And make all the guys happy!
Progress:
1. Prepare everything necessary materials and tools.

2. We take our camera (in my case) or a capsule from a kinder surprise. I will call it the basis.

3. Prepare plastic eyes and glue.

4. Carefully glue the eyes to the top of our base.

5. From red leatherette, cut out a beak in the shape of a diamond (or outline and cut out according to the template).

6. Glue our beak in the middle just below the eyes.

7. Prepare tinsel for the scallop. Fold several times to form a scallop.

Since I had a hole in the base, I inserted the comb into the hole, after first spreading it with glue. In the case of another base, the comb is simply glued at the very top. You can glue the cockerel's eyebrows in the shape of triangles using colored tape for decoration.

8. Next, cut out the wings from leatherette. I took Brown color, but you can choose any other. I cut it out without a template, in the shape of a sheet, folding a rectangle of leatherette measuring 9*12 in half. I started with a wide curve, tapering towards the end.

9. Glue the wings to the base from the sides. The position may vary. The wings can be lowered, directed forward or backward. It all depends on your plan and imagination!

10. Decorate the wings using tape or other materials. To do this, you can cut out smaller “leaves” of different colors. The tape does not cut off very neatly, so I recommend using self-adhesive colored paper.

11. Using the template, cut out the cockerel’s beard from artificial leather and decorate it. Glue to the base below the beak.


12. Next, we put our cockerel on its legs. To do this, cut out the legs in the shape of two triangles from a dishwashing sponge. The size should be proportional to your base. Or use a template. Kinder bases stand well on leatherette legs. Glue it at the very bottom of the base.

Our cockerel is ready -
Golden comb!
You can safely play with him,
Don't let him get bored!
If you still get bored,
Here we will help him:
Let's make him a girlfriend -
Our chicken - Pestrushka!
And there are also a flock of children -
Everything won't get boring now!

To make the chicken, we use the same steps, but decorate it differently. I caught my eye with a hair tie that I glued to the base. It can also be hairpins, bows, etc. The base is made from a large capsule from a Kinder surprise.

There are also a lot of options for making and decorating chickens!

This and cocktail straws, and knitting threads, and other materials. They are made from multi-colored chup capsules - chups.

The image of your crafts depends only on you and your imagination! Go for it, you will succeed!
Most long-awaited holiday for kids and adults – New Year, which everyone is looking forward to with great anticipation. Decorating an apartment so that you feel the arrival of something fabulous and unusual is of paramount importance. Despite the fact that it is the 21st century, many are interested in how to make New Year's toys DIY for 2017. In this article we will look at various options making Christmas tree decorations for the New Year.
Rooster on the Christmas tree
Next year is the year of the Rooster, so you can create it from paper or other materials and hang it on the Christmas tree. You can make a lot of these cockerels and collect the pendants into a garland to decorate your home. If you're going to do paper cockerel, take cardboard as a base, which you will paste over on both sides.
- You will need multi-colored sheets of colored paper (you can use colored cardboard) and a sheet of cardboard. Draw the silhouette of a rooster on cardboard and cut it out.
- Using a cardboard blank as a template where necessary, draw the details on colored paper (cardboard): head, torso, wings and tail - first fold the sheets in half so as not to waste time preparing blanks for the second side.
- The next stage: we cut out our blanks.
- Now we glue the parts made of colored paper (cardboard) onto the cardboard blank. After the cockerel has assembled into a whole picture, you can decorate it with sparkles, beads - whatever comes to mind.
- Make a hole in the blank, thread a ribbon and hang it on the tree.


You can make a similar toy from felt and also use it to decorate a Christmas tree.


Draw the pattern by hand or use any ready-made one, for example, this one:

Homemade cockerels made using the origami technique will look original.

pillow toy
Not easy, but very exciting activity for making toys is the creation of a pillow in the form of a symbol of the year, which will delight you not only in the year of the Rooster, but much longer. You will need a pattern, fabric, filler, felt (depending on the chosen model), thread and needles. Here it's a matter of small things, we trace the pattern, sew the parts together, leaving a hole to fill the pillow with filler. We turn it inside out, put the filling inside the toy, and sew it up until the end.
Photos and patterns


There is also a more complex plan with fabric painting - this is batik, thanks to which the pillow will acquire a bright color. After you have traced the cockerel on the fabric, color it using special paints, they can be replaced with gouache if you mix it with PVA glue. We leave it for a day so that the paint dries and continue to finish the pillow in the shape of a rooster.
From salt dough

For competitions at school, children are often asked to bring some kind of New Year's craft. Make it from salt dough. A craft made from bioceramics can also be an excellent gift from children to grandparents. Moreover, this activity is so exciting that it quite claims to be a hobby.
Before you make a toy from salt dough, you need to prepare the dough itself. To prepare the dough, use a fine table salt, regular wheat flour and water in a ratio of 2:4:2, respectively. First, mix flour and salt, and then add warm water, kneading the dough thoroughly for at least 10 minutes.
There is another recipe for making dough. In this case, take flour and salt in the same proportions, only the flour is pre-sifted. You need to take a little less than 1 1/3 cups of water. The cooking method will vary. According to this recipe, water must be brought to a boil and salt dissolved in it. Only then is flour added.
When the dough is ready, start making crafts. If you are making crafts with your child, simplify the task by using cookie cutters, for example, in the shape of Christmas trees or bunnies - you will get wonderful Christmas tree decorations. Make a toy (you can use beads or seed beads for decoration), don’t forget to make a hole at the top. To harden the toy, it is left for 24 hours or baked in the oven. After the toy has hardened, it is painted with acrylic paints, gouache, watercolors, allowed to dry well and covered with either clear varnish for nails, or nitro varnish for wood. Thread a thread or ribbon through the hole. So the New Year's gift is ready.
Photo ideas for crafts made from salt dough


Soap figures
Soap is always useful. A little unexpectedly, soap can also be used to decorate a Christmas tree. Soap toys for the Christmas tree are made by hand. The process is simple. First, we grate the baby soap on a coarse grater, melt it in a hot bath (make sure no bubbles form), pour the liquid into a mold and leave until it hardens.

- If you want to make colored soap with pleasant aroma, then add dyes to the base - these can be like food colorings, as well as the juice of berries or vegetables, for example, cherries, beets, carrots. Smell can be added using perfumes or flavorings.
- If instead baby soap If you use a ready-made transparent soap base, you can make soap with a “filler.” After you fill the mold halfway with melted soap, let it sit for 20-30 minutes, place a slice of lemon or orange on top, coffee beans and fill the mold completely with soapy liquid.
- In order for the soap to also have a beneficial cosmetic effect, ground coffee is added to the base, which will work as a scrub, various oils, lemon zest, ground cereals. Such a toy, which doubles as an excellent gift, will definitely not go unnoticed.
Big toys
Using threads, you can also create wonderful jewelry of rather large size - giants. Just inflate the balloon, wrap it with a thread soaked in PVA glue and leave it for 24 hours. After drying, the ball is burst, leaving an airy New Year's toy made of threads, which, for decorative purposes, can be coated with silver or gold paint, decorated with beads, seed beads, sequins, and ribbons. Thread the ribbon and the accessory is ready. If you prepare two or three balls different sizes, you can make a snowman.

Christmas trees are made from threads using the same principle. Use a Whatman paper cone as the base on which you will wind the thread. You can make such a toy in miniature if you take a simple sheet of cardboard instead of whatman paper. Light beads and ribbon bows are useful for decoration.
By the way, use a cone of whatman paper for the base if you are going to make Father Frost and the Snow Maiden. It is enough to glue such a cone, paint it, or make clothes from paper or fabric. The head can serve as an inflated balloon with a painted face.
For giant toys, boxes from under household appliances, which can be covered with foil, colored paper, appliques, or even made into a Nutcracker.

Snowmen

Snowmen made from socks – there is nothing more primitive, but it looks very original. To do this, we fill the sock with sand, buckwheat, and with the help of threads we give it a shape and sew on buttons. A white sock can be used to make a base, and a colored sock can be used to make clothes. Cute snowmen can also be made from an unnecessary light bulb; it is simply painted with acrylic paints and decorated with cotton wool and sparkles.

Small accessories will complement your festive table. Let's paint the wine glasses with acrylic paints. If you know how to draw, then you can easily cope with this work, if not, then use stencils. Be careful because... paint may run.
Sweet decorations
The following options are clearly for those with a sweet tooth.
Caramels
The appearance of Christmas tree decorations can be deceiving, because they may well turn out to be sweet candies. It's very simple: first, mix 300 g of sugar and 100 ml of water, put on fire, stir until the sugar melts and the syrup begins to boil, acquiring golden hue. The finished syrup is poured into pre-greased molds. vegetable oil, and leave to cool completely until the caramel hardens. Then we carefully wrap the candy in crispy plastic, tie it with a ribbon and you can safely hang it on the Christmas tree. It's even easier to melt caramel in molds.

Christmas tree made of candies
New Year cannot do without a Christmas tree; a candy tree is not only a decoration, but also delicious gift, which you can please your friends or family with. But even a small child can handle the manufacturing technology:
Various paper Christmas trees


We suggest making a rooster and a chicken out of paper for the New Year. The technique is called paper plastic.
These paper crafts can become a symbol of your strong family for the whole year 2017 symbolic animal according to the Eastern horoscope.
You can make them yourself with your baby. He will love this kind of creativity!
A cockerel and a hen will decorate your New Year's table, and then your child's room. Try it, it's very simple.
You will need:
- flexible, shape-holding, colored paper
- pencil
- ruler
- scissors
- paper clip
- decorative "eyes"
Master class with photo Rooster and Chicken made of paper
Make bird blanks from rectangular sheets of paper folded in half. Draw 7-10 inclined slits along the fold (about 1 cm apart).
The angle of the slits is 50-70 degrees, and the depth is 3/4 of the height of the folded sheet.

Above is a diagram of a hen, below is a diagram of a rooster (without comb).
How to make a rooster out of paper
1. Rectangular sheet Fold colored paper measuring 13.5 x 10 cm in half along the larger side. Using a pencil, draw the head of the cockerel, marking inclined stripes for cutting.

3. Cut along the marked lines.

4. Draw a scallop.

5. Beak and beard.

6. Glue on the head parts.

7. The right edge of the workpiece (tail) must be bent inward.

8. And connect to the reverse edge of the workpiece (the breast of the cockerel).

9. Fix.

10. Glue the connected parts.

The paper cockerel is ready.
How to make a chicken out of paper
1. Fold a rectangular sheet of colored paper 13.5 x 10 cm in half along the larger side. We draw the head with a pencil and outline the inclined stripes for cutting.

2. Cut along the marked lines.

3. Cut out the details: crest, eyes.

4. The right edge of the workpiece (tail) must be bent inward.

New Year and Christmas always bring with them a special pre-holiday atmosphere and a unique feeling of magic. IN last days of the outgoing year we have to complete all the work we started and prepare for a series of winter holidays. As a rule, housewives are preparing menus for the New Year 2017 and making “runs” to grocery stores and markets, trying to purchase the necessary products in advance. However, the main thing New Year's symbol and the attribute is fluffy Christmas tree, decorated with bright lights of garlands, shiny balls and figures fairy tale characters. The modern market offers a huge assortment of Christmas tree decorations - from inexpensive “Chinese-made” balls to original products original work with hand painting. Of course, with such a purchase you can solve the problem of a festive “outfit” for your Christmas tree, and you can save a lot of time. What if you make New Year's toys with your own hands? After all, the process of making Christmas tree decorations can be turned into a good family tradition, when both adults and children together create such a small man-made “miracle”. Moreover, New Year's toys for 2017 can be made with your own hands from scrap materials: lace, fabric, paper and even light bulbs. We offer interesting master classes with step by step photos and a video on making Christmas tree toys for kindergarten. In addition, here you will find templates and patterns for sewing New Year's toys from felt - with the help of our materials you can easily create amazing products with your own hands. And since 2017 a year will pass under the auspices of the Red Rooster, some Christmas tree decorations will be made in a “rooster” theme. So, let's start creating masterpieces!
DIY felt New Year toys for 2017 Year of the Rooster – master class with step-by-step photos
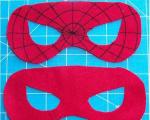
The symbol of 2017 is Red Fire Rooster, so Christmas tree decorations in the form of this bright “bird” will be relevant for the upcoming holidays. We invite you to an interesting master class with step-by-step photos on how to make a cute Cockerel from felt - like this original toy looks great on furry ones spruce branch, attracting attention with her perky appearance. Even beginners in the “handicraft” art are quite capable of creating New Year’s toys with their own hands. A little patience and you can make your wildest creative fantasies come true!
Materials for a master class on making Christmas toys from felt with your own hands:
- felt - white(thickness 1–1.5 mm) and red
- foam ball
- checkered paper strip from a notebook
- red and white knitting thread
- glue gun
- ruler, scissors, pencil
Step-by-step instructions for the master class “DIY New Year’s felt toy”:
- First, a paper strip needs to be placed over the ball (as in the photo) and measured. Cut off the extra “tail”.

- Using a ruler, measure the length of the strip and “split” it into five equal segments.


- We cut the strip at the marked points.

- We wrap the ball with a strip with cuts and make marks in these places with a pencil.

- We mark the “poles” on the surface of the ball with two points, and then draw lines through them that will divide the sphere into five equal “orange slices”.

- Take a wallpaper knife and lightly cut the ball along the marked lines. Set the workpiece aside for the time being.

- If you are making your own New Year's toys for 2017 from felt or any other fabric, you cannot do without a pattern - first you need to “remove” the main dimensions from our ball. The length will be considered the distance between the central points of the sphere, and the width will be the “girth”, which is determined using paper strip with cuts. Leave approximately 3 mm for allowances.

- After marking the main points, you need to draw the shape of a leaf on a piece of felt.

- We cut out five such “leaf” blanks.

- Now you need to take the ball, attach one felt piece to it and tuck its edges into the slots. For this purpose, it is better to use a manicure file. We fasten the rest of the workpieces in the same way. As a result, each “slice” of the ball ends up in a “wrapper” of felt. The result was a body for the future Cockerel.


- Next in line are the wings and head of the New Year's toy. To obtain blanks for these parts, you will need patterns that need to be transferred to a piece of felt. Where can I get these parts? We print the finished ones onto paper, and then cut them out and apply them to the fabric. Alternatively, you can simply draw the patterns with a pencil and cut along the contour.

- Let's get to the head New Year's Cockerel– we start by making a red comb. For this purpose, take a thread of the appropriate color and fold it like an accordion, and a drop of silicone will help to hold the structure together.

- We put the comb between two felt blanks for the rooster's head and glue it (as in the photo).

- We use two textile triangles as the beak, and the eyes can be bought “ready-made” or you can take small buttons. So before you make New Year's toys with your own hands, you need to stock up on the necessary small details. We make the beard using the same “technology” as the comb. We glue all the elements into in the right places heads. To add volume, fill the head with cotton wool and glue it with silicone.

- The wings can be decorated with red thread, which we sew around the edges of the parts.

- To make a “cock” tail, you will need red and white threads - they need to be connected together. First we wrap it 3-4 times around three fingers, then we wrap it the same number of times around two fingers and, finally, one finger (as in the photo).

- Now you need to remove the wound threads at once, thread a thread through them and tie at the top. The result is a bright tail.

- That’s it, let’s start “assembling” our toy Cockerel. The head needs to be glued to the ball body.

- Then we attach the wings and tail. Sequins or rhinestones can be used to decorate the rooster breast.


- The finishing touch will be a loop of thread - with its help we will hang our New Year's toy on the Christmas tree. So, we made the original felt Cockerel with our own hands. Such a symbolic bird will easily find its place on the branch of your New Year's tree, reminding with its appearance of the “owner” of 2017.

DIY New Year's toys from scrap materials for 2017 - an interesting master class with photos
The most readily available materials are perfect for making Christmas tree decorations. With the help of our interesting master class with photos, we will make New Year's toys for 2017 from ordinary light bulbs that are found in every home. Do not forget to be careful when working with this “delicate” material so as not to get injured by fragments of an inadvertently broken light bulb.
List of materials and tools for a master class on creating New Year's toys from light bulbs:
- light bulbs – burnt out or new
- acrylic paint
- lace
- decorative elements (ribbons, buttons, flowers)
- PVA glue
- glue gun
- spray paint in different colors
Making your own New Year's toys from light bulbs - step-by-step description of the master class:
- We begin the work by tinting the light bulb with acrylic paint. a certain color, which we then wrap with a piece of lace. Glue the ends of the lace using glue gun at the base (base) of the light bulb.

- To “disguise” the base, a piece of braid or tape is suitable - wrap it around the base and also fasten it with glue.


- Take a button, pull a piece of braid through it and tie it with a knot. Now you need to glue the button to the light bulb - it makes an excellent loop for hanging on the Christmas tree.

- You can make your own New Year's toys from a variety of materials, but it is important to decorate the composition beautifully - such a product will acquire completeness. To do this, you can use buttons, rhinestones, flowers and other available materials. In this master class we will try to decorate our “Christmas tree” light bulb with small clay roses. In general, there is a wide field for imagination here!

- Now you can attach a New Year’s themed inscription to the composition.

- It remains to cover the toy with a layer acrylic paint, and spray with a tint spray on top to hide the color contrast of the decorative elements.


- After drying, our light bulb Christmas tree toy is ready! You can decorate the New Year tree.

How to make Christmas toys from paper “Christmas balls” with your own hands - master class with photos for kindergarten
Beautiful bright balls and flashlights are traditionally considered the main thing Christmas tree decoration for the New Year. Indeed, the mysterious shine of glass balls between fluffy coniferous branches captivating and uplifting. New Year 2017 is coming soon! But it’s not at all necessary to buy expensive but fragile decorations - you can make New Year’s toys with your own hands from multicolored paper. In this master class with photos you will easily master the art of creating paper Christmas balls, and for kindergarten or primary school you can conduct a themed handicraft lesson.
Materials for a master class on creating paper Christmas balls with your own hands for the New Year 2017:
- thick paper - white and colored
- PVA glue
- scissors
- clothespins
- silk ribbon - matching one of the selected paper colors
Guide to the master class on creating New Year's ball toys for the Christmas tree with your own hands:
- Before you start directly making the balls, you need to make blank parts - for this purpose we print out the templates. Then we apply them to a piece of paper and cut out the required number of two blanks contrasting colors(white and colored).

- We lay out the cut-out blanks in the form of a “sun with rays”, in the center of which we glue a circle to hold the parts together. We make one “sun” blank from white parts, and the other from colored elements.

- We put one blank on top of another and begin to intertwine their “rays” with each other.

- The process is reminiscent of weaving baskets from wicker - by crossing blanks of different colors, we create a “checkerboard” pattern.

- During operation, individual strips may cling to each other and become tangled. Therefore, we fix some blanks with the help of clothespins.

- When the woven paper ball is completely ready, coat the remaining “tails” of the strips with glue, gently press them and wait for them to dry. Don't forget about the silk ribbon by which the toy is hung from the tree - it also needs to be glued to the top of the ball.

In a similar technique " paper weaving“You can make bright New Year’s toys with your own hands from “curly” strips (the photo shows different variations paper balls on the Christmas tree). Excellent holiday decoration to the Christmas tree for the 2017 Year of the Rooster!
Master class on making soft Christmas toys from fabric with your own hands for decorating a Christmas tree - with step-by-step photos and patterns
Making New Year's toys with your own hands to decorate the Christmas tree opens up wide scope for imagination. A few fabric scraps, beads, rhinestones - and you will have an original designer toy for the New Year 2017. We invite you to take an interesting master class with step-by-step photos and patterns on the topic “ Christmas decorations from fabric". You can make such cute soft New Year's toys for the Year of the Rooster and decorate the fluffy forest beauty with them. For crafts you will need simple materials at hand, and ready-made toys They will serve for many years and will eventually become family “talismans”.
Soft New Year's toys made of fabric - necessary materials:
- felt pieces of different colors - brown, white, red
- red cotton fabric - checkered and white polka dots
- striped fabric - white stripe on a red background
- green fabric
- thin ribbons - green, olive and red
- wide red checkered ribbon
- harsh thread
- artificial filler (holofiber)
- threads to match the color of the fabric
- needle