Do-it-yourself snowman from plastic stacks step by step. Snowman from plastic cups
As soon as we do not try to decorate our house before the New Year holidays. You don't have to buy it expensive jewelry and toys, but you can do it yourself original items decor.
Not so long ago, no one would have thought that plastic cups you can make interesting decor. Snowman from disposable cups will be unusual decoration your room. It can also be placed at school or in the garden near the Christmas tree.
If you are interested in this craft, then first go to the store to purchase the necessary materials.
To make a snowman with your own hands from glasses, you will need:
- 3 packs plastic cups, i.e. 300 pieces;
- Glue or stapler;
- Tennis balls;
- Plasticine.
The glasses should be the same, so buy them in the same store. Also, they should have a thin rim.
You can also use different glasses for the head or torso.

Step-by-step instructions for a snowman made of plastic cups
First, take 25 pieces and lay them out in a circle with the bottom inside. Fasten the edges with glue or a stapler.

Lay out the second row of cups in a checkerboard pattern. Fasten the second row of cups together and also the glasses of the first row with the glasses of the second from the top.
Move each line back a little. So she will be more stable.
Do this for 7 rows.
To attach the head, do not close the structure.
Making a snowman's head out of plastic cups. To do this, you will also need tennis balls and plasticine.
To make a snowman head out of plastic cups, use 18 cups for the first row. Fasten them in the same way as the body.

Make snowman eyes with tennis balls. Before that, paint the balls with black paint. Or you can cut out black circles and stick them on the balls.
Make the snowman's nose out of plasticine.
Increasingly, disposable tableware is being used to make all kinds of crafts. Especially on New Year's Eve. This is how Santa Claus appears from plates and a snowman from plastic cups. These crafts are always unique and cute. Moreover, the whole family can be involved in the work. And then surprise guests and friends.
Therefore, the largest and interesting craft for the New Year, we propose to make it in the form of a huge Snowman, which, moreover, feels great on the street. It is made from disposable plastic cups and can be used as a New Year's street craft or to decorate large halls and schools. kindergartens. He's good at home too! BUT step-by-step instruction How to make a snowman out of plastic cups is very simple.
How many cups does a snowman need?
This question is important, because the size of the future craft depends on it. It turns out that in order to make a snowman out of disposable cups, you need to purchase at least 300 pieces and better than white cups, not transparent ones. Moreover, from this amount you get a figure of two balls. And its height will be about a meter (if the cups are 200 ml each).
If you want to make a craft bigger size, more glasses will be needed. The same will happen when the third is added - the most big ball. However, it should be noted that such winter craft turns out to be very unstable. For him, you will need to think over additional support and fastening to it.
What to look for when buying disposable tableware? They must be from the same batch, then the product will turn out neat. It is advisable to choose glasses without rims. This will simplify the assembly process and the joints between the parts will not be so noticeable.
In the process of how to make a snowman out of plastic cups, you will also need the following tools:
To decorate the Snowman craft from disposable cups, you will need:
- cap and scarf (they can be made from paper and tinsel, respectively);
- imitation of a carrot nose (cardboard or plasticine cone);
- paper eyes and rose;
- Christmas balls for holiday buttons.
Snowman from cups step by step instructions
First you need to think over the scheme for creating crafts. And it is very simple: the torso and head. This is if a simplified snowman craft is created from plastic cups. In the full version, there will be three parts that differ in size. Subsequently, all parts are supposed to be fastened to decorate.
The first detail: the body. The beginning of its manufacture is the central part of the sphere. It is formed by 25 cups. They are supposed to be fastened with the bottoms inward. The shape of the dishes will tell you how to fasten the circle. Do not tightly fasten the cups, they should be located freely.
Then stack the next rows of glasses in a checkerboard pattern. It should be noted that in each of them there will be less and less dishes. In order for the structure to be stable, the hemisphere does not need to be completed. The hole left will be the bottom of the snowman.
Turn it upside down in an initial circle. Continue the same work. That is, lay circles in a checkerboard pattern (there should be 7 of them), gradually completing the ball. The topmost of them can not be installed. This hole is useful for fastening snowman parts.
Second detail: the head. It is made in the same way as the body. Only the initial circle is supposed to be made from 18 plastic cups.
Fastening details. Use super glue to fasten the head and body of the snowman. There may be an uneven seam at the attachment point. This defect is easily hidden by the tinsel of a scarf.
To add decorativeness to the craft and a festive New Year's effect, lay an electric one on the floor under the snowman. Christmas garland. Snowman and plastic cups will sparkle and shimmer like Christmas tree with the onset of dusk.

One of the simplest and most entertaining crafts for the New Year is a do-it-yourself snowman made of plastic cups. This figurine is made very simply, so in this light work I'm sure the kids will want to get involved too.
And the result is beautiful big snowman, which can be illuminated with diodes and placed next to the Christmas tree. From cups, you can make both huge and medium-sized or even a small figure.
It all depends on the size and quantity of the source material. The article provides step-by-step instructions and a video on how to make a snowman from plastic and paper disposable cups that will help you create this model in a matter of hours.
Most main question How many plastic cups do you need for a snowman?
- If you focus on a figure of 2 balls about 1 meter high - no less than 300 white (but not transparent) glasses. And this is the minimum amount.
- If you want to make a classic snowman out of 3 balls, you should stock up on 500 glasses, and it’s better to take it with a margin - 600-700 pieces. All cups should be white and preferably without rims so that the joints are not conspicuous.
You also need to keep in mind that the most stable figure is made of two balls. And if a third is added, you need to think of an additional support (base on the bottom of the first ball) or fasten all 3 with a cardboard stick at the back.
We will also need the following items:
- stapler (small staples);
- super glue (only transparent);
- colored paper and tinsel for decoration;
- colored cardboard to create a peephole, spout, etc.;
- a hat with sequins - you can buy it in any supermarket on the eve of the New Year holidays;
- knitted scarf.
And most importantly - we need LEDs for lighting. AT classic version they should be white color- then the snowman looks just like a real one.
Although it is quite acceptable to use other shades - for example, blue or yellow. Or you can even take a multi-colored flashing garland.
Do-it-yourself snowman made of plastic cups: step by step instructions
Plastic cups are inexpensive and almost weightless, so the entire manufacturing process is very easy in the literal and figurative sense of the word. The main requirement is accuracy. Just carefully create row after row, and then connect the balls, embed the diodes and decorate the figure.
Here's how to make a snowman out of plastic cups:
Step 1. We start with the lower ball - this is the base of the torso. The first row will consist of 25 cups or 30-35 depending on which sizes you choose. We will fasten the glasses with a stapler from the side of the rim, i.e. literally along the line to which tea is poured.

Step 2. It turned out such a round base - it is quite stable, so it can hold it in correct position the whole structure. Please note that all cups should lie freely relative to each other. And you don’t need to fasten them too tightly - the main thing is that the row is even, neat.

Step 3. We will arrange all subsequent rows in a checkerboard pattern: i.e. each upper glass lies between the two lower ones. Accordingly, each subsequent row is reduced by exactly 2 cups. Fastening between rows is also done with a stapler.

Step 4. So, the second row is ready. Further, the principle is quite clear - we do the third, fourth, etc. until you get a finished hemisphere. However, we do not close it completely. We do not finish the last 3-4 rows - we need to leave a small hole, as shown in the photo.

At the intermediate stage of production, by the way, such a ballet tutu is obtained - you can give it to the kids, let them play. You just have to stock up on new glasses.

Step 5. Well, now from jokes to business. We make the head. It may be the same or slightly smaller.
For example, the first row of the body was made of 25 elements - then the first row of the head will be made of 19. In this case, the head should have the shape of a real ball, we leave only the smallest hole in it, the size of which is 1 glass, and not 4 rows, as in the previous case.

Step 6. Now it remains to connect both halves together. We take 2 cups, on each we make longitudinal cuts of 4-5 cm at an equal distance. We insert their incision into the incision, as in the grooves and glue it with adhesive tape for fidelity. The result is a kind of rod, which is inserted into the body at one end, and into the head with the other.

Step 7. Actually, we have already made a snowman from glasses with our own hands. Both of its parts can be easily connected and separated, which will be needed when mounting LEDs or a garland inside the figure.
Let him rest for now, and we'll take care of the decorations. Let's make, for example, a cone of orange paper - this is a carrot nose.

Step 8. And also - eyes, buttons, a scarf made of colored paper. By the way, you can also make a hat yourself: we fold a sheet of colored cardboard into a cylinder, cut out a circle (floors) and insert one part into another, decorate with a ribbon. The result is such a nice little snowman - the main participant in the New Year's corporate party.

And now it remains to install a garland inside. You can visually see the entire process of manufacturing and installing LEDs here.
How to make a paper cup snowman
And how can you make a snowman out of cups if the holiday is already very close or there are a few minutes left before the start of a fun corporate party? No problem.
We run to the nearest store or coffee shop. But not for coffee, but for glasses for this noble drink. These containers are most often paper, so you can easily draw a cute face on them, which will, so to speak, humanize our snowman. And of course, let's not forget about colored paper, paints and other ways of decoration.

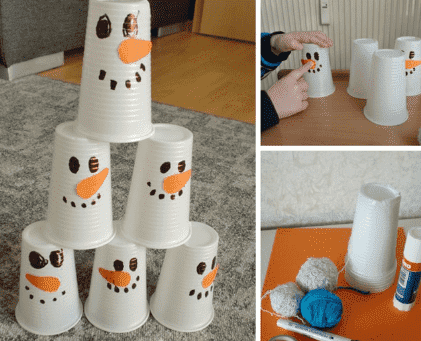
And you can go completely simple way and buy drinking yogurt. This is definitely a combination of pleasant and useful.

Here's how to quickly and easily make this cute figurine.
10 ways to decorate a snowman with disposable cups
Of course, there are a lot of options for decorating the figurine. You can, for example, generally stock up on glasses different colors- then you get such a snowman.

Or decorate it with diodes of a pleasant blue hue.

Another simple option is tinsel decoration.

Or such a “set” of a gentleman.

And of course, the infinite freedom of creativity gives "play" with the light. For the same figure, you can stock up on at least two diode garlands with different colors- it turns out a real New Year's fairy tale.

It has already been mentioned above that it is best to take white rather than transparent glasses. However, in principle this is not a strict rule.
With transparent containers, the snowman also turns out to be very interesting - it seems that it is made of magic ice. But you need to highlight it by all means - remember, for example, how pleasant the ice figures in the park glow.

Well here's the real one creative snowman. Cheerful, red and apparently sporty.

The head of the figurine can be made obviously 1.5-2 times smaller than the body. Then the model turns out to be especially accurate.

Or you can make 2 identical balls in general - this is a matter of taste.

And finally - an example of a model of 3 balls. It can be seen that she is, yes, unstable.
But this problem can be solved by leaning the figurine against the wall, and placing a pillow under the base. Perhaps this snowman is just already tired of the New Year's fuss - but still he is still in the ranks.

Here are some cute figurines you can create from almost waste material. A few hundred glasses and a little patience work wonders. Christmas miracles.
Happy holiday!
At first, it may seem that a do-it-yourself snowman made of plastic cups is extremely difficult step by step. You also need to have cups on hand, somehow fasten them together and in the end it’s not a fact that you get a decent toy. In fact, you need to throw all doubts away, because it’s easy to make a large or small snowman out of a plastic cup, and he will delight you with fun appearance during all holidays.
Important! The financial costs of creating such a snowman, even a very large one, are extremely small. But, in the end, you get a craft that is guaranteed to charge you with positive and only by its appearance cheers you up.
Do-it-yourself snowman from plastic cups, step by step with a photo
To make a snowman according to the first master class, you should have a sufficient number of plastic cups of the same shape and size on hand. You will also need plasticine, it is better to take black material and orange color. Also, you need either glue or a stapler to work.
Immediately, even at the beginning of work, you should think about making the snowman stable. For this, the bottom row of crafts cannot be done. perfect ball, it should turn out to be a hemisphere. In general, the course of work is quite simple, you need to lay out the glasses in a circle and fasten them together with either glue or staples. The first row of a large snowman, as in our pictures, takes about 25 glasses. But everyone can, at will, change the number of glasses up or down to get a craft of a different size. Do you already know what to cook?


The next step in how to make a snowman from plastic cups with your own hands is to use the same number of glasses for the second row. They are attached at the top of the first row, fasten in the chosen way: staples or glue. Each subsequent row should be smaller and smaller. All glasses have conical shape, so that, in the process of assembling crafts for each cup, you will be able to find your own suitable place.
It turns out that first the bottom lump is made to the snowman. But, as you know, this character consists of at least two lumps, and best of all - of three parts. Therefore, you need to start making a smaller round ball of the second one. To do this, glasses are already taken in the amount of 18 pieces, laid out in a circle, and then taking an ever smaller number of glasses. Repeat the process as with the first circle. Then turn the workpiece over, lay out a few more glasses nearby, but not completely. That is, the second lump will turn out to be not completely finished, as it should be.


Basically, you can stop there. If you make more than two lumps, as is the case with a traditional snowman, then the structure, due to its impressive size, may cease to be stable. Therefore, now the second ball is installed on the first one and you can start decorating. There may be a traditional carrot, and pieces different fabric, and a fake hat.

Advice! If you put a Christmas garland under such a snowman and turn it on, then the craft will glow with all the colors of the rainbow and cause even more positive.
Do-it-yourself snowman from threads step by step
In this version, we will not consider the process of how a snowman is made from plastic cups with our own hands, step by step, but from thread balls. It also turns out a beautiful and unusual snowman, which will be an excellent interior decoration for the New Year and Christmas holidays.
From threads you can make both large and small snowmen. The advantage of this craft, unlike plastic cups, is that even a large snowman can consist of three parts at once. Threads are lighter than cups, so this new year friend You can not only put it on the floor, but even hang it from the ceiling.

To make such a snowman, you will need three balloons, also a skein of black thread, PVA glue, scissors, some wind, buttons and beads, twigs and sticks to create additional decor. Since you need to make three balls from threads different diameter in order to properly assemble the craft, this is how balloons are inflated, which will become the basis for thread products. Thread the thread through the needle, pierce the container with glue with the needle and take out the thread already soaked in glue, start wrapping the ball with it. When the ball is completely wrapped in threads without gaps, it can be additionally smeared with glue and hung for 12 hours so that it dries completely.
After the three balls are completely dry, you will need to pierce Balloons to get rid of them. Now glue the thread blanks together to make a real snowman. It remains to make handles from the branches, hand a broom, tie a scarf and make a hat, do not forget about the elements of the face so that the craft is cute and beautiful.
AT this material a simple and how to make a snowman from plastic cups with your own hands is given, step by step. When the cup snowman is ready, he will delight you with an excellent appearance. If you want to continue creating fabulous new year characters, you can use the second master class and make a snowman out of thread.


