Paper helicopter model. How to make a paper helicopter with your own hands DIY paper helicopter
Elena Goryacheva
Master class on manual labor Paper making« Helicopter»
Target: development of productive activities.
Tasks:
1. Improve the ability to work from a finished pattern.
2. Consolidating the ability to create from paper volumetric figures.
3. Development of aesthetic taste.
Material required for work: color paper, colored cardboard, pencil, glue stick, thread, beads, popsicle sticks, black marker, sewing needle.

Sequence of work:
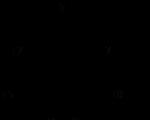
1. Using the pattern, trace and cut out a cabin from cardboard of any color helicopter – 2 parts.

2. Using a pattern from cardboard of any color, trace and cut out the chassis helicopter – 2 parts.

3. Trace around the pattern and cut out from blue paper glass for helicopter cabin – 2 parts.

4. Using the pattern, trace and cut out the tail propeller from red cardboard - 2 parts.

5. Trace and cut according to the pattern helicopter helicopter made of red cardboard - 2 parts.

6. Cut out a nose from cardboard of any color - 2 parts.

7. Cut from white paper eyes -2 details.

8. Cut out small circles - decorations, from paper any color folded like an accordion.
Let's start assembly helicopter.
1. We glue the chassis in the upper part to the middle of the racks, bifurcating the lower part.

2. Glue the 2 parts of the cabin together, gluing the landing gear between them at the bottom of the cabin and a thread at the top.

3. On both sides helicopter glue the cockpit glass.

4. Glue the nose on both sides helicopter, gluing both parts.

5. To the tail helicopter glue the propeller parts glued together.
6. Glue the eyes on both sides and draw a pupil with a marker.
7. Glue the two propeller parts together.

8. On a thread glued to the top of the cabin, use a needle to string a bead and two parts of the propeller glued together.

9. Glue circles - decorations - on both sides of the cabin.

The helicopter is ready.
We attach an ice cream stick to the upper end of the thread, with which you can control by helicopter.

Publications on the topic:
Goal: to teach children to cut out appliqué parts along a drawn outline, to put together a whole from individual parts, and to strengthen their ability to work.
Form of OOD: subgroup, individual. Goal: creating a pincushion as a gift for mom. Objectives: introduce children to the rules of safe handling.
To make a peony flower we will need scissors, paper of the desired color, a heat gun (or thread, a bamboo stick and for fun.
Notes on manual labor “Tulip made of paper” Goal: To teach children to fold paper in different directions. Develop children's eye, fine motor skills, and speech...
After listening to the song “Two cheerful geese lived with grandma,” the children and I decided to please grandma and make a lot of geese. The first stage of our work.
On the eve of Easter, we decided to hold a master class together with parents. For every holiday we make different ones.
Children love to play with various models of technology - cars, planes, helicopters. And a helicopter made with your own hands from paper will not only become your favorite toy, but will certainly be a legitimate reason for pride. There are many techniques for making a helicopter out of paper - this includes origami and paper models of helicopters that completely replicate real flying cars. In any case, making a helicopter out of paper does not require expensive materials or great skills, and the choice of technique for making it is determined by the age of the child and the amount of free time.
Paper helicopter using origami technique
We will need:
- A4 sheet of paper;
- ruler.
Manufacturing:
- Divide a sheet of paper into a square and a rectangle, bending the corner. The square part will be used to make the fuselage, and the rectangular part will be used for the propeller.
- Take the square part and bend it in half and diagonally. Let's mark the inflection lines.
- Let's make a triangle out of the square, putting the sides inside.
- Bend the side corners of the triangle towards the center.
- Bend the side corner to the vertical axis.
- Bend the upper part of the right petal to the right, marking the inflection line.
- We straighten the corner and fold it down.
- Bend the folded corner to the right.
- Let's tuck the corner into the formed valve.
- Let's repeat all these operations for the second corner.
- Let's turn the workpiece over to the other side and perform the same operations of folding and tucking the petals.
- We inflate the workpiece through the hole, resulting in a cube.
- Using a ruler, press down the top edge of the cube and fold it inward.
- Let's connect the top edges of the cube together and get the fuselage.
- For the screw, take the remaining rectangle and bend it in half lengthwise.
- Fold the resulting strip in half across. Fold over the top and fold it in half again. Then we divide into two more parts those quarters of the sheet that are adjacent to the center.
- Bend the blades in different directions - the propeller is ready.
- Let's bend the corners of the fuselage in different directions.
- Insert the screw into the resulting slot. Our helicopter is ready to fly.


Paper helicopter using kirigami technique
We will need:
- strip of paper;
- ruler;
- pencil;
- scissors;
- clip.
Manufacturing:

Bend the propeller blades so that they are perpendicular to the fuselage. The helicopter is ready for launch.
Paper model of a helicopter
This is perhaps the most labor-intensive option for making a helicopter out of paper. As a result, we will get a beautiful bright paper model of a helicopter that will not be able to fly, but will be a good gift for dad, grandfather or older brother.
“Making a model of an airplane and a helicopter from colored paper with your own hands.” Master class with step-by-step photos
Degtyartseva Natalya Vasilievna, teacher of MAU DO DDTT, Vladikavkaz, Russian North Ossetia - Alania
The work is intended for children aged 7 years and older, teachers and parents.
Purpose: interior decoration, a gift for family and friends, an exhibit for an exhibition of technical creativity.
Target: make an airplane and a helicopter from colored paper with your own hands.
Tasks: educational - master the methods of manufacturing airplanes and helicopters; developmental - to develop the practical skills of students when working with scissors, a tool for cutting paper, to develop fine motor skills, imagination and imagination of the child; educational - to cultivate aesthetic taste.
Materials and tools: colored paper, paper cutting tool, scissors, glue stick.

Puzzles
for children about an airplane and a helicopter.
Not a bird, but a flyer
Not a truck, but with a cab,
Not a bat, but with wings.
(Airplane)
For him, his home is
This is our airfield.
He's come a long way
To get some rest.
And when he rests,
Will take flight again.
(Airplane)
Who can tell me what kind of bird it is?
In the sky, like the wind, rushes,
White draws behind himself
A trace in azure blue?
And the pilot is driving it! –
What is this? - … (Airplane)!
What kind of bird:
Doesn't sing songs
Doesn't build a nest
Is it carrying people and cargo? (Airplane)
An iron bird flies in the sky,
Leaving a trail, making noise and buzzing -
It takes people to distant lands...
This is not a dove or a sparrow.
(Airplane)
Big bird -
Steel mare
Flying across the sky
The people sit inside it.
(Airplane)
He's in the vast ocean
The cloud touches the wing.
Will unfold under the rays
Casts silver...
(Airplane)
Thunder rumbles in the skies
And not a cloud around.
The song sings loudly
Rotary wing (Helicopter)
V. Struchkov
Miracle – Yudo - Dragonfly
Glazed eyes.
If it rotates its wings,
Feels every wind.
(Helicopter.)
Iron Bird
It's spinning in the sky.
(Helicopter.)
The car is hanging in the air.-
Stands still. Doesn't fly.
She saves souls
At sea and on land.
(Helicopter)
Who's to the high skies
Raises his belly himself.
There are troops in the belly
For a sudden rush.
(Helicopter.)
What kind of fan is this?
Are you hovering above the ground, guys?
And it roars and rumbles,
Even though it doesn't have wings, it still flies?
(Helicopter)
Silver belly
Spinning ear.
Spinning, buzzing, shaking -
In the sky, like a bumblebee, rushes.
(Helicopter.)
Progress of step-by-step work.
Making an airplane from colored paper.

Cut 3 strips, 2 cm wide for the main parts of the aircraft and several strips 1 and 0.3 cm wide for decorating the parts of the aircraft.

Glue the edges of one wide strip to form an oval. Cut the other strip in half, fold it into unequal parts and press along the fold. Then fold these strips into unequal parts on the other side to form two folds at a distance of 0.3 or 0.5 cm.

Cut corners off airplane wing parts. Press the oval at a distance of 2/3 of the length of the oval and glue the sides of the oval to each other.

Make two folds 0.5cm apart on the tail of the plane. Glue the stripes decorating the wings and base of the plane.

Glue the wings to the base of the plane.

Make airplane wheels from 3x1cm strips.

Glue the wheels to the back of the plane.

Decorate the plane with triangles and other figures left over from cutting out the plane parts. The plane is ready.

Making a helicopter from colored paper.

Prepare parts for a helicopter in the same way as airplane parts. Make an oval from a 20cmx2cm strip. Let's make the tail of the helicopter, as shown in the photo. Cut and round the edges of 4 strips 3x0.5mi and 2x0.3cm. Let's fold the edges of one strip of different sizes. An airplane can also be made from these parts. We will make wings for the airplane, as shown in the photo.

We will paste a blue stripe, 0.5 cm wide, to decorate the main parts of the helicopter. To decorate the propellers, cut out strips with rounded edges half the size of the propeller blades.

Let's glue the wings for the airplane, as shown in the photo.

For a helicopter: glue two yellow strips with curved edges to attach the propellers. We glue the propeller blades at one point, as shown in the photo. Let's make the sides from 7x2cm rectangles, bending the edges for gluing 0.5cm. Decorate the sides with strips of blue paper.

Let's glue the sides and wheels to the helicopter.

Our helicopter is ready.

This is what our colored paper crafts look like: an airplane and a helicopter.

Adviсe.
1. It is better to make the main parts of an airplane and helicopter from thick colored paper, and make decorations from paper of regular thickness.
2. It is better to fasten the main parts with PVA or “Moment” glue for more thorough fastening.
Thank you for your attention. I look forward to your feedback.