New Year's ball made of disks on a street tree. Do-it-yourself large Christmas tree toy
Interesting ideas for creating New Year's toys with your own hands.
On the eve of everyone's favorite holiday, each of us wants to create wonderful toys with which we can decorate the forest beauty. There are a lot of ideas and very interesting options that can be brought to life, creating a very warm, cozy atmosphere in the house and a great mood. Let's take a closer look at all sorts of ideas and unusual ideas, because there is less and less time left before the New Year's fairy tale every day.
DIY felt Christmas tree toys: patterns, master class
Handicraft lovers offer many ideas for sewing Christmas tree decorations. To do this you will need:
- Pattern corresponding to the diagram
- A variety of felt colors to match the design
- Pencil, pen, ruler
- Needle and thread
- Scissors, glue, filler
- Necessary materials for decoration
- Transfer the pattern cut out of paper onto the fabric.
- Carefully cut out all the parts, sew, leave a small area and fill with cotton wool or padding polyester.
- Then sew up the remaining part, sew on the decor: nose, buttons, scarf, hat, gift box and stylish belt.
- The toys are ready, don’t forget to make a beautiful loop.

You can make these wonderful forest beauties or a warm and cozy home, which are ideal for creating a festive mood. The technology is the same as described above.

Felt toys


DIY felt toys
For decoration, you can use everything that your imagination suggests, experiment and get real pleasure from the process itself.
DIY patterns for Christmas tree decorations made of fabric
Using this pattern you can sew a very beautiful snowman that can be hung on the Christmas tree or placed under it. Your children will certainly appreciate such beauty.

For such a snowman you will need:
- thick white fabric and red for a hat and scarf
- small buttons or beads
The process itself does not take much time:
- Using the pattern, cut out the body of the future snowman
- fill it evenly with cotton wool
- sew original buttons
- cut out the head separately
- embroider your eyes and smile
- then attach the nose
- after all the main parts are sewn, start decorating

Such a variety of toys can be made very quickly, from fabrics of different colors, just show yourself. An original and very positive star will lift your spirits.


Fabric star

You can make it voluminous, it will look very unusual, and a heart or Christmas tree will fit perfectly into a series of various Christmas tree decorations. The main thing is that you put your whole heart and soul into it.
DIY children's Christmas tree toys for kindergarten: photo
On the eve of the New Year holidays, every preschool children's institution organizes exhibitions of very interesting and original Christmas tree decorations. Now that there are many different materials and detailed descriptions, the child himself will be able to make such a craft with great pleasure.
Parents, of course, can help their child create a real masterpiece and support him in everything. There are a huge number of different options, here are just a few of them.
Everyone in the house has a lot of buttons in shape and color, with their help you can create such very simple at first glance and unusual toys. The child will show his imagination and discover new abilities.

New Year's decorations made from buttons

And using ordinary napkins with a New Year's pattern, you can create a real fairy tale. The main thing is that it is very exciting!

Napkin toys

DIY New Year's toy cockerel: pattern
There is very little left before the end of the year. We all know that the coming year will be born under the sign of the fiery rooster. Of course, every home should have such a toy hanging on the New Year tree.
It can be made from multi-colored scraps of fabric, plasticine, colored paper and cardboard, and even plastic bottles. To make the toy look good, show your imagination and, most importantly, decide exactly how it should look.
You can experiment by combining different materials, but do not forget about safety and make toys so that they do not ignite very quickly, and all New Year holidays will delight you with their beauty. A little hint:
- make a body out of fabric, filling it with cotton wool.
- scallop and wings made of multi-colored plastic.
- Sew buttons instead of eyes.
- Cut the paws from disposable plates.

Symbol of 2017

New Year's Cockerel with a pattern

DIY toy
Beautiful DIY Christmas tree balls: photo
These very simple and beautiful balls can be made using a regular tennis ball, colored paper, beads and glue. Even small children and their parents can make them:
- Choose your favorite color in advance and make flowers or snowflakes.
- Apply glue to the surface of the ball and leave for 5 minutes.
- After complete drying, attach the previously selected decor to the middle of each flower and make a neat loop.
- You can also decorate a foam ball with decorative cord mixed with small plastic beads.
- Deepen the end of the cord into the inside of the ball and use glue to secure it at the base, then glue it in a spiral shape.
- You can make a heart and decorate it beautifully with beads.

DIY Christmas balls

Tennis ball ball

Decorate with fabric
Thus, update your old toys. It's very easy and fun. You can also make very original foam balls by decorating them with interesting buttons or colored pebbles.
DIY Christmas toys made from colored paper
You can make a lot of interesting toys from paper: snowflakes, garlands, various animals, angels, cones, and so on. Everything is done very simply, the main thing is desire and imagination. For example, to make an angel, you need:
- Cut out one large rectangle and two small ones.
- Fold them like an accordion, attach the wings to a large square body.
- Take a wooden bead, draw eyes, nose, lips, eyebrows and attach it to the angel using glue.
- If you wish, you can add additional details that you want to focus on.


Angel made of colored and white paper

DIY Christmas tree toy
- Look at the picture and cut out a large snowflake from paper for yourself; it will become a decoration not only for the Christmas tree, but for the whole house.

Paper stars

DIY Christmas tree star

Christmas star
- To make a cone, you need to cut squares of the same size and bend two edges inward in each of them.
- Then attach to a pre-prepared form.

Paper cone

Christmas tree toy made of paper
DIY Christmas toys made of cardboard
Such original decorations can be made quite quickly. To do this you need:
- take a regular postcard with a beautiful design.
- cut it into even pieces.
- secure on both sides with a button.
- and then spread it evenly into a ball shape and attach a loop of tape.

Cardboard toys

Cardboard Christmas tree toy

Openwork cardboard toy
To make such a miracle star you need:
- Cut a square of any size, fold it in half and diagonally.
- then lightly make small cuts at the corners.
- fold them into triangles and glue two sides together for volume.
- make another star in the same way, and glue two together, without matching the directions of the rays.
- can be decorated with sequins or small beads.

Christmas tree toy made of cardboard

Openwork star
DIY Christmas tree decorations from scrap materials
Every home has a huge amount of used materials from which you can make very unusual decorations that will amaze with their simplicity and practicality. It is interesting to do them with young children, developing their imagination and fine motor skills. Give your child the opportunity to express himself.
There are a huge number of ideas, everyone can find their own option:
- You can make funny toys out of peanuts by decorating them and drawing funny faces.

Christmas tree toy made from peanuts

- You can make smiling snowmen from ordinary Pepsi or wine caps that will lift the spirits of all family members.

Toys made from lids

You can make a chic toy out of wine bottles

- Snowflakes made from cotton swabs or a spruce branch made from corrugated paper look very original.

Snowflakes made from cotton swabs

DIY bright snowflake
- And if you have stocks of multi-colored threads, then make beautiful decorations by making a wire frame in advance.

Christmas tree toy made of threads

DIY Christmas tree toys


Get inspired by simple things and create!
DIY Christmas toys for a large street tree
In order to create such beauty you need imagination and inspiration. Each of these decorations will not take you much time, but will delight not only you, but also all residents of the city. When choosing a toy, the main thing is to follow three basic rules:
- practicality
- strength
- originality
There are plenty of options for a flight of fancy. Can be used:
- packages
- cups
- baskets
- gift boxes of different shapes and sizes
- threads
Various materials for decoration:
- rhinestones
- glitter
- rain
- beads
- beads
For example, to make a ball or a snowman from cups, you need to make a frame and then attach flower-shaped cups to it. For beauty, you can decorate with rain or sparkles.

Decoration for a big Christmas tree

Balls for street Christmas tree
You can make wonderful toys from disks; you just need to stick a variety of New Year’s pictures on both sides of the media.

DIY New Year's toys from plastic bottles
Many of us never even thought that such beauty could be made from ordinary plastic bottles. The process is very exciting and interesting.
For balls, lamps and bells, you can take bottles of any color. They are very easy to make and don't take much time.
Glittery ribbons or pretty stickers will make the finished product even more beautiful. Penguins look very funny, in the picture you can see detailed, step-by-step instructions on how to do it.

Santa Claus is simply incomparable; it doesn’t take much time to make it either. Take a plastic bottle, make a beard, eyebrows and the side of a hat using disposable small spoons, paint the body with paint. If you wish, you can decorate with rain.


Funny plastic toys
A beautiful and original DIY New Year's toy for the competition
For such a wonderful toy you will need:
- Bunch of straw or cotton swabs
- A piece of burlap
- Thin wooden sticks and branches
- Dry leaves, rose hips
- Scissors, glue, knife and small sponge
To start:
- Make a ball or buy a ready-made one from polystyrene foam.
- Place a napkin on top, slightly crumpling it, and apply paint.
- After complete drying, start creating a composition: a cozy home.
- For the roof, use straw or cotton swabs; lay out doors, windows and fencing using thin wooden sticks.
- For beauty, use rosehip branches and fruits to make a bouquet that will fit harmoniously near the house.
- Lay a path with burlap and decorate on top.
- Finally, use delicate blue flowers to create a background and leave to dry completely.
- If you wish, you can add additional details that you consider necessary.

DIY Christmas toys made from cotton wool
To make the Snow Maiden from cotton wool, first:
- Make a wire frame.
- Then gradually take pre-prepared cotton wool of the desired color and make felt boots and mittens.
- Next, for the body, take some paper and glue it, put a layer of cotton wool on top for outerwear.
- Now you can start working on the head. It is better to make it from foam plastic and carefully paint it with paints.
- But it’s best to make the hat and braid out of cotton wool. It will look very impressive and elegant.

Cotton Snow Maiden

- You don't need a frame for such a cute Christmas tree.
- You can simply cut out the shape you like from cardboard, cover it with ordinary white cotton wool, and then paint it with acrylic paints.
- If desired, you can decorate the Christmas tree with beads or multi-colored balls and roll it in salt, which is used for baths.


DIY Christmas tree decorations made from satin ribbons
Crafts made from satin ribbons are very popular. The finished products are very elegant and beautiful.
In order to make any decoration for the Christmas tree, you will need a certain number of ribbons, it all depends on the size and design. To make a forest beauty:
- Cut out a small square and fold it horizontally (you get a triangle).
- Then fold one edge over again and secure with hot glue.
- When you have made the required number of such petals, attach them to the frame, decreasing the number towards the top.
- Decorate with beautiful decor and you can give it to your loved ones and friends. They will definitely appreciate such a wonderful gift.

Christmas tree made of ribbons

Christmas tree made of satin ribbon
To make a voluminous rose:
- Take two wide satin ribbons of different shades of the main color.
- Start forming the center of the flower, twisting it into a spiral and turning one edge to the right.
- So for the ball you need six of these roses, which you then simply glue to a pre-prepared base.

Christmas ball made of satin ribbons

Volume roses
DIY Christmas tree decorations made from light bulbs
You can make such bright toys from burnt-out light bulbs, one look at which immediately lifts your spirits, and your hands themselves begin to create such beauty. For decoration you can use:
- glitter
- rhinestones
- beads
- shiny ribbons
- toothpaste
- acrylic paints
- stickers
- voluminous napkins with beautiful patterns

Christmas decorations in sparkles


Light bulb toys


Light bulb decorated with paints
You can create entire compositions, it looks gorgeous. Minimum financial costs, effort and energy. Children will be involved in this process with great pleasure and will receive a lot of emotions and pleasure.
DIY Christmas tree decorations made from salt dough
Children love to make crafts from salt dough, you can get creative, and the process of making the dough itself is very exciting:
- Apply the dough to the pre-selected pattern and place it in the oven for a certain time; when it is browned, you can stretch it out.
- When it cools down a little, start decorating.
- You can use cinnamon, lemon, coffee, or simply decorate it beautifully with paints.
- You can simply make a palm print on a piece of dough, finish drawing the face of Santa Claus and a wonderful toy for the Christmas tree is ready.

Dough toys

Edible toys

DIY figurines

New Year's attributes from dough
DIY Christmas toys made of polystyrene foam
The easiest way to make an original toy. Cut out a ball of the required size from polystyrene foam or buy a ready-made one and decorate it as your heart desires. Nowadays, there are a huge number of jewelry beautiful in shape and color that will make an ordinary, inconspicuous ball sparkle in the light and radiate.

Foam decorated with beads

Styrofoam toy
You can make a cute Santa Claus in 15 minutes by simply gluing a design onto the foam and tracing it with a felt-tip pen. Color and decorate, and smiling Santa Claus will definitely bring you happiness.

DIY Christmas tree toys made from threads
Prepare threads, glue and balloons of different shapes. A child can make such beauty if you explain and show him the essence of the process:
Snowman made of threads step by step

DIY New Year's toys made from pine cones
What would New Year be without pine cones and funny toys made from them? There are very simple toys where you just need to spread glue and dip it in glitter and the sparkling cone is ready.

To make the animals, you need to work a little longer:
- Find a suitable shaped pine cone, a wooden ball, artificial hair and beautiful ribbons.
- It’s not very difficult to do, it just takes a lot of time for all the parts to dry and be ready to hang on the tree.

Or make a wonderful Santa Claus, additionally using plasticine for a hat, mustache and beard.

- You can also print out a beautiful design and stick it on a disk to make an accent, for example, on snowdrifts or snow-white treetops, apply glue and sprinkle with semolina or salt, you can add glitter.

- The disk looks very unusual in combination with tubes, which are laid out in the shape of a polygon.
DIY Christmas tree decorations made from pasta
Creating with pasta is an all-consuming process. For toys, you can choose a variety of types of pasta. Just lay out the drawing of the future snowflake, starting from the center.
New Year's figures made from pasta
Video: Master class: DIY New Year's toys
DIY Christmas tree made from disks- an interesting type of creativity for children and adults. Old CDs that have been collecting dust on the shelf for a long time will now find a new life, becoming a bright decoration for your home before the New Year holidays. They can also be used to create original Christmas tree decorations, balls, snowflakes and garlands, using the latest techniques and complex materials. It will be interesting for children to create using cotton pads, because they have already worked with them in kindergarten, when they made winter applications.
CDs have not been popular storage media for several years now, because films and music can be found on the Internet and recorded on a flash drive, but do not rush to throw them away, because they can become excellent material for home creativity. If you are preparing for a New Year's party, where there will be loud music and fun, then collect all the old CDs at home, as well as borrow from friends, and place a large triangle on one of the walls of the room - a fantastic Christmas tree. It will sparkle everything with party lights and set a special mood for the entire holiday.
DIY Christmas tree made from disks
DIY Christmas tree made from disks- this is a present for your programmer friend; such decoration can be placed on the office desk. Such a gift will also please the musician, the main thing is not to spoil the discs with his favorite music.
Today, old and unnecessary CDs are in every home; if 5-6 years ago they were in demand, now at home there are heaps of CDs with films, music and programs that we have not used for a long time. Increasingly, unnecessary CDs end up in landfills, but creative people do not throw away unnecessary materials, but look for suitable creative ideas to breathe new life into them.
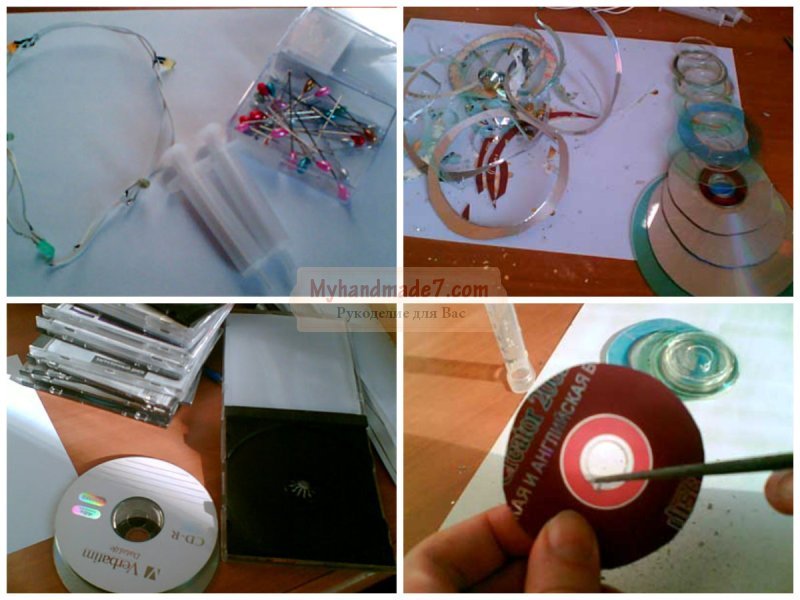
LEDs with a shiny surface are an ideal option for creation and crafts; they themselves are bright and immediately catch the eye, so they do not require special decoration or decoration. But in this case, we will make a real New Year's souvenir and decorate it with an LED garland; for it we will need five LEDs, which will be connected in parallel, and batteries to power them. We recommend using a 4.5V square battery or replacing it with two 1.5V AA batteries connected in series. You may need the help of one of the men who understands electricity.
We will use two 5 ml syringes as a base. For a pyramid imitating a Christmas tree, we will take 10 SD, since the Christmas tree should consist of ten circles with a successively decreasing radius. Each next circle should be one centimeter smaller than the previous one. To cut an even circle, it is advisable to first draw a contour with a pencil on the side where the drawing is applied to the SD, although even if your circle did not turn out perfect, this will not be noticeable in the final version of the craft.
Since we will also be threading the wire for the garland, we need to cut a groove in each LED that would fit two wires.

The easiest option for creating a base is to use plastic syringes. The piston can be removed immediately; they are not needed for this. We put the first largest circle on the base syringe, and pass the garland through the central hole and secure it in the groove. Now under the lower LED we should have two wires left from the garland. To secure the position of the lower disk, you need to secure it with a stationery needle. You need to pierce the plastic body of the syringe almost right next to the CD. Thus, we will fix each next layer Christmas trees made from disks with your own hands, photo process will help you complete the craft.
DIY Christmas tree made from disks
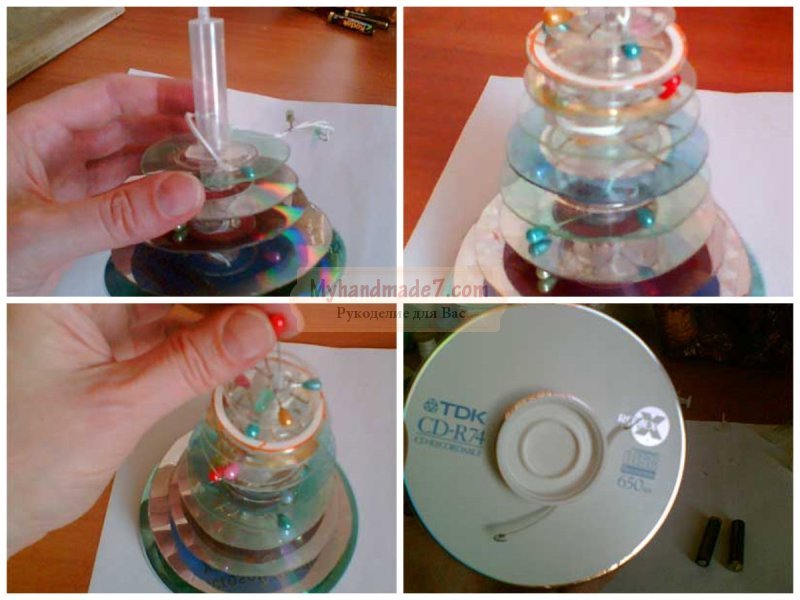
We continue to look at the step-by-step master class, how to make a Christmas tree from disks with your own hands: we will attach the subsequent LEDs, now securing them on both sides (bottom and top), while piercing them in opposite directions so that the heads of the pins are located randomly along the base, because they will also serve as a kind of decoration.
For the next SD, you first need to prepare a place: pierce the base with a pin, stepping back about one centimeter from the previous one. Then place the disk on the base and secure it with a pin at the top. When fixing the next layer, do not forget about the garland, which must be passed into the groove.
When the base of the first syringe runs out, put the second one on top and continue to thread the CD onto it. And the tip of the upper syringe must also be inserted with a pin, this will be our peak.
Now you need to design a stand where you can place the batteries. You can use a bottle cap from a shampoo or medicine bottle as a stand.
You can decorate the Christmas tree with tinsel, which will fill the space between the layers. It is advisable to choose tinsel that is not too fluffy; if necessary, long hairs can be trimmed with scissors. After decorating, the Christmas tree should not lose its cone-shaped shape.
In the end, all that remains is to connect the ends of the garland wires with the poles of our battery, and you will see how our DIY Christmas tree made from CDs, master class helped to complete it, will light up and become a bright decoration of the office desk. You may connect the poles incorrectly, so if the Christmas tree does not light up the first time, the poles should be changed.

DIY Christmas tree decorations made from disks
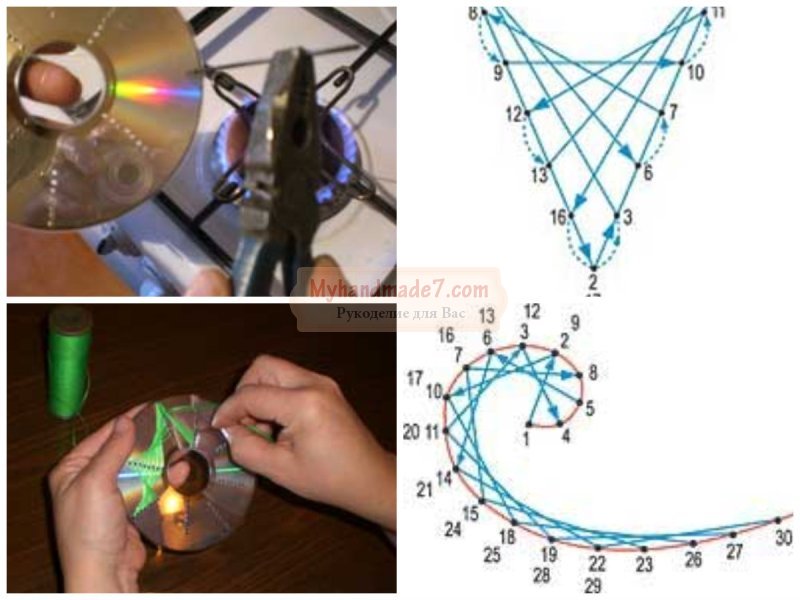
You can do DIY Christmas tree decorations made from CDs in isothread technique. This technique allows you to create various patterns on the surface (in this case, we will use the round surface of the disk as the basis). To create a pattern, you can use silk threads, wool, floss or regular sewing threads.
In addition to the old CD, we will also need scissors, a needle, a ruler and a compass. The drawing must first be drawn on paper: circle the round base of the disk. You need to put dots on the drawing, which will then be used to create a pattern. Our template needs to be cut out and transferred to the surface of the disk.

Holes should be made in the CD according to the template. To do this, we will need a thick needle, which we will heat over the fire and make holes with it. Since the needle will become completely hot when heated, you can hold it with pliers.
Next, you need to insert a thread into the needle and start creating an original pattern, and you can find some patterns in our master class. Experienced craftswomen who have been working in the filament technique for a long time can come up with various patterns on their own. Using the isothread technique, you can combine various shapes: circles, triangles, ovals and diamonds; different colors of threads, overlapping each other, create fancy patterns.
Using this principle, you can make a snowflake on an LED base, but first the circle must be divided into 5-6 sectors, and a symmetrical pattern must be drawn for each ray.
There is nothing easier than doing it in the “Disco” style; with such toys you can decorate a tree that stands on the street, and they will play with bright reflections in the light of street lamps.
For such a ball we will need a foam round base and thermal glue that will reliably glue the elements. The CD must be cut with scissors into small squares, which must then be glued to the base. We will glue the first row in the middle, placing the shiny squares close to each other. Then you need to glue them in a checkerboard pattern until the surface of the base is completely filled. On one side you need to make a loop so that the ball can be hung on a tree branch.

DIY Christmas tree: crafts made from cotton pads
Now let's look at other materials for creating original New Year's decor, we have already done it, and now we can get a beautiful one. DIY Christmas tree - craft from cotton pads. This type of creativity will be interesting to children and experienced needlewomen.
As a result, we will get a lush Christmas tree, shrouded in white flakes of snow, and for this craft we only need a sheet of whatman paper, glue and a pack of cotton pads.
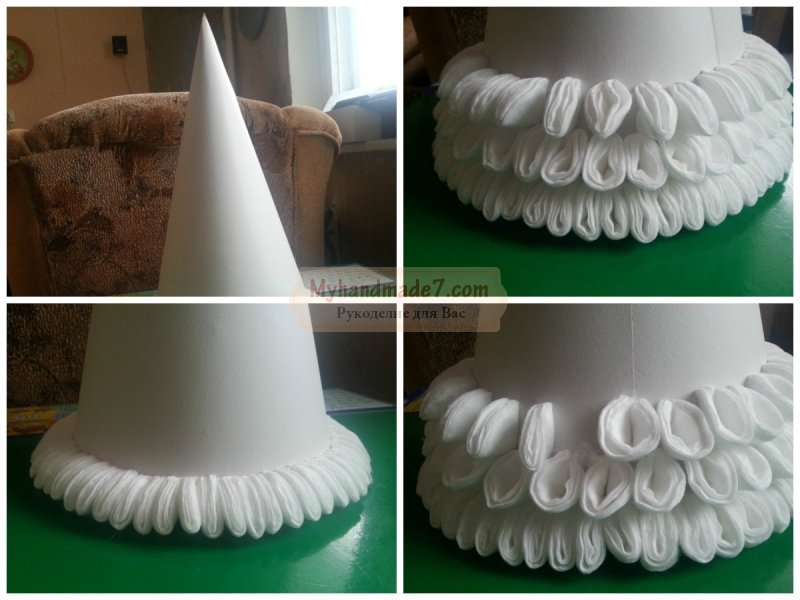
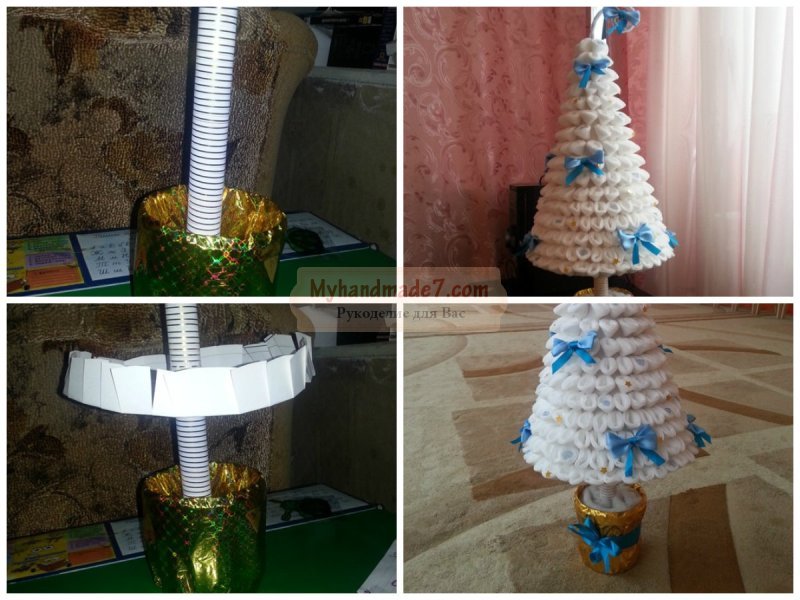
Not difficult at all make your own Christmas tree from cotton pads: the main element will be a disk folded in four (in half, and then in half again, and fixed at the very tip with a stapler), and the base will be a paper cone. Depending on what size you have chosen for your craft, you will need to make a cone. A small base can be made from a sheet of cardboard, but for a large cone you will need whatman paper. A sheet of paper must be rolled into a “bundle”, the joints glued together and the excess part cut off from the bottom.
It is necessary to glue the cotton elements from the very bottom, placing them as close to each other as possible. At the very end of the craft, we will give each element volume by straightening it. Next, you need to glue the next row and so move to the very top of the cone.
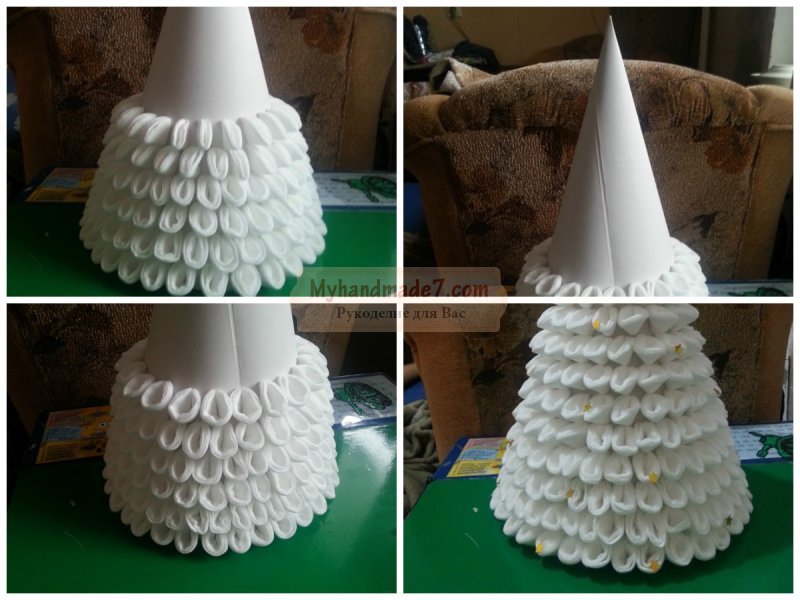
Don’t forget to also decorate our beauty, for example, you can decorate the edges with sparkles: coat the edges with PVA glue and sprinkle with sparkles. Glue beads or artificial pearls to the center of the elements.
For our tree we also need to come up with a decorative pot and trunk, as for any topiary, so that DIY Christmas tree made from cotton pads took center stage in the holiday decor.
DIY Christmas tree made from cotton pads
DIY Christmas tree made from cotton pads- This is also a simple application for a preschool child. It is very simple to do; you need three disks, from which you can use scissors to cut out three triangular elements of different sizes, and then glue them onto a cardboard base.
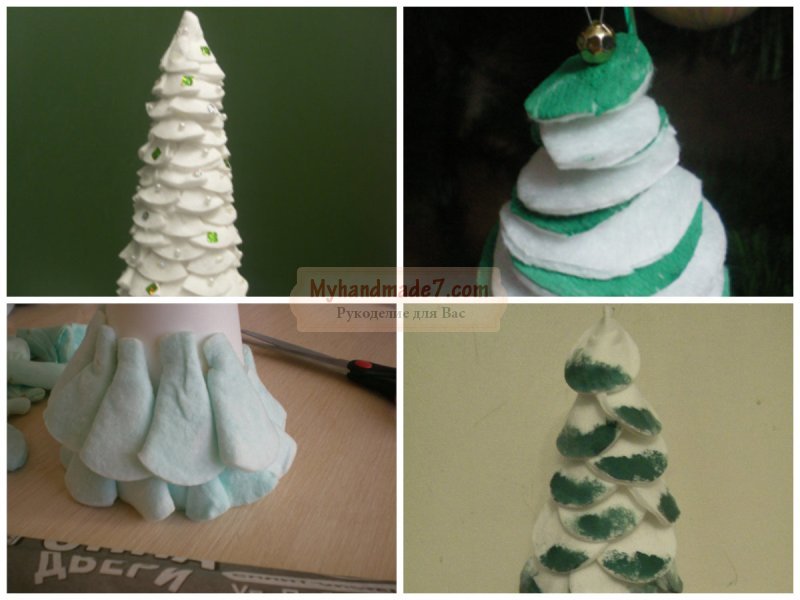
You can also make a fluffy Christmas tree on a cone-shaped base, but this time the elements are created a little differently. This craft is somewhat reminiscent of the cutting technique, known to every child from an early age, when he makes appliqués using napkins. The essence of trimming comes down to the fact that only the center of each element is glued to the base, and its edges “look” upward, creating the volume of the craft. In this case, each subsequent element must be glued as close as possible to the previous one so that the edges do not fall apart.
Instructions for making crafts for a street Christmas tree.
With the New Year holidays approaching, many are eager to decorate their New Year's beauty. Very often, residents of private houses do not place a New Year’s tree inside their home, but prefer only to decorate Christmas trees that are located on the street. It is worth noting that it is not practical to purchase expensive toys to decorate such a Christmas tree, so they can be made from scrap materials.
There are many options for making Christmas tree decorations for an outdoor tree. For this purpose you can use:
- Cardboard boxes
- CDs
- Plastic bottles
- Foil
- Toilet paper and towel cylinders
- A variety of waste, such as cardboard, broken old Christmas tree decorations, old books, postcards, scraps of New Year's tinsel
From all this you can build very nice Christmas tree decorations.
Street Christmas tree 
 street tree
New Year's crafts for a street tree from CDs - snowflakes, balls: manufacturing diagram, photo
One of the simplest and most affordable options for making Christmas tree decorations is the use of CDs. You can make snowflakes and balls from them. To make snowflakes you will need a CD and several cocktail straws. You will also need tinsel for decoration and some thick wire. You will need a glue gun or regular hot glue.
Instructions:
- Take a CD and thread a thick wire through the hole. Place cocktail straws on it, forming a cute snowflake.
- You can decorate the folds and wire with New Year's tinsel.
- To prevent the disk from dangling inside the snowflake, secure it with hot glue.
Next, start making the ball. You will need some side cutters or a very sharp utility knife. You need to cut out several hexagons from the disk. After this, glue them together using hot glue. Decorate the joints with tinsel.


New Year's garlands for a street tree: stencils, photos
New Year's garlands are most often made using paper, foil or some kind of candy wrappers. Below are templates for making garlands for the New Year tree with your own hands. Most often they are made of colored paper or cardboard.


New Year's clock from a cardboard box for a street tree: templates, photos
A good option for decorating a New Year's tree, . They can be made from a cardboard box. They are made according to the principle of an old clock in the form of a house. You will need a cardboard shoe box, some cardboard, and paper for decoration. This could be gift wrapping paper or foil, as well as glue, markers, and a few sheets of paper.
Instructions:
- You need to make a rectangular frame. Attach the roof to it by bending the cardboard into a corner. Fill the voids at the front and back using a triangle of cardboard.
- When the frame is ready, start decorating it. To do this, lubricate the surface with glue. It is enough to apply the adhesive not to the entire area, but only to the ends. That is, along the perimeter. Glue on foil or wrapping paper.
- Glue a circle in the center, it will be a dial. Apply numbers and attach arrows. They can be paper or simply drawn.

 clock from a cardboard box
 Large candies for a street Christmas tree: stencils, photos
Large candy canes for your outdoor tree can be made using paper towel cylinders or toilet paper. You need to take some nice wrapping paper and simply wrap it in a cardboard cylinder. You can tie the corners with beautiful ribbons or pieces of tinsel.
 candies for street tree
 Candy stencil
 Christmas decorations made from plastic bottles for a street Christmas tree: diagrams, photos
Plastic bottles are a real boon for making Christmas tree decorations. With their help you can make both New Year's balls and cute compositions. There are several options for making toys from a bottle. The first option is to use only the bottom.
Instructions:
- You need to cut the bottoms and glue them together.
- Decorate with sparkles, rhinestones, ribbons or tinsel.
- You can glue it both in the shape of a ball and in the shape of a regular New Year’s circle, which is quite flat.
You can also make a composition from plastic bottles. The cylinder itself is used for this. To do this, use transparent plastic bottles made of unpainted plastic. It should be completely transparent, not green. You need to fill the insides with some nice content. It could be artificial snow. The edges at the top and bottom are closed. To do this, you can use either cardboard or cut-off lower parts from plastic bottles. Decorate the gluing areas with New Year's tinsel or cotton wool.


New Year's bells for a street tree: stencils, photos
An excellent decor option are New Year's bells. They can be made either flat from cardboard or from paper. They can also be voluminous. You can use plastic cups for this. You need to cover the cup with wrapping paper or foil. Inside you can glue the dangling part itself, which rings. It can be made from a plastic spoon, which is pre-painted with shiny paint.


 bells for a street tree
 Balls from plastic cups for a street Christmas tree: templates, photos
You can make some very cute toys from plastic cups. There are several manufacturing options.
The first is a New Year's ball. In this case, the plastic cups are glued together like a ball. It turns out to be quite large. In order to reduce the size of the ball, you can use small glasses - shot glasses. If you want, you can make a New Year's ring. To do this, cups in the shape of a ring are glued together. You can decorate such toys using New Year's tinsel, old broken toys, and sparkles.


Volumetric Christmas tree decorations made of foam plastic for a street Christmas tree: instructions, photos
There are quite a lot of options here, since polystyrene foam is a fairly universal material. You can cut out balls and square circles from it; the simplest option is to make gift packages from polystyrene foam. You need to cut a cube out of foam and cover it with wrapping paper. Stretch a ribbon in the center of each side and tie a large bow in the center. You will get a box with a gift.


Toys made of paper, cardboard for a street Christmas tree: stencils, photos
Below are simple toys made from paper and cardboard.


Pasta balls for a street Christmas tree: instructions, photos
Christmas tree decorations made from regular pasta look very unusual and cute. You can use them to make both New Year's balls and a Christmas tree. If you are making a small Christmas tree, you need to roll a cone out of cardboard and cover it with feather pasta. After this, using spray paint, the Christmas tree is painted in the required color. Most often, gold or silver paint is used.
You also need to make New Year's balls from pasta. To do this, the prepared base is pasted over with pasta and painted in the color you like.


Colored ice balls for a street Christmas tree: instructions, photos
An excellent decoration option is to use ice balls. They are made from ordinary balloons, which are filled with water and dye. Find more detailed information . There is a complete description and instructions for making ice balls for the New Year tree and decorating the area near the house.


Crochet balls for a street Christmas tree: diagram, description, photo
If you love crafts and know how to crochet, use your skills and make some cute Christmas tree decorations. Using threads, knit cute horses, dogs, and balls. These products look simply great. DIY Santa Claus for a street Christmas tree: description
What would New Year be without Santa Claus? For a street Christmas tree, it can be made using a plastic bottle and utensils. The body of Santa Claus itself is made from a plastic bottle, which is covered with pretty red paper. This will be an imitation of his outfit. A beard, hair, legs and arms can be made using plastic spoons. Eyes, nose and mouth can be drawn using markers or paints. Below are the simplest and most popular options for making Santa Claus for a street Christmas tree.

 DIY Santa Claus
 DIY Santa Claus
 The best designs of New Year's street trees: photos
Of course, you want the Christmas tree to look very stylish and unusual, so you need to choose beautiful and stylish toys. Try to make decorations using a decent amount of glitter and wrapping paper. Everything must be done carefully so that the toy does not look very cheap and untidy. Below are the cutest options for decorating a street Christmas tree.


We had to wait a long time for snow this winter. New Year is coming soon, and winter doesn’t spoil us with snowdrifts. But this does not at all exclude the appearance of winter symbols in the form of light sparkling snowflakes in your home. Is it time to decorate your home for the New Year? With pleasure! And we will use unnecessary CDs to create snowflakes.
Everyone has CDs in one quantity or another.

The need to use them for their main purpose is less and less, but the iridescent iridescence and standard round shape generate many ideas for New Year's crafts. They are especially suitable for making snowflakes.

The iridescent side is elegant in itself. To convert a CD into a snowflake, you can use different techniques. Even if a thin outline of a snowflake is cut out of white paper and then pasted on top of the disk, the image of a winter ballerina will already appear.

In addition to simple paper snowflakes on disks, you can make scenes from applications; snowmen, huts and New Year trees will feel cozy in the shimmer of disk circles.

You can cut a snowflake from a CD using a template or by cutting the disc along the edge. True, this is quite labor-intensive work.


Snowflakes on CDs drawn using acrylic contours look interesting. Acrylic contour is sold in tubes with a small spout that allows you to apply fine lines to the surface.


Use white, blue, blue, turquoise contours to draw snowflake patterns, which have an innumerable number of patterns. You can also use acrylic glitter glue or nail polish for painting.
.jpg)
For knitting enthusiasts, CDs serve as an interesting stencil that can be braided or tied with strands of yarn. Of course, yarn with Slyurex or small mompons, bouclé, grass or yarn with sequins will add an additional emphasis on festiveness and New Year's sparkle.


Using ribbons or braid, you can also turn an ordinary disk into a New Year's tree decoration. In addition, you can make fabric or felt applications, then the snowflakes will be soft and fluffy.

To get more shimmer and use new shapes, CDs are cut into fragments and used to paste over a snowflake template made of thick cardboard or plywood. The surface of the template is primed, then a shiny mosaic is glued on, the seams are rubbed and painted over with silver or acrylic.


You can also decorate the surface of a CD by gluing rhinestones, sequins, beads, cutting, or foil to its surface. The material for gluing is also placed, drawing the outline of the snowflake.
If you use mother-of-pearl buttons and pearls, the snowflake pattern will turn out to be very rich, dense, and the snowflake will be heavy and very beautiful. It turns out to be a very elegant object for the interior.
.jpg)
.jpg)
.jpg)
You can separately weave a snowflake from beads and beads on a wire and place it on the shiny surface of the disk.
.jpg)
.jpeg)
.jpg)
Another way to decorate a CD with a New Year's motif is to use isothread techniques, which involve sequentially stitching a plane through the holes with straight stitches. An unexpected effect from the combination of threads and the iridescent side of the disc.

.jpg)
Using all these methods, you can make your home festive and elegant just by using stocks of old unnecessary CDs. And each copy can become an exclusive item.
If you have already tried all the previous options, then it’s time to make an unusual craft from old CDs. You probably have a dozen unnecessary disks lying around that you would hate to throw away and no longer need to use. Their finest hour has come! Use your imagination, take note of our master classes and go ahead to create new masterpieces!
Let's start with, perhaps, the simplest thing - decorating an old disk with ordinary stained glass paint. In terms of production, this craft is quite simple, but you can’t tell from the outside. You will need stained glass paints and imagination. You can draw both abstract ornaments or mandalas, and real plot paintings. By the way, if you don’t have stained glass paints, a regular marker will do just fine. You can download templates for drawing mandalas from the link below.
A little more complicated will be a New Year's craft made from disks, decorated with appliqués. The simplest option is an applique made of colored paper.

If your children love the animated film “Smeshariki,” then it’s time to use their old CDs to make their favorite characters. All you need is to find out from your child which character he likes best, cut out Smesharik templates from paper and glue them onto the disk. Smeshariki's New Year's craft is ready! You can draw templates for the application yourself, or you can download them from us for all the cartoon characters.

#4 Christmas tree decoration from old CDs: DIY Christmas crafts from CDs
From an ordinary disk you can make a rather unusual Christmas tree toy that looks like a ball, only this ball is flat. To make such a craft you will need: an old disk, dark acrylic paint (if not, gouache will do), a pencil and a fountain pen or a flat-head screwdriver.

If there are a lot of disks, then you may well think about creating a New Year's garland. With the right lighting, the garland will shimmer with all the colors of the rainbow, reminiscent of snow glistening in the sun. By the way, such a garland makes the house warm and sunny!

There aren't enough disks for the New Year's garland, but do you like the idea? See more ideas:
The perfectly round shape is perfect for snowmen. The technique for making snowmen from disks may be different, but you should be satisfied with the result. By the way, such a craft is quite suitable for a competition for school or kindergarten.

Want to make your own disco ball for decoration? Then you will need a blank for the ball (plastic, glass, foam), an old disk, scissors and glue.

Want more Christmas ball ideas? Then look:
You will need: an old CD, pine cones, glue, an aluminum candle stand, beads, glitter or varnish for decoration.

On a regular disk you can recreate New Year's landscapes using the decoupage technique. The disc decoupage process is standard, the result is amazing!

If, in addition to old disks, there are pieces of felt lying around the house, then you can make these cool snowmen. Well, will any of the guests guess that it is based on an ordinary unnecessary disk?

See more felt Christmas decoration ideas:
A great idea for a New Year's craft from old CDs would be to decorate an ordinary mirror or photo frame. The disk needs to be cut into pieces, and then the surface should be decorated with these pieces. You can keep it for yourself, or you can make an original gift to someone close to you.

If you were once a big fan of CDs, and everyone was, now is the time to give them a second life. What good are discs that just sit on a shelf collecting dust? You can now find the song or movie you need on the Internet. But you can make an unusual Christmas tree only once a year!

Still thinking about what to give your friend for New Year? The best gift is the one made with your own hands. Give your loved one a handmade bracelet that she will definitely appreciate! Well, if you have already chosen a gift for your friend, you can keep this decoration for yourself!

If you want to shine the most dazzlingly at a New Year's party, then it's time to think about a New Year's outfit. You can decorate a regular collar with pieces of an unnecessary disk. Looks very cool!

An owl would be a great idea for a New Year's craft made from old CDs. To create a night guard, you can use pieces of felt, colored paper, several disks and other improvised materials. Turn on your imagination and start creating.


Help us improve: if you notice an error, select a fragment and click Ctrl+Enter.