How to make a big heart with your own hands. DIY paper hearts: the easiest ways to make a Valentine
This needlework technique is gaining more and more popularity among children, youth and adults. It's so exciting to make crafts and souvenirs with your own hands. And the basis is paper, which is in every home. You can add romance to relationships or just please loved ones with the help of an origami heart. In the photo in our gallery, you can admire the paper hearts made in this technique.
Training
Before starting work on the product, it is necessary to prepare improvised materials. Regardless of the complexity of the workpiece, there are no requirements for the list:
- Colored paper (one-sided, two-sided).
- Scissors, ruler, simple pencil.
- Schemes for which you will fold
- Any metal object with a sharp rounded end (knitting needle, nail file, rod from a used pen, etc.).

With the help of the tools from point 4, you can fold a thick cardboard craft without much difficulty. When using thin paper sheets, this item can be omitted.

Varieties of hearts
What are origami and how to use them later? We picked up a few ideas for origami hearts:


You can make a simple heart and use it as a "valentine". And you don't have to wait until February 14th. Such a romantic gift is relevant for any day.

The bookmark in the form of heart will be to the taste to fans to read.

You can put a note or a small present in the heart-envelope.

A heart-shaped box will perfectly complement the main gift. Or become a box for small things.

Simple circuits
So, we have sorted out a few ideas. Now let's start implementing them. To begin with, consider simple schemes for folding hearts for novice masters. After you learn how to fold them, you can safely proceed to more complex things.

Despite the fact that the scheme is very easy, practice on an unnecessary sheet of paper. And learn, and do not spoil the sheet.


We take a blank in the shape of a square with the colored side down. Fold diagonally both sides of the square. There should be a cross in the center. We bend one corner to the middle of the square. The top is an inverted triangle.


We bend the opposite corner so that its tip is in the middle of the “base” of the small triangle. Mark the bottom center of the base. On both sides, bend up the parts of the figure. From the side and top, we bend the corners of the heart to give the product roundness. Ready.

Another simple and straightforward way can be used if you do not know how to make an origami heart with your own hands. To do this, you can find a blank (sweep) on the Internet. Then print on colored paper or cardboard. Glue the right sides together. The result is a box in the shape of a heart.

heart bookmark
This method is also easy to perform. Even a child can handle it. And the step-by-step instructions for bookmarking origami in the shape of a heart will help with this.

First, decide on the size of the product. As a standard, they take a square of 10 * 10 cm. The dimensions can be increased and you will get a large bookmark. It is not desirable to reduce, otherwise it will be difficult to perform small details.

Step by step
- We take a square sheet of paper of the desired color.
- Fold in half twice.
- Expanding.
- Bend the bottom of the figure to the middle line.
- Flip over to the reverse side. We fold the triangular edges.
- Turn the front side back.
- In the inner side, we fold it with a triangle so that its top touches the top line of the square.
- We turn over. Using your finger, open the tabs on both sides.
- On the front side, we perform the same operations (see paragraph 7).
- On both sides, fold small triangles to the center.
- We add triangles from the lowest corners.
- Flip over and fold along the dotted lines. (see picture).

Got a little bookmark. It can decorate not only books. This technique of execution allows the bookmark not to slip off the pages even when the book falls. Make 4 of these hearts and get a clover leaf.


modular origami
If you want to surprise with your skill and please with an unusual present, make a modular origami heart. Let's take a step-by-step look at how to implement this idea.

A module is a set of small parts connected to each other in a certain order. For a medium-sized solid heart, you will need 80 triangular modules.

We divide A4 paper into 24 parts (the long side into 8, the short side into 4). We get rectangles. We add them according to the scheme (insert photo)

Having made the required number of blanks, we proceed to the assembly:
- 1 row - 1 module,
- 2 row - 2 modules.
- Further, the serial number of the row is equal to the number of modules in it.
- 10 row-10 modules
- 11 row - 4 modules on the left, skip one, 4 modules on the right. The extreme details in the 10th row on both sides should remain free.
- 12 row - 3 modules on each side.
- 13 row - 2 modules each
- 14 row - 1 module each.

We reviewed detailed master classes and showed how to make an origami heart. Products in this technique are quite simple, but very beautiful. Do not miss the opportunity to please yourself and your loved ones with handmade creations.


Photo of origami heart


Valentines, valentines, valentines….. On Valentine's Day, it's so nice to receive and give tender, beautiful valentines in the shape of hearts. And to make valentines with your own hands today is easier than ever, such an abundance of ideas and materials to implement the idea that your eyes run wide.
So the child and I did not buy anything in the store for girls, but decided to make a voluminous heart out of paper with our own hands. And on the reverse side, you can easily write congratulatory lines. Below we will show how to make such a voluminous heart.
And here it is written how to make decoupage using the technique.
To make a volumetric heart, we need materials:
- thick cardboard, you can from some box
- A4 size red colored paper
- scissors
- glue stick
- simple pencil
- ruler
- craft or craft knife
- hot glue gun
How to make a voluminous heart out of paper with your own hands - step by step with a photo:
Print or copy the heart template.
Cut out the template with scissors and redraw it on thick cardboard. 
Cut out the heart with scissors. 
We take a sheet of red paper, apply glue to the heart, evenly distributing it over the entire surface, coat the edges well. 
We cut out the shape of the heart with scissors, departing from the edge of the heart 1.5-2 cm. Along the perimeter of the whole heart, we make cuts with scissors on red paper. 
We apply glue to the edge of the heart and, bending the red flats of the lower heart, glue them to the glue along the entire edge. We get such a turn. Moreover, the non-pasted part is our front side. 


Let's put the heart aside and start making cones from colored paper. To do this, take a sheet of red paper, make markings 5 cm wide and cut into strips. 
Next, cut the strips of paper into squares with a side of 5x5 cm. 
Bend one end of the square to the center. 
Lubricate the opposite end with glue and glue it on the first part, which we turned into the center of the square. The end result should be a cone. 
We need to make many, many of these cones. In my version, the heart consists of 65 cones. 
Plug in the heat gun and bring it up to the desired temperature. Starting from the central part of the heart, squeezing a little glue onto the surface and begin to glue the cones, carefully distributing them according to the shape of the heart in ascending or descending order. 
This is what the first row of cones should look like. Even with cones, the heart should remain the same shape and look like a heart. 
Glue the second row of cones in the same way. 
It remains to fill the middle with cones and a voluminous paper heart - you're done. write a congratulation on the reverse side with your own hands. And you can congratulate your loved ones. 
Crafts for Valentine's Day help create a warm, festive atmosphere, conducive to communication and the manifestation of the most sincere, kind, feelings.
Good for interior decoration.
Before you make a bulk, you need to cut a blank out of paper. We use an ordinary white sheet for its manufacture, which we fold in half and cut out half of the heart at the fold. When we unfold the cut out part, we get a whole neat heart.

Using this heart as a template, we cut out many identical shapes from red double-sided paper.
It will turn out especially spectacular if you use thin enough corrugated or tissue paper, but in this case you will need to cut out a lot of hearts. To speed up the process, you can fold the red paper sheets several times or stack them on top of each other.

Even if relatively thick is used, at least nine hearts must be cut.

We put the resulting blanks together and sew on a conventional sewing machine. You can also sew them by hand, trying to lay the most even line.

If we sew on a machine, we lay a line at a sufficiently large distance from the edge of the heart - from the line that goes through the air, we will subsequently make a loop. If we sew by hand, just break the thread, leaving a fairly long tip.

Ours is almost ready!

It remains only to tie the edges of the loop and evenly distribute the layers of the heart along the three-dimensional plane to get a beautiful three-dimensional figure.
Good afternoon - today I will show the most interesting ways to fold a heart using the ORIGAMI technique. That is, we will add voluminous puff heart from an ordinary square sheet of paper. I will show simple quick techniques that can be used as a paper heart craft for kids. I will also show beautiful origami crafts in the shape of a heart with which you can decorate a gift for Valentine's Day or inside which you can hide the gift itself(jewelry). You can make little hearts, big paper hearts. Use the heart as an idea for decorating valentine cards. Make a heart bookmark for a book with your own hands as a gift to your loved one. And even a heart in which you can wrap a lollipop. Anything from the simplest ideas to more complex paper heart folding techniques. Templates, schemes, master classes are waiting for you in this article.
Paper origami heart
PLUSH INFLATABLE.
Here in the photo below we see a beautiful paper heart made of paper, which is filled with air and due to this it turns out plump like a donut.

The basis for this origami heart is a regular square of paper - red on both sides. Office crane paper is suitable. We fold the square in half twice - vertically and horizontally. We get a strip (a square folded in half) in which the line of the previous fold is visible in the middle. Now we raise the corners of this strip - not reaching half a centimeter to the center line (fold).
Turn the craft over so that it lies with the top of the triangle up. And now we raise the edges of the lowered sashes up - flush with the sides of the triangle.

Now lower the newly raised edges of the flaps again. We lifted them only to get the fold lines. And now we bend both corners of the triangle (left and right) with a sharp edge to the beginning of this fold line (which we just got). We get the upper triangular ears.
Now you need to raise the corners - sticking out below the ears. Bend these corners up. And then hide under the upper ears.

The finishing touches of this simple origami paper heart craft are left. We see that the craft resembles a pentagon with sharp corners on the sides. We need to smooth out these sharp corners, so we knead them slightly with our fingers (as shown in the photo of the paper heart).
Now turn our heart craft face up. And we notice that at the bottom of the sharp tip of the heart we have a hole. It is necessary to blow into it - so that our heart straightens, fills with air and becomes lush like an airy soufflé.

HEART ORIGAMI
WITH WINGS
From red and white paper.
For this craft, we need paper that is painted red on one side only.

Here's an easy way to make this origami paper heart with one side dyed red.

We take an even square of paper as a basis. We bend the square in half - 2 times, vertically and horizontally. Then again we straighten the square with the white side up - it turns out 2 fold lines - cross to cross.
We raise the lower edge of the square to the horizontal fold line in the middle. And immediately turn the craft over with the colored side up - so that the fold line of our edge is at the top. And now we bend 2 corners down to the middle vertical line - the right corner and the left corner below - it turns out as in photo 2.
We turn the craft with the white side up - we get the position as in photo 3. And then something that I could not decipher begins. No matter how I twisted the module, I could not figure out what to do with it in order to get picture 4 from picture 3. Maybe I'm stupid, but you have a bright head and you can understand how to make such an origami heart. I am publishing this step-by-step puzzle for those who like to brainstorm.


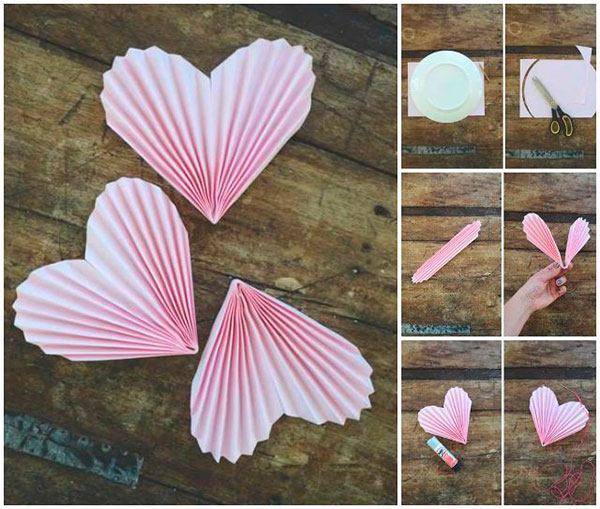
I have Another way out of this puzzle... Below we see a heart that can be made with wings. If we go through this master class, we get just the stage of a heart with a piece of white paper behind. This white part can be folded into an accordion in the form of a fan and decorated as wings.

2 easy ways
Quickly make an origami heart
from paper.
Here are two step-by-step diagrams for how to make a beautiful little paper heart.
The size of the future heart will be 4 times smaller than the sheet you have chosen. That is, the side of the square of your sheet of paper should be 2 times longer than the intended origami heart.

And here are more step-by-step photos for folding a heart from a two-color sheet of paper.

Such hearts can decorate a card or gift wrap for Valentine's Day.

And here is a way to make a simple paper heart FROM A TRIANGULAR piece of paper. And you can also immediately rob this heart for good - wrap a lollipop in it.


Lollipop sticks can be designed as cupid's arrows. A great souvenir gift for Valentine's Day.

You will find even more simple ideas with a heart craft for children's creativity in a special article.
heart envelope
with a surprise or a note inside
in origami technique.
Here is an interesting master class that will help you make an interesting heart craft. A square of paper with the contour of a folding heart extended upwards. The upper part of the square opens and inside under the heart can hide a note or a small gift (ring, chain, keychain, earrings).


And here is another very simple packaging-envelopes in the form of origami hearts. Where inside the heart - in its two halves triangular pockets are formed in them, you can hide coins or small jewelry gifts.
And here is another folding envelope decorated with a heart made of soft but thick paper napkins. The master class below is quite simple - follow the arrows on the diagram and repeat all the simple operations of the template.

You can find other interesting ideas for heart-shaped envelopes in the article.
And also we have an article that will teach you how to make boxes in the form of a heart simply and quickly.
Bookmarks
in the form of a paper heart.
Here's a pretty little heart that can work as a bookmark for your book. A great gift for Valentine's Day is a book and a simple handmade heart.


And you can make a bookmark-heart - which is put on the corner of the book. Because it has a triangular pocket at the bottom, which you can just put on the corner of the page you are reading now.

And here is another option for bookmarking books, also in origami technology. The heart that wears anything, on the edge of a gift bag, on the edge of a book, or on a clothesline in the bathroom… that you have filled with the scent of a bubble bath and strewn with rose petals. Great idea for a romantic evening on Valentine's Day.

big complex
ORIGAMI HEART
With a large flower.
In the photo below, we see a detailed master class for crafting a pink heart with a beautiful origami flower in the center of the heart. It looks complicated to the eye. But in fact, this is a very understandable way to fold origami hearts. The photo looks scary. But when you start doing it with your hands, everything folds up by itself and easily turns in the right direction.


Minor manipulations, with the eversion of the flower petals, are best done with an auxiliary tool (nail file). So even the smallest almost jewelry paper crafts-hearts can be made without difficulty with your thick fingers. As in the photo below.

These are the step-by-step, step-by-step lessons on creating a do-it-yourself paper heart using the origami technique you found today in our article. Simple ways and easy options are good for warming up your arms. To quickly get the result and be happy, but you can take a picture of complex things on your phone and someday sitting in a boring place (queues at the clinic or in the waiting room waiting for the customer) - you can tear a page out of a notebook and get a new skill - the ability to make a small symbol out of paper love. A great gift for the eighth of March, for Valentine's Day.
Inspiration to you and love.
Olga Klishevskaya, specially for the site
Friends, hello everyone! Today I wanted some romance, a beautiful manifestation of feelings. And what if not hearts allow you to do it best? That is why I will tell you about how to make a heart with your own hands.
Hearts are generally my favorite theme - I often give them to family and friends. They are so versatile that they are suitable for literally any holiday, from the classics (February 14) to the exotic (Halloween, for example). If it weren’t for the time limit, then hundreds of these wonderful things would be churned out and flunked by all my friends))
The variety today will be terrible - from unusual paper ideas to mind-blowing fantasies from wire. For every taste and color, so to speak.
How to make a heart with your own hands: amazing ... simple
I have prepared for you as many as three dozen ideas, so there will be clearly plenty to choose from.
Balloon heart
You can make an amazing heart with your own hands if you prepare two long balls (from which different animals are still twisted), thick threads, scissors and silicate glue (you can try experimenting with other glues, the main thing is that they are transparent).
The process is simple: inflate the balloons, as in the photo and wrap them with threads soaked in glue. You can apply several layers to make the design more weighty. After the glue dries, the balls need to burst and get them out of the finished frame. The tubes then need to be glued together, slightly cutting one. All that remains is to hang.

paper heart
Gentleman
This is a two-in-one craft: you can make a designer box or leave it as a valentine. Probably, it can even be called an almost voluminous postcard due to the presence of an intermediate box between the two halves of hearts.
You will need cardboard or thick paper, scissors, glue, satin ribbon and decorative elements. Cut out all the details according to the photo and connect. If you want to make a box, then make it as well (numbers 6-7). Glue everything together.

The envelope
A very simple idea. A heart shape is cut out of paper, in which the side, and then the lower edges are bent. The corner becomes a closing element. If the edges are loosely fastened, then on the heart itself you can write wishes in advance and only then fold.

Heartfall
To implement this decorative idea, you will need several dozen hearts, in each of which make an incision in the center and glue. Such a composition can be placed not only on the wall, but also on the panel.
Tip: you can decorate a pillow with such hearts if you make them from felt.

mermaid tail
The unusual shape of this souvenir is achieved by repeatedly folding the cut circle with an accordion. After that, you just need to fold in half and glue.
The geometry of love
What if not she will help you create this heart card. The most important thing here is not to make a mistake with the folds. Great option for Valentine's Day

The heart of a loved one with your own hands
Undoubtedly, all previous options fit perfectly into this category. But I want to highlight a few romantic patterns in particular for this occasion.
From felt
A classic, but such a cute heart, which can become both a separate souvenir and an element of an interesting project. For her, you just need to cut out two parts and connect them with a “forward needle” seam. Before finishing, fill the souvenir with padding polyester and sew to the end.
Tip: decorate a hearty gift with beads, sequins or buttons - then it will sparkle with new colors.

clip
And again wire fantasies. This time the heart is for the ear. It is only necessary to twist the wire so that it forms, as it were, a clamp consisting of two hearts.
Finally, I advise you to read articles about homemade gifts for your sister and dad - there are also ideas for homemade hearts here.
On this I end and say goodbye to you until the next article. Tell us about your impressions, share links in social networks. networks and subscribe!
Sincerely, Anastasia Skoreva