Learning to model: dresses for different body types. How to emphasize your advantages?! Modeling lessons
This page provides examples and detailed descriptions of how to create some dress designs by altering the bodice darts and creating different shaped lines. If you wish, you can experiment and model various options for blouses and dresses.
The model of a fitted dress is taken as a basis, but the techniques described here can be applied to other styles of dresses.
Let's take a closer look at several sketches of models and options with various changes in the direction of the chest dart.
The location of the new point (the beginning of a new dart) is where the side cut intersects with the waist line, forming an angle. According to the sketch of the model, we put a point and connect it to the lower corner of the chest dart (G8).
Along the resulting line, we cut the pattern and open it, with this change the original darts (along the waist and chest line) are closed. We fix the changes, as shown in the figure. The pattern is ready to be laid out on the fabric.

On the main bodice pattern we connect the corner of the waist dart with (G8). Cut as shown in the picture. We close the top dart and open the bottom one to the end. What happened in the process of changing the pattern, we fasten the final result with pins.

To begin with, we divide it in half, or you can also divide it into three parts, it depends on the style. We put a point, this is the beginning of a new dart, draw a line to G8. Cut and close as shown in the picture.
It should be taken into account that when modifying the pattern, to create a new dart that will originate from the side cut, you should not bring it to the point (G8) by 1.5 - 2 cm.

Depending on the style, we divide the cut of the armhole into three parts or in half, and connect the division point with (G8). We cut according to the added changes; see the picture for further steps.

We divide the curved line of the armhole into three parts or in half; when creating the relief, we connect the division point with a smooth relief curve to (G8). Then we cut the pattern along the intended smooth curve and close the chest opening of the dart as in the figure.
6. Transfer of the chest dart into the cut of the armhole with relief in the form of an angle.

For this product, the pattern changes similarly to the previous one, only we draw the relief in a straight line up to G8 and lower it down to the waist dart. You should get the shape of an angle. We close the upper chest dart and secure it with a pin. After this, a new dart is formed.

Depending on the style of the product, we divide the shoulder section into two or three equal parts. We put a point, build a straight line from it and connect it to the waist dart, cut and close the chest dart.
8. Transfer of the chest dart to the shoulder section with the design of a straight relief.

Depending on the sketch of the product model, we divide the shoulder line into two or three equal parts. We put a point, from it we build a relief line to the waist dart, along which we cut. Closing the chest dart.
9. Transfer the chest dart to the neckline, thereby forming soft gathers.

On the pattern, divide the neck line into 1/2 or 1/3 parts according to the model. We connect the division point with (G8). We cut the connection line and transfer it. See the figure for how to do this correctly.

On the main drawing of the pattern, in the middle of the front panel of the bodice, from point (G8) we build a perpendicular line to the middle of the front. We cut along the resulting line, transfer the chest dart, opening the cut. We record what came out during the change process, as shown in the picture. We drape this dart (that is, we assemble and arrange the assemblies).

The next model is similar to the previous one with minor changes. First, we change the pattern as shown and described in the previous product.
Next, in order for the product to be better gathered into gathers along the entire middle seam, you need to cut the waist dart up to point G8. We close and move the chest and waist darts, and drape their newly formed solution. We record the resulting result.
The front panel of the product consists of two halves (right and left).
11. Transfer the chest dart to the armhole cut (undercut), while forming small gathers.
Here, for example, are two different options for the bodice style, which can be obtained by similarly modifying the position of the dart on the pattern.

Divide the armhole in half or into three equal parts. From the dividing point to the chest dart at a right angle we draw a line along which we make a cut.
We fix part of the upper part, as well as the waist dart (for example, pin it together). From the remaining unfixed part of the tuck solution we form clusters.

This model differs from the previous one only in the waist dart; it does not need to be fixed and closed on the bodice pattern.
These products are similar to description 11, with the only difference that instead of undercuts on the bodice, the upper part of the bodice is cut completely and a wicket is obtained, as shown in the figure.


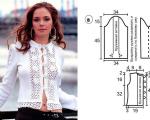
If you like to sew knitwear, then you will definitely like the model that we will model in this lesson. Using the original drapery on the shoulder, soft folds and an asymmetrical neckline are created, which creates a magical image that is truly feminine and luxurious.
To model a bodice with drapery on the shoulder, use (do not add an increase in looseness of fit, since the model is made of elastic knitted fabric).
IMPORTANT! In the presented lesson, only the modeling of a shelf with drapery on the shoulder was performed. Cut out the back according to the basic pattern without changes. Model the skirt of the dress yourself depending on the desired style.
Cut the front pattern along the waistline and continue modeling the bodice. Move the waist darts to the side seams.
From the top point of the left side of the right breast dart, set down 7 cm - you have obtained point B. Connect the top of the left breast dart to point B (see Fig. 1). Close the right breast dart and draw a line through point B parallel to the shoulder seam - points A, C, D are obtained. Open the right breast dart.
From the left shoulder seam (neck point), draw a horizontal line. At the neck, point A is obtained, segment AD = AB + CD. From point D down, draw a segment of 3-4 cm, connect the resulting point with point A (lower point).
Cut the shelf along the red auxiliary lines. Close the left chest dart.
Rice. 1. Modeling a bodice with drapery on the shoulder
Modeling a stitched part. In Fig. 2. A close-up fragment of the shelf is shown. The color shows the stitching part (right shoulder), slightly round the contours of the part, cut out the part separately.
Rice. 2. Modeling a stitched part with drapery
Additionally, draw a one-piece neck facing as shown in Fig. 3. When stitching, it is necessary to connect the marks of parts 1-1 and 2-2 and then gather section 1-2 to the desired length.
Rice. 3. Shelf detail with one-piece neck facing and stitching detail
Details of the shelf cut are shown in Fig. 4. Cut out the back without modification, with a zipper along the middle back seam. If the material is elastic enough, the zipper in the center of the back may not be sewn in.
Rice. 4. Details of the cut of the front bodice with drapery
Before cutting the product from the main material, we recommend sewing a mock-up of the bodice from inexpensive knitted fabric. You will be able to check your pattern and make changes to the design if necessary. Examples of layouts made using the patterns developed in this lesson are presented in Fig. 5 and fig. 6.
Rice. 5. Front bodice model made of knitted fabric
As a dummy fabric, use a knitted fabric with a similar stretch coefficient (to the main material of the product). In order not to make a mistake when laying out the parts on the side where the drapery is located, mark the wrong side of the fabric on the patterns. When laying out, the wrong side of the material and patterns should be directed upward.
Rice. 6. Front bodice layout - side view
You will find even more interesting and fashionable ideas on the website of Anastasia Korfiati’s Sewing School. Subscribe to free lessons at the Sewing School and sew fashionable clothes with us!
It is a dress that can make you more feminine and beautiful, convey your romantic or sensual mood, highlight the advantages of your figure and hide flaws, and visually make your figure slimmer. A dress can save you in a situation where you don’t have time to match a blouse to a skirt or trousers, a jacket, etc. Thanks to the variety of styles, you can use the dress to create a variety of looks: from business to sexy. The main thing is to choose the right dress style for your figure.
MODELING A DRESS FOR A TRIANGLE (PEAR) FIGURE TYPE
The pear-type figure is very feminine, but sometimes brings the owner some difficulties when choosing a ready-made dress due to the difference in the circumference of the hips and chest. Don't be upset. First, let's figure out which style to choose. We narrow the bottom and focus on the upper part: a boat-shaped neck, a large collar, a neckline, a bright print in the upper part of the dress, the bottom can be slightly flared, do not forget about the use of contrasting inserts running along the dress and visually modeling the figure, as well as a little high waist, heels and tights that match your shoes will make you look slimmer. We try to avoid decor in the hip area, patch pockets, draperies, transverse stripes and large prints.

For a modeling example, we will choose a simple sheath dress created on a base pattern with an adjacent silhouette. The style is interesting because the model lines forming the silhouette demonstrate the lower type of female figure in the best possible way. Dark inserts running along the side seams will help visually hide the width of the hips, and a white, widening silhouette will bring a slimmer silhouette to the fore. But here you can’t go overboard with excessively narrowing the skirt, and if the difference between the girths of the chest and hips is large, it is better to widen the skirt a little towards the bottom.


Modeling. On the back and front pattern pieces, draw model relief lines running from the armholes to the bottom of the dress through the waist darts; on the back, transfer part of the solution to the midline of the back, for the greatest fit in this area. Open the chest dart at the armhole. All that remains is to mark the allowance for the slot. If the difference between the waist and hip circumferences is large and the openings of the darts for fitting are more than 3-3.5 cm each, the dart needs to be divided into two, otherwise unsightly creases will appear in the finished product in the waist area.

In the second modeling option, we suggest widening the skirt towards the bottom, making it a so-called A-shaped silhouette, you can also make the dress cut off at the waist.

Modeling a dress for the “Inverted Triangle” body type
Your strong point is narrow hips and long slender legs. We focus on them. All the decor, bright prints are down on the skirt. We reduce the width of the shoulders, here raglan sleeves will help us, or the absence of sleeves at all in summer clothes, a dress with a strap on one shoulder, a Greek silhouette, a loose tunic, a dress with a tulip skirt can become a lifesaver and be loved in your wardrobe. You can afford to wear full, wide skirts, peplum skirts or trousers, straight-cut dresses, but not too voluminous or wide, with vertical seams or trim.


00:49 Unknown 11 Comments
Hello, dear readers!
In this article we will look at additional bust darts that affect the fit of the dress bodice.
In an article about clothing modeling you and I learned that support areas are areas of contact between clothing and the human body; for shoulder clothing, the supporting areas are the neckline, armhole and protruding points of the chest and shoulder blades. All basic designs of shoulder clothing are built from the calculation of these supporting areas, even if when constructing the pattern, allowances for a loose fit were used for the adjacent silhouette, we will still get a design that is in contact with the human body at the neckline, armhole and protruding points of the shoulder blades and chest. That is, we will not get a tight fit of the tissue on other parts of the body.
A natural question arises: why can’t we achieve complete adherence of the fabric in the areas we need? The answer is very simple: for a tight fit of the fabric to the body, it is necessary to take into account additional parameters of the figure - all concavities and convexities.
IN last article We looked at some additional parameters and learned how to measure them; now we will use these measurements when constructing additional darts:
Name of measurements | cm |
|---|---|
Breast radius (R) | |
Dart No. 1 | |
Dart No. 2 | |
Dart No. 3 | |
Dart No. 4 | |
Dart No. 5 | |
Dart No. 6 |
Dart No. 1
There is a slight concavity in the area from the jugular cavity to the protruding point of the chest. This concavity occurs in women of any body type and with any breast size. The magnitude of this concavity is taken into account when sewing folded clothes or products with a deep neckline, when the upper cut of the bodice is built on the bias. If, when constructing a bodice pattern, you do not take into account the amount of concavity, then the product will have a defect, the so-called “lagging” neckline. (This defect is very clearly visible in the photo).
A tuck will help eliminate the defect, the solution of which is equal to the size of the concavity in the area from the jugular cavity to the VTG. The tops of the dart are directed towards the neckline and the protruding point of the chest.
: on the shelf of the bodice (from the basic design of the dress, built according to the TsOTLSH method) draw a circle with a radius equal to the radius of the chest, the center of which is the protruding point of the chest (point C).

Now let’s connect the protruding point of the chest and the top of the neck angle (point P 3) with a straight line.

the resulting segment CR 3 will intersect our circle at a point. From this point to the right and left along the circle, we will set aside half the concavity value we measured (in my example, the concavity value is 1.3 cm, which means that from the point of intersection of the segment with the circle I need to set aside 0.6 cm in both directions along the circumference). We connect the resulting points with points P 3 and C, and our dart is ready.

Dart No. 2
If a person has a stooped figure, then his shoulders are slightly turned forward, which creates tension in the fabric, which is especially noticeable in the design of a dress with a close-fitting silhouette.

To remove this defect in the product, it is necessary to lay a dart, the vertices of which are directed to the end shoulder point and the protruding point of the chest, having previously measured the concavity of the body at the level of the chest radius.
In the drawing, the dart is constructed in this way: a circle is again drawn with a radius equal to the radius of the chest and with a center at the VTG point. Connect the straight protruding point of the chest and the end shoulder point.

This straight line will intersect the circle at the point from which we will plot to the right and left on the circle by half the value of the measured concavity. We connect the resulting points with point C and the end shoulder point. Our tuck is ready.

Dart No. 3
The basic design of the dress, built using any calculation and graphic method, includes an allowance for sewing in sleeves. If the model of our product does not have sleeves and if we model the armhole: deepen and widen it, then due to this increase we will not get a complete fit of the product along the armhole, the product will again “lag behind” the body,

this will cause small creases to appear in the armhole area.

This problem is also solved by introducing an additional dart, the solution of which is equal to the measured value of the concavity of the body at the level of the chest radius.
In the drawing, the dart is built in this way: on the front of the bodice, draw a circle with a radius equal to the radius of the chest, and then connect the protruding point of the chest with the control point of the armhole (in the TsOTLSH method, this point is O 5).

This line will intersect the circle at the point from which half the concavity is plotted to the right and left along the circle. Through the obtained points, straight lines are drawn from the protruding point of the chest and extended until they intersect with the armhole line. And the tuck is ready.

Dart No. 4
To achieve a fit for the bodice of the dress under the base of the bust, it is necessary to take into account the concavity in this area. And as in previous cases, this concavity is decorated with a tuck.


Dart No. 5
If the product has a very deep neckline,

or the product contains breast cups,

or the spare part of the bodice passes through the hollow of the chest,

then it is necessary to take into account the concavity between the chest with the help of an additional chest dart, otherwise we will again get the defect of a “lagging” neckline.
In the drawing, this dart is constructed as follows: on the front of the bodice, from the point of intersection of the chest line and the midline, up and down along the midline, half the measured concavity value is laid down. The resulting points are connected to the protruding point of the chest and the dart is ready.

Dart No. 6
This dart is taken into account in corset-type products, in products with cups or with a rectangular neckline. Without taking this dart into account, it is not possible to achieve a complete fit of the product.

The dart itself is laid during the fitting of the product. On the drawing, the tuck solution is drawn on the bust circumference, and the midline of the dart is the midline of the bust dart in the shoulder seam.

So we've looked at six additional bust darts.

The opening of each of these darts is not that large, however, each dart has a significant impact on the shaping of the product. Depending on the clothing model, one or two or all six additional darts are introduced when modeling the basic design. Often, all six darts are used in bustier-type products and in corset-type clothing.
The tops of all six additional darts are directed towards the center of the bust, which means that any of the darts can be moved to any section of the bodice front, while the top must remain directed towards the center of the bust. Often, darts are transferred to reliefs, undercuts or waist darts.

If, when transferring additional darts to the waist, a too large dart is formed, then it is divided into several equal ones, and the tops of each dart are shifted from the center of the chest along the chest line at the same distance.

In conclusion, I will add that when modeling the bodice of a dress, changing the design lines, changing the degree of fit and moving the darts, it is necessary to sew a test model from inexpensive fabric in order to clearly see how additional darts affect the degree of fit of the product.
In this article you will not find ready-made patterns and patterns, but you will find something more useful: you will master pattern making dress basics. Sewing is one of the most enjoyable and easy forms of art, which, among other things, brings practical benefits. What? You do not believe me? I’m ready to say that the only reason why sewing skills seemed like an unattainable goal to you was the lack of relevant literature.
You can find it on the Internet a lot of ready-made sketches. But this state of affairs prevents craftswomen from improving their skills. After all, without basic knowledge it is impossible to learn how to masterly use threads and a sewing needle. In sewing it is like in music - without knowing the musical notation it is difficult to play a new composition. Possible, but very difficult. But why these difficulties? Building a pattern is the very necessary basis that will help you advance in your sewing skills.
Many of you who tried to sew a dress yourself stopped at the very beginning of the journey, frightened by complex diagrams and calculations, and gave up even at the stage of constructing the basic mesh. And no wonder! Sometimes on the Internet you can find such complex creations that even experienced master thoughtfully scratches the back of his head. What can we say about a beginner, for whom even step-by-step construction causes sacred awe. But now you have the opportunity to start from scratch and learn how to build a pattern quickly and easily. Forget everything you've seen and read about pattern making. The basis of the method that will be discussed in the article will save you:
- from confusing calculations;
- incomprehensible formulas, more like alchemical symbols;
- from the scary and incomprehensible alphanumeric web that entwines most basic dress patterns.
Why did the last paragraph refer specifically to the dress? Because your training will begin with this elegant element of a woman’s wardrobe. And in order to finally dispel all your doubts and fears, let’s go on an exciting journey through the pattern.
Basics of basics or what is a pattern
 The construction of a dress pattern is very similar to making a cast. Subsequently, any product created according to your own drawing will fit perfectly on your figure. This kind of modeling follows your every curve and a feature of the body, becoming like a fingerprint. Of course, you can find on the Internet and download for free any pattern for any size - be it 40 or 52. But will it meet all the requirements of your figure? Therefore, if you want a sewn outfit to look impeccable, always create an individual pattern for each new client. All figures are unique - this cannot be ignored.
If you plan to sew clothes for yourself, then thanks to a correctly constructed pattern, you can sew absolutely any outfit for yourself. Whatever model you prefer, a kind of cast will help you in creating it. Now do you understand how important it is to learn how to create patterns? The basis of the dress for beginners is the trump card, which will allow you to very quickly create unique models.
The wonders of modeling
 Have you ever wondered how trendsetters come up with their designs? Does it really all start with building a basic pattern? Exactly. First, a basis is created and only then can the creator turn on his imagination and add his own ideas to the scheme. How it works? Let's look at it using a practical example.
Find a pattern for a classic sheath dress on the Internet. Pay attention to the style and how the material hugs the model's figure, reminiscent of a plaster cast. Having sewn such a dress according to your pattern, you will receive the same option, only suitable for your figure. But what what is the essence of modeling? I'll explain now.
Now pay attention to any other dress models. Surprised? It is the sheath dress that underlies the creation of absolutely all modified models. Take a closer look and you will see for yourself.
Still in doubt? Try experimenting on your own. I suggest you slightly change the top of the sheath dress and construct it in a new way. For example, let the top of the dress be held on the shoulders by a round yoke. The bodice will be made in the form of overlapping triangles. Now let's see what happened. Surprised? The dress is completely different, but the essence remains the same. All design innovations in the fashion world are based on this principle.
You can experiment in another direction, for example, make its cut straight or looser and lengthen the shoulder line. Such an experiment will help you create something radically new and stop being afraid of experiments. Now let's get to the fun part: we need to understand what does the pattern consist of?. And most importantly, how to build it.
What is the essence of the method
 My task is not to give you a detailed guide to the type: to pave a direct path from point A to point B, etc. No, I want to give you the opportunity to feel the pattern, to reveal the essence of modeling. This way, you can learn to see the essence of things, and this is one of the main skills of the sewing craft. You must realize and see how simple pattern models form the basis of complex fabric structures.
Now you don’t need to draw anything, you just need to be patient and follow the pattern all the way. We will understand the purpose of each of the lines, find out why it is in this particular place and not another, and why it is drawn this way.
What is it for? A detailed tour will help you get rid of all unnecessary fears and inspire you to new achievements and experiments. Understanding the basics gives you a huge leap forward to conquer new heights. Therefore, you should not neglect this.
The sages say: “We are afraid only of what we cannot understand and explain logically. But as soon as the thing that frightens us becomes clear to us, it ceases to cause fear in us.” Let's dispel all doubts, curb fears and with new ones let's rush into battle. So, you will need:
- 30 minutes to analyze the theory;
- 20 minutes to create a pattern.
Yes, after a detailed study of the basis, you will not need to pore over the pattern for long hours. This action will become simple and clear. Let's get started!
Pattern base: detailed inspection
 Where does the pattern for the base of the dress come from? Usually these are those same incomprehensible halves of dresses that can be found in abundance on the Internet. We will also draw something similar, but with a full understanding of the matter.
What's on the drawing:
- half of the back part;
- half front detail.
The halves of the front and rear parts, in professional language, are called “shelves”.
Additionally, the drawing contains:
- dart;
- armhole - the line of the opening for the arms.
When creating the base pattern, pay special attention to the armhole. It should not be too small and straight. The ideal size is when the armhole does not dig into the arm and does not pull, so that the sleeve does not block movement. When modeling your designer armhole, do not reduce the size indicated on your base pattern. You can increase the size, add decorative elements, intricate sleeves and folds, but in no case reduce the acceptable minimum. This is the main rule that should be taken into account when modeling armholes.
The darts are as follows:
- Shoulder dart – necessary so that the material did not gather at neck level into a makeshift hump. When the shoulder ditch is constructed correctly, the fabric fits snugly to the body and follows the curve of the spine.
- Waist dart – helps to fit the dress. Contrary to popular belief, the dress fits on all sides, not just on the sides. To make this happen, the excess fabric is pinched and hidden inside the dart. After this, the edges are sewn up.
The shoulder dart is not always visible. In some models it is moved closer to the zipper or the edge of the armhole. And where it is necessary to make a sleeve, the corner is simply cut off. In this version, the armhole remains invisible, since the excess fabric is trimmed and not hidden. The fabric is sewn in near the front, in the area where the zipper is sewn in, or in the place where the sleeve will be sewn on.
Please note: if you are sewing from stretch fabric, then making darts is not necessary. This fabric is very flexible and easily follows the curves of the body. In addition, it shrinks independently in the area of the shoulders and waist and does not block the sleeve.
Darts on the front shelf
 If we are sewing a dress for an adult girl, then the silhouette of the upper part of the front front should have a convexity. The dart at the front of the shoulder provides this bulge in the chest area. Let's look at a practical example. Task: turn a flat piece of fabric into a convex one.
You need to start work by creating a dart. How to do it:
- Let's try to make a dart on a cardboard circle. To do this, draw a dart on a flat geometric figure.
- We pinch the excess paper inside.
- The top of the bulge will be in the place where the tip of the dart points.
- The bulge is ready.
For clarity, the same can be repeated on a cardboard sketch of the chest shelf. When working with fabric, the point of the bust dart will be where the dome of a bra or nipple is usually located.
If the dress was not made from your own pattern, the silhouette may shift in the bust area. This is due to the point of the dart pointing away from your bust. I think many of you have encountered this problem, choosing a new outfit in the store. Mass products are made according to standard patterns. Therefore, the silhouette of a dress made according to your pattern will always look more attractive than a store-bought one.
Please note that on most dresses the bust dart is not placed on the shoulder, but slightly below the armpit. This technique allows you to hide the dart and make the dress more beautiful. The dart located in this place is covered by the hand, so it cannot be noticed while wearing.
When constructing our pattern, we drew a dart on the shoulder only because it was more convenient and visual. But to model the dress, it must be moved below the armpit. To do this, you do not need to draw a new pattern; the transfer is very easy.
Let's look at the process schematically on a piece of cardboard:
- Cut out a cardboard pattern with shoulder darts. We put it in front of us.
- On the left side, 5-7 cm below the armhole we place a dot. From it we draw a line to the tip of the previous dart. We repeat the same action in mirror image on the right side.
- We cut the cardboard along the lines, leaving about 2 cm to the tip of the dart.
- In one motion we lift the cut part, closing the previous dart.
- Thus, we have opened a new underarm dart.
Basis about lines
 Why do we need need lines in the pattern? Primarily for reference purposes. For example, the bust line is the main reference point when modeling a dress. On this line we end:
- back dart at the waist;
- the front dart at the waist must be completed within four cm of the chest line;
- the front dart ends on the chest line;
- The lower edges of the armholes also pass through the chest line.
It is the main guideline when constructing waist darts on the front and back flanges. In this case, the widest part of the dart is also at the waist.
The hip line helps create a flared hem. In the classic version, the hem widens 1.5 cm on the right and left sides. This construction prevents the dress from rubbing against the body when walking, and also eliminates possible distortions.
In some versions, the hem widens more than in the classic model. This option is used in cases where the model’s hip circumference is wider than the chest circumference. In this case, the expansion is made based on the difference between the model’s hips and her chest. Knowing the basics, pattern making no longer seems such a difficult task. At this stage, you can already start modeling your first dress. And thanks to the knowledge gained, this activity will no longer be so tedious and time-consuming.
Among the popular pattern making techniques, the following should be highlighted:
- method of Gallia Zlachevskaya;
- construction method according to “Muller and Son”.
What are they famous for? Clear examples and simplicity of explanations. The method of Galia Zlachevskaya is considered the simplest and most understandable. We will consider this first.
Unlike most methods, Zlachevskaya’s method does not force beginning needlewomen to study all types of figures, as other sewing masters recommend. In Zlachevskaya’s method, the construction of a base pattern is done immediately according to the individual figure of the model being sewn.
The main difference of the method: in addition to the usual measurements, so-called deep measurements appear in the construction. This is a deviation of the convex points of the shoulder blades, chest, and hips. The deviation is measured from the waist horizontally and vertically. The method has a minimum of difficulties, and Zlachevskaya’s special ruler will simplify the work even more. It will help you accurately measure all the nuances of the figure being sewn.
The main task of a novice master in this method is to learn how to model a base pattern using measurements. However, the control is carried out on a model that fits tightly to the figure. Such a basis helps to see the size of the dart openings, the number of reliefs, as well as their direction. The method is suitable for creating models with a full-fitting effect.
Further work is to correctly use loose fit increases. This will help you quickly start modeling a dress for your chosen figure on your own.
Muller's method is more labor-intensive and difficult to understand. And also, it should be taken into account that this is a Japanese construction method, which is more suitable for modeling dresses for a slender or lean figure.
The method offers two construction options:
- for a standard figure (mass production);
- individual tailoring.
When modeling patterns for individual tailoring, the following are used:
- individual measurements;
- calculated values.
Feature of the method: significant deviations from the standard figure are revealed by control of the calculation of auxiliary dimensional characteristics. The method pays special attention to the graphical method of changing the basis. This only applies to figures that deviate from the standard figure.
The technique is presented smoothly, from simple to complex. Therefore, with patience and diligence, even a novice seamstress can master the construction method. The methodology provides a minimum number of tables and a maximum amount of practical material.
Whatever method you choose to construct your patterns, knowing the basics will help you master the chosen direction in the shortest possible time. The main thing is not to be afraid to experiment and practice as much as possible.
(No ratings yet)