How to make a bouquet of autumn leaves. Tree in a bag
It is better when the autumn bouquet contains more bright and rich flowers. Asters, roses, ripe juicy rose hips+ small inclusions of fresh leaves and stems of herbal plants.
To the bouquet looked like one solid whole- it makes sense to TIE IT into a single BUNCH - and then insert it into a vase in a bundle as a WHOLE AUTUMN COMPOSITION.

It is not necessary to use long stems of flowers and plants... An autumn bouquet can be made from short cut flowers and branches(as in the floral examples below).
Branches fruits of rose hips, hawthorn, barberry and rowan The bouquet creates a special flavor of autumn floristry. You can also add deciduous branches of bushes or trees... heavy fruits along the bottom line of the composition and blue flowers along the top edge of the bouquet.
Autumn flowers: garden roses, asters, rose hips and wild roses... And original floral inserts - in the form miniature pumpkins or pumpkins... In order for heavy pumpkin fruits to hold well in a bouquet, you need to carefully “drill” a hole in them... find a strong branch... and pin the squash onto the branch. And just like that, insert it on a branch into our autumn bouquet.
Any container can serve as a vase for an autumn composition... for example tin milk jug(as in the photo above). Or a clay decorative amphora... or you can place a vessel with water in a wicker basket.

Fresh berries can also be present in an autumn bouquet.
Branches of red currant will give the bouquet a juicy shade - especially if the roses also match the color of the berries. And by the way... in the same composition in the photo below clearly you can see the RULE OF THREE CLASSIC LINES of a bouquet(which I will talk about below).
Autumn bouquets of LEAVES.
You can just cut it off from dwarf maple beautiful twigs with yellow maple leaves. Let their beautiful twigs be visible in the crystal water of a transparent vase.
And another interesting move - if you put cleanly washed carrot root vegetables- there is no need to cut the tops, they will serve as part of the autumn bouquet. And by the way, one thing is visible in this bouquet classic rule compositions (and not only autumn ones).
Dry transparent leafy stems It’s better to choose tall ones - so that they create the TOP EDGE of the bouquet... and place them on the BOTTOM bright succulent flowers and leaves.
HOW to compose a bouquet - rules for the correct placement of lines.
The bouquet also has a RULE OF LINES... This rule is well illustrated by the following photograph. It is necessary to comply with Three main directions (see yellow branches)- branch UP with a slope to the left... branch to the LEFT with a slight rise... branch to the RIGHT almost horizontally.
And for balance - a few branches or stems should hang down (these are the brown branches in the photo below)
Here is the bouquet below - also created according to the same principle of THREE CLASSIC LINES OF COMPOSITION.
LEAVES AND FLOWERS - a friendly combination of shapes and shades.
Look beautiful small bouquets from autumn flowers and large leaves... Chrysanthemums are ideal for this purpose - they last for a very long time without fading...

The color of tea roses... and the orange-yellow hue of lilies match perfectly with the shade of autumn foliage... and in the bouquet we emphasize this color match with green-leafed plants. And also note that as linear elements- are used plant seed stems(brown in the photo below).
Here's an example of how You can make “tea” roses with your own hands from ordinary maple leaves. Below we see the very essence of the technique - and to help yourself, it is better to take adhesive tape to wrap the bases of such leafy buds along the way (and it is better to choose green tape - sold in construction and florist stores).
DRY BOUQUETS for autumn interior.
DRY BOUQUETS are great idea for interior decoration long time. Such autumn compositions do not need moisture. Such a dry bouquet can even be painted with spray paint (as in the photo below).

Or bouquets can be arranged as decorative "heap" from leaves, cones, plant seed pods, dry branches, berry umbrellas and other natural material.
MINIMALIST DESIGN - in the design of an autumn bouquet.
The bouquet can be quite modest- the main thing is that the design is stylish. Here's how in the photo below - from acorns and acorn caps you can glue funny inflorescences... and insert such dried flowers into a vase along with oak leaves. This is a great fall craft for kindergarten(can be done with your child). You'll just have to make the wire holders yourself.
Even so modest composition of leaves in beakers- looks self-sufficient. Also an example of minimalism in an interior bouquet.
After all, you really don’t need much. Small flowers... stalks of cereals... umbrella branches with berries - and now you have a beautiful autumn bouquet for a small composition on the table.
Or you can use cups of flowers with a very short stem- if you place them at the bottom of a large glass vase. For linear harmony, add tall stems- but in muted colors... so that they do not draw attention to themselves and the center of the composition remains JUICY BRIGHT FLOWERS.
Or flower cups can be arranged beautifully flower carpet in a flat vase(similar to a bowl or salad bowl).
By the same principle you can make a bouquet of rowan branches, juniper branches and pine needles...
If you haven’t found a beautiful salad bowl... then you can mask its walls with dry leaves- securing it all with turns of coarse rope, or woolen knitting thread(as in the photo below).
And by the way - this photo below is an example of that HOW TO EXTEND THE LIFE OF YOUR WILLING ROSES(which were given to you... they are standing in a vase and have already drooped their heads and are about to start losing their petals - despite the fact that you change the water and trim the stems)...
Withered calyxes will instantly come back to life... if you cut them short. put it in a small bowl (as in the photo below) and decorate the bowl with this leafy wrapper... The secret is that it won’t take long for the water to get to the bud along a long stem... the buds will receive plenty of water and again the petals will become dense and elastic... and your roses will delight you for a long time...
AUTUMN BOUQUETS - on an “oasis” (floral foam).
Can be done bouquet arrangement in the EASTERN STYLE - when material for bouquets OASIS is placed in a flat vase (this is a very porous material, plasticine foam. It is soaked with water and stems are stuck into it - such a bouquet lives for a long time due to the moisture accumulated in the oasis. And you just need to wet it from time to time floral sponge with water.

In such an oasis you can stick not only stems of flowers and herbs, but also pine needles... cones... poppy pods... and other natural materials. And as we see in the photo below, the oasis can be placed on a cut of an ordinary birch log.
Autumn bouquets - from APPLES.
You can make the beautiful bouquet arrangements with apples in the photo below with your own hands.
In order for the apples to stick, you need pin on holders. It could be metal holder- with spread out peaks... insert the holder into the water... prick apples onto the peaks... and fill the gaps with other vegetation.
Or a holder can be replace with sharp knots... sharpen strong thin branches with a knife...prick apples onto the branches...insert them into water under different punctures...and fill the remaining gaps with autumn flowers and leaves.
You can also use SWEET PEPPER FRUITS in a bouquet...
Fruit-bearing VASES - for autumn bouquets.
Citrus and pumpkin crops have a strong, waterproof PEEL. This brings up the idea of using them - AS A VASE.
It is enough just to cut off the top of the fruit... remove the pulp from it... fill it with water and place our autumn bouquet in such a fruit vase.

And even cabbage can become a vase. No, the pump itself will not hold water for long... most likely it will leak. But you can be smarter... make a recess in the rocker... into which to insert a small vase of water.
But the most convenient thing, of course, is pumpkins - such a vase can be used many times... And not only as a vase, but also as a candlestick for autumn evening gatherings with cozy candle lighting.
In addition to the classic round pumpkin, a vase for a bouquet in the fall can serve pathesons, zucchini and decorative pumpkin crops having a bizarre curved shape.
And even decorative pimply fruits - which are not stable - can be placed on their side - and the neck of such a fruit vase can be made - in the side of the fruit. (as in the left photo below).
Or a vase can be made from birch stump... this is of course not a fruit - but also part of the plant world.
Vases with decorative filling for bouquets.
You can use acorns... pine cones... rose hips... apples... beans... cereals... and other bulk natural materials as filling in a vase.
And most importantly... Water should not be poured into the bulk material itself.... otherwise the water will simply darken and all this beauty will simply rot. Better to do the smart thing.
IN wide vase- place narrow vase... so that there is space between the vases. And so we pour water for the bouquet into the inner vase... and pour natural material into the space between it and the outer vase.
Bouquet of leaves- This is a wonderful decorative decoration for your home. In autumn, nature is full of colors, and to fill your home with a special mood, you can do it yourself original crafts with children, create flower arrangements using a wide variety of natural materials. Such bouquets can be presented to the class teacher for Teacher's Day, make it for grandma on her birthday.
Both children and parents will be happy to engage in such creativity. Children really like working with this material, because it is very pliable, it can be bent, cut, glued, and there is no need to work with complex tools, which means that parents’ help may not be needed at all.

Bouquet of maple leaves
Autumn bouquet of leaves- this is both an element of decor for your home and a nice gift for your friends, so be sure to start mastering a new technique for working with natural materials. Children enjoy making appliqués from dry leaves, but mothers and older sisters can engage in decorative creativity.
For this craft we will use not only maple leaves, but also grape leaves. They must be large, without damage, the “living” leaves must be plucked so that they are soft, but it is better to leave the dry ones for creating flower arrangements, herbariums and other autumn crafts. Pay attention to their color too, so that bouquet of maple leaves It turned out bright, juicy, full of autumn colors. You can collect maple leaves in green, yellow, orange and even red; it is advisable to choose one color of material for one flower, but here it all depends on your imagination.

The first piece of paper must be folded in half, front side outward, and the central vein should run across. Now this folded element must be tightly rolled into a roll to get the core for our future flower - it will be a rose.
It is necessary to further lay the petals around this core. We bend the leaf in half outward, and the edge of this bend should be located slightly above the core, about 1 cm. Next, the fold must be smoothed, then the protruding edge of the leaf must be bent, but it is no longer necessary to smooth it in order for the petal to turn out beautiful. The side halves of the petal must be wrapped around the central roll. The lower edges must be pinched at the base of the bud.
For the next petal you will need new leaf, all the same actions should be repeated with it, but it must be placed on the opposite side so that its center overlaps the side flaps of the previous one.
You need to repeat the steps with all the following leaves until your bud reaches the right size. When the bud is ready, you need to tie it with threads at the base, this way you will secure the flower and it will not bloom.

Actually, how many flowers will be included in your bouquet of autumn leaves with your own hands, it’s up to you to decide, and when all the blanks are ready, you can start decorating. To decorate ours, we will need “greenery” made from variegated leaves. For this, we need the material to be dried, and if there is no time to dry the foliage for a long time, it can be ironed by placing it between two sheets of ordinary newspaper. After such a simple procedure, the leaves will become dry, but at the same time fragile, so you need to work with them very carefully and thriftily.
The prepared leaves should be distributed in a circle under the buds, and then wrapped with threads to secure our finished bouquet. To close the threads, you can wrap the base with yellow tape at the end of the design, and after that the bouquet will definitely take on a finished look.
If you're interested, how to make a bouquet of leaves durable, then you can take advice from experienced craftswomen who, through trial and error, came to a solution important problem: how to save fresh look our crafts. So that the flowers do not dry out, but retain their softness and their saturated color, they are recommended to be lubricated sunflower oil. The oil should be applied with a brush to the finished bud, and the oil will be completely absorbed after a couple of days.
Some people also coat the finished buds with varnish to make them easier to care for and to wipe off accumulated dust without spoiling the composition.

Autumn bouquet of leaves
DIY leaf bouquets can be supplemented with other natural materials, for example, in the forest you can collect not only maple leaves, but also collect twigs with rose hips, barberry, hawthorn, they will perfectly complement the composition.
They look very original, and they can also serve as decorative decoration for your home, and such a wreath can be hung on the door, and only after a few months it will be replaced by a Christmas wreath.

In schools and kindergartens in October they organize autumn Ball, and for a girl such a wreath will be a wonderful decoration, and you can also arrange a themed family photo session to preserve bright, warm memories of this wonderful time of year.
The bright colors of autumn in our garden inspire us to create original autumn garden crafts made from natural materials. We offer you great ideas on how to make funny crafts with your own hands.
For example, children can draw a face on a pumpkin with felt-tip pens and then color it with gouache.
And funny crafts made from cones and acorns can unexpectedly captivate even the most serious and adult person.

So bright fun crafts will add a cheerful sparkle to a cool autumn day.
Autumn crafts for the garden from natural materials. Making from pumpkin.
Autumn is generous with harvests and therefore you can use almost any vegetables and fruits for crafts. But pumpkin is traditionally the most popular material for autumn crafts.

The most simple techniques will help you achieve beautiful effect in the garden: children's Carnival masks on a pumpkin or a vertical “bed” of small pumpkins.

How much pleasure it will bring to both old and young to build a “carriage for Cinderella” from regular pumpkin, grown in your own garden!

Bright beautiful ideas Table decorations at the autumn holiday will also lift everyone’s spirits.

Romantic autumn notes will also come in handy in home decor: for this we need small pumpkins, a mirror, glass vase and candles in glass candlesticks, which are attached with wire to the sides of the vase.

Autumn is a time of generous harvests, weddings and preparations for the winter. Autumn crafts made from natural materials are simply imbued with this sunny mood. A riot of colors, tastes and smells is the last cheerful chord of nature before the laconic colors of winter.

Autumn crafts for the garden from grass and leaves.
From dry grass, such as feather grass, you can make amazing beautiful crafts. After all, traditionally folk toys were made from straw.

We bend a bunch of grass in half, forming the head and body, while leaving half of the grass to form the wings. 
Bend the remaining stems to form the right and left wings. Carefully trim the grass from below, making a tail for the owl.

We make an owl's head from ears of corn and berries. These beautiful garden crafts can be made from natural materials.

Using various natural materials for crafts: fruits, flowers, branches, leaves, hay, you can create your own original garden figurine.

Simple, but no less beautiful garden crafts can be made from leaves. After all, the beauty of autumn leaves is mesmerizing. The simplest autumn bouquet will be completely sunny mood. if you add a funny face to the middle of it. You can decorate the table with an autumn bouquet of branches, pine cones and leaves; such decor will look especially beautiful in the warm light of candles.
Can be decorated with a wreath of leaves front door- such a wreath is made on the basis of a frame of branches, to which leaves, berries and fruits are attached. The trunks of climbing garden vines such as clematis can be used as the basis for exterior home decor. We decorate the bare trunks with branches, small pumpkins and add a funny face made of plywood.
You can make a funny little man for the garden from flower pots, decorating it with an armful of leaves, flowers and reeds. A simple but cute craft made from a beach straw hat. And it is done very simply, you can do it with children: you need to cut out eyes and a mouth from paper, and wide tape hats attach a variety of autumn decor.
Autumn crafts from acorns and cones.
Acorns and cones are the most favorite materials for children's autumn crafts. There is so much material like this that you could make a whole series about the lives of acorn men.

These are some cute autumn crafts you can make with your kids for the garden.

Even adults will be interested in making such exciting stories from the life of acorns.

And such a craft can become cute and an unexpected gift for someone special.

For mushrooms...

Even acorns educate themselves...

What do acorns do on weekends...

It seems that autumn is also a very romantic time.

The main steps on how to make crafts from acorns using acorns, twigs and glue:

Cones lead exciting lives too! 
DIY autumn ekibana crafts made from natural materials.
Ekibana- this is traditional japanese art creating bouquets of flowers. Translated into Russian, this word, incomprehensible to us, means flowers that live. As a rule, the Japanese use exclusively live and, if possible, freshly cut flowers to create their floral sculptures.
But since we live in a country where there is no possibility all year round grow fresh flowers, then our Ekibana has transformed a little. In the autumn-winter period, florists and simply lovers of beautiful floral objects make it from all kinds of available materials. In addition to dried flowers and herbs, our people use chestnuts, autumn fruits and even rowan.
Crafts - do-it-yourself ekibans from natural materials on the theme of autumn: ideas, photos
Idea #1 Idea No. 2
 Idea No. 3
 Idea No. 4
  Idea No. 5
 Idea #6
 As you probably already understood, not only compositions made from fresh flowers have the right to be called ekibana. Therefore, if you wish, you can quite easily use any floral material. True, when composing these objects, one must remember that visually they should look as harmonious as possible.
Therefore, when choosing material for your future masterpiece, try to ensure that it matches perfectly in color. That is why you must remember that ekibana is not just flowers in a vase. If desired, it can be secured in a basket, a large glass, a plastic container, or even in a pumpkin. The main thing to remember is that the container in which you will attach the floral material should not be very bright.
If it is noticeable, it will draw attention to itself quite strongly and, as a result, the ekibana itself will be lost against its background. And, of course, remember that such a composition should be as dynamic as possible, that is, it will be better if you try to install the material at different angles and create at least two-tiered objects.
How to make autumn ekibana from leaves: preparation and volumetric compositions
 Bouquet of roses from maple leaves
 Master class on making a bouquet
 The creation of any floral object begins with the preparation of the material. If you ignore this stage, then with a high probability you can say that in the end you will not get exactly what you wanted. As for preparing leaves for autumn ekibana, the first thing you should do is prepare a beautiful and undamaged material, and first lightly dry it from street moisture.
After drying, the leaves will definitely need to be treated with a composition that will make them more pliable and elastic. To do this, you will need to dilute 220 ml of glycerin in 450 ml of water, and soak all the decorative material in the resulting solution. After it has been in it for 3-4 days, the liquid will need to be drained and the leaves should be blotted. paper napkin. And only after they become elastic can you begin to make a floral object.
- So, first, prepare a vase, approximately 40 pieces of maple leaves, threads and beads for decoration
- Then we take the still wet leaves and begin to form a rose from them (the master class can be seen above)
- We make the required number of buds, and then begin to attach them to the stem
- It can be made from any flexible twig of brown or green color
- After your autumn roses will be ready, let's start collecting ekibana
- To do this, pour sand into the bottom of the vase and start sticking the stems of our roses into it
- Having arranged all the roses, be sure to make them a so-called wrapper of beautiful maple leaves and, if desired, decorate them with beads
- If you don’t like this edging, you can easily replace it with a satin ribbon tied in a bow
How to make autumn ekibana from leaves: preparation and flat compositions

 Leaf Butterfly
 Mouse made from leaves
  Birds made from leaves
 House of leaves
 Leaf painting
 Flat Ekibana is ideal option for school and kindergarten. Some florists also call it foliage paintings and panels. Since in this case the leaves are attached to a dense base, all that will be required of you is to give them correct form and form certain shapes. If you wish, you can very quickly make beautiful and air butterfly, a little mouse, flowers or lay out a beautiful clearing.
But in order for you to get all these pictures, first you will need to prepare decorative material. And if for a volumetric composition the leaves must be flexible, then for flat ones they must be as dry and even as possible. In view of this, all collected material it will need to be dried properly.
So:
- The easiest way is to just collect leaves different shapes, tie them in small bunches and hang them to dry in a room with good ventilation. True, you must understand that in this case, when drying, the leaves will curl and will not be smooth and beautiful.
- If you want to get the smoothest possible material, then you can dry it with an iron. To do this, you will need to take a leaf, place it between two sheets of cardboard and iron it with an iron. This manipulation will need to be continued until all the moisture has evaporated from the material.
- If you have time, then put the leaves in a book and put it under a press. Open it periodically and let the moisture accumulated in it evaporate. If you are patient, you will eventually get a material that will retain both its color and its structure.
Ekibana - DIY autumn composition made from chestnuts
 Recommendations for making topiary
  Ready-made chestnut topiaries
  Chestnut beetle
 Vase of chestnuts
 Chestnuts are an ideal material for autumn crafts. With their help you can make some pretty cute toys for preschool and school age, as well as beautiful and, most importantly, exclusive interior decorations. Above you can see an example of how using chestnuts you can make a composition called a beetle on autumn leaves.
Kids will definitely like this craft. You can also decorate with this excellent material a vase (simply placing it on glue), and insert the same roses from maple leaves or dried flowers into it. Well, those who want to do something truly original with their own hands can try making a topiary from chestnuts.
- First, pour the gypsum mixture into the container in which your tree will stand.
- When it begins to thicken, install the trunk of the future topiary in it
- While it is fixed in plaster, start making the top
- Take foam ball and cover it with chestnuts (be sure to cut them in half)
- Next, cut into as small pieces as possible. corrugated paper and fill the voids between the chestnuts with it (use glue to fix)
- When the top is ready, fix it on the trunk and you can safely start decorating
- For this you can use dried flowers, small leaves, acorns, large beads
Autumn ekibana made from fresh flowers
 Ekibana autumn
 Floral composition with leaves
 Autumn motives
 We already told you a little higher that ekibana is, first of all, harmony, so when choosing material for this autumn object, give preference to flowers that bloom at this time of year.
The best option in this case would be asters and chrysanthemums. And in order for others to understand that you have created an autumn composition, you can supplement it with leaves, grass and other flowers that have already changed color. interesting shape twigs.
Yes, and when composing an ekibana, remember that it is advisable to place the brightest and most massive flowers in the center of the composition, this way you will create a point that attracts the eye, but at the same time does not distract from all the other elements of the man-made object.
So:
- At the initial stage, think about what your ekibana will ultimately be like, and in accordance with this, select a container for it
- After this, take a special sponge for ekibana and adjust its size to the selected container
- Place the sponge in a container and fill it with liquid, which will prolong the life of living flowers
- In the next step, start preparing the flowers (cut their stems at an acute angle)
- After this, carefully stick them into the sponge and try to immediately give them the desired slope
- Fill empty spaces with leaves, grass and branches
Ekibana from dried flowers

 Ekibana from dried flowers
  Homemade vase
  Bouquet in a beer glass
 Autumn composition
 Dried flowers are good because you can use them to create quite a lot of different objects. These can be bouquets, wreaths, paintings and original panels. The simplest ekibana, of course, is a bouquet. It can be done in two ways. If you prepare flowers yourself, then simply collect the plants that you like, make a bouquet of them, tie the stems well and hang them to dry in a dark, well-ventilated place (buds down).
If you do everything correctly, then in the fall your home will be decorated not only with a beautiful and pleasant-smelling composition. If you buy dried flowers and then make compositions from them, you will first need to adjust their stems to the same length, put all the flowers together, and then carefully look at whether all the elements of your ekibana are in harmony with each other.
As a rule, if ekibana is made from separately dried elements, then some of its parts stand out from the general visual sequence. If this happens to you, then just take sharp scissors and carefully cut off what, in your opinion, spoils the bouquet. After this, take a ribbon or thin twine and wrap it as carefully as possible around the stems of the flowers.
- If you need to attach a bud to a stem or form one large one from several small flowers, then do this using thin wire.
- If you need to secure a ready-made composition, then use medium-thick wire. It will help you connect all parts of the floral object together without damaging the delicate structure of the dried flowers.
- Well, finally, let's talk about artificial stems. If you need to make them, then take the thickest diameter wire and wrap it as carefully as possible satin ribbon or corrugated paper.
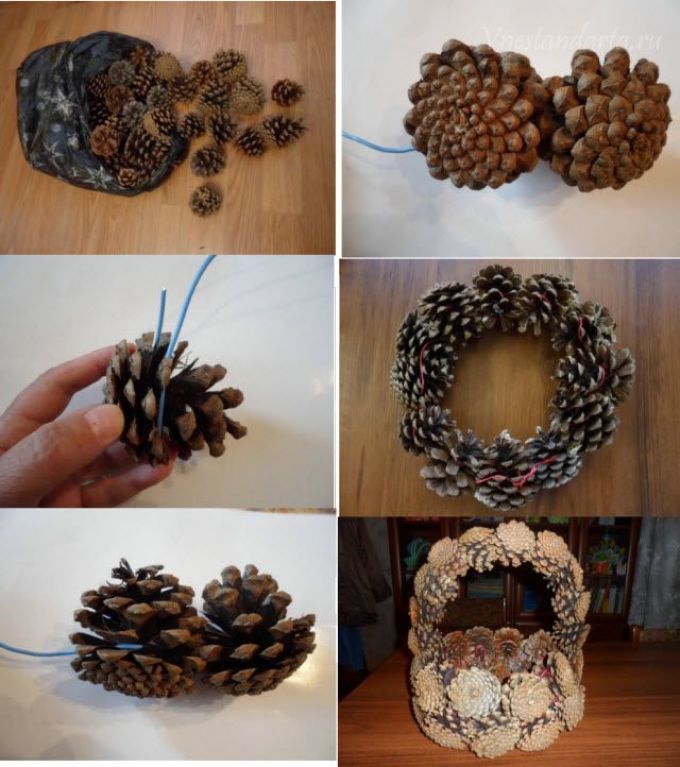
Ekibana of autumn fruits: a basket of cones or acorns

 Master class on making a basket
 Ready product

 Basket from the box
 In autumn, there is literally a lot of decorative material lying under your feet, which can be used to create an original autumn ekibana. For example, you can collect acorns or cones and make them original basket, which can later be filled with dried flowers, fruits or autumn leaves. The easiest way to make such a basket is to take an ordinary cardboard box small size and carefully cover it with cones or acorns of the same size.
You can use a piece of grapevine as a handle for this craft. As a rule, it takes a little over an hour to make all the parts of an ekibana, and after that they are simply connected to each other with wire. If you are willing to tinker a little, you can make a basket exclusively from autumn fruits.
So:
- To begin, collect cones or acorns of the same size and shape.
- If you wish, you can bleach some parts using commercial bleach.
- Next, start forming the bottom of the future craft.
- To do this, take 6 cones and combine them into a flower (if the basket is larger, then you will need 12 or even 18 cones)
- If you use acorns, you can connect them together at the butts and then twist them into a tight spiral
- When the bottom of the basket is ready, begin to shape its depth.
- First, connect two or three cones together, and then form them into the wall of your basket
- At the next stage, using wire we connect all the workpieces together
- Attach a grapevine handle to the basket and fill it autumn apples, pears and rose hips
Ekibana - autumn fantasy in a basket

 Ekibana idea #1
 Idea for Ekibana No. 2
 Idea for Ekibana No. 3
 If you don’t want to make a basket yourself, you can take a ready-made one and turn it into an original one. autumn decoration. Both fresh and dried flowers can be used as filling. If you will use live plants, for example, asters or chrysanthemums, then you need to provide what they need to create favorable conditions, which will help them stay fresh for as long as possible.
In view of this, you will have to insert a plastic or glass container inside the basket into which you can place a floral sponge soaked in a nutrient solution. If you use dried flowers for filling, you will need to stick them into the sand or simply attach them to the walls of the basket with thin wire. Now let's talk about the compositions that are most suitable for ready-made baskets.
I would like to say right away that they do not look very nice on low and sparse bouquets. If you want your ekibana to be as beautiful and original as possible, then try to create an asymmetrical composition that will have two or three tiers. If it turns out that you have flowers with a small stem, then make a continuation of the bouquet on the handle, simply decorating it with buds. This little trick will help visually stretch your ekibana, thereby making it more noticeable.
Pumpkin ekibana for autumn holiday
 Pumpkin Ekibana
  Ekibana on autumn holiday

 Autumn composition
 Pumpkin Ekibana
 Original Ekibana
 Pumpkin is better than any other fruit for creating autumn compositions. If you want to make a similar craft with your child, then opt for a vase. This kind of ekibana is easy to do, but most importantly, it looks very impressive. If desired, you can additionally decorate it with bean flowers or simply make a very delicate and beautiful carving on a floral theme.
But, although such a craft is considered the simplest, it must be done taking into account some nuances. Firstly, you need to know how to choose the right pumpkin. Many beginning needlewomen mistakenly think that the larger it is, the more beautiful the ekibana will end up. In fact, the ideal option for creating an autumn composition are medium-sized fruits. As practice shows, they are the ones who have the most suitable form to create a vase. Secondly, you should never rush to cut out an opening that will imitate the top of a vase. First, you should think about what you will insert inside the fruit (a glass, glass jar or a cut plastic bottle).
Once you understand what is most suitable for these purposes, take a ruler and measure the diameter of the container, and based on the data obtained, cut out a perfectly round hole. Yes, and if you want your vase to visually appear shiny, then cover its surface with glue, and then sprinkle it as thoroughly as possible with ordinary sugar. After it all dries, such a sugar coating will appear crystalline from afar.
Ekibana - autumn bouquet
 Bouquet of leaves
 Bouquet of dried flowers
  Ekibana on the table
  Bouquet of branches
 Most people associate a bouquet exclusively with flowers. But in the case of ekibana, you have the opportunity to deviate from the generally accepted rules and make it from beautiful autumn leaves, dried flowers and twigs. If you manage to arrange these correctly decorative elements, then in the end you will get a floral object that will delight you all autumn and winter.
True, you must take into account that in order for this to happen, first you will need to dry all the components of the ekibana as thoroughly as possible and only then assemble it. Yes, and remember, it is not advisable to combine flowers and dry leaves at the same time. Since these elements are very bright in themselves, visually they will look slightly extravagant. Therefore, it will be better if you supplement the twigs with either dried flowers or leaves.
Ekibana from rowan

 Autumn wreath

 Rowan wreath
 Autumn Ekibana
 Above, we have already told you how you can make original floral objects using autumn flowers and fruits. But while talking about them, we forgot, perhaps, about the most beautiful autumn fruit - the mountain ash. With its brightness and ideal forms it can make any ekibana more attractive.
Therefore, if you think that your craft looks unfinished, try adding bunches of rowan berries to it. If you want rowan to be the main element of the ekibana, then try making an autumn wreath from it.
So:
- Cut the required number of rowan bunches, rinse them in water and air dry
- While this is happening, take a piece of vine and bend it into a circle of the desired size
- If you wish, you can replace grapevine ready-made circle from a florist shop
- Be sure to prepare dried flowers, castings different colors and thin satin ribbons
- When everything is ready, start making your Ekibana
- To begin, fix the rowan on the circle (it is better to place them all as close to each other as possible
- After this stage is completed, begin to fill the voids that have formed between the bunches
- Attach dried flowers, leaves and pine cones to them, and at the very end decorate the wreath with small satin bows
Video: Craft - DIY autumn bouquet (from leaves and cones)
As a rule, we accompany holiday congratulations by presenting beautiful bouquets. However, it is now difficult to surprise the hero of the occasion with a bouquet of roses, chrysanthemums, and lilies. And if you still want to surprise, then you can do bouquet of autumn leaves and rowan berries with your own hands. This bouquet will be an extraordinary gift for someone who celebrates the holiday in the fall.
Fortunately, to make such a bouquet you need completely simple natural materials that you can collect while walking through a park or forest. What you need to make a bouquet

Add a few more leaves and you get a gorgeous flower.

For creating flower arrangement You will need about 15 roses.
Gluing roses and berries to a ball of thread. We thread the “stem” of the rose (leaf cuttings collected in a heap) between the threads of the ball and glue the flower to them.

Place the next few flowers, gluing them to the ball.

Glue all the flowers from the leaves, leaving gaps between them - we will fill them with rowan berries.

We fasten the ball and rowan brush between the threads, gluing their cuttings to the base for better fixation.

We get this flower and berry composition.

Please note that the rowan and flowers are located quite tightly relative to each other - jute threads the balls are invisible.

From the other side.

We place the composition on a decorated bottle - we get a flower and berry autumn bouquet of rowan leaves and berries.