How to make an original kanzashi headband with your own hands in autumn colors. How to make a crown or headband from leaves with your own hands
On fashion shows In recent seasons, you can often see the demonstration of dresses and sundresses in combination with wreaths adorning the heads of models. The sizes of the compositions are very diverse, as well as color solutions. Trend on this accessory representatives of the fair sex immediately appreciated it. Moreover, age does not matter. Everyone can choose for themselves ideal model, favorably emphasizing the natural beauty.
Suitable for whom and for what occasions?
Almost all women can use a wreath to decorate their hair. Another question is the choice of floral composition and flower sizes. Teenagers and girls can safely try on any form. The main criterion is compatibility with the outfit. Discreet compositions of buds are more suitable for women small sizes. The color scheme should consist primarily of pastel and light colors.
It is appropriate to wear the accessory even in Everyday life. It’s clear that you can hardly wear such an accessory to work. But for meetings with friends or a weekend trip, this decor is quite suitable.
The main purpose of the wreath is considered to be special occasions and holidays. IN last years There is a popularity of using the accessory in the image of a bride. Little girls and grown ladies look equally good with delicate little buds on their heads. This emphasizes femininity and gives the appearance a delicate note and charm.
Folk festivals and holidays can also be an occasion to transform your hair by decorating your hair with a wreath. Today's youth love to celebrate Ivan Kupala. Girls with a floral arrangement on their heads look mysterious and charming. This holiday is not complete without required attribute- a wreath woven from fresh flowers.
When using a floral accessory, it is important to remember that it is appropriate in the spring and summer. Although some fashionistas manage to combine it with fur coats and high boots. You can adapt the accessory to the time of year using decorative elements, which correspond to the flowering time. Autumn decorations look beautiful and appropriate from yellowed leaves.
 Wedding hairstyle can be complemented with delicate wreaths of beads or flowers
  It is appropriate to wear the accessory even in everyday life
  Little girls and grown ladies look equally good with delicate little buds on their heads
  Cute little ladies can wear a wreath for a photo shoot
 How to make it yourself
For manufacturing you will need the following materials:
- wire;
- flowers on branches or individual buds;
- tapes.
To ensure that the base is firmly fixed on the head, you can use a headband. It is recommended to complement the flowers with beads and various greenery. This way the composition will look more beautiful and richer.
The only tools you need are scissors. To make it easier to attach flowers, stylists recommend using glue gun. Hot way fixation will quickly and reliably secure the desired fragment to the base. This will save a lot of time drying the surface.
Elements for the composition are used from different materials. For celebrations and stately events, the hair is decorated with a headband of live inflorescences. But plastic and paper are more often used. A composition made of fabric looks very impressive. The skill is honed over the years, resulting in buds that cannot be immediately distinguished from real flowers.

Made from artificial flowers
Step-by-step instruction:
- Measure the circumference of your head to create a wire frame. If it is not possible to take measurements, then you should make a wire rim with open ends to which the ribbons are fixed. By tying it at the back of the head, the wreath can be worn on different sizes. If you use a measure, you need to cut 3-4 wire rods with a length equal to the circumference of the head plus 4-5 cm to fix the ring. Twist the base from them without closing the ends.
- Take twigs artificial flowers and disassemble them into individual buds and leaves. Short branches are also suitable for the composition. Flowers need to be cut close to the base so that the stems do not interfere with the fastening.
- First make a preparation of buds and leaves, laying them out on the table. Larger fragments are placed in the center, and smaller ones are placed toward the back of the head. Flowers should have the same tone and size, and the overall composition should be complemented by greenery from leaves and twigs.
- Cut circles from felt, smaller in diameter than flower buds.
- Glue a felt piece to each piece so that there is a free strip 0.5-0.7 mm wide in the center.
- String all the elements one by one, pulling the wire backing into the empty space in the center of the felt.
- Distribute and adjust the composition.
- Twist the ends of the wire, wrapping each other several times.
- Cover the junction of the rim with flowers.


From fresh flowers
Step-by-step instructions for making a wreath:
- Make a wire frame. To do this, you need to cut 3-4 twigs, the length of which will be equal to the size of the head circumference plus 3-4 cm for fixing the ends.
- Prepare the plants by cutting their stems into 10-14 cm pieces. To prevent flowers from wilting quickly, they should be treated with floral spray. This way the wreath will last a long time presentable appearance.
- Wrap the resulting ring with 4-5 cm of floral tape, then place the wreath fragments one by one. Secure each stem tightly with tape, making 3-4 turns. The elements need to be placed closer to each other. The elements will be primary flowers, field herbs, and other greenery. As an addition, you can use beads and pebbles mounted on pieces of wire. In combination with fresh flowers, the decor will look elegant.
- The stems of the last elements are hidden under fixed plants and tightly fixed with tape.
Wreaths from living inflorescences can be woven without creating a frame. Trim the stems to in this case not necessary. Start weaving by forming a bunch of 3-5 stems. Each new fragment is wrapped around the long stems of the initial bundle in two turns (before the inflorescence and after it).
The end is connected to the bundle and closed into a ring using floral tape. To give the accessory strength, you can add a satin ribbon to the stems of the initial bunch. You can use it later to connect the composition.


From autumn leaves
A wreath made of autumn leaves. The most popular is maple. Its leaves turn yellow faster than other trees, and its structure is strong and does not lose original form for a long time.
Step-by-step instruction:
- Attach 4-6 leaves at a time to a rim prepared from wire. Fixation is carried out using floral tape.
- After 3-4 beams maple leaves insert a sprig of rowan. A reminder of summer would be useful. To do this, you can insert green leaves every 5-7 rows.
- The stems of the last fragments need to be hidden under the fixed leaves, and cut off the excess ones.


From paper
Paper flowers turn out to be very delicate and fragile. When worn, they may lose their shape, so experts recommend fixing flower arrangements on solid foundation. A regular hoop is best suited for this. It is better if its base is wide, then the accessory will turn out to be massive.
Instructions:
- Place a composition of paper buds and leaves on the table. You can add plastic greenery and beads fixed on a wire. Place the massive part in the middle, and place small elements towards the edges.
- Attach the fragments to the base of the hoop one by one using hot glue or PVA.
- Compact the composition with herbs and other decor.
- Parts of the hoop that go behind the ears There is no need to paste over with floral elements.


From tapes
To create a wreath, you will need to prepare elements: flowers of 4-5 types, greenery, stamens. All of them are made from satin and organza ribbons. If everything is clear from the tonality of the colors (for beautiful composition they are made from various bright colors), then the leaves are cut out to create a three-dimensional composition from several shades of green ribbon. To add airiness, you need to use organza blanks.
The shape of the greenery should follow the outlines of the leaves of several plants. For example: poplar, oak, maple. All edges of elements made from tapes must be melted to prevent fraying of the threads. You can use a lighter for these purposes. Flowers most often chosen are: poppies, daisies, cornflowers, roses, chrysanthemums, asters. They combine well with each other or in addition to other inflorescences.
Step-by-step instruction:
- Braid the headband with green ribbon using the “snake” method. Secure the ends of the weave with a needle and thread. This will be the basis.
- Glue the leaves along the contour of the rim on both sides. Lay the elements overlapping, using different types greenery You should get a voluminous base.
- Next, secure one by one flowers on glue.
- Lastly, the composition is sealed with organza leaves. They need to be fixed 3-5 pieces at a time. Then the wreath will be big.
- Sew a 10-15 cm elastic band to the edges of the headband(depending on head circumference). It should be decorated with green organza.
- Sew several freely sagging ribbons of 30-40 cm each onto the elastic band. It will look beautiful if you use satin strips of different thicknesses (1 and 2 cm). Their colors should echo the tones of the colors used in the composition. Make a beautiful triangular undercut along the edges of the ribbons.


- For long events, you should carefully use accessories made from live inflorescences. They quickly lose their appearance and by the middle of the celebration they will completely lose their presentable appearance if they are not first kept in the refrigerator. Helps prevent rapid fading special spray purchased at a florist shop.
- If provided leisure, you should take into account the reliability of fastening the wreath. Ribbons tied at the back of the head will help to better fix the headband on the head.
- A bright wreath of large flowers should not be complemented with flashy makeup. The result will be an overload of the image.
- A floral accessory looks impressive on loose and slightly curled hair. Appearance takes on features of tenderness, romanticism and freshness.
- You can make a wreath from several branches of artificial flowers. First you need to disassemble the branches into individual fragments. Then assemble the composition by gluing the elements onto the hoop.
- On special events and weddings it is recommended to use accessories from small flowers of pastel colors. Thin satin ribbons will make the decoration fit for purpose.
- Before making a wreath for the bride from fresh flowers, you should consult a florist. A specialist will tell you which plants are best used to make decorations. Quick spoilage A floral headband can ruin the holiday.
- How longer strand , the larger the composition elements in the wreath.
- The accessory should fit comfortably on the head. You should not build too bulky rims. They are uncomfortable to wear, and in the photo your face will constantly get lost in the buds and leaves.
- If the bride's outfit involves adding a wreath, then the buds from the rim should echo the bouquet.
Alena Turyeva
Traditionally, in October, in our kindergarten pass autumn matinees . And despite the fact that called autumn"dull times", however, who else but the children are most happy bright decoration hall, models of mushrooms, a garland of green, yellow, red and orange leaves.
Within a week beauty Autumn looked into each group: to both big and small, leaving no one unattended. Role Autumn I tried it on myself more than once. Every time the image Autumn was different.


For the image Autumn was done and autumn wreath on the head. The first time I made it from colored paper and artificial flowers.
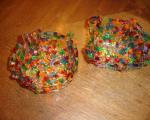
Now I would like to show you how to do it QUICKLY DIY autumn headband. For we will need a headband: bezel(I had green and yellow, various berries, flowers, cones (what I had available, I used, thread (I used yellow color, because the rim was this color, hot glue, crepe paper yellow, green.


Let's start making ours bezel: with the help of thread we fix our parts to rim.


We cut out leaves from crepe paper and glue them where we see fit.


If you need for a short time do autumn headband, then my description of the work on its manufacture will be useful to you. My work took 15 minutes. Can be done bezel and without the help of threads, for this you will need to separate each berry and wrap it around bezel(I bought the berries at the Leonardo store).
Thank you for your attention!
Publications on the topic:
 Material for the master class: - printouts with images fairy-tale heroes; - cash register - fan; - scissors; - glue stick.
It is no longer so easy to surprise a modern person with sophistication and uniqueness. soft toy, because the market is oversaturated with very diverse ones.
 Master class with children and parents “Flicker - with your own hands” (within social project“Competent pedestrian”) Relevance: large number.
 Of course, the easiest way is to buy a costume in a store, but this will not be cheap, especially since kindergarten requires more than one costume.
Master class “Do-it-yourself labyrinth” The labyrinth has always been considered a difficult test, requiring attentiveness and perseverance. Of course, for children.
Master class “Do-it-yourself crayons” How nice it is to be in kindergarten in the summer! During the summer health period, my colleagues and I try to create favorable conditions for our children.
A stylish headband decorated with ribbons will instantly transform your look and decorate your hair.
Bright and at the same time unobtrusive kanzashi headband in autumn color scheme Suitable for both blondes and brunettes! To make such beauty with your own hands, you will need a little time and some skills in working with ribbons, which you will acquire in this master class. Step by step photos is an indispensable tool for beginners, so feel free to start creating, even if you have never worked in the proposed technique.
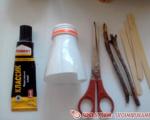
Decorative elements and tools for work
To make such an autumn headband with flowers from ribbons, you must have in stock:
- 7 colors satin ribbon With smooth transition from one shade to another - from yellow to brick red or burgundy (13 pieces of 2.5 cm by 6 cm for making a twig and 6 of the same pieces for modeling a flower);
- thin plastic bezel;
- glue and thread with a needle for attaching the petals;
- fluffy fringe golden color or tape (13 or more pieces measuring 4 cm by 1.5 cm);
- red sugar viburnum berries for decoration;
- yellow felt base in the form of a rectangle 12 cm by 2 cm;
- metal sun hug and stone 0.8 cm.


If you decide to try your hand at the kanzashi technique for the first time, take a look at.
Master class with step-by-step photos
Cut 2.5 cm strips from the satin ribbon to make twig and flower petals. The following will be used in the work:
- 3 bright yellow,
- 2 yellow,
- 2 orange,
- 2 dark orange,
- 2 fiery,
- 2 red,
- 6 burgundy stripes.
The length of all blanks is 6 cm.
To decorate the kanzashi with a floral arrangement, prepare a headband, the width of which is approximately 0.5 cm. To make a fringe from a gold ribbon, fluff the pieces. Also prepare decorative berries and a half bead with a stone.
To make petals from strips of ribbon, place the blanks vertically. Create a fold, forming a 90 degree angle.

Turn side part corner down so as to align the 2 ends of the tape. One side of the petal will be smooth - this is front side, the second – with a pocket.


Prepare pairs of petals different colors to form a long branch like a spikelet. The first color will be bright yellow, so you need to prepare 3 of these parts. Glue all the parts in pairs, then draw a spikelet.

The darkest petals, intended for the kanzashi flower decorating the rim, can be collected on a thread or glued together, helping with tweezers. Glue the rock into the center of the sun hugger.

Cut a 2 cm by 12 cm rectangle from yellow felt and start gluing on one side flower arrangement. Glue on the first lightest yellow petal. Go around the first piece with two pieces of gold fringe and glue two berries.


Continue gluing the prepared pairs, arranging them by color (from lightest to darkest). Place gold between layers.

Create an elegant composition from satin ribbons.

Glue the remaining fringe to the back of the flower around the circumference. Decorate the center of the kanzashi rim with a hugger with a bead.

Add 2-3 berries to the back of the felt after adding a drop of glue.

Cover the top end of the wire with gold, then a small piece of felt.

A bright stripe with flowers to decorate the headband is ready.

Glue the decorative kanzashi blank onto the hoop, slightly moving it from the middle to the right or left.

Add to the side dark flower, which will complete the decor.

An elegant and exclusive autumn headband using the kanzashi technique is ready. If you can convey all the colors of the brightest time of year in your product, then the owner of such an accessory will not go unnoticed in any season!


To watch other master classes on making headbands and other jewelry using the kanzashi technique, take a look at “ Women's hobbies" If you are interested in instructions for making headbands in different techniques, go to .
To stay updated on new interesting and useful publications, join our groups on social networks! Until new creative meetings!
All kinds of headbands, headbands, hairpins, plaits, hair decorations - all this is fashionable, beautiful, modern and in demand. Why not make yourself a hair decoration? This could be a DIY headband, a turban, plaits or fabric hairbands. For girls, you can make a crown or a unicorn on the headband (patterns are included).
The easiest option: how to make a hairband with your own hands - use wire, beads or flowers. You don’t always have a headband on hand that can be decorated. In this case, a wire rim is what you need to create a decoration. It is easiest to work with thin wire with a diameter of 0.5 or 0.3 mm. This wire is used in beading and is sold in craft stores.

This kind of rim can be made from 0.3 mm wire. and beads.

You can change the design, make the wire cells smaller - everything is in your hands. The technique itself is very simple: take a large piece of wire, bend it in half and twist 4 cm, then bend these 4 cm into a ring, to which an elastic band or chain is attached at the end.

Then there are 10 cm without decoration - just twisted wire. And then, at approximately the same distance, you twist these “honeycombs”, putting a bead on a “twig” of wire. Nothing complicated, everything ingenious is simple! I think that instead of beads, you can use beads, stringing them on a wire, and if you make small flowers from beads with your own hands, you will already have a twig with a flower.

If you want to know more details, watch the master class on this decor.
Look at what a beautiful beaded beaded bezel you can make on a thin base:

Such a headband with white beads can be made for a wedding. Here the thin bezel itself is braided with wire and beads. Decorated with beads and roses made of polymer clay.

Roses can be made from ribbon, felt, leather or any nylon fabric.

Hairbands can also be made from thick wire, and decorations can be different.
Felt headbands - ideas and master class
How to decorate a headband? Multi-colored felt works well for this. Felt can be replaced with leather, suede, felt. Felt flowers self made — beautiful jewelry. Felt products are in no way inferior to felt jewelry.


Felt headband - master class
You can make an original decoration made of felt with an elastic band or on a headband with your own hands. In terms of costs, it turns out to be very cheap, and such decoration looks quite interesting and fashionable.

To work you will need:
- Felt in three colors: burgundy, pink and green.
- Some beads.
- Thick wool thread.
- Thick needle.
- Elastic band or headband.

Use a ruler to estimate the size big flower. Print or draw a pattern by hand and pin it to the felt.

We cut out these details.

Then to the big ones burgundy flowers add 2 more pink flowers. Notice how they are cut: the pink felt protrudes slightly beyond the cut of the burgundy felt.


We folded it, and now we take a needle with a thick thread and sew our design, stitching right through.


All that remains is to cover our structure with the second circle. That's all. Autumn accessory ready from felt.

Hairband with flowers - master class
It's no secret that bandages are one of the most fashion jewelry for hair today. A soft, comfortable base, inexpensive - after all, such a beautiful headband can be made from leftover fabric, from any scraps of leather, suede, or simply from old t-shirt. Such stylish headbands are decorated with butterflies, rhinestones, beads, and so on.

To work you will need:
- Flowers, ready-made or made with your own hands.
- Glue Moment.
- Wire.
- Beads.
- Some beads.
- Elastic and fabric for the base.
- Centimeter.
- Pencil, ruler.

We measure the volume of the head with a centimeter. ⅓ of the total volume will be elastic. We measure the length of the base, make a piece of fabric: put the 2 parts together, stitch them and turn them inside out. Please allow 1 cm allowance. We apply the base to the elastic band and secure it with pins. Don't forget to turn the edges in 1 cm. Measure on your head. If everything suits you, sew it on, stepping back from the edge by 0.3 mm. You can sew by hand, a machine is welcome.

We make flowers from ribbons, organza, or. We arrange the flowers on the bandage.

Apply glue to the base of the flower and glue it to the fabric base.

We make this additional decoration from twisted wire, beads and seed beads.

Glue or sew one or more branches to the base. Ready fashion accessory, made with your own hands.

Jewelry such as hair plaits appeared relatively recently. Especially popular among Americans. They look very interesting. The most complex harness is called the Celtic knot.


Making such a rope is not difficult, you need to take a thick rope, cut it into pieces 75-80 cm long. Next, take fabric or knitwear of the same length and width, equal to the diameter of the rope plus 1 cm. Stitch with wrong side and turn it right out. We make a Celtic knot and stitch it with a needle and thread to match the color of the fabric. This is necessary so that our knot does not come apart. Trim off the excess. Sew on elastic or tape.

This type of tourniquet is also called Greek. You can also make a tourniquet from an old T-shirt. It is enough to cut the strips, stretch them by the ends so that they curl into tubes. Tie a knot, sew the ends together, or simply tie.


To work you will need:
- Light fabric - width from 14 to 18 cm, length - 70-75 cm (2 strips). You can simply cut a long scarf.
- Centimeter.
- Threads to match the color of the fabric.
- Pins, scissors.
- Beads or rhinestones (optional).
- Thin wire 0.3 or 0.5 mm. (Needed for the turban to keep its shape).

We measure the head. The bandage should be no smaller, but slightly larger in size than the head. We fold both strips lengthwise and stitch the edges of both, leaving a 4-5 cm section unstitched - this is necessary for turning it inside out. We also stitch the transverse ends. Turn it inside out. It turned out to be two “pipes”. Bend the ends of the wire (make a loop at both ends). Insert the wire into one of the pipes, inserting it into sharp corner“pipes” and sewing with threads. Sew open areas blind stitch. Next, we lay out both “pipes” on the table. Red “pipe” on top.

Pass one “pipe” into the other, as in the photo. We thread the red part into the burgundy one. Pull out the burgundy piece so that both “pipes” are connected together. Manually secure the joints of the parts with invisible stitches.

Let's learn how to weave wreaths, skullcaps and hats from natural materials. Let's start with a regular wreath, we will weave it from fresh flowers. How to weave a wreath correctly depends on the flowers we are weaving from. You can weave a wreath from dandelions, clover or chamomile like this:
Take a flower, for example, a chamomile, place a second one crosswise on it, wrap the stem of the second chamomile around the stem of the first and lay it along the first stem, etc. See how to do this in the figure below. When the wreath is woven to the size of the head, the first and last daisies are tied together with a blade of grass - the wreath is ready.
If you want to weave a wreath from flowers such as water lilies, the stems of which are so thick and fleshy that they are difficult to braid, weave the wreath differently. Take a lily and, together with it, hold a flexible blade of grass or two blades of grass in your hand. Then take the second lily, place its stem crosswise on the stem of the first and braid the flowers with a blade of grass. Thus, you will weave a wreath of grass, weaving lily flowers into it.
Using this principle, you can weave wreaths from any large flowers, even roses, of course, having first removed all the thorns from them.
Very beautiful wreaths are made from flowers interspersed with leaves. You can weave a wreath from only leaves alone.
Interesting wreaths are made from leaves with bunches of bright berries woven into them here and there - rowan, elderberry and others. 
If you want to make yourself a costume for a carnival of some fairy-tale figure, such as a goblin or a merman, you can put a wreath woven from horsetail with tufts sticking out in all directions on your head. A mermaid costume will go with a wreath of white lilies, yellow water lilies, or a wreath woven from long branches of white or pale pink bindweed.
DIY crafts made from natural materials from leaves:
Pick leaves from some tree that does not wither very quickly, such as birch, and braid them into a long garland using blades of grass. Having rolled the garland into a ring according to the size of your head, fasten the ring with a blade of grass and gradually lay out the garland in a spiral, fastening the blades of grass to each other and gradually narrowing them upward. You can do it interesting hat from green leaves. She will be reliable protection from the scorching sun on a hot summer day, a good headdress at the carnival. How this is done - see the picture. 
Burdock hat 
A hat with a large brim that provides good protection from the sun can also be made from burdocks. Pick several large burdocks, almost to the base of the stem, place the burdocks together and use ribbon or blades of grass to tie them together by the remaining pieces of stems. Weave a wreath from blades of grass to the size of your head. Pierce each burdock with a twig in two places near its main vein and use blades of grass to attach the burdocks to the grass wreath. You'll get it cool broad-brim, which will stay on your head very well. To prevent such a headdress from quickly withering, spray it with water from time to time.
Burdock skullcap
And one more interesting example. From scraps of some fabric, cut four strips one centimeter wide, each the size of your head. Cut one strip three centimeters wide for the rim. First sew the headband, and then sew all four stripes crosswise to it. At the top, where the strips intersect, secure them with threads.

Then collect burdock flowers different color and place the burdocks on the made frame, one next to the other. Make sure that there are no gaps between the burdock balls so that the fabric is not visible. Cover the band with burdock in two or three rows.
G. V. Bubekina, G. P. Goslavskaya
Homemade products from natural material

A wreath of leaves is woven in the same way as a summer wreath of daisies or dandelions. Just in case, here's a picture to make it clear how to weave.

Making a crown from maple leaves!
|
One autumn day I saw a couple walking along the sidewalk. The boy had something like this crown on his head, and the girl didn’t even have a wreath, but rather a kippah, but a very beautiful one, made of maple leaves... I then really regretted that I didn’t have a camera with me, and it’s a sin to take pictures of THAT on a phone. They really stuck into my consciousness with their spontaneity and carefree autumn light...
|