Volumetric application on the theme of May 9. Volumetric application for the Victory Day
Paper crafts for Victory Day in kindergarten. Senior - preparatory group
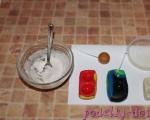
Nechaeva Elena Nikolaevna, primary school teacher, KSU "Secondary school No. 21, Saryozek village" Osakarovsky district, Karaganda region Kazakhstan
Description: I want to offer an application of colored paper "Salute of Victory" by May 9. The application can be performed with children 5-7 years old. Work for teachers of additional education, educators, primary school teachers.
Purpose: gift for veterans with their own hands.
Target: Making a gift for the holiday on May 9 to veterans.
Tasks: Develop imagination in composing a composition, artistic taste in choosing colors, fine motor skills in the process of making an application. To educate patriotism, respect for people who won the Victory.
Materials and tools necessary for the manufacture of the application: cardboard, colored paper, scissors, glue, pencil, black felt-tip pen or marker, templates, sample work.

On May 9, 1945, everyone celebrated Victory Day. Many years of peace have passed. In 2015, the whole country celebrated the 70th anniversary of the Great Victory. This heroic day is a day of remembrance for all people who gave their lives for a peaceful sky above our heads, for the happiness of all people. Victory Day is a holiday in honor of all those who defended peace in our land! Glory to them, eternal memory and best wishes. We thank them for the world they gave us 70 years ago. And let the bright salute of Victory fly into the sky in their honor.

Salute and glory to the anniversary
Forever memorable day!
Salute to the Victory in Berlin
Fire trampled down the power of fire!
Salute her big and small
Creators who walked the same path,
Her fighters and generals,
Heroes fallen and alive
Salute!
Guys, today we will perform the application "Salute of Victory". And our works will be presented to war veterans.
But first, let's remember -
safety precautions when working with scissors:
Use scissors with rounded ends.
Store scissors in a certain place, put them with closed sharp ends away from you.
Pass the scissors with the rings forward with the blades closed.
You can't cut on the go.
When working with scissors, it is necessary to monitor the movement and position of the blades during operation.
Do not use blunt scissors or loose hinges.
Do not hold scissors with the blade up.
We need templates to work.
You have templates on your tables with which we will cut out all the details of our work.

Choose colored paper for your application, make your salute bright, beautiful, festive.
Step by step work:
1. We select the color scheme of colored paper and cut out the details of the application according to the templates.

2. We take a sheet of cardboard and glue the inscription May 9 at the bottom.


3. We take a red star and glue it over the inscription. Draw a relief on the star with a felt-tip pen.


4. Glue the flames. We have an eternal flame.


5. Glue the base for the salute over the eternal flame.

6. Next, glue the salute stars, beautifully, evenly distributing them on the cardboard, so that we get clusters of salute.


7. Salute stars can be cut from different colored paper.

8. Salute stars can be made in one color.

9. Salute can be made not with stars, but with different shapes of circles.

Salute of Victory
Splashes of stars
Scattered in the blue sky.
Good afternoon everyone. In the previous note, we touched on the great holiday - Victory Day. Therefore, I decided to continue the issue of preparing for this event.
Along with the festive celebration, at which military songs are sung, exciting ones are read, they also organize craft contests for May 9, the creators of which are most often children.
That is why the topic of today's post is the manufacture of various souvenirs dedicated to the Great Patriotic War. Also, in this collection you will find works that can act as handmade gifts for veterans.
The main attributes of this holiday are the Eternal Flame, the St. George ribbon, the Dove of Peace, the red star and carnations. That is why all products contain one or another element.
Let's take a closer look at what you can make with children on Victory Day.
First of all, you can make all kinds of postcards, applications in the form of paintings. Moreover, the work can be made from any improvised materials.

See what beauty can be made from beads. Looks very original and festive.


And here is the Dove of Peace with a carnation. Find a stencil or draw a bird yourself, then prepare a beautiful background and glue it on.


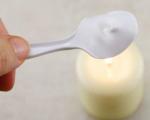
This event also hosts reviews of military equipment, so you can make such cars. We already know how to make a tank. Remember, on February 23, it was about this, we made it from an unusual material, from a sponge.

Here is another version of the spring bouquet, which is decorated with St. George ribbons. It turns out a very good gift for our esteemed veterans. How to make flowers from candy corrugations? Very easy!! There is already a separate one about this too.

You can also make various symbolic orders, for example, mold them from salt dough.

But look what an easy job done on an unnecessary CD-ROM. This option is suitable for preschoolers.

Do not forget to create different obelisks, monuments. You can even use matchboxes.

I found another original bouquet made using the quilling technique.

All crafts are filled with a special spirit, they remind us of the tragedy of those times ...
Step by step process of making paper carnations
Carnations are special colors for this military holiday, especially the red ones. This is the memory of those who gave their lives for our peaceful sky.
I suggest you make paper flowers, it is best to use corrugated paper or napkins.

You will need: corrugated paper, a simple pencil, a ruler, zigzag scissors, regular scissors, glue stick, disposable tubes.

Work process:
1. Take a whole package of corrugated red paper, and without opening it, mark with a pencil on both sides along the edge the dimensions of 2 cm and 4 cm. Draw straight lines.

2. Now cut the zigzag along the 4 cm line with scissors.

3. Using ordinary scissors, cut the flower petals from the side of the zigzag to a line of 2 cm. At the same time, alternate 3 notches, 4 notches each.

4. Expand the workpiece along its entire length and cut in half.

5. Take one half and coat with glue along the entire length at a distance of 3-4 cm.


7. At the end, press the flower firmly.

8. To make a stalk, you need to cut across a whole package of green corrugated paper 1.5 cm.

9. Lubricate the strip with glue and wrap it around the tube, starting from the sepal.

10. To make leaves, cut a strip of green paper 8 mm wide and 15 cm long.

11. Now cut the top diagonally.

12. Coat with glue and glue obliquely onto the stem.

13. Move the bud petals down.

14. And then slightly lift them at the base.

15. Your red carnation is ready.

If the work is done by an adult, the red paper can be left uncut, and the tops of the petals can be colored with wax crayons.
Very beautiful and quick crafts for kindergarten children
Let's see how our kids, preschool children, can surprise and please us.
I found not at all difficult, but an easy craft for our guys. We will make the Dove of Peace from children's hands. And remember that the dove is a symbol of purity and nobility.

You will need: A4 strong white paper (cardboard), green paper, pencil, scissors, figured hole punch, glue, sticks (wooden skewers).
Work process:
1. Trace a child's palm on thick paper. Draw a beak on the thumb. Cut out the piece.

2. Using a curly hole punch from green paper, cut out a twig and glue it to the beak.


3. On the reverse side, attach a wooden skewer.

4. That's all. See how easy and fast these birds are made. Then all the work can be put in a beautiful vase.

For older children, you can use not your palms, but patterns of cut-out figurines for pigeons, plus you can tie the skewers with ribbons.

Here's what else you can do with the guys:
Beautiful daisies from paper strips.

Field postcards, very cute and patriotic.

Plasticine postcards, just right for kindergarten.

Or a beautiful applique for older preschoolers.

Also, do not forget about the origami technique.

Use thread, sequins and sequins.

Here are some beautiful orders that can be made from colored paper and cardboard.

As you can see, there are a lot of ideas for creativity, there are plenty to choose from.
We make gifts for the Victory Day for veterans (holiday cards)
Of course, as souvenirs for our defenders, in the first place, there are flowers and postcards. We have already learned how to make carnations. Therefore, now let's see what postcards can be made.
A couple of holiday options for you:


But to create it yourself, I offer you just such a voluminous beauty with the Eternal Flame. Well, or you can use the options above))

You will need:
- cardboard box;
- colored paper or colored cardboard (red, orange, gray, yellow);
- PVA glue or double-sided tape;
- hydrocyanic wire;
- paper molds for cupcakes;
- red paint;
- tassel;
- full length photograph of a soldier.

Work process:
1. First you need to make a base. To do this, take a cardboard box and glue it on cardboard, preferably gray.

Paste the box itself with red paper, or initially choose a red box.
2. Glue the cardboard strip at the bottom so that its edges form a stand for the soldier. You can make two coasters.
3. Now make a star. Take a gray sheet of paper and draw some stars of different sizes. Cut out the stars and glue them on top of each other, starting with the largest star and ending with the smallest one.

4. Now cut out the flame and cut it out. It is best to use three different colors: red, orange, yellow. Glue the fire on the stand, that is, on our stars.

5. Find an image of soldiers, print and cut out. Glue them with double-sided tape to a strip of cardboard that is slightly longer than the picture itself. Then bend this strip like a triangle and glue it to the base.

6. Glue the fire to the gray background, glue the soldiers on the sides, make arcs out of cardboard and stick them too, as shown in the photo.


8. Fix the flowers on the pedestal. Additionally, you can cut out the flag and helmet.

This is how a beautiful, original and voluminous craft-postcard turns out. On the side, you can glue a white sheet with wishes, cutting the edges with curly scissors.
In general, the topic of postcards for May 9 is very large and multifaceted, so there will be a separate article on this issue, so stay tuned.
Master class on making a St. George ribbon from satin ribbons
When I started looking for a photo selection on this issue, I realized that we take the original tape itself, that is, the orange-black one, which you can buy or get for free. Recently, they are handed out to all passers-by.
But to make it not like all the others, but special, then we need satin ribbons.
And for you, as always, I have an excellent, and most importantly, detailed video story. The author will tell you how to decorate the St. George ribbon in the style of kanzashi.
As a result, you will get an original brooch. Look at more options:

Creative work by May 9 from plasticine
I have already said more than once that plasticine is a favorite means of work for children. Therefore, we begin to make souvenirs from this material, or take a mass for modeling.
Such a voluminous composition, in which all the paraphernalia of the holiday.

And look what a bright postcard, drawn with pencils and supplemented with plasticine elements. Easy option for kids.

Here is another version of sculpting symbols.

This work is for older children, here is a whole military composition.

You can also mold military vehicles: planes, tanks, ships.

Or portray our heroes in battle!!

Plasticine postcard.

You can also fashion stars, orders, a ribbon.

Or here is another composition from the battlefield.

Ideas for holiday souvenirs from the Land of Masters
There are a lot of different crafts for May 9 on the Country of Masters website. I sat down and looked for works that, in my opinion, are the best, I share with you.
- Postcards, monuments


- Postcard in scrapbooking technique

Good afternoon dear friends. Very soon, our entire vast country will celebrate the holiday of the great victory over Nazi Germany. And in a number of schools and institutions, competitions will be announced for the best do-it-yourself crafts dedicated to Victory Day before school education.
Children's crafts for this holiday are not only the development of creative thinking, but also a good way to instill in the younger generation a sense of patriotism and deep respect and gratitude for the feat of our people, which made it possible to live on our land without war. And also to live and enjoy life under a peaceful sky above your head. Even if your kindergarten or school does not require you to make any crafts, I still suggest making a small souvenir to give to a passing veteran at the parade as a token of deep respect and gratitude for his feat.
And to make it easier for you to make a choice which craft to make with your child, I flipped through a bunch of Internet pages and selected for you the most beautiful and simple souvenirs that you can easily make with your own hands without having special skills. All found instructions are attached below so go scissors in hand and get creative.
Of course, we will start with very simple ideas. And the simplest thing is, of course, to make a beautiful thematic picture from plasticine. An integral part of which will be a red star and a St. George ribbon. See what options there are. Perhaps they will lead you to something similar.
Also, something voluminous can be placed on a plasticine picture. For example, these are paper carnations. How to make such flowers instructions will be a little lower.
Ordinary plasticine, but at least put the paintings up for auction. The bird as a symbol of peace, and the eternal flame as a symbol of eternal memory.
Here is another beautiful composition, also made of plasticine. The master fashioned a whole memorial with flowers and eternal flame. Did you know that instead of plasticine, you can use specially salted dough? Pay attention to all the crafts below are made from salt dough and painted with ordinary watercolors.
And this is called the trimming method. For it, you will need a drawing with contours, scissors, PVA glue. And a ballpoint pen. As a material, you can use tissue paper or ordinary table napkins. Here the fire is made in the styles of facing.
For trimming, cut out a small piece of paper, wrap it around the rod and glue it in the right place.
Here is another painting done in the same style. Nothing particularly complicated, but it looks great. Try it and you will definitely succeed.
Of course, a little perseverance and a car of patience will be required here.
To do this, draw the outlines of a dove with a pencil. Cut small squares from a white napkin, and then wrap it on a rod and glue it in the right place, choosing the necessary colors of napkins. 
Here is an asterisk on a plain background. If your imagination doesn’t particularly work in this direction, try writing the date in beautiful numbers and supplementing it with flowers or a red star. It won't be bad either. 
Well, where without a beautiful salute of victory.
I think every home has a few old CDs or DVDs. Of these, you can make such an original craft for Victory Day.
Here's another idea of how you can use old CDs as decoration. We just glue the St. George ribbon, supplement it with other symbols and the craft is ready. Simple and tasteful.
Or if there is space left, you can write a significant date.
Next, consider the quilling technique. This method consists in the following: small strips of paper are folded into rolls, then glued along the marked contours. See what a simple beautiful tank can be made according to this principle. 
The author used corrugated cardboard. But you can also use plain paper.
Or here is a video instruction for you on how to assemble a tank from matches and paper. Look at how difficult it is.
In addition to the tank, you can try to collect a beautiful star folded in the style of ogrigami. Here is the detailed instruction. 

According to the template, we schematically draw a fire, a star, cut it out and glue it on colored cardboard.
Or you can make a three-dimensional star. Here is a good template for you where the fold line is indicated by a dotted line.
We transfer the template to cardboard on one side and make clear lines. To make it easier to bend. Using a ruler and scissors, draw scissors along the fold lines.
Then the cardboard will bend where you need it. Not where he wants.
Here is the beauty.
We supplement the fire from the red napkin.
Here is an additional video instruction to make it easier for you to understand all the technical points.
Also, the eternal flame can be laid out from small plasticine balls.
Print or draw a schematic picture of an eternal flame. Tell your child the idea and watch how enthusiastically he will try. 
And the background can be painted with watercolors.
Or complete the picture with a beautiful application.
Here's another idea for you on how to create a mini replica of a memorial. With sentries.
Would need;
candy box.
Colored cardboard and paper.
PVA glue.
Two photographs of sentries.
Production;
We print out a picture with stars, glue it on the back of the cardboard and cut it out. 
We cover the box with red colored paper. We cut out a fire schematically from cardboard. You can color it, or you can cut out colored fire from paper.
Next, we make small stands for sentries from cardboard and paste the photo on the stand. From colored cardboard, make small arches in which the soldiers will stand. And put it all together. You can complement the composition with such homemade carnations. Which are made from colored paper cupcake tins. A stalk of green cardboard rolled into a tube. Or you can use corrugated cardboard for the stem. At the end, a beautiful memorial of memory is obtained.
Postcard made of paper and cardboard for Victory Day for students in grades 1-4
Of course, the simplest and most beautiful thing you can do quickly and simply is flowers. There are a huge number of master classes so that your eyes run wide.
Here is the simplest instruction on how to make a beautiful paper flower.
We take a red napkin, fold it in half, then in half again and again. As a result, we have 6 even rectangles.
We fold the resulting rectangles in a pile, fold them into an accordion and tie them with wire. Here is a diagram to help you. 
Next, cut the ends with a triangle and dissolve the flower. You can also make a white carnation with green or red edges. See how it's done in the picture. You just need to paint the edges in the desired color with a felt-tip pen.
There are many options for how to make flowers and almost all have the same production technology.
It is very good to decorate postcards and crafts with such flowers.
Well, now I propose to make the card itself. We take a sheet of colored cardboard, bend it in half on one inner side, schematically draw a drawing with a pencil.
From a red napkin we cut out such squares.
Roll them into small balls.
Next, we cut several strips from the same napkin and twist them into such twigs.
And we begin to glue the balls according to the pattern.
Can be supplemented with flowers.
Or fireworks.
Here the work is done very simply, but it looks solid.
All materials for making these postcards can be found in almost every home. I think that a couple of wipes and glue can be found for sure.
We do crafts very quickly by May 9 for a school competition
Of course, the very first thing you can make is a beautiful wall newspaper with newspaper clippings about the day of the GREAT VICTORY. We used to release something like this every week at school, why not remind the children how we did it.
See how you can quickly make a poster for Victory Day.
You can also just take a coloring template and color it beautifully. Here is a small selection of pictures that you can take to color.
These flowers can be made from foamiran. If you make such beauty, then I think you will be the only one who will have such beauty.
Would need;
Fomiran.
Glue gun.
Wire.
Pin.
George Ribbon.
Manufacturing process.
We cut off a small piece from the tape about 20-25 cm. We singe the edges with a match or a lighter.
Let's make something like this.
Rukavishnikova Alena, 4th grade student, MKOUSOSH, p. Kalinino, Malmyzhsky district, Kirov region.
Supervisor: Rukavishnikova Olga Leonidovna, music director of MKDOU d / s "Kolosok", p. Kalinino, Malmyzhsky district, Kirov region.
This master class is intended for preschool teachers, primary school teachers, additional education teachers, parents, children of senior preschool and primary school age.
Purpose: a gift to a veteran
Target: learn how to make paper crafts with your own hands.
Tasks:
- Exercise in the use of various techniques for working with paper.
- develop imagination, artistic taste in the choice of colors, fine motor skills of the fingers;
- to consolidate the ability to select material for work.
- to cultivate a sense of pride in their homeland.
A bright day is wonderful in the morning,
It's full of flowers!
We hear the sound of songs
The holiday has come to our city!
This holiday is known everywhere
Celebrate by country
Victory Day is called
People are all over the earth.
The path to the Great Victory was difficult, long, but heroic. All people, young and old, stood up to defend their homeland. Many did not return home. We must remember the warriors - heroes and peaceful people who worked during the difficult years of the war, bringing the Great Victory closer. On May 9, at exactly seven o'clock in the evening, a minute of silence begins. At this moment we are silent and think about those who saved the world from the Nazis, about those thanks to whom we now live in a beautiful peaceful country. In memory of the heroes, we pin the St. George ribbon to our clothes. Saint George the Victorious is the heavenly patron of brave warriors. The colors of the ribbon are black and orange - meaning "smoke and fire" and are a sign of the soldier's personal prowess on the battlefield.
The years of the terrible war are going further and further into the past. But the feat of the people who stood up to defend the Fatherland will live forever in the memory of the Russian people.
The beauty that nature gives us
The soldiers were on fire.
May Day forty-five
Became the last point in the war.
(A. Surkov)
We bring to your attention two works. (The difference is in different ways of making flowers).


Material for the first job:
- colored paper
- colored cardboard
- scissors
- glue stick
- pink marker
- pencil
- brush for glue
- millet groats
- PVA glue

Step by step work:
Prepare stencils for numbers, St. George's ribbon, flowers

Cut out numbers from red paper - small size, from golden cardboard - larger size

Glue the red number onto the gold one.

Cut out a wide strip of black paper and two narrow orange stripes for the St. George Ribbon.

Glue orange stripes on top of black

Stick the number and ribbon on the postcard.

Print the word May on red paper (choose one of the styles in WordArt - size 56, no fill), carefully cut it out.

glue on the side of the number 9
Fold a strip of white paper (4-20 cm) like an accordion, draw a flower, cut it out

We decorate flowers
Put a drop of PVA glue in the center of the flower

Pour millet, lightly press down with your finger,

Sprinkle excess millet, gently tweak the middle.

Draw stamens with a pink felt-tip pen, slightly twist the petals with scissors.

Glue the flowers as shown in the photo or as you wish.
The work is ready.

Material for making flowers of the second work
- pencil
- stapler
- yellow plasticine
-pink napkins
- scissors
Step by step flower making:
Take a pink napkin (3 layers), stencil the flowers

fasten the centers of the flowers with a stapler.

we will “disguise” the paper clips from the stapler with pieces of yellow plasticine.

We begin to form a flower, bending each layer of the napkin to the center, slightly crushing the edges with your fingers.

Glue the flowers, the card is ready.

Thank you for your attention!
For the background, it is better to use shades of blue and green.
Paper crafts by May 9
With the approach of the great holiday of Victory Day in the Great Patriotic War, a number of preschool and school educational institutions, as well as many young mothers, for educational and educational purposes, begin to make themed children's crafts by May 9th.
Children's crafts by May 9 is not only a way to instill in the younger generation respect and love for veterans, patriotism and deep gratitude for the exploits of our grandfathers and great-grandfathers, who made it possible for each of us to live under a peaceful sky above our heads. But they are also amazing, touching little masterpieces of arts and crafts that can be a great gift for war veterans.
In this article, the Site news portal has prepared for you several simple master classes on making themed crafts by May 9 from paper, cardboard and other improvised materials.
So let's get creative...
DIY paper carnations
 The traditional flowers that are usually given to our dear veterans are, of course, bright red carnations. Try with your children to make paper bouquets of carnations that will delight veterans for more than one day or even a week, such flowers can stand for years.
 To make paper carnations, you will need corrugated paper in two colors (green and red), wire, glue and scissors.
 You can use green electrical tape to drape the carnation stem.
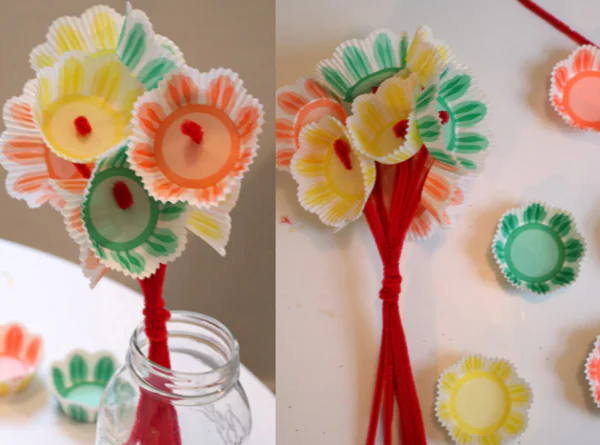
 If your child is still too young to make such flowers, then you can try to make a simpler paper bouquet.
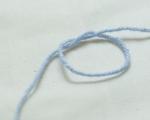
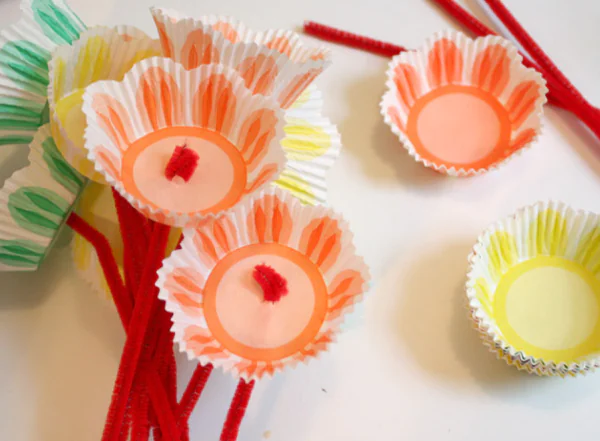
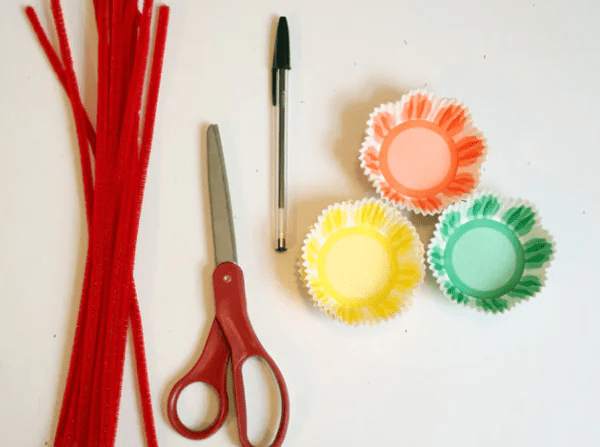 To make it, you will need paper cupcake baskets, you can buy them in any supermarket and decorative wire.
 Make a small hole in the middle of the cupcake basket with a piece of paper through which you thread the decorative wire.
 Tie one knot inside the future flower, and the other outside.
Do-it-yourself eternal flame from paper
 Such a paper craft by May 9 can become the design of a concert hall, an exhibition or a school class for Victory Day.


 From a thick sheet of colored paper (you can use colored cardboard), fold a three-dimensional star.

 Make a small hole in the center of the star and place a piece of red paper in it.
Do-it-yourself aircraft
DIY paper tank
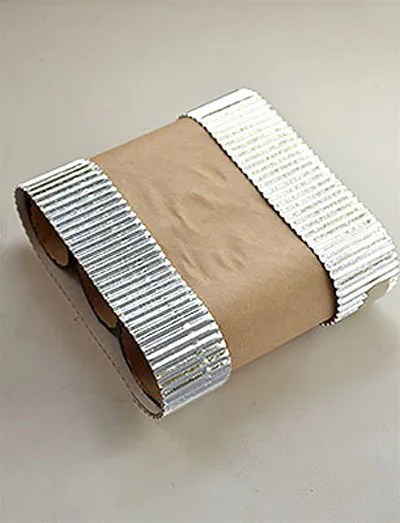
 To make a paper tank, you will need cardboard toilet paper rolls, any paper (you can use colored paper too), silver decorative paper (if not, you can make a foil tank caterpillar), and a straw for cocktails.


Do-it-yourself tank from washcloths for washing dishes
 This craft is sure to please young children, because it is easy to do, but it looks very colorful. To make a washcloth tank, you will need washcloths, glue, scissors, and a baby juice tube.
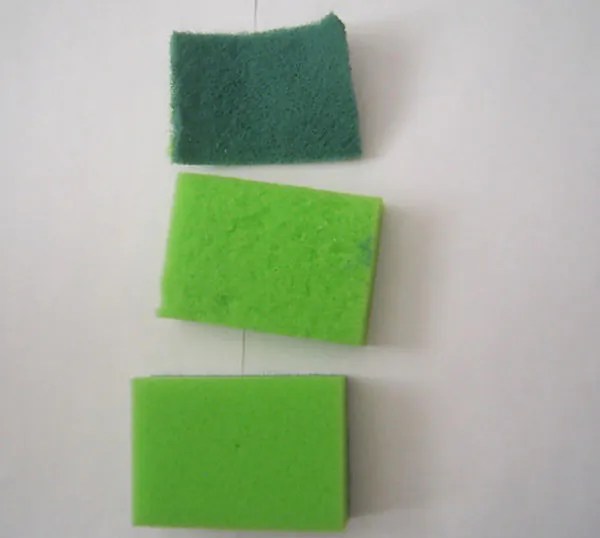


 Depending on which washcloths you choose as a material, in this color and size you will get tanks.
 Be sure to decorate the finished tank with a red star.
Vytynanka
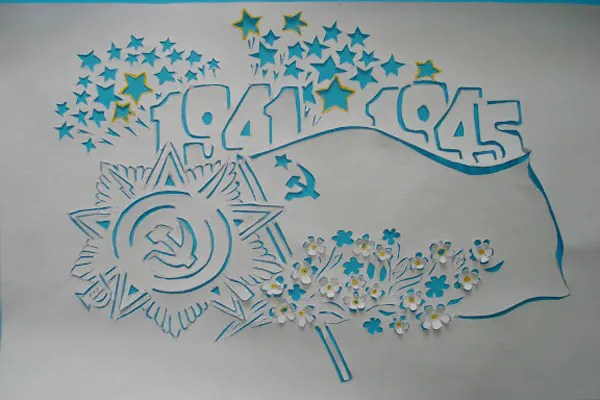 Another amazingly beautiful and interesting craft for May 9, Victory Day, can be considered paintings made using the extrusion technique.
 Choose any postcard or picture you like on the theme of the holiday, transfer it with tracing paper to a white sheet of paper and cut out some details with a sharp knife or nail scissors. Attach the finished white composition to a sheet of colored paper, then the drawing will be visible more clearly.
Do-it-yourself orders of military glory
 This craft is made in the applique technique. You can make a wide variety of medals, any shapes and colors.