Mouse baby fabric pattern with sizes. Fabric bear pattern
Charming Teddy bears are no longer just a child's toy. Increasingly, they are sewn to decorate the interior or just for the soul. Cute bears from faux fur, velvet, suede or fabrics bring us back to childhood and give us unique emotions. It is especially pleasant that you can sew such a bear yourself, even if you have never held a needle and thread in your hands. And sewing a couple simple toys, be sure to try to take a more complicated pattern and you will surely get a unique bear.
Material selection
Sewing a bear from fabric is much easier than from faux fur, since fur or other similar pile fabric (suede, velor) has a pile direction that must be taken into account when cutting.
Plus, these loose fabrics are just harder to work with. Therefore, we recommend that beginners try to sew a bear from ordinary thick cotton. Another great material is felt. It is also ideal for beginners, as it is easiest to sew a bear out of felt. In other cases, take a fabric that imitates fur, which does not fray too much on the cut and does not stretch so that the toy does not deform when assembling parts. Consider recycling and scrapping things you don't need, like making a teddy bear out of jeans or an old sweater. Take the amount of fabric based on the size of the future product. Recommended for beginners the average size toys of 20-25 centimeters - it will be easier to work with details and the amount of work will not be too large. Miniature toys are the most difficult to sew, so we advise you not to start with them.

Next, prepare the stuffing material. You can use a synthetic winterizer or holofiber for this, or even scraps of fabric, or you can fill the bear with granulate, sawdust, or even cotton wool. Such materials are often found in specialized stores for creativity.
In addition to fabric and padding, you will need thread, needles (even if you plan to use sewing machine, all parts are sewn to each other by hand).
Details of the future bear
Next, think about how you will make the bear's face. The easiest way is to buy ready-made plastic nose and eyes and glue them on or draw on the eyes, nose and mouth with fabric markers. You can embroider a nose with threads, but for the most beautiful interior bears, you should look for hand-sewn glass eyes in needlework stores. Also, for such bears, as well as for real Teddy bears, special articulated mounts will be required that allow the head and paws to move.

And the last - decorative elements. You can do without them, but the bear will be much prettier if you add it with simple clothes or a ribbon around your neck.
The simplest bear made of fabric
Even a child can cope with such work, so you can safely sew a toy with your children. A fabric bear pattern can be drawn by you by hand, and you can draw as you like - a bear cub with long paws or a rounded plump bear, with big head or ears.
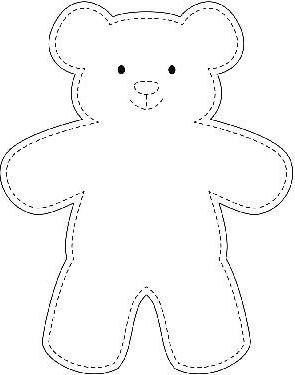
Fold the fabric in half with the pattern inside, put the pattern on top and circle with chalk or Cut out two parts at once and sew them on a typewriter or by hand, leaving a small opening for turning and stuffing. Turn the fabric inside out, stuff it well, not forgetting about the ears and paws, sew the hole with your hands. The bear is almost ready, it remains to draw a face for him and decorate it as fantasy tells.

Teddy bear from a sock
A pair of woolen or knitted socks, naturally new, will make a very cute bear. A pattern is not needed, and the entire master class fits in one picture - cut out a head with ears from one end of the sock, a torso with lower paws from the other, cut out the upper paws from scraps, and an oval for the muzzle from the other sock. Next, you should sew a cut on the head between the ears, sew in the paws and fill the torso and head, connect them together and shape the muzzle. Funny bear is ready.

Bear in Tilda style
Another option popular toy- this is a bear in the style of minimalistic textile toys whose body proportions are elongated and long. It is best to sew such a bear from bright cotton with a small original print.

So, from the fabric should be transferred to the fabric, folded in half. Next, cut out the pieces with a seam allowance. Sew each part of the toy, leaving a hole, and turn it inside out. front side. To turn the narrow parts of the paws, use a pencil or wooden stick. Stuff all the details and sew up the holes with a blind seam.
Buttons can be used to connect the paws and torso, then the paws can be moved. Gently sew the ears to the head and the head to the body. It is better to embroider the muzzle with threads - Tild's eyes are traditionally made using the French knot technique, and the nose and mouth can be embroidered with small stitches according to a pre-made pattern.

Teddy bear
The pattern of this bear is perhaps the most difficult, since it requires a fabric that imitates fur and special paw attachments. So in this case the pattern is not transferred to the material folded in half, but two drawings of the details of the torso, head, ears and paws are made. Moreover, one detail of the pattern is located next to the other, but mirrored. This is necessary so that the pile of the fabric finished toy was directed in one direction. Cut out the details only with very sharp scissors so as not to damage the pile. In the details of the paws and torso, where they will be fastened to each other, make punctures for future hinges.

Also often Teddy has feet, hands and inner part the ears are made of another material, such as leather, so they are cut out separately.
Then we do everything as usual - the bear pattern from the fabric should be cut, stitched, turned inside out and stuffed. It's time to insert the fasteners. These are cardboard discs with a hole in which a bolt, nut and 2 washers are inserted. A disk with a bolt is inserted into the paw through an unsewn hole, the fabric is sewn around the bolt that comes out. A disc is also placed in the body at the attachment point of this paw and its hole must be aligned with the hole previously made in the fabric. Next, attach the paw to the body so that the bolt from the paw enters the hole in the body and fasten the structure from the inside with a nut. Do the same with all the paws and head, and you can sew up all the remaining holes and form the muzzle.

To do this, with a needle with a thread and a knot tied at its end, pull the muzzle from the inside in the area of \u200b\u200bthe eyes (to add volume to the eye sockets) and mouth (to form a bear smile). You can bring the thread out behind the ears. The drawstring makes it possible to create exactly the expression of the muzzle that you want to give to your toy.
Bear Me to you
This charming bear is familiar to everyone for its cute and touching postcards. These bears are distinguished by a gray-blue color, so choose a fabric that is close in color. They also have a muzzle in a special way - it consists of two parts contrasting color and from the blue nose. These details and the special fabric pattern of the bear make the Me to you toy recognizable.

Please note that this bear must have feet made of suede or finely piled fabric. They are sewn in a circle after sweeping the details of the lower paw and only after that they are stuffed.

Also salient feature- a large decorative patch made of the same companion material. A blue nose can be bought ready-made from plastic and glued to the muzzle. Otherwise, this toy is sewn in the same way as they can have the same one, but it can be assembled without hinges, but simply by sewing the parts together.
polar bear
The pattern of this bear differs from the previous ones in that polar bear will not sit, but stand on four legs.

In principle, the whole sewing process repeats those described earlier, the only caveat is to stuff the paws well and tightly so that your polar bear does not fall on its side, but stands well and firmly.

As you can see, there is nothing complicated about how to sew a bear out of fabric, the main thing is patience and accuracy, and you will succeed.
There are soft toys that are very simple in execution and do not take much time to make. For example, such a small soft toy mouse.
When I sewed this mouse, it simply charmed all members of our family. Originally it was intended as a gift for a little girl, but it was beyond our power to give it away.
Therefore, the second mouse was sewn together, her sister, who now lives with the girl Nastya. And mouse number 1 remained in native family. She loves sweets and is friends with an owl, also made of felt.
For a wonderful gray mouse you will need (Fig. 1):
- Gray felt size 12cm x 18cm
- Pink felt size 1.5cm x 3cm
- For stuffing wadding or synthetic winterizer
- threads in the color of the fabric
- needle
- scissors
- PVA glue
- brush for glue
- piece of cardboard 7.5 cm x 5.0 cm
- black large beads 3 pcs
We used synthetic felt for our mouse. This material is easily accepted and stored desired shape. At the same time, it does not crumble. If you wish to use a different fabric, then choose one so that it does not crumble.
According to the templates in Fig. 2, make the details of the pattern. To see them in full size, click on the picture.

Put the details on the fabric, cut out, adding a seam allowance of 0.5 cm (Fig. 3):
- Sides of the mouse - 2 parts
- Belly - 1 piece
- Tail - 1 detail
- Ear (outer part) - 2 parts
- Ear (inner part) - 2 parts

Fold the sides of the mouse front side fabric inside and sew (Fig. 4).

Trim the seam allowances at a distance of 2 - 2.5 mm from the seam itself. This must be done carefully so as not to cut it. After that we turn it out. It should turn out as in Fig.5.

We sew the tail not to the end, leaving about 1 cm unsewn in the wide part (Fig. 6):

We sew the unfinished part to the front side of the mouse's back (Fig. 7).

We connect the tummy of the mouse with the sewn side parts. To do this, we fold all the details with the front sides inward and sew them around the perimeter, leaving one side unsewn (Fig. 8).

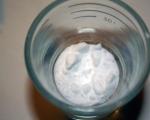
Now we twist the mouse through the unsewn part and insert a part into its tummy for stability. We used foam rubber, but you can replace it with cardboard (Fig. 9).

We fill the mouse with padding polyester (Fig. 10).

After that, we sew the side to the end (Fig. 11).

Let's start with the ears: glue the inner and outer parts of the ears with PVA glue and leave them to dry (Fig. 12). 
After the glue dries, we sew the ears to the head of the mouse (Fig. 13).

For the eye and nose, we use large black beads, sewing it in right places. The antennae are made with large stitches of black thread (Fig. 14). 
It turned out such a nice mouse-louse (Fig. 15)! 
Please your child, sew a little funny mouse for him. She will be wonderful gift, especially made mother's hands. How much joy it will bring to your child! And how he will admire his mother, who can do everything!
Older children can try sewing soft toy mouse with your own hands or with the help of parents.
Why are sock toys good?
- Economic option. It is made from what lies idle - for example, from a sock that lost its pair in the prime of youth.
- Socks, especially for children, have bright colors and cute patterns that can be played with in a toy.
- Flight of fantasy. Each of your toys, even made from one pattern, will be unique, and most importantly - handmade.
They can be given, they can decorate the interior. They are cute and cute. They are made simply and quickly. In an hour, you can create not one mouse, but a whole family of mice. The number of members of the mouse family will depend on your skills and abilities.


So, to business!
Option number 1. A mouse standing on its hind legs with a heart.
We will need:
- sock,
- holofiber or synthetic winterizer. Cotton wool is not welcome - the toy will be heavy and dry poorly after washing.
- thread with a needle or glue that dries quickly. Great if it's a glue gun.
- three small buttons or beads (two eyes and a nose),
- fabric from which the heart and tail will be cut.
- felt on the ears.
- mustache threads.
- scissors.

Stages of the birth of a mouse from a sock
- We open the belly of the sock - along its entire length we make a cut along.
- Let's make a heart applique. From the fabric that was prepared. The heart will be on the belly of the mouse, so we cut it right size. Cut out, not forgetting the seam allowances. We sew.
- The tail can be built from a thick thread or braid. Can be cut from the same fabric as the mouse heart. There will be harmony.
- The bottom of the mouse, on which it will stand, is sewn up last. Through it, the filler will get inside. Remember to insert the tail before closing the bottom.
- Ears - two circles - are cut out of felt, you can from the rest of the sock.
- Leave the nose and eyes for last. They can be sewn on or glued on.
Advice: in work, use a “needle forward” or “needle back” seam. The stitches should be small so that the loops of the knitted sock do not run.
For stuffing, you can use knitting needles or Chinese sticks.
Option number 2. Mouse on four legs

- We put the sock with the heel up. The body of the future mouse is the length of the toe to the heel. How less sock, the smaller the mouse will be.
- Cut off near the heel, slightly rounding.
- Through the hole in the back we fill the mouse with padding polyester.
- From the gum of the sock we cut out the ears-circles. Each double. Stuff them for volume.
- We cut off the very edge of the gum with a strip. This is the future tail. You can hit it too.
- We insert the finished tail and finally sew the mouse back.
- We grab the ears at the bottom with a thread, forming a fold. Then, in such a form, typical for mouse ears, we sew it to the mouse.
- Button eyes and nose, string antennae complete the look.
Option number 3. This is a lightweight analogue of the previous options. Thread and needle are not needed. This mouse can handle even a child.
- The body is done in exactly the same way as in the previous version, except for the moment when it comes to sewing up the backside. This time we do not sew anything - we just tightly bandage the place of the cut with a thread. The body is ready!
- Tie the tail. It can also be from twisted woolen thread, and from braid ... Fantasy is not limited. The length of the tail is also up to you.
- We make ears out of felt. You can make the ears double - that is, you need two circles of felt for each ear different color. We put one on top of the other, squeeze it at the bottom, forming a soft fold. You can fix the fold with glue.
- In the place where the ear will be, we make a small incision. Exactly such that the bottom of the ear goes there. We insert the ear, fix it with glue. Ready!
- We endow the eared, tailed mouse with eyes, a nose and antennae. We fix them glue gun. Here, too, is a flight of fancy. Buttons, beads, beads can become eyes. Same story with the nose. Antennae - thread trimming. Do you want a mustachioed
When we bring a pet into the house, we surround it with care and love. We pamper our pets with delicious delicacies, comfortable sleeping beds and beautiful bowls. However, you should also take care of toys for your furry friend. If you have a cat or a cat in your house, you need to think about the process of games. Cats of any breed need play complexes and small toys. Do not rush to buy a toy in the store. I want to offer to sew a toy in the form of a mouse with my own hands. For greater realism, I suggest using natural fur as the base material.
For tailoring we need:

- fur, in our case light fur mink.
- fabric for the abdomen and ears in a color that matches the fur (we have pink).
- sintepon.
- threads, needles, scissors.
- ruler.
- paper for drawing or checkered sheets.
- pencil.
- three black beads: two identical for the eyes and one bigger size for the nose.
Work algorithm.
1. First, we determine the size of the toy. We should get a medium-sized mouse. Based on these preferences, draw a pattern on a sheet of paper using a ruler with a pencil.

The bottom of the mouse, namely the abdomen, we will cut from fabric.

The top, or main part, will be sewn from mink fur.

The ears will consist of two parts, the larger part is fur, the smaller one is made of fabric.

The tail will be from a thin strip of fur.
2. Cut out patterns from paper. We impose a pattern of the bottom and a smaller part of the ears on the fabric, we cut off with needles.

Do not forget that there should be two ears.
3. Cut out the details from the fabric. For the abdomen, we make an allowance of 0.5 cm, no allowance is needed for the ears.

We've got three pieces.

4. We put the top pattern on reverse side fur and pin with needles.

It is necessary to arrange the pattern according to the growth of fur hairs so that the pile on the back of the mouse looks back.
There should be 2 such parts.
5. We pin the pattern of the lower side of the ears to the fur, observing the same principle as for the back.

We do this for both ears.
6. Cut out the details from the fur. For the top we make an allowance of 2-3 mm, for the rest of the parts the allowance is not necessary.
Do not forget to cut the tail, according to the pattern and without allowance.

7. Gently sew the back from the inside along the upper convex edge.

8. We take the details of the ears from fur and fabric.

We put the fabric part on the front side of the fur with the wrong side to the bottom and sew it by hand along the edges. There is no need to make stitches often, it is enough to grab in several places.

We do this with the second ear. Excess bristling fur is carefully cut off with sharp scissors.

9. Sew the ears to the details of the top.

10. We sew the abdomen with the back, while sewing the tail in the back of the product. Leave a hole for stuffing with padding polyester.

11. We fill the product with padding polyester quite tightly.
The mouse is ready.

Now you can comb it and give it to your favorite cat to play with.

Sewing a fur toy is interesting, and most importantly useful activity. It will require accuracy and patience, but all the work will be rewarded with the joy of your pet.
Give your cat such a toy, and he will thank you with a healing purr.