Bracelet made of wooden sticks with your own hands. Original DIY crafts from ice cream sticks
If a daughter grows up in the family, then parents should be prepared for the fact that she needs not only toys, but also outfits, as well as jewelry. Of course, the most common children's jewelry can be used as jewelry, and even better if these jewelry are made by hand. And to create them, you will not need any special materials, chenille wire and beads will be enough. It is this bracelet that is proposed to be made in our master class.

To create such a wide bracelet, we prepared:
- chenille wire (4 pcs.) of two colors - lilac and pink;
- decorative beads-crystals of suitable shades;
- scissors.

Our bracelet will be made in lilac-pink colors. Therefore, we have prepared fluffy sticks and beads in a suitable shade. For the base of the bracelet, we chose 4 chenille wires - 2 pieces of each color. First, let's decide on their location in the bracelet, in our case, the lilac sticks will be located at the edges, and the pink ones will go in the middle. At the beginning of work, we twist all the fluffy sticks together.

After that, we will begin to string beads on the chenille wire, but we will do this in a certain order. First, with the help of beads, we connect in pairs adjacent fluffy sticks - pink and lilac.

The next bead needs to be connected to each other by pink fluffy sticks located in the middle. At the same time, we try to keep the same distance, which is necessary for the formation of the original cells of our bracelet.


Then we continue to work on creating a bracelet in the same order - with the help of one bead we connect the central pink sticks.

And in this way we weave a bracelet of the desired length. We finish the work by twisting all four fluffy sticks together.

We got such a blank for the bracelet.

Now it remains to connect both ends of the jewelry into a ring.

Here we have such a bracelet made of chenille wire and crystal beads.


Today, even the most demanding fashionista has the opportunity to choose an accessory to taste - after all, there are a lot of options! But whatever the newly acquired decoration, nothing compares to the one you made with your own hands. And in terms of originality, it certainly will not yield even to designer ones, because if you wish, you can use the most unexpected material - a plastic bottle, a zipper, clothespins, pins and hairpins, egg trays ... And that's not all!
1.From lace and pendants
This is the easiest option to make a bracelet with your own hands, and the most labor-intensive. Take the pendant you like and attach strong threads to it (cords, ribbons, plaits). You can fasten the ends with clasps, or you can simply tie them on your wrist with a bow.


2.Knitting
Tie a finished piece of wood or make a base out of a plastic bottle (see step 13). If you are not particularly fond of yarn and knitting needles, you can simply buy a ready-made "tie" or use a piece of an unnecessary knitted thing.


3. Buttons
Very original and bright bracelets! Absolutely everything is used: the smallest and largest, wooden, plastic, iron, convex and embossed, children's figured and old-fashioned with mother of pearl ...


4. Use pins
Recently, such bracelets are gaining more and more popularity among needlewomen - here and there you can see stylish "pin" ribbons on graceful tassels. Experiment - change the color of beads and pins, vary their size and shape until you find your perfect option.


The decoupage technique is suitable for both plastic and wooden blanks. It is only necessary to thoroughly degrease the surface of the base with alcohol or nail polish remover, prime it (with paints or PVA glue diluted with water in a ratio of 1: 1). Then cut out some element from any napkin you like (it is very difficult to glue a solid napkin without a certain skill) and glue it on the bracelet. Remember to only use the top ball of the napkin (usually they are three ply). The primer must dry completely! When the glue and the napkin stop sticking to your hands, you can varnish the product. Instead of a napkin, you can use newspaper clippings.

6.Polymer clay or thermoplastic


7. Old zippers
An excellent solution on how to use failed "snakes".


8. In the style of Coco Chanel
Madame Coco was the first to come up with the idea of attaching long straps to miniature clutches, and to make them stronger, she pulled them through large chains. We use the same technique when creating such a stylish bracelet ...

You can add a few large beads if you like.

9. Beads
Do you think you can only weave baubles from beads? But no! A few basic techniques...


10 Ice Cream Sticks
It's funny, but even they can be used in the creation of costume jewelry! Boil the wooden sticks in a small saucepan for 15 minutes to make them more pliable. Then place them in cups or mugs so that future bracelets get the desired shape (make sure that the neck of the container is not too narrow, otherwise your hand simply won’t fit through!). In a day you can start decorating! To do this, you can paint blanks, decoupage them, cover them with fabric or paste over ... with stamps, for example!


11. Bracelet from ... an egg tray!
Yes, there is even such a base option as an egg tray. To do this, tear the trays into pieces, soak them overnight in water, wring out the resulting mass, add a little glue and knead like a dough. Now from this "clay" you can sculpt anything! But you can try to make a bracelet using a bottle or glass as a base for shaping. Stick the mixture from the egg tray onto the base, give it a clear shape, but don't try too hard - this will make the bracelet more authentic. After the finished bracelet dries, you can paint it.


12. Use hex nuts
A little photo tutorial...


Such a bracelet cannot but interest lovers of all kinds of originality.

13. Plastic bottle
A blank from a plastic bottle can be tied, covered with fabric, embroidered with beads or sequins.


14. Leather, suede or felt - stylish "eight"
For such a bracelet, you will need a thick fabric and a stencil that you can draw by hand and cut out. A detailed master class will help you fold it correctly ...

Photos are clickable.


15. Flirty bow
Another fabric bracelet. Try also using tight lace!

16. Mouline thread and afro style
For the base, take rubber or plastic straws (there is a reason to visit the plumbing department!). Wrap them with multi-colored floss and secure with large fasteners at the ends. You can create a similar necklace for such a bracelet - just take a longer pipe.
Our blog is taking on a second life and today we will tell you how to make a wooden bracelet with your own hands and at home.
Of course, we will not make it from solid wood, because. here we would need sophisticated tools, but ice cream sticks!
If you want to see already finished products, then be sure to check out our catalog with wooden bracelets -
After this lesson, you will be able to make yourself an ornament that will be unique and inimitable.
So what do we need?
- Ice cream sticks. They can be easily found in any supermarket (this is if you go the easy way). If the procedure is a little more complicated, then you will need to buy a popsicle on a stick and eat it, but because two - three such ice creams will not have a very positive effect on your figure, then this procedure is best entrusted to your husband or child 🙂
- A saucepan or some kind of container where we can pour water and put our sticks there.
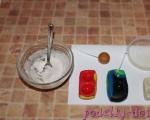
- Rhinestones, beads, satin - everything that will be at hand to make your bracelet unique.
Steps to make a wooden bracelet from ice cream sticks
- First of all, we take any container (in our case, it is a saucepan), pour water and heat it to a boil. When the water boils, we put our chopsticks in there and cook over medium heat for about forty minutes. You can do without boiling (although this speeds up the process as a whole) and soak our blanks in cold water overnight. The purpose of this process is to make them softer and more flexible.
- The second step in our master class for making an unusual wooden bracelet is shaping it. The easiest option for this is to take a glass (empty, without water) and carefully place the workpiece there as shown in the figure. We have one stick per glass, but their number can be increased to two or three. It is necessary to leave them in this form for about a day, until they dry out, shrink and fall to the bottom of the glass themselves.


- The third and final stage is decoration. Here you have complete imagination, you can use both beads and multi-colored rhinestones, as well as shreds of satin braid, there are no restrictions here.
See the options for what you can get with the proper imagination - below, create, do not be shy!

Ice cream stick bracelets
Unexpected crafts. And quite. Summer decoration and fun at the same time. The kids should really like it. And we will make them from ice cream sticks. It's a pleasure: you can eat ice cream and make a bracelet.
These are such glorious bracelets. Here they are in war paint.
So, making this decoration is simple. Soak ice cream sticks in warm water. And we put it in a container to dry, pressing the sticks tightly against the wall. That is, the size of the bracelet depends on the width of the container: for children - we are looking for something smaller, an adult hand requires a different volume. The stick will dry, we will immediately paint it with paints or paste over it with beautiful velvet paper, cloth, etc.

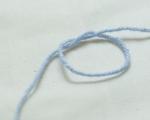
The same sticks, the same technique, a different decor - now with yarn.

But such pictures are very useful for the development of the child. Type homemade puzzles
We choose different pictures, preferably several at once. We cut them according to the width of the sticks. Paste. We dry. Educational game - home puzzle - ready. Now mix the sticks with pictures and let the child collect.

found on thecreativecrate.blogspot.com; blog.bitsofeverything.com
Everything. An activity that is both useful and fun for yourself and for the children. And with puzzles, you can arrange a real competition. And who will do all this for our children, if not us?
- Wooden sticks for ice cream (15 * 2 cm are used in mk)
- Pot of water
- rolling pin
- A cable tie, a clamp, is a couple of centimeters longer than a wooden stick.
- Strips of decoupage paper, wider and longer than a wooden stick
- Glue for decoupage
- Scissors
- Tassel.
Place the sticks in a pot of water, bring to a boil and cook for at least 15-20 minutes (the longer the sticks boil, the softer they become).
2. Using a rolling pin, form the original circle by wrapping the stick around it.
3. Take a cable tie and fix the curve of the stick with it. The ends of the stick should overlap slightly.

4. Leave to dry in this position for 24 hours. After the time has elapsed before removing the clamp, make sure that the sticks are well dried.
We remove the strap. We have the basis for the bracelet. Sand it lightly, apply a primer and proceed to decoupage.
We cover the surface of the bracelet with a thin layer of decoupage glue, carefully glue decoupage paper or the first layer of a 3-layer napkin on top. Apply another layer of glue on top. Top can be varnished.
Tip: If, after decoupage, the base of the bracelet has expanded a lot, simply insert them back into the cable tie and leave them for a few minutes to return to their shape.
These homemade bases for the bracelet can be decorated in different ways, the main thing is to let your imagination fly. For example, instead of decoupage, you can wrap the base with threads, use fears, or simply paint with paints.