Weaving baubles from threads for beginners. Weaving patterns for floss baubles, various types of weaving with photos and a video selection
Floss baubles are also called friendship bracelets, they are given to friends and girlfriends. After you give a few baubles to your girlfriends, those who want such a gift will line up.
In order to weave floss baubles, you will need floss threads of different colors, scissors, a ruler and adhesive tape, with which the threads are attached, for example, to the table. Since weaving baubles is a long process, it is worth getting comfortable and in a well-lit place.
Well, let's proceed to the analysis of ways to weave baubles. There will be many of them, and we will try to paint everything as detailed and illustrated as possible.
1. How to braid
The simplest weaving used in baubles is a pigtail. Yes, the most common pigtail. It is woven with three threads. Often the ends of the baubles are braided with a pigtail. In this case, of course, there are more than three threads, but then all the threads are simply divided into three groups and a pigtail is woven. And at the end of the pigtail, a regular knot is tied so that the pigtail does not bloom. But there are more interesting and beautiful options for how to braid threads, if there are more than three, into a pigtail. Let's take a look at them.
The scheme of weaving a pigtail of four threads. By the same principle, you can weave from any even number of threads(six, eight, ten, twelve, fourteen, and so on). At each step, we take two central threads, transfer the left one to the right edge, and the right one to the left, and so we weave.
 The scheme of weaving a pigtail of five threads (cord aiguillette). Again, according to this weaving pattern, you can weave from any odd number of threads(seven, nine, eleven, thirteen, fifteen, etc.). The essence of this scheme is that we take the left thread and move it to the center, then we move the right one to the center and repeat the required number of times.
 The second way to weave a pigtail of five threads.
 The third way to weave a pigtail of five threads.
 The scheme of weaving a pigtail of six threads.
 Another way to weave a six-strand pigtail.
2. How to weave baubles with an oblique weave

 This is a very popular weaving baubles. There are a huge number of patterns for weaving baubles with oblique weaving. On our site there is an article 50 baubles weaving patterns and a separate category of baubles patterns is highlighted, where patterns are added every day (usually two per day) and represent the pattern itself, as well as photographs of woven baubles according to this pattern. Usually the photos are different, that is, the scheme is the same, but the colors are different. Go to the Baubles Schemes page and choose what you like, and stay tuned. And now you can create an oblique weaving pattern yourself using our new generator.
In the oblique weaving of baubles, 4 different knots are used, they are designated differently and woven differently. Weaving such baubles should be in rows from left to right, or from right to left, and not in some other way, and not as the arrows show. The arrows in this case only show which knot to tie. You can learn how to weave baubles with oblique weaving in our master class:.

3. How to weave baubles with a straight weave with two colors (including baubles with names)
 There are already articles on this topic on our website that tell how baubles are woven with direct weaving. This is a master class How to weave baubles with names and Baubles pattern generator with names. On the generator page, you can create your individual baubles scheme with any name or text.

4. How to weave baubles with a straight weave with a lot of colors
 Straight weave baubles with two colors are woven differently than baubles with a lot of colors. In this article, we will not describe this technique, it should be given special attention. We dismantled this weaving in the master class. You can design your own baubles with our Direct Weave Baubles Pattern Generator.

5. How to weave baubles with sharp arrows (braid)

 To weave this baubles, take floss threads a little over a meter long. 6 colors, 2 pieces of each color. Lay out the threads symmetrically, connect them into a bundle and tie them into a knot at a distance of 7 centimeters from the edge. Thread a pin through the knot and attach to the pillow, or glue the beginning of the baubles to the table with tape. Divide the threads in half.
Start on the left side with the outer color, ours is red. With this thread, make a quad shape above the second thread, then pass the first thread under it and thread it through the hole as shown in the photo. 
 Tighten the knot by pulling the first thread to the right up. Repeat this knot again, you get a double knot, it is they who will weave the whole bauble. Thus, the first thread we have moved from the left side to one position to the right and became the second. In exactly the same knot we tie the second thread around the third and so on until the second thread reaches the center. This is one half of the bauble.
Now take the thread from the other side, we also have it red. We will make knots from right to left. To do this, we do everything symmetrically: we bend the red thread over the orange one in the form of a mirror four. Then we also pass it inward and tighten it to the left up. The main thing do not forget that this knot must be done twice on each thread. 
 We continue to knit knots with this thread from left to right until it reaches the middle. Tie a knot with two middle threads of the same color in order to tie the halves together. So we finished the first line of our baubles. The remaining rows are knitted in the same way with two outer threads of the same color.
 When you have finished the bauble (this can be found out by simply trying it on by your hand, just allow for a little free space in order to tie the bauble), tie a regular knot with all the threads, and then braid the pigtail.
This bauble can also be made asymmetrical, for this, first lay out the threads without symmetry. If you do not stop in the middle, then you will get a classic baubles with oblique weaving. Remember to tie knots twice. And don't skip the middle when knitting.

6. How to make a bauble with rhinestones

There are many ways to weave baubles, and we will also look at how to make any baubles more unique and shiny.
 We make a bauble with rhinestones. To do this, we need a ready-made bauble (we will take a woven bauble with arrows), a chain with rhinestones, a floss thread, a needle and scissors.
 Thread the needle and tie a knot at the end. Thread the bauble with a needle from the bottom up at the very beginning of the bauble. Or, to better hide the knot, you can thread the thread through the knot at the very beginning of the baubles. Attach a chain with rhinestones in the center of the baubles.
Make a stitch between the first two rhinestones. Then again thread the needle from the bottom up, trying this time to hit in the middle between the second and third stone. 
 Continue like this until the end of the bauble. After the last stitch, tie a knot at the back. Or again, thread through the knot at the end of the baubles. Then cut off the end of the thread.
Our bauble with rhinestones is ready.
7. How to make a spiked bauble

 To create a baubles with spikes, we need: any baubles, 5 chrome spikes with fasteners, a screwdriver and scissors.
 Make marks with a marker to evenly place the spikes. Use a ruler, or count by thread. In the marked places, pierce with scissors so that the screw crawls through.
 Pass the screw through the hole and screw it into the spike with a screwdriver.
Repeat with the rest of the spikes in the same way. That's all! Our bauble with spikes is ready.
8. How to make a bauble with a chain

 In order to make a bauble with a chain, we need: any ready-made bauble, a short chain with large links, a floss thread, a needle and scissors.
 Thread the floss through the needle. Then untie one knot at the end of the baubles and tie it together with the end of our thread. On the reverse side, thread the needle first from the very edge of the baubles.
Place the chain near the baubles and thread the needle through the first link. Thread the needle again from the back of the baubles, so that the needle is near the second link of our chain. 
 Continue like this until the end of the bauble. The chain will need to be adjusted to the length of the baubles. To do this, unbend the link that goes beyond the length of the baubles and remove the rest of the chain. On the last link, make two stitches. After that, untie the knot of the baubles and tie it together with our thread.
Cut off the rest of the thread. Your updated shiny bauble is ready. Does she look brighter now?

9. How to weave baubles with nuts

Using ordinary hex nuts, you can weave a very original bauble. It is somewhat reminiscent of the spine. This bauble will look great on a guy's hand. And nuts can be bought at any hardware store in different colors and sizes.
 For this baubles, we will need a skein of cotton rope, hex nuts (the quantity is up to you) and scissors.
 Take three ropes, tie them into a knot, leaving free ends 5-10 centimeters long. After the knot, start weaving with a regular pigtail 3-5 centimeters.
Next, before making a strand with the left thread, put a nut on it, press the nut tightly against the pigtail and make a strand with the left thread. If you have a not very thick thread, or rope, then you can make a ring inside the nut (wrapping the nut with thread), and then weave further. Thus, not very thick rope will not wear out very quickly. 
Hold the left nut with your finger. Before you make a strand now with the right thread, put a nut on it and make a strand. In the same way, hold the nut with your finger so that it is firmly pressed against the pigtail. 
 Then a new thread will appear on the left, we thread the nut and knit a bauble in the same way. We try to knit tightly so that the nuts do not hang out, or do not come loose after a couple of days of socks.
 We repeat the steps and weave a bauble. We calculate the required length according to our wrist, taking into account the free space before and after the nuts.
 After we have finished braiding the nuts, we again make 3-5 centimeters of an ordinary pigtail, tie a knot and leave another 5-10 centimeters of the free end of the ropes.
We wrap the bauble 2-3 times around the wrist and tie it. Our bauble with nuts is ready!

10. How to weave baubles tied with chains

 Shiny chains tied with multi-colored floss threads look spectacular, right? And they are made very simply. Let's learn how to weave them. We will need: a chain with large links, floss threads of different colors, two hair clips and scissors.
 We cut 2 sets of 15 threads each. The length of one thread should be 4 times the length of our bracelet. Tie both sets of threads into one knot, leaving 5 centimeters free. Put on a hairpin for each set of threads, they will help you easily thread the threads into the links of the chain and weave a bauble.
 Place the threads to the left of the chain. Pull the first set of threads with a hair clip into the first link of the chain, as shown in the photo.
 Lay the second set of threads on top of the first. Pass the second set of threads into the same link of the chain from the bottom up.
 We pass to the second link, again we put the first color on top of the second and thread it into the second link from the bottom up. Do the same with the second color. We have a chain with fairly large links, so in each link we make a pigtail with each set of threads. If you have a bracelet with smaller links, then you can weave one pass into each link.
 Repeat steps until you reach the end of the chain, then tie a knot and cut off the ends. So our bauble is ready. You can tie the chain on both sides, it will also be interesting. To do this, simply turn the chain over to the other side and weave according to the same instructions.

11. How to weave a friendship necklace
Let's learn how to weave a wonderful necklace. It looks interesting. It can also be given as a friendship bracelet. And weaving them is easy enough.

 Well, we need: cotton rope, floss threads, nuts and washers, spools for skeins of thread and scissors.
In order to make a necklace of two colors, we take two skeins of floss and wind them on spools so that it is convenient to weave. Then we take the rope of the required length and tie it together with the threads with one large knot. We fasten the end with tape to the table, or with a pin to the sofa. Let's start weaving in red, which means we hold the purple color in our left hand so that it is stretched along with the rope. We take the red color in our right hand, make a loop in the form of a four with a thread over the rope, then we thread the coil into the loop formed from the bottom up (see photo) and tighten the knot by pulling the coil to the right up. Repeat this knot many times until you decide to change the color.

Changing the color is very easy. To do this, simply shift the red coil to the left hand and pull it, and with a purple thread we begin to knit knots, as described above.

You can change colors as you wish. In the middle of the friendship necklace, you can add washers, or nuts, and then knit knots again. When finished knitting, untie the first knot and tie both ends of the necklace into one knot. In addition, the necklace will look much more interesting if there are more flowers. You can weave a large number of colors of thread in the same way, just hold all the currently unused spools of thread in your left hand. It turns out such a beauty!

12. How to weave a wrapped chain with rhinestones

 For this baubles we need: 110-140 centimeters of a leather cord one and a half millimeters thick, 30-40 centimeters of a chain of balls or crystals, 150-180 centimeters of thread, a brass nut and scissors. The length varies depending on the size of your wrist. It is designed to wrap twice around the wrist and tie.
 Fold the leather cord in half to form a loop. The size of the loop must be chosen in such a way that the nut fits tightly into it, which will act as a fastener. Run the thread along a leather cord a couple of centimeters long. Then we begin to wrap the rest of the thread around the cord in the opposite direction from the loop. Pull the thread tight so that the end does not pop out and unravel.
 Place a ball chain between the two halves of the leather cord. Wrap the thread tightly between each individual ball.
 Continue winding the chain until the bauble reaches the desired length.
 When you have finished braiding to the required length, tie a knot with three threads (a thread and two halves of a leather cord).
 Then thread the nut and tie another knot. Trim off excess ends.
 The bauble with wrapped rhinestones is ready. Please note that the size is designed for two rings around the wrist. If you want to make one turn, or vice versa more, count on these dimensions.

13. How to weave macrame baubles
In baubles, square knots that are used in macrame also look very impressive. We will only take brighter materials. Instead of threads, we will use nylon cord of different colors. Add shiny metal and stones and get shiny macrame baubles.

a href="http://3rebenka.ru/articles/544-kak-plesti-fenechk...ss-10-foto-1-video.html"  So, we need: four meters of nylon cord half a millimeter thick, metal jewelry, or stones, a needle and scissors.
 Cut the nylon cord like this: 2 pieces of 75 centimeters, 2 pieces of 50 centimeters and 1 piece of 25 centimeters. Fold one half-meter piece of nylon cord in half, thread the resulting loop into the ring, and thread the end of the thread into this loop and tighten. With the second half-meter end, repeat on the other side. So we fix the ring. These threads will be motionless with us.
Take one piece of 75 cm long nylon cord, bend it in half and place the center under the cord tied to the ring. Turn the right part of the cord to the left, put the left part of the cord over the right one and thread it into the loop formed on the right from the bottom up as shown in the photo. 
 Tighten the knot tightly and slide it up until it stops.
 Next, turn the left side of the cord to the right, lift the right side above it, and then thread it into the loop on the left, also from the bottom up and tighten the knot. It is obtained as a mirror image of the previous node.
 Repeat the knots left and right until the required length of the baubles is reached. Please note that the clasp will take about one and a half centimeters.
When you're done, take the left side of the cord first and thread it along the center section 4-5 knots from the back of the bauble. 
 Repeat the same steps with the right half of the cord.
 When you thread the cords, cut off the excess, and the small pieces that remain sticking out can be additionally melted and sealed with a lighter for better fixation. In the same way, we weave on the other side of the ring with a second piece of cord 75 centimeters long.
 Next, we will make the bauble can be moved apart and tightened. It will turn out solid and without knots. Take the piece of cord that we cut off as extra and temporarily tie the cords of the ends of the baubles together.
 Next, take the last piece of nylon cord 25 centimeters long, fold it in half, and start knitting the same left and right knots as we knitted earlier on the bracelet itself.
Make knots about one and a half centimeters long. Thread the ends of the cord with which we knitted back and solder with a lighter. Remove the temporary knots that tied the two ends of the baubles. 
 Thus, with the help of the central cords, we can now adjust the size of the baubles. Choose the length you need and tie knots at the ends, and then cut off the excess.
All. Adjustable macrame bauble is ready! As a decoration in the center, you can take whatever your imagination comes up with.

14. How to weave beaded baubles

 Let's make another unusual bauble - threads plus beads. For this baubles we need 1.2 meters of thread, beads, buttons, scissors.
 Cut the thread into two pieces, one 70 cm, the other 50 cm. Fold the long thread in half. Then attach one end of the short thread to the ends of the long thread and make a bend on half of the long thread. Look at the photo how it looks. You get a loop and three ends of a thread 35 centimeters long and one tip is short.
 We tie a knot, leaving a loop of such a size that the selected button passes tightly. The fourth short tip is then cut off.
 With three threads, we begin to weave an ordinary pigtail. After three centimeters of the pigtail, we thread the beads on the left thread.
Press the beads to the pigtail and cross the center thread with the left thread. Now put the beads on the right thread and cross the center thread with the right thread. 
 Hold the beads with your finger when weaving to make the bauble tight. Continue to weave a pigtail alternately threading beads on the left, then on the right.
 When the size of the baubles is enough for your hand, weave again a braid free from beads of the same length as at the beginning. Tie a knot at the end.
 After the knot, we put a button on the threads and tie a double knot.
 Cut off the excess. So our bauble with beads is ready.
You can take threads and beads of any colors, try, experiment, you will like it!

15. How to weave a bauble with hooks
Let's look at another option how to weave baubles. This will be a bauble with hooks. It is not difficult to make it, in addition, it has one interesting plus, which I will talk about at the end of the master class.

 Well, let's get started. For this bauble we need:
- a cord 2 mm thick, about 60 cm long, instead of it you can use a flexible wire, twine, or something else similar;
- copper hook;
- ruler;
- pliers;
- lighter.
 Before you begin, solder the ends of the cord with a lighter so that it does not unravel when worn. Take the pliers and bend the hook on one side until it stops so that the cord cannot come out. On the other hand, also bend, but so that the cord can pass.
 Now we will make an adjustable knot. Pass one end of the 15 cm cord through the fully folded side of the hook. Bend 8 centimeters of the cord back towards the hook, of which 5 centimeters turn towards you. With this end we will knit a knot.
 Wrap it around all the threads, making two circles towards the left loop. Pass the end through the left loop.
 Hold it with your left hand, and press the skeins to the left side with your right until the knot is tied tightly. You can check if you tied the knot correctly by holding the hook in your right hand and pulling the cord with your left. The knot should move close to the hook.
 At the other end of the cord, you need to make the same knot. You don't need to hook it up. In this case, the turns with the end of the cord must be wound with the direction to the right.
 Pass the end of the cord through the right loop and tighten the knot by moving the turns also to the right.
Trim the ends of the cord and re-solder with a lighter if necessary. Here is our bracelet. It must be wrapped around the arm 2-3 times and adjusted with a second sliding knot.

And now an interesting moment. Anything can be used instead of a hook. You just need a hook on one side, and on the other, you can drill a hole if that. This is how you can make this bauble for a guy. Especially if he is a fisherman will be very relevant. Here, a designer version of the fishing hook is used.

If you show imagination, then you can use any item that can emphasize and convey the owner's hobbies. For musicians, for example, you can take a keychain in the form of a note, on one side you can fasten the cord by its tail, and on the other, drill a hole in its base. It will also look stylish and interesting. Show your imagination and surprise your friends!
Needlework, . You can follow replies to this entry via RSS .
You can leave a response, or trackback from your own site.
Unusual and cute baubles made of threads have always attracted the attention of others. You won’t surprise anyone with the usual jewelry, but with such bracelets you can easily stand out from the crowd. Moreover, they are attractive not only for their brightness, but also for the fact that they can be made independently. Another important feature is the rather interesting meaning that connects the two friends.
Baubles - what is it?
A bauble is an accessory in the form of a bracelet, made in the form of weaving from threads, ribbons, beads and other materials. Most often, it is woven by hand, and the meaning of friendship between two people is embedded in its creation. But the last point is not necessary, since in modern times, many perceive it simply as an ornament.


The prototype of modern baubles are the jewelry of the natives and Indians, who exchanged similar bracelets to establish a spiritual connection. Later, this idea was borrowed by supporters of the “hippie” movement, who thereby confirmed their attitude towards this brotherhood.


The classic option is baubles woven from floss threads. They can be both monophonic and multi-colored. Also, depending on the type of weaving, various patterns and patterns can be depicted on them. The colors on the baubles have certain meanings, thanks to which it was possible to determine what a person is like.


Now baubles made of threads and other materials are a fairly popular accessory, while you can weave it yourself or buy a finished product. They go great with summer and spring outfits. At the same time, both girls and boys can wear them.


Ways of weaving baubles
The weaving of baubles itself is a tying of knots of four types. There are two main ways of weaving baubles: oblique and straight. Already among them you can find interesting solutions to a pattern or pattern, which will differ not only in complexity, but also in execution technique.

Those who have enough experience can even combine these two weaving methods, creating new original patterns, color mixtures.
Oblique weaving

The principle of oblique weaving is that the knots are knitted in one chosen direction - from left to right or vice versa. The simplest pattern that perfectly demonstrates the principle of oblique weaving is the classic tricolor.

So, you will need threads of three colors, the length of which is at least 60 cm.
- The first step will be the creation of a knot, the beginning of a kerchief made of threads. It is attached to the work surface.
- Weaving starts from left to right. It is from this side that you need to start tying knots. To do this, the two outermost threads are knitted together into a knot, while the outermost one adheres.
- The resulting knot is transferred to the base of the thread baubles, and another knot is made next.
- The same must be done with other threads in the direction to the right. That is, the extreme thread will tie two knots on subsequent threads.
- After the first row, you can proceed to the next. It is done in the same way as the first one. Only the color of the extreme thread will already be different.
- When the weaving of the baubles from the threads fits the size of the wrist, the final part should be fixed.


straight weave
Direct weaving of baubles is more difficult. However, those who have mastered the oblique will also cope with this. The advantage of this weaving method is a greater variety of patterns. Baubles can contain not only multi-colored patterns, but also full-fledged drawings. This can be achieved due to the fact that knots are knitted horizontally.

Weaving moves first from right to left, and then vice versa. It is better to start learning to weave baubles in a direct way with two colors. One will act as a background, and the other as knots. And the second one needs much more.

- A beautiful base for a thread baubles is made like this: the threads that will be used as a background must be folded in half.
- On the one hand, closer to the fold, a thread is tied, which has the name "leading".
- With a leading thread, you need to tie all the threads of the background, so that in the end you get a beautiful uniform loop.
- Then you need to tie certain knots on the threads of the background, moving towards the opposite side.
- When the first row is completed, you need to move on to the second. Here weaving will be carried out according to the same principle, but in the opposite direction. Therefore, many people call this method "snake".
Having stuffed your hand on weaving baubles of their two colors, you should try your skills on several shades or start creating real patterns.

Patterns of weaving baubles from threads
To begin with, it must be said that there are two types of schemes:
- a full cycle means that after the weaving of the pattern has ended, it must be repeated again;
- an incomplete cycle demonstrates the principle of tying knots, that is, there will be some colors on top and others on the bottom.

As for the nodes themselves, they also come in two types:
- the right one is characterized by the fact that the working thread will be located on the right side of the received node,
- left means that the working thread will be on the left side of the node itself.

There are also 4 types of nodes:
- straight - in the diagram is depicted by an arrow pointing in the right-down direction. And for this you need to make two left nodes;
- the reverse is depicted in the diagram as an arrow that shows the direction left-down. And that means you have to make two right knots;
- the left tatting appears on the diagram as an arrow in the form of a right angle, looking in the lower left direction. To make it, you need to do the following: first you need to tie the left knot, after which, changing the threads in places, you need to make the right knot;
- right tatting - on the diagram it has the designation of the direction to the right and down in the form of a right angle. It is performed according to the same principle as the previous node, only in the opposite direction: first the right node, then the left.

Often the diagrams show the colors of the nodes, however, you can replace them with others. At the beginning of the path of weaving baubles from threads, in order not to get confused, you can mark the rows that have already been made.

As for the schemes themselves, there are a huge number of them. Thanks to them, you can create various patterns and patterns on baubles. It is also possible to come up with a pattern yourself, for this special programs have been created that process the intended ornament in the form of a weaving pattern.


In the video below, you will see how diverse thread baubles can be, in which case to use direct weaving, and in which oblique. Get inspired.
To create a multi-colored baubles from threads, you will need floss threads - at least six colors, scissors and a mount.

- The threads are cut in half so that each color is doubled.
- Then the threads are arranged so that the same colors are mirrored. That is, red will be the last color on the left and right sides, green will be the second, and so on.
- Thread fastening is done in any way you like.
- Weaving can be started from any side, for example, from the left. To do this, the extreme thread makes two left knots, which must be placed right at the base of the bracelet.
- Then, again, the red thread should tie knots on other threads. You need to tie them to the middle.
- The same must be done on the other side, that is, repeat the steps, but in the opposite order.
- When the red threads converge in the middle, you need to tie a knot with the right leading thread.
- You need to start the second row already from the green color. Everything is done in the same way as with the red thread.
- At the end of weaving, the bauble can be tied into a knot and weaved a thin pigtail from the remaining threads. The same must be done with the threads that remained at the base.


How to decorate baubles?
The bauble itself is an original accessory, but this does not mean that the bracelet should be made exclusively from floss. It can be complemented with various decorations. The simplest option for decorating baubles are interesting locks. They can be purchased at craft stores. It can be an infinity sign, chain links, a lighthouse and much more. And in the bracelet itself, you can weave beads, spikes, beads, stones, sequins, rhinestones.


To decorate a bauble with beads or beads, they need to be strung on a thread and sewn into a bracelet with a needle.

The decoration in the form of rhinestones looks interesting. They can be glued to the finished bauble, but in this case there is a risk that the glue will leave marks. Therefore, you can buy a thread with ready-made applied small rhinestones.
So, in order to attach a thread with rhinestones, you need to do the following:
- In the middle along the thread baubles, you need to lay out a thread with rhinestones of the appropriate length.
- Then, with a thread whose color matches the bauble, you need to start sewing on a thread with rhinestones.
- To do this, you need to make stitches with a needle that will run perpendicular to the thread with rhinestones.

To decorate a bauble with spikes, you need to stock up on special fasteners. But before that, it is better to make markup for decorations. Then, with the help of a needle, the spikes are applied to the bracelet, and fixed from the wrong side.

Weaving baubles is quite an interesting process, but it can also be difficult. And the first problem for beginners is the incorrect determination of the length of the threads. First, you need to leave a length so that you can wear a bauble on your hand. Secondly, depending on the complexity of weaving, threads with a length of 80 cm or more are needed. Therefore, the more complex the pattern, the longer the thread should be.

At the beginning of training, you can simply fasten the threads in the form of a simple knot. But to make the work look more neat, you can use one of the suggested methods:
- Fixing the threads with a pin. All the threads need to be tied around the pin, and then it can be attached to a piece of fabric or even to your jeans.
- Fixing the threads with adhesive tape, electrical tape or plaster to the work surface.
- Tie knots with lead thread around the base of the bracelet.
- So that the end of the baubles does not unravel, you need to tie it in a knot, or braid a tight pigtail.


Another important point is the quality of the threads. It should be a cotton floss. But since it can be dull, manufacturers carry out a mercerization process. You can also weave baubles from silk, woolen and staple threads.

If a thread runs out during weaving, and this often happens when creating complex patterns, you need to do the following: from the wrong side, a new thread of the same color is attached to the finished thread.
If you want to create a bauble according to traditions, then you need to know the meanings of colors:
- red symbolizes love and passion,
- green - hope and faith,
- white - innocence and freedom,
- black - loneliness and independence.

A bauble is a great decoration that is suitable for summer. And the weaving process itself can become an interesting hobby, because there are many patterns of varying complexity, according to which you can create a beautiful and unusual bracelet. Also, a hand-woven bauble can be a nice present for girlfriends or friends.
Finally, an easy master class on weaving the simplest thread baubles, which will allow even inexperienced beginners to catch fire with the idea of \u200b\u200bweaving.
A floss bauble will be a good gift for friends or relatives. In order to weave it, you will need threads, a ruler, scissors. Considering that weaving takes a long time, it is best for you to sit in a well-lit area. Below we will tell you how to weave a wide variety of types of baubles.
1. Weave a pigtail
The easiest way is to weave a pigtail. It is woven from three threads, and sometimes I braid the ends of baubles into pigtails. The end of the braid can be tied into a knot.
One of the methods of weaving is weaving a pigtail from 4 threads. Using this weaving pattern, you can use more threads (even fourteen). The main thing in this scheme is to alternately transfer the threads from left to right, and from right to left.
You can weave a pigtail and from 5 threads, the so-called cord aglet. This scheme is used for any non-paired number of threads. The essence of the scheme is to alternately move to the center of the left thread, and then the right thread, and repeat as much as you need.


From 6 threads


2. Weave with an oblique weave
In this weaving, you will use 4 knots, which can be woven in different ways. Weaving should start from left to right, or vice versa, guided by the scheme.
3. Baubles with sharp arrows

 You will need floss threads about a meter long, take 12 threads of 6 colors. Arrange them in a bun, tying a knot 7 centimeters from their edge. It would be better to fix the threads with tape to the edge of the table, divide them into 2 parts by color.

Taking the leftmost thread, make a "four" on the second thread from the left, and pass through the hole (see picture). Then you need to draw the thread up and to the right. This should be repeated, you will get a double knot. The rest of the threads are knitted in the same way until you reach the center. This will make half of the bauble.


On the other hand, do everything symmetrically. Continuing to knit knots, you will complete the first stitch of the baubles. Having received the desired number of lines, tie a bauble at the end with a knot of all threads. Such a bauble can be made both symmetrical in colors and not.
4. Weave rhinestones


Take the finished bauble, floss thread, scissors, needle and rhinestones.
 Tie a thread on the needle and thread it through the bauble at the very beginning. Thread a chain with rhinestones on a bauble.
Make stitches through 2 rhinestones, then again thread the needle from the bottom up, trying this time to get in the middle between the second and third stone.

 Tie a knot at the end on the back.
5. Baubles with spikes

 You will need 5 spikes, attachments to them, scissors, a screwdriver, a bauble.
Make markings on the bauble in the places where the spikes are fixed. Poke holes in them with scissors. Inserting a screw into it, secure the spike. Do this action with all spikes.


6. Baubles with a chain

 You will need a bauble, floss thread, not a long chain, a needle, scissors.
 After threading the needle, tie the end of the thread with the last knot of the baubles, the needle should be threaded at the beginning of the baubles.
Putting the chain next to the bauble, thread the needle through each link, making stitches on each of them.

 If the chain is too long, adjust it to fit by removing a few links.
7. Weave a bauble with nuts

 You will need cotton ropes, scissors and nuts (you can use hex ones).
 Tie 3 ropes into a knot, leaving 5-7 centimeters on the edge. Braid 6 centimeters with a regular pigtail.
When making a strand with the left thread, put a nut on the thread, make sure that they fit one to the other.

When you make a strand with the right thread, put the nut back on and press it.


8. Baubles with a tied chain

 You will need floss threads, 2 hair clips, a large chain and scissors.
 By cutting two sets of fifteen threads, you should get threads that are 4 times longer than your bracelet. Tie all the threads into a knot, leaving 6 centimeters from the end.
 Secure each set of threads in a barrette, this will make the whole process easier for you.
 Pull the set into the first link (see picture), placing the second set on top of the first, slide it from the bottom up into the first link.
 On the second link, we start in the same way, putting the first set on top of the second, and draw it into the link.
 Do the same with the second set. So we repeat with all the links.
9. Making a Friendship Necklace

 You will need cotton ropes, floss, washers, nuts, scissors and spools of thread.
Wind 2 skeins of floss threads on spools, so it will be more convenient for you to weave. Fasten all the threads in a position convenient for you. Then follow the instructions in the photo. The described procedure should be repeated until you want to change the color.

Changing the color is easy, you should shift the replaced thread to your left hand, and knit knots with the new one, as shown in the photo.

The color scheme can be changed at will. In the process of knitting, you can add washers, nuts, fixing them with knots. Remember that a necklace with many colors will look better.

10. Baubles with a chain and rhinestones

 You will need 130 centimeters of leather cord, 1.5 mm thick, about 30 centimeters of a chain of crystals or balls, about 160 centimeters of thread, a nut.
 The length should be chosen depending on your wrist, so that you can wrap the bauble 2 times around it and tie it.
 Make a large loop of leather cord by folding it in half so that the nut can go through the loop. Take the thread and fasten it to the end of the loop, then begin to wind the chain with the leather cord.
Continue like this until the very end of the chain. Tie a knot at the end to secure the nut.


With the help of a loop and a nut, the bauble is attached to the hand.
12. Making baubles from beads

 You will need 120 centimeters of thread, scissors and a button.
Baubles are handmade bracelets made of leatherette, threads, beads, ribbons and other materials. Around the world, they are also known as "friendship bracelets", because they are usually exchanged with friends and generally made with love and care for one's neighbor. They are worn and weaved by both girls and boys! It was the floss bracelets that became the most popular, because they are the most versatile, and the process of their creation is as simple and understandable as possible for beginners. Therefore, today we will tell our readers how to weave baubles from threads - let's go!
What you need for weaving baubles
In order to weave baubles from threads, you need special threads - floss. They are sold in almost any store with goods for needlework and sewing, they come in different colors, types, sizes - depending on the manufacturer. There are skeins with a length of 20 meters at once, and there are skeins and smaller ones - 16, 10, 8 meters. Some floss are brighter, some are more shiny and smooth, somewhere the palette of colors is richer, some threads are found even in multicolor, or in a gradient, when the color from one smoothly passes into another. Choose those floss threads that are more suitable for you in terms of quality, colors and price.
If you just want to try to learn how to weave baubles, and not spend extra money on threads for a trial bracelet, you can use other materials that you find at home: these can be ordinary threads folded in half or three, woolen threads, threads "iris ”, “peony”, etc.
In addition to a set of threads, fennec braids need something with which to secure the fennec to the surface while you weave it. There are several ways to do this:
- Attach the threads with tape to the table, and tie the upper part into a knot so that the threads do not pull out when weaving.
- You can also attach the free top end of the bangle to the book using a clerical clip.
- And finally, you can tie a knot at the end and attach it with a pin to your own jeans on your knees if you are weaving while sitting.

Types of weaving and types of knots
In total, there are two main types of weaving baubles from threads - this oblique and straight.
Oblique- this is weaving, where the leading threads alternate one after another, braiding each other. But in the case of direct weaving there is only one leading thread, and it is she who braids the entire bauble, so it must be much longer than the rest - sometimes a whole skein of thread is used for this. Look at the diagrams and photos below, and then the principle of oblique (1) and straight (2) weaving will become obvious:
1.
2.
And what do these circles with arrows mean? These are the different types of knots used when weaving baubles from threads. There are only four of them:
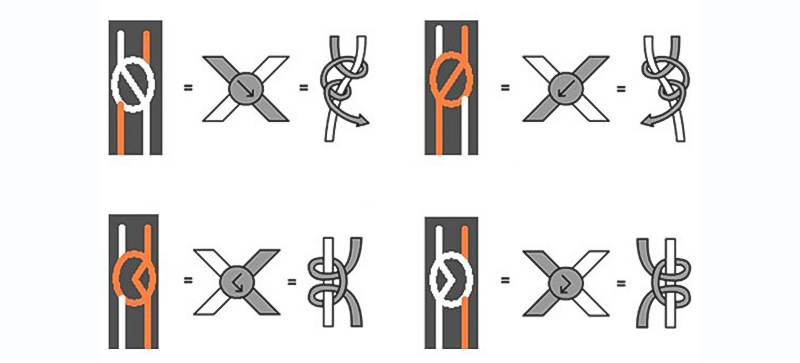
- Right / right - hold the right thread with one hand and pull it. With the other hand, we take the left thread and throw it on top of the right one to form a loop. We pass it through this loop from below and tighten the knot. Remember that all the knots in the fenko weave are double! Therefore, we repeat the same knot on the same threads again. We tighten the first knot more tightly, and the second one can be made a little looser to make the bauble more voluminous and beautiful. More details - on the diagram:

- Left / left - a knot, almost similar to the previous one, with the only difference being that this time we pull the left thread, and with the help of the right we form our loop and pull the upper thread through it. We repeat the knot twice, see the picture:

- Tatting left / right-left - sounds difficult, but in fact this knot is not much more difficult than the previous ones. Look at the diagram: since we have each knot, that is, each step in weaving a baubles, consists of two knots, the first knot repeats the “right”, and the second, upper knot, repeats the “left”. Please note that the working thread does not change! That is, we pull the right thread, form a loop from the left thread from above, pull it from below and tighten the knot. Next, we throw the same left thread to the right, forming a loop with the end directed to the left, we stretch the thread from below into this loop and again tighten the knot, as if it were going to the left. Ready!

- Tatting left / left-right - similar to the previous knot, only now we make the first knot, as in the left knot, and the second - as in the right one. Pull the left thread, pull the right thread through the loop formed by it and tighten; now throw the same thread to the left, form a loop and pull it from below, as if repeating the knot to the right. Consider the diagram again:

That's all - these are the knots that will help you understand how to weave baubles from threads. When you look at weaving patterns, you will see that there are baubles where only two knots alternate, and somewhere a third is added, or all four types are used at once. The main thing is to carefully follow the pattern: it happens that just one wrong knot significantly spoils the whole picture, so you should weave baubles from threads in a calm environment where you can concentrate - this is especially useful for beginners.
If you still mixed up the knot, or tightened it too much, you can loosen it or dissolve it completely with an ordinary needle.
Thread baubles patterns: the simplest bracelet
Let's try to weave the simplest bauble, which is called "Candy Stripe". It is made with oblique weaving, which is considered simpler than straight, while it looks very cute and pretty. You can weave it both as a plain bauble and as a striped one using different colors. It will be possible to weave it even from 4 threads, but in this case it will turn out to be very thin, so it is much better to weave from 6, and even better - from 8-10 threads.

We will consider the option with 6 threads. This bauble is suitable for beginners in that it uses only one type of knot - "left"! A great way to work it out in practice, isn't it? Look at the diagram:

We will be guided by the colors of this scheme, but you have every right to replace them with your favorite ones. So, we take 6 threads of red, black and white, 2 for each color. The length of each thread should be approximately 70 cm. We suggest measuring this length with a ruler or centimeter for one thread, and then align the remaining 5 with it. You can also take one end of the thread in your left hand, pull it all the way to the side and stretch the other end to the right shoulder. This distance is approximately 1 m. So for 70 cm you need to measure a little less.

And here are some more beautiful and simple baubles for beginners, which you should definitely learn how to weave:

After our article, you should not have any problems with how to decipher the patterns of weaving baubles, because we have learned all types of knots! Just learn how this or that knot is woven, which arrow corresponds to it, and start weaving them one by one, as shown in the picture for your current baubles. If you still have questions, feel free to leave them in the comments. In the meantime, we invite you to see how to weave baubles with direct weaving - the video is very detailed and understandable:
We wish you success in the weaving!
If someone wants to learn how to weave floss baubles, then first for beginners it is worth mastering the technique of creating “masterpieces” from 2, 3, 4, 6 threads. At the same time, it is necessary to learn how to “read” ready-made patterns of various thread ornaments and, of course, practice in this matter.
Thread fastening methods
First, the threads are fixed in any of 4 ways:
- A wide clip on a cardboard, book or notebook.
- With an ordinary pin, tying knots on it, and then attaching it to a pillow or any fabric.
- Sticky tape to a table or other hard surface.
- Using a special tablet with a clip (sold in stores).
It should be remembered that the threads when fastening must be arranged according to the color scheme of weaving. When the floss is securely fixed, they begin to study the main knots.
Technique for performing the main nodes
When weaving baubles, only four basic knots are used:
Baubles are made very simply if you follow the weaving technique.
Baubles from 2 threads
The simplest bracelet can be woven from two threads.
To make it easier to navigate and not confuse the sequence of steps, use 2 colors of floss threads, for example, red and blue:

After you have learned to weave floss baubles with two threads, you can move on to more complicated patterns. For beginners, it is worth mastering the manufacture of baubles with a pigtail from a different number of threads.
4-strand pigtail or other even number
Weaving baubles with a pigtail of an even number and an odd number has slight differences.
First, it matters to disassemble the 4-strand pigtail pattern:

For a pigtail of 6 threads, the knitting sequence is the same as for 4:

The principle of weaving a product from an even number of fibers is as follows: the leftmost fibers of the floss are placed to the right, first above the next fiber, and then under the next. And the extreme right fiber, on the contrary, is first shifted to the left under the next fiber, only then above the other. Such weaving is used in the manufacture of wicker baskets.
3-strand pigtail or other odd number
The easiest way to make a bauble is to weave a 3-strand braid.
To do this, take 3 threads (can be of different colors):

Weaving jewelry from 7 threads:

The principle of weaving baubles with a pigtail of an odd number of fibers is that the left and right extreme threads are always first shifted in the opposite direction above the first nearest fiber, and then under the next two fibers.
Direct weaving instruction
One of the popular ways to make baubles is straight weaving. With its help, interesting drawings, patterns, names and paintings are obtained. Straight weaving is a little more complicated than oblique. However, this technique will more fully reveal the topic of how to weave floss baubles for beginners. Allocate some threads for the background and others for a specific pattern.
At the beginning of the work, all other threads are tied with the extreme leading thread in one direction and the other. Looks like zigzags. This is the background color.
When knitting a pattern, its thread ties around the leading thread and goes in the other direction, while the leading thread is free.
It's best to start with a simple two-color pattern:

In the technique of oblique weaving floss baubles, the same basic left and right knots are used.
Bias instructions
Oblique weaving is considered classic. It most simply reveals the question of how to weave floss baubles for beginners. There are 2 options for performing oblique weaving.
First option
This weaving includes only one base knot - the main left or the main right. This knot is repeated on all rows to the end of the product. For clarity, it is worth considering the oblique weaving with the main left knot. Take 2 threads, for example pink and blue, 100 cm long. 
Weaving:

Second option
Fenechka arrow or “on the corner”, she is also “braid”. In this version of oblique weaving, both main knots are used - left and right. The result is an arrow-shaped pattern. 
Weaving:
- Fasten with a paper clip on the book the connected ends of six threads of 3 colors. The colors are arranged in the following sequence: along the edges 2 blue, then 2 red and 2 yellow floss threads.
- The left extreme thread (blue) braids the left main knot in sequence with the red and yellow threads on the left. The right extreme (blue) is tied with the right main knot to the right red and yellow threads. Two blue threads are knitted together with the left or right main knot. Now the blue fibers have become central, and the red ones are extreme.
- Repeat all actions, as in paragraph B, only with the extreme leading red fibers. After this step, the red fibers become central.
- With the left extreme yellow thread, two threads on the left, blue and red, are knitted with the left main knot. With the right extreme yellow thread, two threads on the right of blue and red are tied. Yellow threads are woven in the center between themselves with the left or right main knot.
So sequentially knit a bauble to the required length. At the end, a regular knot is tied, removed from the base. Connect the ends of the baubles together, carefully cut off the excess material. On the bauble, a pattern in the form of an arrow turned out.
Two-tone weave
Take an even number of meter floss threads, 4 blue and 4 pink:

This version of two-color floss weaving is very easy, because there is no need to count the number of knots. The bauble is dense. It can be used as a watch strap.
How to weave baubles with names
Before you start weaving baubles with a name, draw up a diagram. To do this, all the letters of the required name from the proposed letter schemes on the Internet are entered on a sheet in a box. 
The cell corresponds to one knot.
Weaving:

Patterned bracelet
When some skills are gained in how to weave floss baubles for beginners, they proceed to more complex weaving patterns.
First, you can make a bracelet with a simple pattern, for example, a two-tone one with hearts: 
- Learn the weaving pattern.
- Take 4 threads of red and black, 1 meter long. Recede from the end of 8 cm and tie a knot.
- Fasten the short part with a wide clamp on a flat surface. Lay out the fibers by color, as shown in the diagram.
- Weaving is carried out in pairs. In the first row, the left half knot is made with the first black and second red threads. The black thread is placed in the left corner above the red thread, brought inside the corner and tightened the knot. Then the black thread is placed with the right corner over the red thread, brought inside the corner and tightened the knot. The couple is set aside.
- The second pair, black and red threads, are woven with the left knot (as indicated in the diagram). Set aside a couple.
- The third pair of red and black threads is woven with the right knot according to the scheme and also set aside.
- The fourth pair of red and black threads according to the scheme is performed with the right half knot.
- Row 2. Black extreme threads on the left and right are removed to the side. They are not woven, as in the subsequent even rows of baubles. Red threads 2 and 3 are knitted with the left knot and set aside.
- Black fibers 4 and 5 are knitted with a left knot and set aside.
- Red fibers 6 and 7 are knitted with the right knot and set aside.
- Row 3. Knitting also begins from left to right. The first black and second red threads are knitted with the right knot and set aside.
- Red 3 and black 4 are knitted with a left knot and left.
- Black 5 and red 6 are tied with a right knot and set aside.
- Red 7 and black 8 are woven with the left knot, set aside.
Ways of weaving with rhinestones and beads
Any bauble will look more spectacular if you decorate it with additional beads or rhinestones. The easiest way is to sew beads or rhinestones with matching threads to the finished baubles as your imagination allows.  In the second way, beads are woven in the process of making baubles with a flat knot. As a base, take 2 threads of the same color as 2 leading threads.
Weaving:
- The first 3-4 cm weave a bauble with a flat knot without beads. Next, add 1 pc to each node. beads on each side of the base.
- The last 3-4 cm of the baubles are made without beads.
- Fasteners are made with two simple pigtails.
What to do if the thread runs out
During the weaving of floss jewelry, one of the threads may break, or it may end, and work must be continued.
In this case:
- Bring the finished thread to the wrong side.
- They take a thread of the same color and put it in place of the previous one.
- The upper end of the new thread is tucked into the wrong side and tied with two knots of the leading thread.
- On the wrong side, knot the old and new threads.
- Continue weaving on the front side of the baubles according to the chosen pattern.
How to make a clasp
There are several options for fasteners baubles.
Option 1 - braid clasp:

Option 2 - tying the two ends of the braids with a separate thread:

Option 3 - Velcro, button, button:

After the necessary basics have been mastered, it will not be difficult for beginners to weave simple floss baubles for beginners, as well as draw their own drawing schemes on their own. On the Internet you can find complex drawings of baubles on various topics: emoticons, new year, sweets, plants, Halloween, flags, etc.
Video: how to weave floss baubles
How to weave floss baubles, see the video clip:
How to weave an arrow bauble from floss, find out in the video: