What you need for a French manicure with gel polish. How to make a beautiful colored French on short, medium, long and extended nails? Manicure colored French gel polish, shellac and regular polish
Today, French manicure with gel polish at home is a reality for every nail art lover. It is not difficult to purchase everything you need. The main difficulty lies in applying gel polish. French manicure is a classic of nail art. It emphasizes the elegance and sophistication of the image, so it must be executed flawlessly. Making the lines perfectly straight takes skill. Few people manage to perform French gel polish flawlessly the first time. To make your task as easy as possible, you need to adhere to certain rules.
Before you decide to apply French gel polish, you need to buy products and tools, as well as prepare a place to work. For a French manicure you will need 2 types of polish. Classic combination involves the use of white and flesh (beige) shades. However, you can perform French in any other color scheme. For a business lady, moderate color compositions are more suitable: white and pink, beige and black, transparent and lilac, beige and gold. IN Everyday life, on vacation and holiday party Any color combinations will be appropriate.
In addition to colored gel polish, you will need a base and top coat, 1-2 brushes, a UV lamp and special liquid for degreasing. It is advisable to additionally buy 1 thin brush for painting nails. To process nail plates, you need to prepare 2 files: with an abrasiveness of 180-240 grit (for filing) and 240-500 grit (for grinding).
To get a French manicure, you need to choose workplace With good lighting. All items are placed within reach. Need to stock up cotton pads or lint-free manicure napkins, pushers or orange sticks.
Before you paint your French manicure with gel polish, you need to prepare nail plate. The final result directly depends on the quality of its processing. The free edge of the nail needs to be trimmed and filed, giving it desired shape. Then the surface of the nail plate is processed. In order for the manicure to lie perfectly flat and look flawless, you need to remove the top keratin layer. The surface of the nail should become slightly rough and matte, this will provide better adhesion to the coating.
Then the cuticle is pushed back so that no voids form under the base layer. Remains of cuticle that have grown to the nail must be removed with a cuticle remover. The treated nail is wiped with a liquid to degrease the surface. Before creating nail art, you need to familiarize yourself with the rules for decorating a French manicure with gel polish step by step, which we will tell you about below.

First of all, apply a base layer to the prepared nail plate. The base is applied to the central part of the nail, then gradually distributed over the entire surface, after which it is polymerized under a UV lamp for 30 seconds. Excess product is removed with a toothpick or orange stick. There is no need to remove the sticky layer. 2 thin layers of gel polish are applied to it the desired shade, painting the end of the nail. Each of them is polymerized for 2 minutes.
Smile line design:
- Before doing a French manicure, you need to find the longitudinal center line of the nail. If the nail has square shape, its extreme point will be located strictly in the middle of the nail cut. If the cut shape is round or oval, the extreme point of the axis will be at the apex.
- From the extreme point of the center line, they retreat downward to a distance that will be the width of the smile (white tips). Here they make a point with a brush for painting. In order not to spoil the manicure, you can make a mark with transparent gel polish.
- From the mark to the right and left, draw lines parallel to the cut. In this case, their end points should be on the same straight line, perpendicular to the center line of the nail. It is advisable that the end points be located near the place where the nail grows into the skin of the finger.
- If the free edge of the nail is large, there is no need to paint it completely white. The white stripe is made thin (2-3 mm). It is carried out strictly along the cut.
- It is important to make the lines perfectly straight and maintain the proportions of a French manicure. The width of the white stripe should always be several times smaller than the beige part.
- Before applying gel polish, you need to check that the selected smile width is suitable for all nails. Sometimes girls start applying polish from large nail plates. When it comes to the little finger, it turns out that the white stripe is very large for it. Its width on all fingers should be the same.
- When the smile line is marked, it is painted over with white gel polish. You must act extremely carefully so as not to cross the marked boundaries during step-by-step staining. It is advisable to apply a thin layer of varnish so that it does not flow beyond the area to be painted. Experienced manicurists recommend correcting the design using a clean brush. The applied layer is dried under a UV lamp for 2 minutes.
- Then the final top coat of clear gel polish is applied. The top coat is polymerized in a UV lamp for 1-2 minutes. If a topcoat with a sticky layer is used, it is removed using a dispersion layer remover.
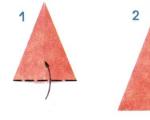
If you don’t know how to correctly draw a smile line so that it turns out perfectly straight, use stencils for a French manicure. Stencils are strips of paper on a sticky base, 5-6 mm wide. They have different shapes, allowing you to create a smile line not only in the form of a classic semicircle, but also in the form of a wave, zigzag, triangle, heart or straight beveled line. Using stencils is very easy. They are glued onto a layer beige colour only after it has completely dried. Draw a smile line when the stencil fits tightly to the nail.
After applying the gel polish to the smile line, the stencil is carefully removed. An awkward movement can lead to smearing of the varnish and disruption of a perfectly straight line. After removing the strips, the white layer is dried in a UV lamp for 2 minutes.
You can make a stencil yourself from regular tape. You need to cut a piece 3 cm long. It is cut into strips 0.5 cm wide. The side line of the strips is given the desired shape (semicircle, wave or triangle). Before gluing the adhesive tape to the surface of the nail, you need to glue it to any other surface 1-2 times. This will help reduce its stickiness, and then maintain the integrity of the gel coating.
IN summer time when used open shoes A beautifully designed French pedicure is especially appreciated. Gel polish is ideal for coloring toenails. It does not wear off and does not lose shine from friction against the surface of shoes, does not turn yellow or peel off from sea water and hot sand. Gel polish allows you to save perfect pedicure for a long time.
Before you draw a French jacket on your legs, you need to think through the design and choose colors. You should not make an extended stretch on your toes. oval shape smiles. It is suitable for very large and elongated nail beds, which are extremely rare. The width of the white stripe should not be more than 1-3 mm, otherwise the French coat will look rough and unaesthetic.
It is not recommended to use clear gel polish for pedicures as it does not correct natural shade nail Combination natural color with white can aggravate the blue and yellowness of the natural color.
- Before applying gel polish, perform trim pedicure. Cuticle can be removed special means and an orange stick. The nails are given the desired shape and filed. Use a file to remove the glossy shine from their surface. After removing dust, the plates are degreased with a preparatory agent.
- Treated nails are covered with a base, evenly distributing it over the entire surface. The base layer is dried in a UV lamp for 30 seconds. After this apply color coating, painting the cut of the nail. It is polymerized for 2 minutes. Then apply another 1-2 layers of colored gel polish. The gel layers are dried for 2 minutes.
- When the surface is dry, draw white stripe. It can be applied according to the same pattern that is used for manicure. But it’s easier to paint the strip with the same type of strokes, moving from one edge of the nail to the other. To paint the nails of small fingers, it is more convenient to use a very thin brush. The white layer is dried in a UV lamp for 2 minutes. After applying the top layer, the gel polish is polymerized for 2 minutes. Then the nails are treated with a sticky layer remover and cuticle oil is applied.
To always be at your best and look unsurpassed, it is important to take care of your appearance. Manicure is playing today big role in the life of the fair sex. It’s not for nothing that they say that hands can say a lot about a person. The type and shape of fingers, curves, lines and especially well-groomed nails.
French manicure is a fairly common service among women of any age. However, in order for the nails to have attractive appearance for long period time, sometimes they resort to covering the nail plate with modern special gel-based materials.
Preparation for the procedure
Before you start covering your nails with varnish, you should carefully and correctly prepare the nail plate. To do this you will need a minimal manicure set:
Step-by-step manicure
The ideal option would be to get a manicure at a salon. But today all materials are available at an objective price, and the technique of execution is quickly taught in a master class. But even a novice master can do this type of manicure at home if he has everything at hand necessary items and tools.
Let's move on to the process itself. Before you start, try to protect yourself from household chores for a while. Not only will cooking dinner and cleaning up after the kids interfere with your concentration, but it's simply impossible to get everyone's flooring neat and even.
Next, wash your hands with soap and dry them thoroughly. File your nails so that they look even and uniform. In the future you will not have such an opportunity. Push back the cuticle with a special spatula or the cut edge of an orange stick. Many people prefer to trim the cuticle with nail scissors or a special pointed spatula.
After all of the above has been done, pay attention to the plate itself. Using a soft file, sand the enamel to a light roughness. However, you should not file it too hard so as not to damage it. This is necessary so that the varnish adheres to the surface as best as possible. Next, wipe the nail with alcohol using a lint-free cloth or a special alcohol-based product.
Nail polish
 French manicure with shellac at home requires attention to detail. After the nail is prepared, you need to cover it primer. This is a means to ensure maximum adherence of the polish to the nail. When experienced craftsmen give lessons, they always emphasize that each layer must be carefully painted, however, it is strictly not recommended to go beyond the edge of the plate, since subsequently the varnish will begin to scrape off.
Basically, the primer is not dried under a lamp, so this layer can be applied quickly.
After that comes the base coat., it has no color and serves to even out the nail plate and hide all imperfections. We draw your attention to the fact that the layer should be uniform, but it should not be poured. It is better to make an even but thin ball. It is dried in a lamp for 2-2.5 minutes. It is worth remembering that you do not need to let it dry out, because the stickiness will ensure reliable bonding with the next layers.
After drying, take the previously selected base color and cover the entire nail with it. The application should also form a thin ball and not extend beyond the edges.
Many video tutorials recommend applying several layers of base color varnish. They should be thin and neat. Each of them is dried under a lamp. However, you should make sure that there are not too many of them, otherwise the manicure will look careless and vulgar. The best option there will be 2-3 layers.
White edge can be done with a brush small sizes. To make it easier for beginners to understand how it should look, you can imagine a smile on the edge of the nail. But let us immediately note that the design may differ significantly. So, some people prefer to paint over absolutely the entire regrown edge with white and make it massive. The rest, on the contrary, are trying to draw the coveted strip as thinly and evenly as possible.
Striping using stencils
 If you still haven’t learned how to draw pictures with a brush, don’t waste your nerves. For French nail polish, gel polish is also suitable stencils. They need to be fixed on a nail covered with colored varnish, retreating the part that you plan to paint. Then run the brush over free edge and distribute the varnish evenly. Next you need to carefully and very slowly remove the stencil and correct any inaccuracies. It is important that all stripes look the same in width.
If you don't succeed the first time, don't rush to despair. You can remove a failed drawing if you did not dry it under a lamp. Using a napkin soaked in a special liquid or alcohol. And then continue the same thing. White coating You also need to dry it under a lamp and check how dry it is to avoid bubbles and swelling.
When all actions are completed, you need to apply the top coat. They cover the nail plate at the very last stage. Then it is also dried in a lamp until completely dry.
Upon completion you can find sticky layer on the covering. This is absolutely normal phenomenon, and can be easily cleaned with a lint-free cloth and alcohol-based liquid. Remember that the layer should not darken or become cloudy, but should remain shiny.
Design and original design
Today, you won’t surprise anyone with a classic French manicure. However, the girls resort to original methods and are often used additional elements design. You can decorate your nails with different designs and methods. In addition to various curls made from gel paint, stickers and shiny pebbles for decoration will add some charm and sparkle to your manicure.
French manicure with gel polish at home also implies the opportunity to experiment with the width and types of the white line in accordance with the shape of your nail plate and how much the regrown edge has been filed.
You can make the line smooth and clear, but there is an option when a smile can go beyond the strict image. The edges can be lengthened closer to the bottom of the nail, rounded to a greater or lesser extent.
If you do your manicure at home, Some rules must be followed:

In conclusion, I would like to note that today such a manicure is practical and universal remedy. With its help, you will forget about the nail file and unpleasant appearance peeling varnish. And a pleasant, discreet design will great addition to your everyday as well as festive look.
I wanted something unusual for the holiday. But I still couldn’t choose my image, outfit and nail design. I watched a lot of video tutorials on this topic and found a very interesting jacket with sparkles and stones. Now at my mother’s anniversary I will be beautiful and attractive.
Every woman wants her hands to look beautiful at any time, whether she is in the office, on festive feast, in the gym or on vacation outside the city. Dear ladies, remember: perfect option manicure for all occasions - French, or, in other words, French.
In a French manicure, the outer edge of the nail is always a different color from the rest of the painted surface. IN classic version the nail plate has a natural color, and the edge is painted over white.
Is it possible to make a beautiful French manicure yourself, at home? Of course you can! But first, prepare everything you need. To do this, select the method of performing the French.
When French manicure first appeared (and it happened a little less than 50 years ago in the USA), women simply covered their nails with varnish neutral color, and the protruding edge was tinted from the inside with a white pencil.
You can do this now, but the pencil wears off quite quickly, so other methods of creating a French jacket are more popular:
- ordinary varnishes;
- gel polish;
- on extended nails;
- tips.
The main difficulty in creating the perfect French manicure is drawing the “smile line” separating the two zones of the nail. Without the proper skill, few people succeed in making it even.
In this case, special stencils are suitable for beginners - by gluing them on your nails, you can easily draw an even outline. Some resourceful young ladies stick on pieces of ordinary tape instead of stencils. True, in this case the “smile line” is not curved, but straight, and it must be said that it is not always neat.
If you don't want to bother with adhesive strips, use a white pencil - painting the edge of the nail from the inside will make it easier for you to follow the desired line with your brush.
Necessary materials and tools for French manicure
To create a French jacket at home regular varnish you will need:
- corrector (or acetone with a brush);
- thin or flat brush;
- nail polish remover;
- varnish base;
- white varnish;
- varnish natural color(pink, nude, beige, milky);
- fixative
If you want a more permanent result, you can use shellac instead of regular varnishes.
Then to create a French manicure at home with gel polish you will need:
- LED lamp;
- primer;
- base coat
- sticky layer remover;
- special gel polishes in appropriate shades (white, beige);
- top coating;
- lint-free wipes;
- thin brush.
What kind of polish is needed for a French manicure?
 For a classic French jacket, you will need two colors. The first one is white. The second is a natural color: pink, flesh-colored, beige, peach, milky, etc. Many famous manufacturers cosmetics are produced ready-made kits polishes for French manicure.
There are many companies producing gel polishes, but the most popular among artists are Orly, NSI, TNL, Haruyama, Vogue Nails, UNO, Gelish, Bluesky, Kodi, CND.
From these same manufacturers you can purchase base coat, primer and even brushes.
How to choose a brush for a French manicure
 It is best to take a thin brush from natural pile. Flat brushes are also suitable - either with a straight edge or with a beveled edge. It is more convenient to work with a thin brush on short nails, and a flat brush on long nails.
Stages of performing a French manicure with gel polish
To obtain good result, perform all actions step by step and very carefully. The technique of performing a French manicure is not complicated and has several options. Let's consider classic way applying a jacket and drawing a smile line.
The sequence of your actions will be like this:
- Performing a manicure. Be sure to remove old varnish, if there is one. Shape your nails with a file the required form, remove the cuticle or push it back with a special stick.
- Degreasing the plates. For a long-lasting manicure, it is necessary to remove sebum and pollution. Suitable for this regular liquid nail polish remover or a sticky layer remover.
- Application of primer.
In order for the gel polish to properly “grab” the surface of the nail, it is covered with a thin layer of primer, which is dried in air for 15-30 seconds. - Covering the nails with a base (base).
We apply another layer, which will improve the quality of the manicure and help the nails maintain their health. After application, keep your nails in the lamp for 2 minutes. - Application of colored gel polish.
Select desired color gel polish (nude, pink, beige) and apply it in two layers to your nails. After applying each layer, be sure to dry your nails in an LED lamp for 30 seconds, or in a UV lamp for 2 minutes. - Creating a smile line.
This is the most important stage in French manicure.
- The classic method of applying a smile line is done with a gel polish brush. Leave a small amount of gel polish on the brush and begin drawing a line on one side, moving the brush from the edge where the nail touches the side of the nail to the top of the nail plate. Then repeat this movement on the other side. Make sure that both lines start at the same level. You will end up with two small crescent moons on each edge of your nail. Bring both of these crescents from above into one line. This way you will get a neat smile line in a classic way.
- The second method of drawing a smile line is also done with a gel polish brush, on which we leave a small amount of varnish. Line drawing technique in in this case consists of applying small, neat brush strokes along the edge of the nail from the center to the bottom of the smile. When drawing a line with strokes, try to make it thinner first, and only then add and correct it in those places where it is necessary.
- The third method of drawing a smile line is very similar to the first (classic), but in this case the smile line is drawn with a thin special brush, and not with a gel polish brush. Taking a small amount of gel polish onto a clean, thin brush, draw a thin line of the edge of the smile on one side of the nail plate from the side roller to the top. And then paint the gap from the thin line to the edge of the nail with a brush. Repeat the same procedure on the other side, and merge these two lines into one at the top of the nail. Drawing a smile with a thin brush, you can create a lower and thinner smile whisker.
Once you've finished drawing, you may want to touch up the inner edge of the line, making it sharper and smoother. To do this, take a thin brush and clean it with a sticky layer remover. The brush must be clean. Then use this brush to go along the edge of the inside of the smile line, thereby erasing imperfections and fixing the clarity of the line. After finishing drawing the line, dry the drawing in the lamp for 1 minute.
You can watch the tricks of drawing a smile line in this video:
- Decoration. If you have artistic talent or even experience, you can further decorate your nails. For example, the accent on the ring finger (rhinestones, flowers, geometric designs etc.)
- Applying a fixative.
After the French manicure is done, apply a fixative - this will give your French manicure a beautiful shine and additional durability. Dry the finish coat for 1-2 minutes. - At the end of the procedure it is necessary remove sticky layer from nails.
French can be done not only on natural, but also on extended nails. Extensions are performed with acrylic or gel. There are also special false nails for French - tips.
French gel
Transparent gel is applied with a brush to nail bed, and the desired nail shape is immediately formed. After processing and filing the base of the nail, apply colored gel to the plate and to the tip of the nail. Such gel nails They look natural and beautiful, and also last quite a long time - 3-4 weeks.
Recommendations for creating a French manicure with gel are presented in this video:
French acrylic
For this manicure you need two materials: acrylic Powder and a special liquid for diluting it. A durable layer of base is laid out on the nail plate, and then a thin layer of natural color is applied to it using acrylic powder and a smile line is drawn.
Instructions for making French acrylic are in this video:
French tips
Having bought tips, be sure to try them on - forefinger and there are tips of different sizes for the little finger.
French manicure with tips step by step:
- Nail preparation – file, sand, degrease, push back cuticles.
- Using a brush, gently spread special glue By inside tips. Now press the tip to half of the nail and hold for 10 seconds.
- Adjust the shape of your nails with clippers (if necessary) and a file.
- Apply gel polish to your nails. After each layer, dry your nails in a lamp.
- Draw a smile line with white varnish and decorate it if desired. Don't forget to put your nails in the lamp.
- Remove uneven surfaces and excess layers of gel with a file.
- Apply a finishing layer of transparent gel and dry again in the lamp.
Instructions for performing French tips
Choosing a design

French manicure on pointed nails
The beauty of the French jacket is that it will fit on short nails, and on long nails. You can get a French manicure at round nails and square ones. It looks equally good on nails of any length and shape. A sharp French manicure looks especially impressive.
As mentioned above, a French jacket is suitable for all occasions. But we women still carefully select nail designs, especially for special occasions.
We use a regular French jacket “for every day.” A bright jacket, in which all kinds of colors are acceptable, will complement your look on the beach or at a party.

Neat French manicure gradient
A particularly popular manicure option now is a gradient. It differs from a regular manicure in that the boundaries between colors are not clear, but seem blurred, with smooth transitions.
French manicure can be supplemented with drawings, stickers, rhinestones, glitter, modeling - depending on your desire and mood.
With a French manicure, your hands will always look well-groomed, the main thing is that it is neat. To do this, the French technology must be performed correctly, step by step.
If you want to be irresistible, get a French manicure! After all, it can be different every time, and most importantly, it’s easy to make it yourself!
If you prefer elegant, graceful and fashionable at the same time, stylish manicure, comfortable to wear, think about whether it’s time to make a French jacket. With it you can forget about constantly repainting your nails to match your clothes; it is suitable for a special event and everyday life at the same time.
With the help of exquisite French technology You can advantageously emphasize any shape of nails and, conversely, hide minor imperfections and damage. The French style is laconic and simple to perform; in order to create it, you do not need any special skills, only the desire to be even more attractive and feminine.
When a woman has enough time to monitor the proper condition of her manicure, you can do without gel polish, but if you are constantly on the move and do not have the opportunity to sit for a long time drawing pictures, use gel polish, especially since the procedure can be carried out at home.
Benefits of gel polish
Why should you choose gel polish:
- it is universal big choice the palette provides a huge field for experimentation and creating unique masterpieces;
- these masterpieces can be saved in in its original form for a long time - from 2 to 3 weeks of active wearing, regardless of how often you wash dishes and clean the apartment;
- It has been proven that gel polishes strengthen the thinned nail plate, restore and heal it;
- a nail decorated with gel polish still breathes;
- following step-by-step technology, you don’t have to worry about fungus appearing on your nail, because this is impossible;
- nails coated with gel polish can crack only if the surface is strongly squeezed or pressed by some object (thanks to the gel substance, the manicure becomes strong and durable, and you do not need to worry about its integrity).
French gel polish: step-by-step instructions
 A step-by-step guide to creating a French manicure looks something like this:
- Do regular manicure, soften the nails in a bath with nourishing oil, push back or even trim the cuticle, and use a nail file to give the desired shape. Dry your hands.
- The trick to good adhesion of gel polish to the natural surface of the nail is degreasing and the absence of a sticky layer. To do this, be sure to run a soft buff over the surface of each nail. There is no need to literally file off the top nail layer; a couple of movements is enough.
- Now degrease your manicure using a degreaser. If this is not available, you can use a cotton swab soaked in medical alcohol at home. Ideally, you need to buy lint-free wipes that will not leave a trace of excess oil in the area of the nail plates.
- Open the base bottle and, scooping up a small amount of product with a brush, distribute it in an even and thin layer over the entire surface. Move the brush from end to end, sealing it well (running the brush perpendicular to the growth of the nail). To make the liquid dry quickly, there is special equipment called a UV lamp. Without it, you cannot create a French gel polish; the substance will dry for many hours and will disappear in a few days. Drying the gel polish in a UV lamp takes 2 minutes.
- It's time to start drawing the smile - the edging at the tip of the nail. Some people use stencils, but experts do not recommend using them; it’s easier to practice drawing several times straight line and, having filled your hand, enjoy the end result. Ideal for drawing thin will do a flat brush or a brush from a bottle of gel polish.
- Gel that gets on the skin can be easily removed with an orange stick.
- If you need to modify a slightly lopsided smile, use a thin, damp brush slightly moistened with a disinfectant (degreaser).
- After correction, the material is fixed in a UV lamp for up to 2 minutes.
- If you are not completely satisfied with the result, and the varnish has formed a transparent layer, apply another coat and place your palm again in the polymerization equipment.
- If you want to make the background coating pale pink or beige, you can apply it both under the smile and on top of it, it all depends on the degree of glow and transparency of the composition.
- French is fixed top coating, which should also be well sealed at the end of each nail. When your manicure is completely dry, soak a cloth in degreaser and go over your nails thoroughly.
- At the final stage, apply to the cuticle and nail plate. nourishing oil. https://www.youtube.com/watch?v=nbn_43yBn2M
French manicure with gel polish is a classic way to decorate your nails. French looks perfect on nails different lengths and shapes, and also fits many fashionable images. That is why most often girls and women prefer a neat French manicure.
Preparation of materials and tools

To paint your nails with gel polish you will need different set tools and materials. It could be Fraser or basic kit for home manicure.
For the perfect French gel polish, you will need:
- Set for nail treatment: file, buff, manicure scissors, orange stick, napkins, pusher;
- Antiseptic;
- Bath with warm water;
- Cuticle oil;
- Gel polish suitable shade: white, transparent or beige for the base, gel polishes for French design;
- Brush, stencils, strips or tips for drawing a smile line on the nails;
- Primer;
- Base;
- UV or LED lamp;
- A product that removes the sticky layer.
Making French step by step

In order for a French manicure to be as natural and feminine as possible, but at the same time attract the gaze of others with its elegance, it is recommended to follow some rules:
- First of all, the French line is drawn by defining the central axis of the finger;
- Then, from this point, curved smiles are drawn symmetrically on the sides;
- Also mark the end points of smiles in advance;
- In the classic version of French manicure, the length of the white part should be at least 2 times less than the base.
The main component of a neat and beautiful French manicure with gel polish is high-quality processing nail plates. The durability of the manicure will depend on this. Read on to learn how to properly prepare your nails for coating.
Nail preparation

First, treat your nails with a disinfectant. At the same time, make sure that the antiseptic does not flood the nail plates, as the product has a strong moisturizing effect. If they are heavily moisturized, this will weaken the interaction of the nail plate with all applied layers of varnish.

At the next stage of nail preparation, the old coating is removed if necessary. Moisten sanitary napkin into gel polish remover and wet each nail with it.
After this, pry off the old layer with a special manicure stick and remove the varnish. If the previous manicure was done using a machine, the old layer is removed using a cutter.

Before processing the cuticle, it is necessary to align the edge of the nails. Try to keep the shape and length the same on all ten fingers. Experienced specialists recommend moving the nail file in one direction, this will help avoid the formation of gel polish peeling.

A clear cuticle remover is applied around the nail. After all fingers have been treated with the product, they should be placed in a bath of warm water to soften them. This liquid contains substances that promote painless cleansing of the pterygium and cuticle. For the product to work, keep your hands in warm water (30-40 degrees) for 5 minutes. After the time has passed, wipe your fingers dry.

First you need to lift the cuticles, for this you will need a pusher, with the help of which the cuticles are gently pushed back and lifted. The cuticles are trimmed either with nail scissors or with a cuticle cutter.
When processing the cuticle, the tool must be held at one angle, in this case the cutting line will be smooth and not broken. This is very important, since it is the uneven line that is the main reason for the gel polish to flow behind the cuticle, resulting in the formation of burrs. After all the fingers have been treated, use an orange stick to check whether all the pterygium is cleaned. Apply oil around the nail area and massage so that the product is better absorbed.

Don't forget that your nails have a natural gloss. However, when applying gel polish, it must be removed. In order not to injure the nail plate, it is best to use a buff.
Lightly move the tool over the entire nail several times, removing the protective film. Sanding also needs to be done with sufficient quality, reaching all edges of the nail, since skipping even a small area can cause the gel polish to peel off.
Apply primer and base

After the gloss is removed, excess residue is removed with a brush, then a dehydrator is applied to the surface of the nail. This tool degreases the surface, thereby enhancing the interaction of the nail with the gel polish.
Before applying the main composition, it is recommended to further strengthen the nail plate.
A transparent strengthening agent (primer) is applied to the nails, with the help of which the plate will not be too thin after polishing. The primer is also dried in a UV or LED lamp. The time depends on the type of product used and the type of lamp, but as a rule, it is 30-60 seconds.

Apply the base in a thin layer. You should be extremely careful and attentive so that it does not flow beyond the nail. The base material can be transparent, white or beige. You can also use it to create highlights that fit perfectly with a French manicure.
Immediately after the base is applied to the nail, it needs to be dried in a lamp. It is important to ensure that the base does not roll off. To do this, try to keep your finger level. The base is dried in the lamp for approximately 1-2 minutes.
Drawing a French jacket

There are many ways to simplify your work when drawing a French jacket. Only professionals can paint the perfect smile for a French manicure with a brush, without the use of special tools.
You can draw a French line:
- A special manicure brush with a flat end;
- Stripes (stencils). At home, you can make homemade strips from narrow tape, electrical tape, masking tape and adhesive tape;
- Tips.

French gel polish is done with a brush. It can be made from kolinsky or sable fur, also suitable with nylon bristles. Before drawing, it is recommended to flatten the brush on both sides, in this case the line will be clearer. The varnish is applied with a brush, starting from the periungual ridges to the middle of the nail, after which they are connected by a line parallel to the base.

French manicure is also created using stripes (stencil). Such devices are sold in cosmetic stores and are thin strips of self-adhesive paper. As a rule, they have an arched shape.
They are very easy to use: separate from the base and press the adhesive side onto the nail so that the tip remains free. Fill the tip of the nail with polish and place it in the lamp, then remove the strip. If you did everything correctly, the line will turn out neat. Thus, treat all the nails. If you didn’t have time to purchase ready-made strips, and beautiful manicure If you need it today, you can use improvised means, for example, thin tape or electrical tape, masking tape or adhesive tape.

French manicure is done with tips. These are like this special devices from a plastic holder with already drawn jacket. The technology of use is simple:
- Prepare your hands as usual;
- Choose tips that match the shape and size of your nails;
- Apply glue to the white strip and press it to the nail;
- Then break the transparent holder and use a glass file to file the edge of the false smile;
- Then treat the nail with a degreaser.
Apply top coat and remove sticky layer

After the gel polish has dried and the French manicure design is completed, the coating must be fixed with a layer of top coat. The product also needs to be dried in a lamp.

The sticky layer is removed only at the final stage of the French manicure after the top layer has polymerized.
On final stage You need to remove the sticky layer from a French manicure. Many girls mistakenly assume that they need to remove the layer after applying the base. However, it is thanks to the sticky layer that all stages of manicure - base, color layers and top - are well bonded to each other. If you remove the dispersion ahead of time, the manicure will lose its strength and the gel polish will begin to peel off from the nail.
Ideas for French manicure with gel polish

– painting the nail with a transparent, beige or pink base, and its tip – white. It is considered a universal type of French manicure, which gives girls elegance and naturalness. However, for last years modern fashion expanded the range of French jacket colors.

Or with neat accessories it can gracefully emphasize any length of the nail, especially short ones.

You can decorate such a manicure in the most different ways: using mosaics, broken glass, colored and iridescent foil, stones. A French manicure decorated in this way will only look richer because of it. This is an ideal option for those who are tired of the classic version.


One of the most fashion trends for 2019 is geometry on nails. Using this technique, a girl can create a beautiful and unusual, but at the same time minimalistic design on her nails that is not overloaded with details.


It is very popular to apply to a French manicure. floral print. For gentle image choose flowers pink shade: lilies, roses, violets or tulips. Usually this design is used ring finger, and all the rest are made in a more classic style.


A combination of French and moon manicure - a true classic of the genre in nail art. This French look looks great on any length of nails.

There are no restrictions on how you can experiment with this design. These can be graceful and fine lines holes and smiles, as well as reverse French or an unusual colored base.

A French manicure with gel polish will sparkle with new colors if you change the standard shade to bright and rich tones. The nails can be covered in one tone, or you can add geometric lines.