Angel from a knitted round napkin. Christmas angels made from openwork napkins and paper
Today you will learn how to make simple angels from paper napkins. The technology is so simple that even younger children can handle it school age.
To make angels you need the following materials:
- paper napkins(two white 25x25 cm and two colored three-layer ones, size 33x33 cm);
- silver braid and ribbon;
- a little padding polyester;
- scissors;
- bright ribbons.
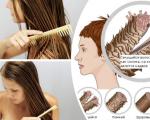
First do little angel from white napkins.

Open one of the napkins and place a little padding polyester in the center.

Connect the corners to form a triangle.

Then wrap the napkin around the padding polyester and tie with a bright ribbon. It turns out the head and torso.

Make wings from the second white napkin. Unfold the napkin into a large square.

Fold like an accordion and tie with a red ribbon.

Tie the wings to the first piece.

Shorten the wings a little so that they are proportional to the body.

Tie a silver braid around your head. The miniature light angel is ready.

The second angel will be larger and its manufacturing technology will be more complex.
Open one of the colored napkins.

Place padding polyester balls in the middle (with wrong side).

Fold the napkin into a triangle.

Tie a silver ribbon around the padding polyester ball. It turns out to be a head.

Make angel hands from the side corners of the napkin. Just tie pieces of ribbon around the edges.

Use the second napkin to form wings. This can be done in two ways.
Unfold the napkin.

Gather with an accordion from the top to the bottom corner. Tie with ribbon.

Tie the blank to the head of the toy. You get fluffy wings.

Second manufacturing option!
You need to fold the napkin into a large triangle.

And pull the corner to the center of the long side. Secure everything with tape.

Then tie it to the first workpiece.

If you think the wings are too big, you can shorten them a little.

Tie a ribbon to the middle of your head. This is such a charming little angel.

The first manufacturing option is much simpler, but only the angel is more fragile. But you can play with the second toy. Let it be a little fairy with wings and with a magic wand, which will fulfill all your daughter’s wishes.
And if you want to extend the life of these toys, use pieces of thick fabric to make them.
Master class: “Christmas Angel from openwork napkins»
Target: introduce children to the symbol of the Nativity of Christ - the Angel, teach them how to make it themselves.
Tasks:
1. Develop imagination, creativity, and the ability to perform a sequence of actions.
2. Develop skills in working with paper, scissors and glue.
3. Cultivate interest in folk culture and traditions.
Description. At all times the personificationChristmas
angels were considered, so all kinds of souvenirs with their symbolism have always been and will be the most relevant and a nice gift to that happy holiday. And, if this gift is also made with your own hands, then it will become truly priceless! In old times winter evenings It was customary to carve angels; everyone had their own secrets for making them.
I propose to create your own Christmas Angel. Decorate your home, Christmas tree or give it to your loved one.
Purpose. The master class is intended for children of senior preschool age.
Equipment: To make a Christmas Angel we will need: openwork napkins, cardboard, decorative tape, decorative cord, scissors, glue.
Stages of work:
- For the body, take a round openwork napkin, cut it in half and make a cone from one half. When gluing the cone, try to ensure that the openwork pattern on the top and bottom layers matches.
- For the sleeves, take the remaining half of the napkin, cut it in half and glue two cones together.
- Cut the second napkin in half. Take one half and fold it like an accordion. Glue the sleeves and wings. The angel's body is ready.
- For the head you need to cut out two circles from white cardboard. Glue a loop of decorative cord and torso, and glue another circle on top. Draw a face.
- Decorate the angel with a decorative ribbon in the form of a bow.
Angel is ready! We decorate the house, the Christmas tree, and give it to family and friends.
On the topic: methodological developments, presentations and notes
Master class: "Spanish dance", designing from openwork paper napkins, cuttings and plastic napkins.
STATE BUDGETARY EDUCATIONAL INSTITUTION OF THE CITY OF MOSCOW SECONDARY SCHOOL No. 1465 NAMED AFTER ADMIRAL N. G. KUZNETSOV, PRESCHOOL DEPARTMENT No. 5. ...
Master class “Flower for Mom” from napkins for Mother’s Day
I bring to your attention a master class on making a gift - “Flower for Mom” from napkins for Mother’s Day....
Master class for teachers "Crafts from napkins"
[[("type":"media","view_mode":"media_large","fid":"11398399","attributes":("alt":"","class":"media-image"," height":"360","width":"480")]] [[("type":"media","view_mode":"media_large","fid":"11398...
Napkin angel - Christmas souvenir
Master class - two manufacturing options
Tsukanova Tatyana Petrovna, teacher of MKOUDO "Spas-Demenskaya children's art school", Spas-Demensk, Kaluga region
Purpose: The master class is intended for children of senior preschool and primary school age, creative parents, educators kindergarten, teachers additional education, technology teachers.
Description: Decoration for the Christmas tree to create a festive atmosphere, Have a good mood.
Target: making crafts from napkins.
Tasks:
- Learn to form a head and torso from napkins.
- Learn to fold basic form“accordion” using origami technique.
- Develop the ability to follow oral instructions.
- Develop visual and tactile memory, logical and spatial imagination
- Develop fine motor skills hands, ability to work with hands, accustom to precise finger movements, eye.
- Cultivate accuracy, instill perseverance in achieving goals. Encourage creative initiative.
In this master class I propose to make an angel from napkins with your own hands.
Materials and tools:
White napkins, thread, scissors.
Narrow ribbon or rain, glue.

Safety precautions when working with scissors:
When cutting, open the scissors wide and keep the ends away from you.
Be careful not to hurt the fingers of your left hand.
When working, do not hold the scissors with the ends up.
Don't leave them open.
Do not use loose scissors.
Pass the scissors only closed, rings first.
Use scissors only in your own workplace.
It is snowing At Christmas
It snows at Christmas
falls like God's mercy.
It's snowing - and magic
could happen on this day.
Silence and purity,
nothing will disturb them.
Believe: beauty is not for nothing,
since she saves the soul.
Sent to you from above,
miraculous power,
this is the meaning of your destiny
and unraveling the secrets of the world.
It's snowing - and, barely breathing,
We look at the winged world.
The soul awakens
once dead.
The snow is falling, relieving the pain,
near the icy ground.
You offer him your palm:
A white angel will land.
(Iva Afonskaya)
Christmas tree! For me, this is an event, this is joy, this is the expectation of a miracle from communicating with children.
This is the second time I have been invited to our district cultural center for the Christmas tree! Show the works of children studying in the “Paper Fantasies” class at the Children's Art School, and conduct a master class with the children while the actors prepare for the performance.
Last year there was an exhibition before the holiday of my works.

And the master class was the simplest - a chain of stripes for a Christmas tree, and the guys' imaginations - a garland of stripes.

This year I wanted the children to have little angels that they could hold in their hands! This angel in the form of a postcard was made by 1st grade children at an art school.

These angels were carved by a 2nd grade student, Denis Antonenkov, to decorate the hall for the holiday.

Such an angel took part last year at the exhibition “1st Christmas Festival” in the city of Kirov.

The organizers set the task - a master class for children of different ages and minimum production time! I decided to show you how to make an angel out of a napkin.
Manufacturing sequence:
I invite you and your children to make an angel as a souvenir. Spread two ordinary table napkins in one layer, crumple the third and shape it into a ball, roll it out like plasticine.

Place the napkins evenly on top of each other. Place a lump in the center.

Connect the corners in pairs and wrap the thread tightly around the lump. Tie a thread and make one end longer.

Do not open the napkin, leave it in four layers. Fold diagonally.


Make a fold of about one centimeter, then fold it like an accordion, turning the edge up and down.

Open and fold the accordion from the center where necessary, changing the direction of the folds.

Bend the accordion in half and mark the middle.

Attach to the back of the workpiece.

Tie the wings crosswise and tie a knot. Cut a short thread, and the long one will serve as a hanger.

Turn over. Spread your wings.


Wrap the raincoat around the neck and, without tearing it off, around the head, simulating a halo, tie it in a knot, cut off the excess.

The napkin angel is ready.


We'll hang it on the Christmas tree while the show is going on.

An angel sat down on a fir branch
Light, airy, almost weightless.
Among the tinsel and colorful balls
He seems inconspicuous and modest.
At Christmas he came down to earth,
Bringing a miracle to us at the tips of our wings.
On Bright Night the whole Universe listens
To the incessant angelic hymns.
He came to give consolation
To souls troubled in sorrows, mired,
Joy, hope, love and salvation,
Become true friend, Our Guardian.
(Olga Kalugina)
After the holiday, the children took the angels home to decorate their Christmas tree! If you make a craft in class or at home, you can use gold or yellow paint draw a halo, decorate the wings and buttons on the dress with dots, like the angel from the exhibition.
In preparation for this event, a technology for making another angel. It can be done with school-age children.
The beginning of the work is the same, unfold two napkins, put a third napkin, crumpled into a ball, in the center.

Carefully lift the corners in pairs, tie them under the lump with thread, forming a head and a dress.

Define front side, raise the side corners in the form of wings.

Leave the top layer of the napkin in the form of wings, and lower the bottom one.

Trim the corners of the wings and glue them only at the base, near the body.

Make cuts in the top layer up to the shoulders.

Starting from a small corner, twist it into a tube, lifting it up.

Fold this tube in the form of crossed arms and secure with thread.

Pull the wings back, level and round the tops.

From narrow tape, or strips of paper to make a halo by gluing them into a ring.

Try on halos made of different materials.
If you have not yet figured out how you will decorate the upcoming holiday, for example, children's party, then we suggest you familiarize yourself with great idea- making cute angels from openwork napkins. This option is also perfect for celebrating the New Year. And photographers in the city of Moscow will help you capture your holiday.
To make paper angels you will need:
Round pastry napkins with a diameter of 20 cm (for the body) and 10 cm (for the sleeves);
A piece of knitwear/nylon + padding polyester/cotton wool;
Gold looped ribbon and cardboard (other suitable materials);
Scissors, universal glue UHU (Germany), thread + needle.
Angel from an openwork napkin step by step:
Take a 20cm round napkin and glue it into a cone. You can seal the central part of the napkin, for which you need to stick on the wrong side white paper suitable shape. When you glue the cone, make sure that the openwork pattern on the bottom and top layers matches (photo 1).

Take another napkin with a diameter of 10 cm and make sleeves out of it, for which you need to cut it in half and glue it into two cones (photo 2). Cut the second 10 cm diameter napkin in half. Fold each half so that counter folds are formed (photo 3).
Then cut off the top of the cone body by 1-2 cm and glue the wings and sleeves (photo 4). This way you will make the body for the angel, as in photo 5.

Make an angel's head by cutting out a circle with a diameter of about 9 cm from a piece of white nylon/knitwear, sewing it with a “forward needle” seam, stepping back from the edge about 1 cm. Then tighten the thread slightly and stuff the workpiece with cotton wool/sintepon. Finally tighten and secure the thread to the knot (photo 6). Get a pad like the one in photo 7.
Can be used to imitate hair various materials, V in this case Here is a golden ribbon with loops that will help decorate unsightly ties on the fabric (photo 8).
Glue the ribbon onto the pillow head using universal glue UHU (Germany), which can be used for gluing different fabrics together and for gluing fabrics to cardboard (photo 9).

A halo can also be made different ways, for example, twist from copper wire. You can also cut out two circles from golden cardboard with a diameter of about 5 cm. Then they need to be glued together and glued to the place of the tie on the head. Then glue the body to the head and get a cute angel (photo 10-11).
You can create entire garlands from such angels. To do this you will need to make a loop for hanging the angels. So, carefully pierce the head pad with a long needle and thread through the body cone. These angels can be hung on lamps or even on a Christmas tree.
Auto MK: Olga Kiryanova
In this article we will tell you how to make angels from a napkin with your own hands. This craft is very simple, even kindergarten children or schoolchildren can do it. primary classes. By making several paper angels, you can not only decorate your home, but also create a small miniature for the game.
Paper angels from napkins, step-by-step master class
Since in one article we offer two different options angels, so you need to prepare two sets of materials:
- white napkins size 25x25 – 2 pcs.;
- colored paper napkins size 33x33 – 2 pcs.;
- silver cord and red braid;
- a small piece of cotton wool or padding polyester;
- scissors.

Progress:
- We suggest starting by creating a small paper angel. To do this, take a white napkin, unfold it, and place a rolled up ball of cotton wool in the center.

- Next, fold the two corners of the napkin, the result should be a triangle with cotton wool in the center.

- Crumple up the triangle a little so that a small ball of cotton wool or synthetic padding stands out, and to prevent the paper from opening, tie everything together with red thread as shown in the photo.

- In just a few minutes you have made the body for the angel, now it’s time for the wings. This will require a second white napkin, which needs to be unfolded into a square, folded like an accordion, and the center tied with the same red thread.

- Connect two blanks.

- All that remains is to decorate the angel with a small hoop made of silver braid and shorten the wings a little so that they are proportional to the body.

Angel from a large and colored table napkin
- You need to start working the same way as the previous craft: open the napkin, place a piece of padding polyester in the center and fold it into a triangle.

- Instead of a red thread, take a gray or white one and use it to separate the head. But unlike the previous craft, here you need to highlight the hands of the food. Schematically outline the waist and fold the edges of the napkin to form handles, and then tie everything again with thread. If you find it difficult to understand, just look at the photo below.

- Now it’s time for the wings, you already know how to do one option, now we suggest you familiarize yourself with the second. This time, unfold the napkin into a diamond shape.

- Assemble the accordion again, from the top corner to the bottom, and then tie everything in the middle with threads.

- Tie the wings to the body and the decoration is ready.

- But that's not all, there is another option for the wings. This time you need to fold the square into a double triangle.

- Fold and tie the central part, and pull the side parts to the top.

- All that remains is to reattach the wings to the angel’s body and the craft is ready. For beauty, you can also make a small braid hoop on your head.