Growth flowers like. Large flowers made of corrugated paper: step-by-step instructions for beginners
0 216 060
The easiest way to feel the approach of any holiday is to start making home decor for the celebration. This time I decided to figure out how to make flowers from corrugated paper- realistic and stylized. Let's figure out together how to make flowers from corrugated paper and what you need for this.
There are many handicraft techniques in the world that allow you to make beautiful flowers with your own hands - today flowers are made from beads and fabric, plain paper(quilling, origami, appliqué, and so on), they are knitted and felted, but still one of the most popular manufacturing methods remains assembling flowers from corrugated paper. What are these flowers good for:
- they can be either photorealistic or fantasy;
- they are easy to make in a few minutes (unlike felting or beading);
- easy to recycle (relevant for those who want to decorate a large hall with flowers for the holiday);
- Very available materials- corrugated paper costs a penny, especially if you buy in rolls rather than sheets;
- no special training required;
- there is no need to use any complex tool;
- it’s easy to get an acceptable result without experience (for example, you can do it with sweets - even small bouquets look very presentable);
- the products are bright and expressive (which is very important for children).
Getting ready for work
What you will need to make flowers from corrugated paper with your own hands:- several rolls of paper (it is better to choose matching colors and green for leaves and stems);
- wire, floral sleeve or any other devices for stems;
- cardboard for blanks;
- glue;
- sharp scissors;
- breadboard knife;
- threads and fishing line.
Making flowers
The simplest option:So, making flowers from corrugated paper in more complex versions almost always follows the same scenario. I will describe it so as not to rewrite one by one:
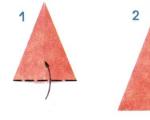
- first you need to make a petal template;
- cut 15-20 petals for each flower (if you want to make a realistic flower, then make petals different sizes- for example, five small, five medium, five large);
- cut the petals (when cutting, observe the direction of the corrugation);
- collect the central part of the bud (twist 5-7 petals together, tying them at the bottom and gluing them together);
- Next, the petals need to be slightly stretched and bent so that they take the most natural shape for the plant;
- Glue the prepared petals to the bud;
- fix the flower head on the prepared stem.

How to make a stem:
- We take a piece of wire, a floral sleeve, an ordinary twig - at our discretion, measure the required length;
- cut;
- decorate with green corrugation, or fabric, or paper;
- we imitate leaves, shoots and thorns;
- cut on both sides again.

Making realistic roses

To make roses, prepare the highest quality paper possible. natural shades. You should not take burgundy or fuchsia, use delicate tones - cool shades of pink, tea tones. Such roses will look very, very natural.

And this is the easiest way to create a rose:
A similar option for twisting a rose flower, but with explanations from the author:
Realistic peonies
Peony - big flower on its own, so it's better not to try small flowers, but to collect some really big and beautiful peonies. To make a large flower from corrugated paper, you will need about twenty minutes.By the way, if you want to achieve a more natural color, you can take white paper, and tint it food coloring- soft pink and orange flowers They will really look like the real thing.


Or a more complicated option:
Decorative and stylized flowers
How to do it simple flowers made from corrugated paper? Step-by-step manufacturing instructions different colors And different ways.Realistic lilies. Photos of creation step by step:

We make large flowers from corrugated paper - roses.

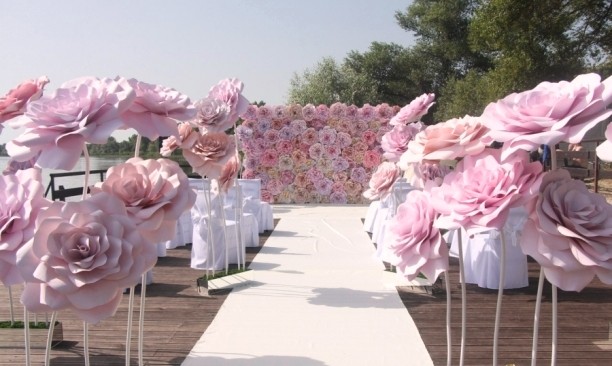
Such elegant and simple flowers made of corrugated paper can be useful for photo shoots or interior decoration, and they can also be used to create various decorative compositions outside (you just need to keep in mind that the flowers are quite light and can be carried away by a gust of wind). In general, full-size flowers are often used for decoration, but making them according to the same principle as small flowers is not too labor-intensive.
Huge poppies/anemones:
Photos step by step: stylized poppies, but in miniature.
In order to make lush artificial poppies, you will need paper of three colors (black, red, green), wire, thread, glue or stapler, and of course, scissors.
- From a roll of black paper you need to cut a cylinder about ten centimeters long.
- Tie tightly with thread and cut into a fringe along one edge - this will be the center of our flower.
- You can also make a box in the middle - to do this you need to take scraps and wrap them in black paper to make a ball. The ball is fixed with a thread or a stapler and attached to the center of the fringe.
- The roll of red paper must be unrolled and cut into six parts, each part folded like an accordion.
- Place all the accordions one on top of the other and secure them well with thread.
- The corners of the accordions need to be rounded with scissors.
- All petals need to be well unfolded (we straighten each accordion and it turns out to be a petal).
- Use thick wire or wooden slats as stems - they need to be wrapped in green corrugation, cut out large leaves and attached to the stems.
- Secure the poppy heads to the stems and straighten the petals.
Now you know how to make more flowers from crepe paper. If you want to make giant flowers, then for beginners it will not be very difficult, however, it is worth considering some points:
- use quality paper - of course, even from junk paper a master can do something wonderful, but beginners are better off relying on good materials;
- huge flowers must have weights, otherwise they will simply fall (or fix them with fishing line to the wall);
- do not smooth the petals completely, leave a slight corrugation;
- It’s better to have a lot of petals than a few (large roses with four petals look very pathetic);
- for a field composition, use several shades of green paper - then common herbs and the plants will look natural;
- if a child is making three-dimensional flowers with you, take care that he does not cut himself with paper, scissors, fishing line or threads;
- For decoration, use flowers made in two or three shades - more colors may look awkward.
More ideas and inspiration
Have you already wanted to make beautiful flowers from corrugated paper with your own hands? Great, that means you liked the ideas I proposed and mk. I’ll tell you a little more about what you can create with your own hands from corrugated paper.See how they make crafts from corrugated paper - cute daisies that look better than life!
And in this master class you can learn how to make sweet flowers made of corrugated paper with your own hands. And so, flowers made of corrugated paper with sweets, decorated in the shape of a heart:
Floristry is always in trend. Flowers are tenderness and beauty, love and exquisite charm. This is probably why we try so hard to decorate our lives with flowers.
Fresh flowers are short-lived and not always convenient, but you can decorate your home with artificial flowers that do not require our care and attention, but look aesthetically pleasing and natural.

Large artificial flowers good example interior decor of your home, various holidays - from children's matinees to anniversaries, weddings and photo sessions. They are also used for decorating shop windows, garden plots, stages for concerts and various presentations.


These master classes will tell you how to decorate a holiday and your home with large flowers without special tools and impressive expenses.
Choosing a material for creating large flowers - foamiran, isolon, fabric
For several years in a row, there has been a fashion for large growth flowers. They are called tall because of their size - they range from 1 m to 3 m. Not only children, but also adults sometimes look next to such giants as little elves.


IN Lately To create such growth products, two types are used synthetic materials- foamiran and isolon.

Flowers made of foamiran, or as it is also called, “foam rubber” or “ faux suede“look impressive and very natural, easy to clean and do not wrinkle.


How to make giant flowers from foamiran, see this master class
The disadvantage of these spectacular flowers only one thing - they cannot be used outdoors. This material fades quite quickly in the sun. For open areas - city events, weddings and garden decoration, it is better to use a material such as isolon. It does not fade and easily withstands all weather surprises.


Giant orchid from isolon master class


Another option for interior decor is large fabric flowers.

Aerial daffodil from nylon - step-by-step instructions

Materials for work:
- White and yellow nylon, tulle or similar material with an “airy” texture;
- Thermal gun;
- Scissors;
Making the daffodil core. Cut the yellow nylon into large ribbons. The size varies at your discretion. We bend this tape in half, grease the end with glue and roll it into a tube.
Now let's work on the petals. Fold a strip of nylon (or other light fabric) outwards along the bias and twist it around the middle of the daffodil. For one row of petals you will need to do this 3-5 times. From time to time we lubricate each row with glue. When the size is sufficient, fold the remaining piece of fabric down and fix it at the base of the flower. Such delicate airy flowers will look good in the interior of a Provence or Shabby Chic style room.

Video master class - large flowers made of fabric for festive decor


Interior design options with large flowers, be it festive event, city apartment, Vacation home or garden, a great variety.
Do-it-yourself full-size flowers
Clove, chamomile, dandelion and aster
The easiest way to make several types of large flowers from corrugated paper.
The principle of making all these colors is the same and quite simple: cuts are made on rectangles cut from paper on one side. What width, length and shape will these cuts be? Such a model will produce a flower.

The flowers are fixed on a rigid aluminum wire, which is pre-wrapped with green paper and fixed with glue. Instead of paper, you can wrap the stem with green tape. Then we attach green leaves to the stem (you can print templates from the Internet and cut out leaves using them) and the flower is ready.
Video master class: how to make a huge peony from corrugated paper
Large interior rose for floor vases and stands
We cut a strip of corrugated paper to the size of the future flower and fold it like an accordion. Place a stencil of petals on it and cut it out.

There is no need to cut the bottom part of the template.
It turns out to be such a detail from identical petals.

Let's take material for the stem (thick wire, twig or thin stick). Apply glue along the bottom edge of the resulting part, and then begin to wind this “garland” around the stem.


To prevent the wire from coming off and the flower falling apart, we firmly fix the lower part.

Luxurious large peony rose with your own hands
Large flowers on the wall as a decorative element

Flower arrangements made from various materials, fit perfectly into the interior of apartments and into the design of special events.

They are used to decorate arches of doorways, columns, stairs and walls.
 Unusual large flowers add a festive touch to the interior
How to make a rose on a wall from foamiran - master class

How to make a flower on the wall from corrugated paper

A room decorated with such flowers always arouses interest and attracts attention.
Giant flowers for a photo shoot - ideas for beautiful photos
This decor is perfect for professional photo shoots.


Fresh flowers are limitless material for creative ideas. Try yourself in this type of needlework, make the world around you a little more elegant and festive.
We hope that our master classes will help you master this area of hand-made work. Good luck and creative ideas!
- a modern trend that has spread to the design of premises for celebrations. Large flowers will help you create a fairy tale in the style of “Alice from Wonderland” or be transported to the royal garden. Let's take a closer look at the process and try to create large flowers from isolon with our own hands.
Getting to know the material and tools
First you need to understand what isolon is, what it comes in and its properties.

Before making large flowers, you need to go to a hardware store for a universal insulating material - polyethylene foam. According to the production method it is:
- uncrosslinked is polyethylene foam without additional processing, so the price of such material is affordable;
- physically cross-linked (PPE 500) is a modified PPE that has improved properties, its service life is longer, but the price is higher.
Isolon is produced in rolls and sheets with a thickness of 0.2 mm to 1 cm - material 2–3 mm is suitable for creating flowers. There are options for foil and colored isolon, so your flowers can be not only white.

In order to come up with a flower shape, you need to understand what can be done with the source material. So, the properties of isolon and possible manipulations with it:
- Thin sheets are easy to cut with scissors or a mounting knife - thanks to the softness of the material, full-length flowers made from isolon look natural.
- It doesn't burn, it melts. This property is used to give shape to the petals - when heated, they bend, and by increasing the temperature, the sheets can be “glued” together point by point.
- Relative tensile strength. The porous structure allows it to withstand small tensile loads without breaking, and waves are formed that can become the decor of the petal.
- Connects only with hot glue, stapler or thread.
However, craftsmen have found a couple more ways: the cut parts can be glued together with hot air from a hair dryer and a soldering iron
- Regular paints don't stick to it. You can take colored sheets or use special ones.
- Scars form on the folds, so when making and storing flowers you need to be careful not to spoil the work.
- It is not afraid of moisture, but turns yellow in the sun. Large flowers are great for decorating outdoor areas, but white ones are best used in the shade.
Based on this, we understand that we will need additional tools and accessories:
- tailor's scissors or mounting knife;
- hair dryer - construction or household, but always with two heating modes;
- glue gun with temperature switch;
- stapler, thread;
- acrylic, rubber paints or from a spray can;
You will also need wire, masking tape, flower pots, metal-plastic tubes and even cement. But first things first…
Basic techniques and secrets of creating flowers from isolon
The principle of formation is radically different - the flower is gathered around the stem, and the petals are glued in a special way. The process is shown in detail in the master class:


Framing a photo is an effective technique

However, not only life-size flowers or large-scale compositions can be created from isolon; lamps from it will look quite organic - on a stand or as a replacement for traditional sconces.


Sconce or - a large flower made of isolon will take a central place in the decor of the room
The process of creating a lamp is described in detail in the master class of craftswoman Marusya DIY.
Part 1. Electrical preparation.
Part 2. Assembling the lamp.
Although a lot of time will pass from mastering the technique to creating a masterpiece and more than one sheet of isolon will be spent, this is not a reason to stop, because handmade decor is more soulful, and each work is unique.
For lovers of huge paper flowers made with my own hands You will like this article on our website.
For crafts - huge flowers you will need:
- corrugated paper various shades, suitable for flowers
- corrugated paper for making leaves and stems.
- stem wires wrapped in paper. About six pieces
- floral ribbon
- glue
- round pencil
- scissors

1.The whole job takes about an hour. Pre-prepared templates need to be fixed on corrugated paper and traced with a pencil, and then cut out.
To make a flower you need to have:
— 5 small petals made of corrugated paper, matching the shades of the flowers
- 15 large petals of a similar color
— 3 sheets olive color
- 1 cup from strip

2. Cut
3. We begin making the trunk. You need to take three stem wires (for one flower), wrap them all one by one with floral tape. It is important to keep a wet towel or rag handy when doing this, as the tape will make your fingers sticky.

4. We make the design of the petals. First you need to take medium-sized petals, slightly straighten the edges with them and then bend them in the center. Curl the tops of the petals. This is easy to do with a pencil, simply wrapping them around it.
5. The same actions need to be done with heart-shaped petals.
6. We begin the formation of a bud of five medium-sized petals. The first petal needs to be wrapped around the stem. So, wrap all the other petals one by one, one by one, you will end up with five wrapped petals.

7. The next step is to secure the petals with floral tape. Wind it around the bottom of the petals, which are located near the stem. This will allow the petals to attach well to the stem.

8. Add 15 heart-shaped petals. This is done in the same way as in the case of attaching small petals, we rotate the stem and attach the leaves. After this, each petal must be wrapped at the bottom with ribbon to secure it well to the stem.

9. Now all that remains is to add the cups to the bottom of the rose. Turn the rose upside down and wrap the cup around the stem. This work is not easy. The paper may bulge, try to collect it with your fingers and wrap it with floral tape.

10. Now let's start decorating the petals. Take a sheet that has been pre-cut, olive shade, add a little glue to the center, attach the end of the stem wire and take the sheet from the outside with your fingers. Do not let go for a few seconds until the sheet becomes dry. Straighten the edges of the leaf.

11. Do the same with the remaining leaves.
12. Don’t forget about the stem, which needs to be wrapped, starting from the top and to the very bottom. Cut out an olive-colored ribbon from paper and wrap it in a circle. At the end, add a little glue to secure it. Do the same with the other two stems.
13. Using tape, secure the stems with leaves to the main stem. It is necessary to take into account that they should be much lower than the bud.
14. If desired, you can straighten the leaves. The flower is ready.

We hope you can repeat such paper decorations with your own hands. Also read more master classes on making
Today we'll talk on how to make chic and unique flowers from corrugated paper. What should you give your loved ones for their birthday or any other holiday? An eternal question that leads to a dead end. What could it be better than a gift, which is made with love with your own hands? Many of you believe that creating a masterpiece with your own hands is incredibly difficult. But that's not true!
You will see for yourself that there is nothing complicated here. All you need to do is necessary tools and materials at hand, as well as a little patience. So let's get started.
Why do you need corrugated paper?
It just so happens that this delicate, colorful, crumpled paper attracts many designers and fans of the “crazy hands” circle.

Indeed, “corrugation” is suitable for implementing various design solutions.

For example, from of this material you can make unique lampshades for wall and floor lamps, interesting wall decoration elements, and so on.

Plus, corrugated is incredibly easy to work with. Elements made from crumpled paper can be easily shaped into any shape, such as flower petals.

They are easy to manipulate and bend in any direction. “Corrugation” can also be repainted in a different color without damaging the manufactured product.

Another argument in favor of choosing crinkled paper is its expensive and elegant look. They look really rich and festive.

Well, before we start the review detailed instructions, how to make chic compositions from harvest, let's reveal the full potential of this topic.

Original gift ideas
And so, what can they be useful for and where to use them. In fact, there are many practical solutions, here are a few of the most original ones:
Any gift that you buy for your family and friends, you wrap it in gift wrapping. This is common decision, which has become banal over time.

But, if you decorate it with homemade compositions, you will not only emphasize the uniqueness, but also focus attention on the talent of the giver. Such a gift will be unique and one of a kind, because you made it yourself.

You can simply give it to your loved one and to a loved one tasty candy, which he will happily eat with a cup of aromatic tea.

But you can do it differently. Imagine the delight and sincere surprise if you wrap each candy with corrugation. It will not just look beautiful, it will show how dear the person is to you.

Decoration for a postcard. You can make one large or several small corrugated flowers and attach them to a regular card.

This simple, yet unique solution will please your loved one.

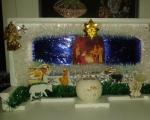
Heart. This decoration is relevant for a wedding procession and for the holiday of all lovers.

Cut out a heart from cardboard of the size you need, and then cover its surface. The jewelry can be given to a loved one as a symbol of unity and devotion.

Give your loved one a “HEART”
An original heart can also become part of the interior decoration chosen for a wedding celebration.

Ladybug made from candy. Very current gift for sweet tooths and children. All you need to do is form the ladybug layout.

Little tricks
Decorate the back with bright red compositions from the harvest, and instead of the famous black dots, place chocolate candies in the center. Simple and original.

You can also limit yourself a simple bouquet, made from crumpled paper with your own hands. Remember, from your creative solution the result depends.

Perhaps you will come up with your own use of corrugation, which will become a general trend.

Let's quickly move on to today's master class, because, for sure, you can't wait to start needlework as soon as possible.
![]()
Some people like roses, others like daisies. What can you do here, everyone different tastes. In this regard, we will not limit ourselves to the example of making a particular flower.

Tips will help you learn how to make different compositions and crafts from them.

Sweet rose
First of all, you need to stock up the following materials: corrugation (for the stem we choose green, and for the bud the one that your imagination approves), small chocolate candy, thread, scissors, adhesive tape, wire.

So, let's start creating a “chocolate” masterpiece:
- cut 10 rectangular shape blanks: 5 petals measuring 6x7 cm and 5 blanks measuring 4x7 cm, slightly curl the edges on one side;
- try to give the cut out petals 4x7 cm a shape, stretching out their middle, this will be the core;

- wrap five wide pieces around the formed core;
- You can secure the petals at the base with threads, wrapping them several times around the bottom of the leaves;
- carefully place the candy in the center of your product;
- take a wire of the required length (preferably aluminum) and wrap it with green paper, this will be your stem;
- also take care of the leaves by first cutting them out and securing them to the stem.

You can cut out the leaves for the bud in your own sizes. If you want to do big rose Accordingly, pre-prepare large petals.
Sunflowers - the sun in your hands
We will need: yellow, brown and green corrugation, a small piece of wire, glue, thread and scissors, tape. Let's start making:
- First of all we need to start from the middle of the sunflower. From the brown roll we cut several strips 6-7 cm wide. Cut one side of the strips into a fringe, and let the other side remain flat. Roll both strips into a roll, securing them at the bottom with threads.
- From yellow paper you need to cut the petals. Do not limit yourself to 5-6 petals, the more there are, the more natural and beautiful it will be. Therefore, according to the same principle, cut out the sepals. Glue yellow and then green blanks in several rows to the base of the middle.
- Attach the sunflower head to a wire wrapped in green corrugation.

Crocuses and tulips - harbingers of spring
Tulips and crocuses can only please you with their one-day bloom, but I would like to enjoy this wonderful phenomenon for a longer time. Well, you can extend the life of these plants by making them yourself.

You will need to stock up on the following tools and materials: green corrugation and a different shade of your preference, glue, aluminum wire, scissors and glue. First, let's look at how to make tulips:

- cut a long strip measuring 4x19 cm;
- fold this strip in half until you get the size of a real tulip petal;
- To get petals of the same size, you need to fold the strip very carefully, treat this process responsibly;
- cut a small triangle from both edges of the folded sheet, align the bottom with an oval;
- all that remains to be done is to separate the resulting petals from each other, crumple the oval bottom a little and pull it together with a flagellum;
- bend the top of each petal slightly to give them a more natural shape. To achieve this, stretch;
- form a bud, for this you need to fold the blanks and give them a natural shape;
- Attach the lower part of the tulip to the wire, previously wrapped in green corrugation;
- don't forget to attach a couple of green leaves to the stem.

This may be of interest to you: