Master class, velvet paper. DIY paper flowers: a master class for beginners
Good afternoon, today I'm finally uploading large selection master classes on the theme of paper flowers. Here are the most interesting ways to make paper flowers. We will make the most different flowers- flat and voluminous - from corrugated paper and from dense color. I will show each craft step by step in photos and give the most detailed instructions to each flower made in one way or another. And also ladies stencils- patterns of silhouettes of flowers. All the crafts I have collected are posted in order from simple to complex. First of all, we will take the MOST UNDERSTANDING paper flower folding techniques for study (those that are easy to understand and repeat ourselves) ... and gradually move on to MORE COMPLEX and painstaking instructions (to prefabricated detailed flowers and to the origami technique). I also uploaded a special article dedicated to different ways do paper rose- here is a link to it
And, for teachers (teachers and educators) I made an article with simple children's crafts FLOWERS that can be done in the classroom at school and kindergarten from paper and other materials:
I specifically decided to so big a selection of paper flowers in one place - so that you can immediately find a suitable flower assembly scheme for THE PAPER THAT YOU HAVE and for the task that you want to solve with the help of paper flowers (flower crafts as a gift for mom, decoration children's day birth voluminous flower arrangements, wedding decoration, decoration of cards or gift bags).
The only thing that I did not include in the body of this article is ROSES FROM PAPER. ways to do volumetric rose I found so much that I had to put these crafts in a separate article on the same site, it will be called "Paper roses - 20 ways to do it yourself."
But before proceeding to the master classes themselves, I want to make you fall in love with the very idea of paper flowers. I want even random guests of this web page to itch their hands and light up their eyes. And I want to awaken in you delight and a burning desire to make a flower with your own hands. For this magic to arise ... so that your soul also spreads its petals and blooms ...
Let's see what piece of life the flower you made can decorate. Here are examples of how an ordinary table setting can become very beautiful and solemn with lush floral crafts.

Also, large paper flowers made of crepe or corrugated paper are used for decorative purposes. to decorate a celebration – wedding hall, children's birthday, incendiary party. They are mounted on the wall or on the backs of chairs, tied to window handles.

But such large flowers can be made from A4 paper (office format) or from a corrugated roll crepe paper.
Photographers and photo studios also use voluminous large paper flowers as exclusive props for staged photos.

And also such big flower you can make it simple from paper - as a gift for Mother's Day, or on March 8th. No one has ever given something like this to your mother. Will be remembered for a long time. And you can also take a picture of your mother right away with this flower - she will proudly post this photo on her page in the social network.
Ordinary plastic combs, rims and metal hairpins can also be decorated with voluminous paper flowers. So we'll get smart hair accessories for a wedding or party.

Miniature paper flowers can decorate postcards self made , and other scrapbooking crafts (such as these delicate pansies corrugated paper).

Also, a handmade paper flower is the best decoration for gift box . And not costly. Lush gift ribbon costs much more than a pair of sheets of color or white office paper- a few movements with scissors and now a paper orchid or a delicate pink color of a wild rosehip has blossomed on your package.

And the flowers themselves can be excellent independent gift . If you arrange your work in the form of a basket, or a decorative panel (as in the photo with poppies made of colored paper).

If you learn how to make paper flowers with your own hands, you can use this talent in many areas of life. It will become simple and easy for you to decorate the hall for any holiday, decorate your home family celebration or beautifully decorate gifts for relatives and friends, or entertain the neighborhood kids by organizing interesting craft with a master class.
METHOD #1
Paper FLOWERS
Flowers made in this way, I decided to call "puffs", because their construction principle is the same as that of puff pastry. Thin layers of floral silhouettes overlap each other. And each layer is given convex volume(or faceted relief), and due to this, the flower looks lush and voluminous.
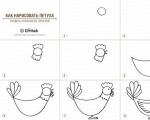
In the photo below we see step by step master class for beginners to create such a voluminous dahlia flower. It is the dahlia - not to be confused with the aster, the aster has narrower petals and each has a face (a embossed fold like on trousers).
So ... let's look carefully at the photo of the flower craft below. Here the trick is that they are cut from paper layer outlines- each circuit has six petals, and is different from its counterparts only in size. That is, the shape of the stencil is the same - only the size is different.
Before gluing, each cut paper arch silhouette in order to give it a natural form. We start gluing and assembling the paper dahlia from small middle layers to bigger and bigger ones.

Of course, you have a QUESTION:“And how to cut such even-sized petal circles-layers.
ANSWER: Here is the most simple and fast way to make such a flower with the hands of a novice master. It does not require searching for a stencil template, but allows you to get geometrically even petal details for yourself without any measuring instruments (compasses and rulers). paper flower.
- We take a sheet of paper and glasses and glasses different radius. Draw them on a sheet of paper.
- We cut out the resulting rounds, fold each round in four and in half again (as when cutting a snowflake). And on such a circle folded into a triangle we draw outlines of two petals (like a heart).
- We cut this contour with scissors (see photo below) - deepen the cutout in the middle of the heart - unfold and get a petal layer.
Because we have circles of different sizes - then we will get petal layers different in size. We set the relief, put it together, add a yellow stamen-middle (about stamens we will talk a little lower).

Such delicate flower can be strung on a wire (make a stalk) and donate paper bouquet for Mother's Day to my mom.
ANSWER: An ordinary round stick (pencil or pen, or knitting needle) can serve as a stamp for imprinting a relief on the petals. Here's how you can do it yourself, you can clearly see it in the photo craft of the flower below.
The flower assembly scheme is the same as the previous one (see step-by-step photos).

In the technique of PAPER Puff you can make a variety of voluminous flowers (anemones, poppies, asters, dahlias, roses). Photo evidence below.
You see - the same "puff" method - but completely different flowers are obtained. And all due to the fact that silhouettes of paper petal layers DIFFERENT IN THEIR OUTLINES.

And do not forget that not only the contour (silhouette, petal shape) is important ... but the RELIEF of the petals is also important. It is the correctly set relief that turns flat outlines into living convex layers of the future flower.
For relief we need round sticks of various thicknesses (thin knitting needles, toothpicks, thick round-sided markers, felt-tip pens, spherical perfume caps, or lollipops). Any items that will help set the shape.
So that the relief fits neatly on thick paper- it may need to be slightly moistened before work (sprinkle from a pulverizer or hold on a wet towel). Try it and see how it works out better - dry or wet.

And here's to you ready-made templates paper puff flower. Flower stencils are already several sizes in size. Can right now put a sheet of paper on a luminous screen and trace with a pencil these silhouettes translucent from the screen onto your sheet of paper (this is my favorite way copy the template without any printer - not every home has a printing device).


Also, you can resize any template using a computer mouse.
Look - in the photo below I give you a template silhouette. Silhouette only ONE size. Do you want this silhouette? different sizes - to make a multi-layer paper flower craft.

To change the size of this silhouette, you press with one hand on the keyboard buttonctrl, and while holding this button down, use your other hand to roll the mouse wheel back and forth. And from this action of yours, everything that is drawn on your screen now increases or decreases, depending on where you turn the wheel - away from you or towards you.
Here try it right now- press and twist. See how the stencil image below has resized? In this way you can adjust the template to any size right on the computer screen and circle it with a pencil on a piece of paper placed on the screen of your monitor. This is the fastest way to get the outline of any flower stencil at once in any size we need.
Here are curly templates for future paper flowers - and you can already change the size of the picture yourself. And you yourself can design and create any paper flower with your own hands. 
And let's take a closer look at interesting additions to such puff colors.
How to make stamen
in puff paper colors.
Below is an interesting step-by-step lesson where we see how a stamen is created step by step for layered flower from paper.

How to issue
large inflorescence
on one stem.
And I would like to show here one more smart and simple trick, which allows you to do whole inflorescence of flowers on one stem. In nature, such flowers are often found, where many cups of flowers nest in one place and have common central stem.
It is such a flower craft that will now demonstrate a step-by-step master class in the photo below.
- We cut out from green thick paper (or cardboard) a shock of stems with a common round base. On this round base we glue double-sided tape.
- We twist the tube from the newspaper and wrap it with green paper. We glue the tube-stem to the round base - twisting it around the stem.
- We make flowers (from two red layers and one black stamen). We glue each flower on its stalk. We glue wide leaves to the central stem-leg. It turns out a very beautiful stem-bouquet of paper.

How to make a puff flower
WITH ASYMMETRIC petals.
But in the photo below we see from what layers the ORCHID paper flower is created with our own hands.
In a glass of water dilute a drop of green paint- we get light green water. We moisten the white details of the orchid with this water, they become white-green (exactly like in nature).
Further while the pale green petals are still wet, apply lines of purple paint on them - according to wet paper the lines themselves are slightly blurred - an uneven blurry color is obtained (exactly like a real orchid).
The middle part of the orchid upper layer also make it green ... and along the very edge (right along the cut of the paper) we paint it in bright purple. Thus, when we lift this top layer up, the purple edges just stick out with their color upwards, imitating the position and color of the shaggy central orchid petals.

The same principle is used to create various asymmetric flowers-crafts. Let's remember what other flowers do not have circular symmetry in their calyx ... that's right, these are PANIES (photo below).
- Lower layer of blue petals (only 2 pieces with a location on the upper side).
- After layer of blue petals (also 2 pieces splayed to the sides).
- And the third top layer in the form just one white petal.
- Then we smear the central part of the flower yellow, draw the central lines with a pencil. From crumpled paper we make yellow balls of stamens (or from plasticine).

A simple DIY craft that even a child can do. The main thing is to prepare in advance the templates that the child will circle on colored paper.
Volumetric puff flower
from THIN paper.
We do such techniques as “different sizes of layers” and “work on folding the relief on paper petals” only when we use ordinary THICK COLOR PAPER
But if If you are making flower crafts from CREPE, CORRUGATED MINT PAPER, then you can not set the relief there. The very texture of the paper will make it fluffy bulk flower.
Moreover, the corrugated structure of the paper allows you not even to bother with obtaining DIFFERENT-SIZED LAYERS. That is all layers of the flower can be the same size. Here are the master classes on paper flowers below just clearly prove this.
See? All layers of the flower are the same size. We pierce the middle of the layers folded in half with a hole punch (or with a needle and thread, or fasten with a stapler). Unfold the flower and fluff its layers in fluffy pompom. These are very beautiful large paper flowers.

This is perhaps the easiest and lightning fast way to make a flower with your own hands. It turns out big, lush, rich and expressive.
If we choose napkins of two colors - and apply them with alternating colors, we will get a play of halftones in each layer, and our flower will look like a rose.
You see, in the method below, we make identical silhouettes from napkins of two colors (in shape and size, like twin brothers). Under the bottom we put a piece of cardboard with two holes (like a button ... however, cardboard can be replaced with a button). And we thread the threads into the holes and pierce through all the layers of the napkin. We tie a knot in the middle of the flower - and fluff all the corrugated layers of crafts with our hands.

Think for yourself how you can diversify and complement this air-napkin flower. Can you add more border color- for this, cut out the napkin silhouettes a little bit along the edges with an office marker.
Turn on your imagination ... and let it show off plenty of napkins. No one has a shortage of tea in napkins. And suddenly you will give birth to your own author's flower.
And in the same way, red carnations are made. The same rounds with a serrated edge are also cut out of the napkin - and deep cuts into the petal parts. And then they simply overlap each other with a drop of glue in the center ... or instead of glue in the center, we pierce them with a stick (but it will be a stalk. Beautiful craft do-it-yourself flower for dad on February 23, or for grandfather's Victory Day.

And exactly on the same principle as cloves (on step by step lesson above) Lingeri terry daffodils are also made. Here they are in nature - lush and voluminous.

Spring paper flowers good gift mom on March 8th. And now you will learn how easy it is to make them with your own hands.
And here's how they can be made from dyed paper napkins. We put a stack of napkins on top of each other - fold it a quarter - in a triangle - cut off the edges with a jagged semicircle. We paint the top napkins in a bright yellow color, and the middle layers of napkins in light yellow color, leave the bottom layer white.

Now about the material. Daffodils are gorgeous, you might say, but where do you get these paper colors (pale yellow and bright yellow)? Here, I tell you, there are 2 ways at once - 1) dye white paper napkins in 2 shades of yellow ... or 2) get a pale shade of yellow from bright yellow crepe crepe paper.
INSTRUCTION №1. How to dye a white paper napkin.
ANSWER: We paint the napkin in a straightened form - tinted water. We paint in a glass of water and pour it on a straightened napkin. We are waiting for the natural drying of the napkin (about a day).
INSTRUCTION №2. How to make light yellow from bright yellow crepe paper.
ANSWER: We take crepe yellow paper- put it on a wet towel - put a dry white napkin on top. We iron it with an iron - bright crepe paper gives off its moisture to a dry napkin, and together with moisture it partially gives off color. And we get already PALE YELLOW crepe paper. Thus, we can change the shades of crepe corrugated paper.
As you can see, everything is solved - if you turn on your head and think ... and try to experiment. Knowledge often comes by experience (even if this path is a mess). One failed experience can be the source of several ideas at once. I somehow wet the crepe paper, ruined the craft - but I saw that when wetting the crepe paper loses its color. And once I spilled some water for washing brushes on paper napkin- and she dyed in a gentle even color. So out of two jambs - I got 2 color changes for delicate and thin paper textures.
Well, it was all just about the FIRST METHOD of making paper flowers with your own hands. I deliberately made this first chapter of our article so detailed and detailed so that you immediately understand a simple and important truth:
Even one the only way can have MULTIPLE CONTINUATIONS… numerous options… endless designs. And you yourself can become an author - and create your own own flower from paper, made all in the same way "curly layers superimposed on each other ».
And now let's look at the next way to make flowers from colored paper with your own hands.
METHOD #2
paper flowers
TWISTED IN A TUBE.
We have been familiar with this method of creating flowers since childhood. We all made classic flower crafts at school or kindergarten. by February 23 - red carnations from crumpled crepe paper. They twisted a strip of paper around a toothpick, wrapped the twist with a piece of green paper and fluffed the bunch-panicle of the flower.

And it never occurred to us that inside this primitive method there is a recipe for not only a modest carnation.
This method " twisting crepe paper into a roll» can give birth to completely different voluminous and flat flowers. It all depends on how we changed the SHAPE OF THE EDGE OF THE PAPER STRIP. Depending on its pattern, we will get paper flowers that are completely different in design.
Here is photo proof. See?
Different edge gives different flowers- disheveled aster, neat chamomile, chrysanthemums. Even roses can be made in this way (but roses will be discussed in a separate article - in detail and in detail, as befits a queen of flowers).

And not only from soft corrugated (crepe) paper you can make craft flowers using this ROLL technique.
Here you are in the photo below - an example of paper flowers in the same roll-up technique FROM ORDINARY THICK COLOR PAPER (office double-sided colored paper).

Here is a simple job and very simple instructions.
- On a thin rod (or toothpick) they wound narrow strip paper (to get the middle of the flower).
- And then a winding of more wide tape, already cut along the edge into strips-petals.
- And the petals are folded to the side - like an umbrella-spread.
AND IF THIS SIMPLE TWISTING TECHNIQUE IS ADDED TO THE EXPERIMENT, YOU CAN GET NEW PAPER FLOWER DESIGNS.
For example, what if... these petals are not just bent to the sides with a flat spreading chamomile, but slightly twist the tip of each petal inward (as we cover curls in the morning) - and we will get a voluminous lush ASTRA.

And what if ... make a strip for twisting with DIFFERENT WIDTH AREAS. We see the result of this plan in the photo diagram below.
- A narrow strip (1 cm wide) for the middle stamen (we wind it into a tight roll on a toothpick).
- Next, on this roll we wind an already petal strip (with an edge cut into a fringe) 2 centimeters wide.
- And then we wind a petal strip 2.5 cm wide ...
- and then a petal strip 3 cm wide.

And thanks different width strips, we get a flower-roll in which the height of the petals increases from the center to the edges.
As you can see, in this simple roll technique, you can and should do EXPERIMENTS. Let's continue to encourage our inquisitiveness of the mind and decide on one more dashing idea ...
WHAT IF, cut the fringe not straight, but OBSOLUTE. And what if ... this oblique fringe is not cut along the edge CUT, and along the edge of the BEND (that is, bend the strip in half along the entire length, and cut this fold line obliquely into a fringe, and then twist it in this form.
We see the result in the photo below - an amazing aster with spirally twisting carved perforated petals. Beautiful flower craft - looks like hard work, but making it with your own hands is simple and fast.

Such shaggy flowers with slanting petals can be used as a shaggy stamen for other flowers.
Here's how, for example, in this master class in the photo below. See?
There, too, a bent strip is cut along the OBLIQUE FRINGE ... and an orange shaggy stamen is formed - needed to decorate the center of the paper aster.
By the way, myself paper aster with the photo below is made very original in its simplicity of way.
- The base of the aster is puffs (a multi-beam star with cut rays).
- Each beam in the puff is bent with a slate ruler into a sharp arrow (as on trousers).
- The layers are superimposed on each other - we get a lush flower.
And just the stamen inside this voluminous flower is made using the OBLIQUE FRINGE technique, which we just talked about.

This roll technique can be combine with a regular petal puff (Method # 1 from this article).. Yes - you can - because it occurs in nature. God Himself once came to this idea - and created the flowers of TIGAGE. And we will embody this method of combining a roll and a puff on paper. (See how it is done in the infographic below).
In roll technology the fluffy center of the flower is performed. And in the "Puff" technique»The lower petal part of the marigold flower is made of paper (patterns with five-leaf silhouettes). Photo instructions for assembling the flower below.

And here is the rosehip flower - where the middle stamen is also combined using the roll twist technique and 2 petal layers. By the way, they can also be made in large sheets of A4 format and pasted on the wall - and your living room will be transformed. Buy a pack of red office paper at the stationery and play interior designer. All the neighbors will come running to gasp with delight.

And here is a flower craft where the roll technique is also used to create a fluffy panicle-stamen, and the side petals are simply glued separately to the lower layers of the fluffy panicle-stamen.

It turns out large flowers-sunflowers from crepe paper.
In a similar technique ROLL-BUNCH + INDIVIDUAL PETALS, a do-it-yourself narcissus flower is also made.

But these flowers are WHETHER LILAC, OR SALVIIA - with a long stem of inflorescences, also made in a roll technique.

Yes, yes, this is also a common roll technique, with the only difference being that the strip of paper is not folded into a tube, but wrapped around spiral roll around a long stick.
Here is a master class in the photo below lush flower from paper.
- A wide strip of crepe (corrugated) paper cut into long fringes.
- We wrap the fringes on a toothpick(or a knitting needle) - and we get curls along one edge of the tape.
- We take a long wooden skewer and wrap ours around it. paper tape with curly fringes - wrapping begins from the top end of the wooden skewer and spiral down.
- Doing under the flower green winding stalk-skewers and glue wide green leaves to this stem.
paper rose flowers
ROLLING method.
In roll technology, you can quickly roll a paper rose. By paper roses we will have separate article. But I will give two master classes right here - because they affect the roll technique for creating flowers.
Here is the first step by step paper rose tutorial. Thick paper is used here, and in order for the petal parts to have the geometry of broken rose petals, you need this dense paper strip, in the process of rolling into a roll, KIND AND TWIST around itself.
And don't pay attention to those centimeters… just take the very essence this instruction. Cut off a strip of paper from the draft and try to twist it into a rosette, just bending the strip as God puts it on your soul - the paper itself will tell you where to bend and turn it.

Many other options to make a paper rose from different types papers can be found in the article
And here's another way roll up the roll of paper so that it looks like a rose. For such a roll we need paper strip NOT STRAIGHT FORM, but make a strip of paper IN THE FORM OF A SPIRAL.
For this it is enough draw a snail on a piece of cardboard(the curve is uneven, no matter which one). This drawn spiral will be the template for our paper flower.
Now this spiral line need to cut and then start twisting the roll NOT FROM THE MIDDLE OF THE SPIRAL ... but vice versa FROM ITS EDGE. And in our hands a paper rose will appear by itself.
My advice, do not take for such crafts - roses polished slippery glossy paper- such an elastic rose will strive to turn around or the circles of the spiral will slip out of the flower bed. It is better to choose rough paper or not very thick cardboard- so the rose will keep its shape better.

paper flowers
Method number 3
In the POMPON technique.
And here's an even faster way to create a fluffy three-dimensional flower. It is made using the "pompom" technique - from corrugated crepe paper.
This technique is good because it allows you to make large paper flowers very quickly - as crepe paper is sold in large rolls (like wallpaper). And every roll can turn into large flower to decorate the holiday.
The master class in the photo below shows how to make such a lush paper flower with your own hands. We fold a wide (20 cm wide tape) several times to get a layering in many layers. We cut the folded ribbon into a fringe FROM TWO EDGES, leave the middle intact.


We fluff the fringe of the flower in all directions - achieving the shape of a perfect circle. And we decorate the central part of the flower with a lump of black paper - and we get the similarity of a flower with a disheveled poppy.

As you understand, the height of the petals depends on the length of the fringe. And the shape of the petals depends on the shape of the fringe.
Below (paper flower tutorial) we make anemones using exactly the same pom-pom technique. The difference is that we slightly changed the shape of the fringe - it's not even a fringe cut at all, but just a beautiful curly petal edge of the napkin.
As a result, the fluffy flower no longer becomes a poppy - but a delicate anemone made of paper.

And you can completely do not change the shape of the edge- that is, in general, do not incise or fringe it in any way. Leave it flat, as it is with a napkin. Just lightly paint over with a marker.
And in the same pompom technique we make a carnation flower with our own hands. They pinched it with wire, folded it in half - fluffed it up and got a carnation on a wire leg.
It remains to add elements from green paper - receptacle(wrap a toothed roll around the flower bowl), stalk(a long green strip for wrapping the flower stem), leaves (glue long oval to the stem).

And you can also make such a pom-pom flower two-color with a center of a different color (see photo below). To do this, we need paper strips of two colors - one wide (yellow), and the second 2 times narrower (black).
We prepare the strips - first we cut a wide strip into a double-sided fringe (or a patterned edge, also on both sides), then we make patterned edges from two on a narrow strip.
To make a patterned petal edge- you need to fold the strip into an accordion (as fans were made in childhood) and on both sides of this folded fan we make a rounding with scissors.
After unfold the strips and put a narrow black strip in the middle of the wide yellow stripe. We fold them again with an accordion (already two-color).
We tie up the twine or wire. And we turn the sides of the fan in a circle - a flower is formed. If desired, the center of the flower can be decorated with crumpled paper or threaded fringe, glued between the blades of the black center.

And here is a master class, which shows how to make a paper pom-pom flower WITH A FRINGE-STAMEN with your own hands (photo-instruction below).
The principle of creating this flower from paper of two colors is the same as in the previous master class. Only here the middle strip is shredded on both sides into a small fringe. This is another way to make large crepe paper flowers.

Method number 4
paper flowers
Twisted on a ball.
And here is another way to create flowers from crepe paper.
To make such paper flowers, you need wide short strips of crepe paper and balls of different sizes (chupa-chups, balls). We put the ball on the strip and hug the ball from both sides with the strip - we twist the tails-tips of the strip into a tight flagellum. Carefully take out the ball, trying not to crush the inflated petal pattern. We make several of these petals and collect them into a lush flower.

By the same principle, rounded crocus petals are made from corrugated paper (photo below). Here you need a paper strip already longer - it is placed on the ball with one of its halves. The other half is twisted at the top of the ball and goes back behind the back of the ball and lies on top of its first half. It turns out a rounded petal.

If you fold such petals close to each other, you get a cup of a closed crocus flower (as in the photo below). Excellent hand-made flowers for March 8 for mom.

A lot of bouquets can be made from crepe corrugated paper. Including candy bouquets.
Method number 5
FLOWERS from paper
In ORIGAMI technique.
And now we will talk about folding flowers out of paper - without any cutting with scissors. That is about the art of origami.
The first model is flowers with conical petals. That's how handsome they are. Each petal of such a flower is made from simple square paper. In simple origami technique.
All the finished petals are glued to each other - and in the center of the gluing we put a beautiful rhinestone-pebble.

Such craft flowers are very simple and quick to make yourself - and they look very elegant on gift box. They can even decorate a Christmas tree.

As soon as you pick up a square of paper and look at the master class below, you will immediately make the same petal. It's very simple - you start doing it and you understand everything along the way. And you are surprised that this is not taught in kindergarten - everything is so simple and accessible common man. After the 10th module, when the whole flower scheme has already been absorbed into your subconscious, your hands are already doing everything almost blindly - on the machine.

If you take a roll of plain wallpaper as paper and cut it into large squares, you can get large-sized flowers to decorate a hall or decorate a home celebration.
And also due to the fact that these flowers have the shape of a CONE - it is convenient to collect them in one common big ball. And use it as a pendant. Or as a crown for an ornamental tree (usually used to decorate weddings).

And here is a master class of a large water lily and paper folding technique without cutting.

And here interesting way where the petals-modules are made separately, and then each module is not glued, but simply inserted into the grooves of the neighboring module.
These do-it-yourself paper flowers can become great craft for any occasion. You can now make paper flowers in different techniques and teach it to children. You can use these ideas for holiday decorating or club activities. Skilful Hands. Such flowers are suitable as crafts for the Spring contest at school or kindergarten. Or these flowers can be a gift for the day of March 8 for mom - a bouquet of paper flowers made by yourself.
A lot of simple ideas
for children's crafts on the theme of flowers you will find in our other articles:
Good luck with your crafts.
Olga Klishevskaya, specially for the site
This paper flower tutorial uses photos from the following sites: http://www.wikihow.com http://www.instructables.com http://tipnut.com http://www.twopinkcanaries.com http:// www.marthastewart.com http://vivatunisie.com http://www.linazlina.com
Colored cardboard crafts are a pleasure for both children and adults. This is a great pastime, which, moreover, does not cause damage at all family budget since most materials can be found at home.
Crafts can be done just to keep the child busy, or for a certain holiday. For example, you can make a very cute bunny that will decorate the house for Easter.
Hare - crafts from colored cardboard
We will need:
Colored cardboard (preferably yellow)
Velvet paper
Scissors
Marker - blue or black
simple pencil
Step 1. From colored paper of yellow or any other color, we glue a cylinder 7-10 cm high and 3-4 cm in radius. It will become the body of a bunny. To simplify this task, you can also take a roll from under toilet paper and cover it with colored paper.
Step 2. Making ears. To do this, cut them out of colored cardboard of the same color as the body. The length should be about 6-8 cm. Cut out and glue in the center of the ears from velvet paper orange color(if the ears are yellow) blanks that repeat the shape of the ears, but smaller in size.
Step 3. We glue the resulting ears inside the finished cylinder.
Step 4. Cut out a nose from red or black velvet paper. It can be round, transverse oval or heart-shaped. Glue it a little above the middle.
Step 5. Cut out two small eyes from white cardboard and draw the pupils of the bunny with a blue or black felt-tip pen. Glue.
Step 6. From white cardboard, you also need to cut out a trapezoid figure that will serve as teeth for the bunny. Cut it in half vertically and glue it too. The muzzle of the bunny is almost ready.

Step 7. From black or cardboard dark- of blue color you need to cut 6 thin strips. These will be the mustaches that need to be glued on both sides of the nose, 3 pieces each.
Step 8. Now we make arms and legs from velvet paper for the bunny. To do this, you need velvet paper of a darker or contrasting color compared to the body. Cut out the handles. We glue the cams together and glue the hangers to the sides.
Step 9. For the legs, cut out an oval from velvet paper, which will become the heel, and three smaller circles. Glue at the bottom of the body, first an oval, and circles above it. We do the same with the second leg.
Another hare can be made from a cardboard cylinder. For him, in addition to cardboard, we need scissors, glue, brushes, paints and beautiful ribbons.

Step 1. Cut cardboard cylinder into 7 equal parts and begin to glue them together. First we make the head and ears of the future bunny. Why glue two ovals in their lower part from the outside. One oval will be an ear, and the second we give the shape of a circle - it will be the head.
Step 2. Glue the second ear to the head. In order to receive upper paws, tightly squeeze another cardboard oval. It can even be carefully glued in the center and glued to the bottom of the head.
Step 3. Next, glue the torso to the upper legs. It also needs to be rounded as much as possible, like the head of a hare. The lower legs complete the figure, which must be glued in the same way as the ears, and give them an oval shape.
Step 4. If you made a hare from one color or plain cardboard, then after it dries, it can be painted. To make the craft more interesting, you can paint all or some of it. inner sides in colors that contrast with the exterior hues.
Step 5. You can glue a small bow or a bright button on the bunny's neck. This bunny will be an excellent window decoration. You can make several multi-colored hares and, using ribbons passed through the top of the head between the ears, hang them in the window opening.
Handmade postcards have a special appeal and charm. They are always original, unique and filled with warmth.
A beautiful velvet rose is placed in the center of this outline card.
Rose is one of the most beautiful flowers on the ground. Her beauty has been admired and inspired since ancient times. The symbol of the rose embodies perfect beauty, wisdom, true love and secret.
To make such a postcard, you need to prepare:
- a sheet of light semi-cardboard (120-160 g / m2),
1/2 sheet of raspberry thick velvet paper,
- sheet of office paper blue color,
- sheet of office paper Green colour,
- 1/2 sheet of office paper Pink colour,
- ruler, glue,
- shaped composters,
- dummy knife, scissors,
- stapler, paper tape,
- transparent rhinestones.
1. These are the stencils needed to make a postcard.

2. The template of the base should be printed on white paper and attached to a light semi-cardboard. Staple marks should be outside the area of the future postcard.

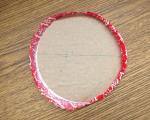
3. Cut out the leaf pattern, while you can round the lines so that there are no sharp corners.

4. Free up space between branches. Delete the remnants of the template.

5. We make scoring (punching) of the middle line. A scribbled rod can become an assistant in this.

6. The base of the postcard is ready.

7. If desired, you can "paint over" the leaves. There are two ways to implement this idea. The first one is simple and fast. Glue with reverse side green paper. Cut it around the perimeter and cut the gaps between the leaves. The second method involves cutting out a substrate for each leaf. In this case, you can use not a whole sheet, but pieces of green paper.

8. This is the result of our decoration.

9. View from the back.

10. Let's start creating a rose. We print its template and connect it with velvet paper. The size of the flower should match the silhouette on the outside.

11. Carefully cut out.

12. Glue the pink backing.

13. We attach the rose in its place with the help of double-sided tape.

14. This is what the front side of the postcard looks like.

15. For liner suitable blue paper.


17. Now we decorate the spread. This is the first station.

18. Inside you can put a small rose. And leave room for congratulations.

19. Several transparent rhinestones glued to a rose imitate water droplets.
Now postcard velvet rose fully completed.

Is it possible to turn an ordinary notebook into a gift?
A notebook and a pen are things that will always find a use. So the gift will be useful.
And so that it is also unique, memorable - you can decorate it with your own hands.
For work you will need:
Notepad and pen
- scissors
- glue
- colored paper: velvet, self-adhesive, mother-of-pearl - any beautiful paper(just not too thin)
- pencil and ruler.
Notebook and application paper
IN this case velvet self-adhesive paper of blue color is used, and mother-of-pearl paper of blue and silver colors is used.
 Paper loop for a pen
 To make a loop for a pen, cut out a strip 2 cm wide from blue velvet paper. The length of the strip depends on the size of the notebook: multiply the width of the notebook by two and add 5 cm for the loop. We make a loop and try on a handle in it so that the handle is easily inserted, but does not pop out. We cut off the excess. We glue the strip, leaving right size loop.
Next, carefully remove both covers from the spring to make the appliqué. If you can not remove the covers so as not to tear them, then colored paper it is better to choose the color of the cover: the same or matching in color. So that the part of the side with holes left without application does not get out of color from the intended composition.
For this New Year's notebook, a background of blue mother-of-pearl paper is glued to the front cover. There are silvery stripes along three sides: on the top and side (left) 1 cm wide, on the bottom - 2.5 cm wide.
 Front side notepad with application
  Reverse side of the notepad with appliqué
 A rectangle is cut out of blue velvet paper so that three sides of the silvery color turn out to be a frame (without right side). The drawing was transferred to the back of the paper and cut out along the contour. A hole punch made holes - from below and to the right.
You can cut out whatever you want: a flower, the sun, an asterisk, a house, a silhouette of some animal, or a person. And the frame, of course, to make it your own way. Or don't do it at all.
Blue velvet paper, with a Christmas tree and circles cut out in it, is glued on top of mother-of-pearl.
The cover of the reverse side of the notebook is pasted over with blue velvet paper and two stripes of silver - on top and on the side.
When the application is ready, insert the covers back into the notebook spring.
And the handle is in a loop.