What materials can be used to make a rooster? We knit a cockerel with crochet and knitting needles
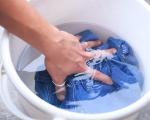
Are you ready for the upcoming New Year celebration? If you haven’t bought gifts for everyone yet, you can please your loved ones with very beautiful and unique souvenirs that you make yourself. Do-it-yourself rooster, master classes on making the symbol of 2017, suitable for both experienced needlewomen, and for beginners. We have 6 original techniques for making cute Roosters: stuffed toy, papier-mâché rooster, newspaper tubes, from candies, from salt dough and even from cardboard egg trays. Find out for yourself which of these master classes you like best.
Stuffed toy cockerel – a caring father
The original image of a rooster, instead of a hen, hatching an egg, will certainly appeal to people with good feeling humor.
For work you will need: polystyrene foam; multi-colored pieces of fabric; tailor's chalk; threads; buttons; felt fabric (for decoration small parts); stationery knife; decorative ribbons and beads; padding polyester or any soft filler; hot glue.
How to do?

Papier-mâché handsome rooster
You will need: cardboard; plastic bottles; scotch; PVA glue; wood varnish; watercolor; gouache or any paints for painting; brushes; stationery knife; thin paper or newspapers; hot water and a saucepan. The dough for the papier-mâché rooster master class needs to be cooked a little on the stove.
 How to do?
- We assemble the base frame from bottles and cardboard, as shown in the figure, connect them well with tape.
- Prepare the papier-mâché dough: tear the paper into small pieces and pour hot water for soaking. For thin parts, the paper will have to be cooked over a fire. When the paper gets wet, squeeze out the water and mix with PVA glue.
- We gradually apply layer by layer, giving the papier-mâché the shape of a rooster. Each layer must be thoroughly dried.
- Now you can paint the cockerel and, to secure it, coat it with wood varnish so that the paints do not spread and stain your hands.
Rooster from egg trays
For the master class on a rooster made from egg trays you will need: pearlescent acrylic paints; cardboard egg trays; balloon IR; PVA glue; hot glue; newspapers; paper; brushes; scissors; stationery knife; simple pencil.

How to do?
- Cut out separate parts from the trays for feathers, beak and everything else, as shown in the picture.
- Gradually glue the feathers onto the cardboard base using hot glue and assemble the parts of the cockerel - head, wings and tail.
- Make the abdomen using the papier-mâché technique from newspapers; to do this, cut the newspapers into strips, coat them with PVA glue and cover the balloon with them in several layers. The top layer should be made of white paper.
- When the paper on the ball has hardened, pierce it and cut the shape into two unequal parts, as shown in the picture. Insert the smaller half into the larger one and secure it with strips of glue.
- Fasten all the parts and paint every feather, every detail with multi-colored mother-of-pearl acrylic paints, changing shades. You can imagine with your children.
Candy rooster
What you will need for the candy rooster master class: lollipops - roosters on a stick; a scattering of different chocolates; skewers; cling film; basket; decorative ribbons; artificial flowers; Styrofoam.
How to do?
- Wrapping chocolate candies cling film and thread onto skewers.
- Glue a piece of foam plastic to the bottom of the basket.
- We beautifully distribute the skewers with candies and lollipops on the foam.
- We place the flowers last to cover the entire bottom of the basket.
- We decorate the skewers and the basket with bows and multi-colored ribbons.
Rooster made from newspaper tubes
What you will need for the master class: a rooster made from newspaper tubes: newspapers; PVA glue; stationery knife; knitting needles; paints for painting;

How to do?
- Fold the newspaper lengthwise and cut it, bend it again and cut it again so that you get four strips from one sheet. Using a knitting needle, twist the paper at an angle of 30 degrees to create a long thin tube. Towards the end of the work, remove the knitting needle and tighten the tube, lightly gluing its edge. Paint the dried tubes in different colors.
- Place ten tubes together. Twist the tube from the middle around the bundle three times and divide them in half. Leave the tip to the side.
- We braid the two halves with a figure eight.
- From one bunch we make a rooster's tail. Let's straighten the tubes, flattening them.
- We will continue to braid the second bundle with the tip of the middle tube, creating a neck.
- We bend a piece of tube in the middle and weave it into the neck, this is the beak.
- We wrap the bundle over the beak three more times and hide the tip of the tube inside.
- For the stand, take a new wet tube and screw it onto the bottom of the bundle, adding glue. Trim the protruding ends with a knife.
- The wings need to be made in the middle of the figure; to do this, use a knitting needle to widen the hole between the tubes and insert three multi-colored bent tubes into it.
Salt dough rooster
What you will need: a glass of flour; half a glass of salt; half a glass of water; PVA glue 20 grams; toothpicks; paints; brush.
 Making a rooster from dough is very simple, you can do it with your children. Knead a soft dough from water, flour, salt and glue, preferably with a mixer, so that the mass is more homogeneous. You need to immediately start sculpting the parts of the cockerel; toothpicks are needed to draw small details, feathers, pupils on the eyes. Connect them together and dry them near the battery. After drying, you can start painting.
The cockerel is ready! We wish you creative inspiration! And may he bring good luck to your home and cheer everyone up throughout 2017!
If you liked our site or found the information on this page useful, share it with your friends and acquaintances - click one of the buttons social networks at the bottom of the page or at the top, because among the heaps of unnecessary garbage on the Internet it is quite difficult to find truly interesting materials.
There are only a few weeks left before 2016 changes to the year of the proud Rooster with a truly fighting character. The most popular gift, which can be presented to relatives, colleagues or bosom friends on the eve of this celebration, is an image of this particular stately and spirited bird. It is precisely the New Year's rooster with your own hands that is the most an expensive gift, created from the heart to please the person for whom it is intended. Such designer crafts are represented by a wide range:
- souvenirs;
- Stuffed Toys;
- accessories;
- interior items;
- household little things.
In progress self-made With any of the selected crafts, you can show your creativity and practice new technology handicrafts, improve skills in an already familiar form of creativity.
A good idea would be to jointly creative process parents with children, which will serve as a unifying principle for family members and provide an opportunity to spend time together in family circle for an exciting activity.
The workshops offered below will help you choose a craft from among many varieties and master the technology of making it yourself, in which step by step process creating crafts is accompanied by unique photos.
A popular gift is a greeting card

The simplest to implement, and therefore accessible even to relatively small child the rooster's craft is greeting card from paper.
To bring this idea to life bright gift with sincere wishes needed minimum set materials and tools:
- paper;
- scissors;
- PVA glue;
- double sided tape;
- paints (if necessary).
A ready-made New Year's card template with a picture of a rooster, developed by competent designers, can be easily obtained by contacting search engine Internet resources. The template chosen to your taste is usually printed on a color printer, after which the image is carefully cut out.
Anyone with the talents of an artist can easily cope with the task of independently depicting a particular composition.
A successful example of a rooster image used to design a New Year’s card is shown in the photo below.

Traditionally for creating New Year cards use paper blue color. Great option The base of the card is scrap paper, which already has a New Year's background or a specific image applied to it. As elements additional decor usually used paper snowflakes or sequins.

On the outside of the rooster figurine cut out along the contours of the printed template, you need to glue pieces of double-sided tape. The second side of the tape is attached directly to the postcard, thereby creating a three-dimensional image of the symbol of 2017. A similar figurine is cut out in two more copies. Both are attached to the previous ones in the manner described above, clearly aligning the contours.

Inside the card folded in half you can place Happy New Year greetings. It can be composed in verse.


Such exclusive postcard With sincere wishes will certainly produce pleasant impression for the person who received it as a gift.
Rooster made of threads - a toy for the Christmas tree

The original decoration will be bright toy rooster, it can be made simply and quickly from scrap materials.

To make jewelry you need:
- yarn for knitting of any color, in our example it will be yellow;
- small balloon;
- a piece of red fabric;
- eyes for toys, if you don’t have them, you can make them yourself;
- cardboard;
- scissors and glue.

1. First of all, we inflate the balloon of the size we need.
2. From red fabric we cut out blanks for a beak, two legs and a scallop.
3. Inflated balloon Lubricate with PVA glue and wind the thread in random order. If there are several layers, then each layer must be additionally lubricated with glue. And the thread also needs to be made into a loop to hang the toy on the Christmas tree.
4. Glue on the beak, paws and scallop. For this it is better to use hot melt glue.

1. The next stage is making the wings. But to make them we need a template, which we will cut out from cardboard. Our template will resemble a jagged pentagon.
2. We wind the thread onto a cardboard template.
3. Remove the thread from the template and tie the skeins of thread together at the base of the wings.
4. Attach the wings with glue. The toy is ready.

It’s not at all difficult to make funny colorful New Year’s cockerels with your own hands from colored paper. To create this kind of craft, very young craftsmen will need:
- cardboard;
- colored paper;
- silicate glue or PVA;
- stapler;
- scissors.
The first stage of this craft consists of forming a cone from cardboard of the selected size. The edge of the cone is secured with PVA glue or several staples.
Next, various elements of the craft are cut out from thinner-textured colored paper and glued onto a cardboard base, which will serve as the paws, tail, comb, wings of a rooster, and imitate its eyes, beak and beard.
It is not necessary to have special skills to independently make another model of the symbol of the coming year from paper.

Working on the craft shown in the photo requires availability the following materials and accessories:
- paper boxes of different sizes;
- several sheets of standard colored paper;
- scissors;
- glue.
First of all, the top part of each paper box is cut off.
Following the fold lines made, each box is carefully cut to half its height. The places of the cuts made are bent to the side, thus forming the head, wings and tail of the rooster.

The formed paper wings are given a rounded shape using scissors. The heads are cut out in the shape of a triangle. Several cuts are made on the edge of the tail, imitating plumage.
On top of the base of the box, fragments of colored paper are glued throughout the rooster figurine to make the bird colorful and attractive.
Modeling as a way to create crafts Rooster

Together with children, especially small age, you can make crafts not only from paper, but also from plasticine. The multi-colored plastic mass will appeal to children in their creative activities.
Sculpting process bright cockerel consists of several stages:
- from yellow plasticine form three balls of different sizes, which in the future will become the head, neck and body of the bird;
- elements are connected to each other, carefully smoothing the boundaries between them;
- on each side of the body it is necessary to make a couple of cuts, where the cock’s wings should be inserted in the future;
- a crest, beak and eyes are sculpted from small fragments of plasticine of appropriate colors;
- for forming a plasticine tail different shades roll sausages, which are slightly flattened and attached in a fan shape to the back of the body;
- a pair of drop-shaped elements are formed from red plasticine, on which feather cuts are made with a knife; the wings are attached in places designated for them on the body of the rooster;
- They place the finished cockerel on fragments of cocktail tubes, which are completed with three-toed legs made of yellow plasticine.
Craft Rooster from scrap materials

Memorable New Year's souvenirs and effectively decorating home interior Do-it-yourself crafts using appliqué techniques using improvised materials can become accessories. An original example Such a gift is a rooster created with your own hands from coffee beans on a magnet.
Making a custom magnet will require a little time and the materials listed below:
- sheet of cardboard;
- magnet;
- a piece of burlap;
- a fragment of red felt;
- a handful of coffee beans;
- leg-split;
- scissors;
- silicone glue in a gun;
- hook;
- gouache;
- sequins or rhinestones for decoration.
A template of the future magnet is drawn on a cardboard base. It is carefully cut out. The wing, cockscomb and beard are made from burlap and red felt.
Next, the cardboard figure is painted with light brown gouache. In certain places, after it dries, a cardboard tail, a burlap wing, a comb and a felt beard are glued. The legs are formed from sections of rope.
The outer part of the cardboard base of the figure is glued to burlap.
Coffee beans are placed on silicone glue over the entire surface of the bird's body, excluding the burlap wing. They also decorate the edge of each paw.
Using several loops of twine, create a rooster tail. Using rhinestones and sequins, I imitate the bird’s eye and decorate the wings and tail.
The final stage of the work is to carefully cut out the rooster figurine from the burlap glued to the outside. A strip of magnet is glued to the back center of the formed rooster figurine.

A magnet made using this technique will remind you of its talented donor throughout 2017.
Interior items with the image of a rooster

Another type of non-standard appliqué is a way to effectively decorate the wall of any room with a panel of buttons depicting the symbol of the New Year.
For such creative crafts, which will effectively complement your home interior, just prepare:
- multi-colored buttons of different sizes;
- beads;
- sheet of cardboard;
- silicone glue;
- frame.
An image of a rooster for a future panel can also be found on Internet resources. Taking into account such an important nuance as the diversity of the rooster’s plumage, it is necessary to select buttons that would harmonize next to each other and convey all the richness of the rooster’s coloring.
It is recommended to fill any free space between buttons with plain beads or seed beads.
At the first stage of work, it is recommended to apply the outline of a rooster figure to the cardboard base.
Certain areas of cardboard should be filled with glue, onto which buttons and smaller decorative elements are attached.
If you want the craft to acquire a more solid appearance and impress with its creativity, it can be framed in a frame whose format corresponds to the format of a cardboard sheet.

In addition to wall panels, successful New Year's gift, capable of effectively complementing the interior of a living room, for example, a living room, bedroom or, will become cushion, decorated with an applique with the image of a rooster.
For this kind of gift, you can use a ready-made pillow and sew a pillowcase for it with an applique made of fabric or felt.
Using the selected image patterns, you need to cut out the necessary elements from textiles. The composition will be perfectly complemented by plant elements and insects.
Fragments of the appliqué are usually sewn to the base using a zig-zag seam.
A colorful pillow full of positivity will undoubtedly please its owner.
Beaded rooster

Beads can be used not only as an additional decoration, but also as the main material for creating a Rooster craft with your own hands.
You can master the art of weaving with beads by using step by step diagram alternating beads of different shades.
To make your own rooster figurine from beads, you should stock up on:
- beads of red, yellow, green, light green, blue colors;
- brass wire;
- with wire cutters.
The craft shown in the photo above requires familiarity with bead weaving techniques such as parallel knitting and the “toward” technique.

Traditionally, beaded figurine weaving begins from the head. Then they gradually move on to performing parts of the body.
To form the legs, additional pieces of wire are woven in during the work. An important point on at this stage is a single wire piercing.
Weaving the tail also requires additional pieces of wire. The last things to work on the figurine are feathers of blue and green colors.
The rooster created using the beading technique will serve as an original keychain, which means that the person receiving it as a gift will be happy to use such a useful accessory.
Anti-stress gift

A rather original and noteworthy New Year's gift is an anti-stress toy, created in the image of the symbol of 2017. Such a craft can become not only entertainment, but also an interior decoration.
To make this yourself colorful gift, uplifting, you need:
- a variegated piece of cotton fabric;
- scissors;
- needle;
- threads;
- padding polyester;
- fragments of red and yellow felt.
Work on tailoring unusual toy consists of several stages:
- a square should be cut from the selected fabric;
- a comb and beak are formed from felt;
- the cut out parts are sewn into the formed corner of the square;
- the cavity of the toy is filled with padding polyester or other filler;
- The edges of the square are connected with a seam so that a pyramid is formed.
A funny toy will only give you a joyful mood next year.

Quickly done New Year's rooster You can do it yourself using an ordinary rubber glove.
A set of materials and tools for making crafts:
- yellow, white or red rubber gloves;
- colored paper;
- marker;
- glue;
- thread, feathers, napkins.

We inflate the glove and tie it with thread, somewhere in the middle of the length of the glove.

We fold the bottom part and fill it with paper - this will be the base. We make the top layer from colored green paper.

Our blank is ready for decoration. Thumb the gloves will be the head, and all the rest will be the plumage. Now you need to cut out a comb, beak, and eyes from colored paper and stick it on the glove. For feathering you can use tighter colored paper or colored feathers. Some elements can be completed with a marker.
Having become acquainted with the proposed options for DIY rooster crafts and gifts for the new year 2017, everyone will be able to choose one that they would like to make themselves and please people dear to their hearts with it.
The rooster is a symbol of 2017, made with your own hands from various materials will be wonderful a memorable gift for a loved one.
And according to legend, he will also bring good luck to the house where he settles.

You can make a simple symbol of 2017 with your own hands from, decorating the craft in the form of a wall panel. At the beginning of work, you will need to decorate the background (sky and grass) with a layer of plasticine of the appropriate color. We immediately make clouds in the sky. Then a brown fence is laid out, and sunflowers are planted near it. We sculpt a bright village rooster on the fence, making it quite convex.


Plasticine makes real New Year's souvenir- a picture with a cockerel.

Painting with a cockerel - the symbol of 2017
The New Year's cockerel can be made from salt dough. Watch the video for more details:
You can make a rooster from a bright cardboard sheet. To do this, we cut off one of the corners of the cardboard around the circumference and roll it into a cone. We cut out wings from the remaining paper, and a scallop, beak and paws from red cardboard.


Using the same principle, you can make little cheerful cockerels.

You can arrange them in the form of a postcard, the decoration of which will be feather wings.

The original cockerel comes from paper rings and triangles, into which stripes easily turn.

And if the body is made from a paper cylinder, the cockerel will become more stable.

By rotating the cylinder vertically, you will get the basis for the original pendant.

Pendant "Cockerel"
And having glued it bottom part, you can do interesting souvenirs. Special chic they will be given feather wings.


Feathers can also be used to create a cockerel from a bright household glove. If you replace it with a knitted glove, the craft will be more durable.

The smallest creators will be able to make a cockerel using drawing and appliqué techniques.
Print and cut out the template for drawing the “cockerel”.

Template for drawing "cockerel"
We paint the cockerel in the most rainbow colors. All that remains is to decorate the rooster's tail. Cut from colored paper bright stripes and ask the children to roll them into small tubes. Glue the tubes onto the tail.

Drawing and applique for the smallest “cockerels”
To make the cockerel even brighter and more beautiful, sprinkle it with glitter.

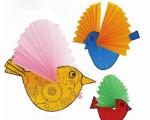
Little children will be able to make a “Rooster” applique from colored feathers. The basis is two sheets of thick paper, between which a stick is glued.

Applique of colored feathers “Rooster”
IN kindergarten can be done working together"Cockerel made from palms."

The beautiful “cockerel” applique is made from coffee beans and real feathers.

Rooster applique made from coffee beans
Feathers are also useful in making bell cockerels, the base of which is sculpted from clay. It is also convenient to use cells from cardboard packaging from under the eggs.

You can turn an entire carriage into a cockerel box for chicken eggs. Fill it with small candies - and you've got a gift for kids!

You can also use other waste materials in your work - for example, disposable plates. Pendants made from them are easy to manufacture.

Funny cockerels are made from colored clothespins decorated with pieces of felt.

And from a piece of knitwear or chintz fabric you can sew a real soft toy in the form of a symbol of the year.

Beautiful New Year's cockerels are made from multi-colored felt. We connect the pattern pieces together with threads or glue. Inner part We fill the crafts with cotton wool.

You can make a flat cockerel on a stick from felt.

Skilled craftsmen will be able to make a cockerel from colored wool.

Watch the video master class: “ New Year's cockerel from felt."
The cockerel created using the technique looks very beautiful.


The cockerel is not inferior to it in originality and beauty. wall panel, decorated from flat multi-colored buttons. Using buttons different sizes, you will make the picture more expressive.

Rooster applique made from buttons
And by placing such a panel in a frame with glass, you will significantly extend its service life.

Painting "rooster" made of buttons
A charming colorful cockerel is made from beads.

Very different cockerels can be made using vegetables and fruits. You can decorate your New Year's table with this symbol of the year.

Table decoration "rooster"

A very impressive cockerel is made from apples.

We connect the parts of the craft together using toothpicks.


Look at the video - how to do it fire cockerel from foarmin.
Show the kids how to make the symbol of 2017 with your own hands, a master class - and they will definitely surprise you with unusual ideas and solutions!
This thematic section of the MAAM portal is dedicated to the colorful and proud leader of the chicken family, the “winged alarm clock”. In addition, the cockerel is a character in many fairy tales and other works. folklore; an unchanging prototype of folk crafts; souvenirs, crafts and compositions for Easter.
A large collection of original master classes on the artistic depiction of roosters and cockerels is formed on these pages. In addition, there is ready-made ideas for making a rooster costume for theatrical performances.
The brightest and most cheerful cockerels are in our “poultry yard”.
Contained in sections:Showing publications 1-10 of 550.
All sections | Rooster, cockerel. Master classes, DIY rooster crafts
My task was: Learning the ability to draw lines, placing them from one point; consolidate knowledge of primary colors; also cultivate interest in drawing. Develop color perception, consolidate knowledge of the basic colors of the spectrum (yellow, green, red, blue. Continue learning...
 What is an application? - asks a question from a child or an adult? A question always requires an answer. Let's figure it out together! Application is a type visual arts, in which the parts are first cut out with scissors and then glued in the correct order onto the base. This kind...
DIY crafts from natural material It’s not difficult to do, but it’s very interesting and entertaining. To make such crafts, you will need material that can be found in the forest, in the field, near the river. To make the craft more expressive, also use plasticine, paints and other similar materials. DIY crafts made from natural materials will decorate your interior or become great gifts for friends and family.

You will need:
- plasticine
- cone
How to do
Preparing raw materials
To make a craft, prepare plasticine and a pine cone.

Making a head and paws from plasticine
Let's make a rooster's head and two legs from plasticine. For the head, roll a ball of yellow plasticine. Add a red plasticine comb and beak. Make eyes from a piece of white and black plasticine. Make two orange bird legs.

Making a cockerel
Turn the pine cone over. Attach the cockerel's head to the wide part, and the legs to the narrow part. All we have to do is add two plasticine covers. You can also make a tail, but it will outweigh the craft and it may fall. But even so, the cockerel looks quite attractive and will be an excellent toy for kids.