How to make a frying pan out of cardboard. What can be done for dolls, what accessories? DIY furniture, clothes, shoes and food
Playing with dolls is exciting not only for children. Many even as adults do not deny themselves the joy of this fun. Especially if the assortment of all kinds of interesting things is made by hand. Of course, in every house, even a doll house, you need a set of dishes, in appearance as close as possible to the present. Having figured out how to make dishes for dolls with your own hands, in the future it will be possible to improvise with her appearance.
Necessary for work
The process of making toy accessories does not threaten with serious expenses, because miniature dishes can be made using improvised materials. Of course, sets from eminent masters are represented by luxurious porcelain items, often with jewelry painting and a silver / gold border, or no less beautiful embossed metal sets. Such doll dishes are a real work of art.
For the manufacture of everyday doll dishes, you can use simple and cheap materials:
- polymer clay;
- plasticine;
- salt dough;
- plain paper/cardboard;
- tree;
- some completely non-standard things: the remaining lids, corks, caps, plastic boxes, metal elements of electronic circuit boards, the remains of tin cans;
- natural materials: acorns, nut shells, sticks, etc.
When a child is carried away by barbie or monster high dolls for self-made accessories, it is better to give preference to plasticine or polymer clay. Materials are affordable and easy to use. You can get bright, beautiful and durable doll utensils from them. In addition, when using them, you can create any color scheme without resorting to additional painting or coloring.
So, for the manufacture of miniature children's dishes, you should stock up:

If there is no experience in such miniature creativity, you can use ready-made master classes or video tutorials that demonstrate how to make plates for dolls and describe step by step how to make barbie or monster high dishes yourself.
Workflow steps
First you need to understand the process of manufacturing simple items. For example, plates for dolls:

In this simple way, a flat plate is made.
Making a tea service
In the same way, you can get a saucepan and deep vases designed to be filled with honey, jam, condensed milk or sour cream:

Taking the work of other masters as a basis, you can start creating masterpieces of miniature dishes from plasticine or polymer clay. The choice of materials is not limited to them, because you can also use the quilling technique, using which you can learn how to make a paper plate with your own hands. You can create items from natural and improvised materials. Well, what products to blind to serve on the doll table, it’s up to the hostess of the dolls to decide!
How to make dishes for dolls. Miniature children's toy dishes for dolls (tea set for puppet tea drinking) with their own hands (modeling from plasticine, salt dough, plastic).
Tea drinking, treating guests and cooking are the most popular plots of children's games. This is especially important for girls - future housewives.
And since children work out and play out many programs and behaviors not only in role-playing games, but also in games with dolls, children want their dolls to have everything like people have: a house, furniture, clothes, food, utensils.
When my daughter and I made toy food for her Barbie dolls: pies, pizza and pancakes, it turned out that there was nothing beautiful to serve them on the table. So our dolls got a dish, and for the company - a tea set for puppet tea drinking: saucers, mugs, rosette vases and a teapot.
Such dishes for dolls can be molded from any material suitable for modeling: plasticine, polymer clay (plastic), salt dough, etc.
Ready-made figures from ordinary plasticine or salt dough are best varnished for durability.
My daughter and I have a favorite modeling material - light self-hardening plasticine.
Mixing colors to get the desired shade. In this case, white and blue. Because small pieces of such plasticine quickly harden, we pinch off a piece needed for work from the main mass, the rest is hermetically sealed until needed.
The easiest way to sculpt dishes, saucers and plates.
Plates, saucers and dishes

Roll a piece of plasticine (dough, modeling mass, plastic, etc.) into a ball, flatten it with your fingers, constantly turning. In order for the plates to turn out to be the same size, you need to make several identical balls.
Another way is to roll the plasticine into a cake, and then squeeze circles out of it using a mold of the desired size. Plastic covers are suitable for this.
With the opposite end of the felt-tip pen, make indentations in the saucers and plates (you do not need to make an indentation in the dish). On the reverse side, arrange the bottom: glue a ring from plasticine rolled out with a thin sausage.
Raise the edges up a little. Cut the edges of the dish, if desired, with curly scissors with blades in the form of a small frequent wave.

Rosette vases for honey, jam, sour cream, etc., are made from a ball. It is necessary, by gently turning it, to make a recess with a finger or the end of a ballpoint pen. The bottom, like the plates, is a ring made of plasticine rolled out with a thin sausage.

Cups or mugs
Cups for puppet service can be made in the same way as rosette vases, only with a larger recess and a handle from a piece of plasticine rolled into a thin sausage.
Making mugs is a little more difficult. Wrap a rectangular piece of plasticine around the felt-tip pen cap from the edge (the cap should be round and even, not ribbed). Make the bottom of a small plasticine ball, flattened into a circle, and a handle of plasticine rolled out with a thin sausage.
After the plasticine has completely dried (hardened), the most difficult and crucial moment is to remove the mug from the cap, gently turning them in different directions.

Teapot, sugar bowl and jug

The basis for the teapot, sugar bowl and jug is a ball. For a teapot and a sugar bowl, the lid is a small flattened ball and another ball, very small. The bottom and handles are made of plasticine rolled out with a thin sausage. For a sugar bowl, make two handles symmetrically, for a teapot - one handle and a curved spout.
A jug (it can also serve as a vase for flowers) consists of a base - a ball, a bottom - a ring and a neck, which is made similarly to cups. Handles are optional.
What girl does not dream of a real doll dish! From what they just do not try to make it: from acorn caps and nutshells, various plastic bottles for shampoos, even from papier-mâché.
But the best way to create realistic dishes for dolls with your own hands is to use polymer clay for modeling. Today's selection of master classes will teach you how to make a tea set for a doll miniature.
Polymer clay helps not only in the creation of jewelry and decor items. From this material surprisingly beautiful doll miniature turn out.
We have already talked about modeling food more than once: meat, vegetables, fish, fruits, and all kinds of desserts. And since it is difficult to imagine goodies without an appropriate entourage, mini-dishes appeared.
Today we propose to make a do-it-yourself tea set for dolls. Cups can be one-color, multi-colored, painted and a variety of sizes.
If everything is done correctly in full accordance with the master's explanations, your collection of miniatures or doll utensils will be replenished regularly. Create with pleasure!
How to make dishes for dolls from polymer clay. Video master classes
A set of doll utensils made of polymer clay:
DIY polymer clay tea cups:
Do-it-yourself tea set for polymer clay dolls:
Dollware made of polymer clay:
Do-it-yourself teapot and cups for polymer clay dolls:
Discussion of the article
Please your children by making dishes and food for their dolls from a variety of materials: from paper, from plasticine, from clay, from lids and caps.
Such utensils consist of plates, cups, saucers, a teapot and other items.

It is hard to believe that these items are made from waste material. See what similar dishes for dolls are made of.

Some items need to be glued together, then painted in a certain color.
To make it as clear as possible for you how to make such utensils, look at the master classes illustrated with photographs.
How to make a plate with your own hands?
Made of plastic

To make such kitchen utensils, you will need:
- plastic lids from vegetable oil;
- scissors;
- cardboard;
- stickers.
Attach a sticker to it, glue this element in the center of the circle.

If there are no stickers, then just draw a flower on cardboard.
You have made small plates for dolls, see how to make deep ones. To do this, you will need the plastic packaging from Kinder Surprise, which is inside this artificial egg.
Cut off the deeper part from the shallower part, singe the edges as follows. Put baking paper on the electric burner, place the workpiece on it with the cut down. If you have a gas stove, then glassine should be placed in a pan.

From paper
And here's how to make a plate for paper dolls so that it is as deep as a bowl. This will help.

Cut a strip 1-2 cm wide from white or colored paper. Wind it around a pencil or a rod, remove it from this accessory.
Glue the tip, pull the middle a little to give the plate shape.

From polymer clay
Beautiful plates for dolls are also made from polymer clay. To make them, you need to take:
- polymer clay;
- white acrylic paint;
- caps;
- toothpick;
- brush;
- glossy varnish.

Break up the plastic. Roll out a piece, attach a round object to it, cut out the future dish according to this template. Now attach a round object of a smaller diameter to the center of the workpiece, press it on the plastic.
Attach a toothpick to the edges of the plate, make them openwork. Cover the edge with paint. When it dries, level it with a knife. You can draw a flower in the center of the dish, then leave the plate to harden in the air or bake in the oven (this is written in the instructions for a specific polymer clay).

From cardboard

On the wrong side of the cardboard, draw a circle of the diameter you want to be the size of the bottom of the plate. Draw a larger circle around this blank. Cut out the resulting ring, which is located between the large and small circle.
Make an incision on its side. Align the two edges of this blank, glue them in this position. Attach the remaining circle to the cardboard, cut it out with a margin. Glue the prepared ring onto this blank, you will get a plate with sides.
To make this item more durable, you can make several layers and glue them together.

And here is another interesting option that will allow you to make a whole toy set for feeding dolls. For it, you will need old boards that have failed, which should not be thrown away.
How to make a toy set for dolls?

You can see what source material was used. It will be necessary to carefully disconnect the small elements from the base so as not to damage them, remove the winding with your hands, slightly prying it with the tip of small scissors.
Insert a wooden rod inside such an element, saw off the excess.

Make several of these toy containers with wooden lids and write the names of the seasonings on small paper strips. Attach them with glue or tape.

The child will also be pleased with sets for loose spices, making them is also quite simple.
Take a metal element, use a nail and a hammer to make several holes in it.

It remains to close the lids and admire what an interesting toy set you have turned out.

You will transform old capacitors beyond recognition. To do this, you first need to remove the covers from their bottom and saw off one part to half.

Work on some other details in the same way. Here's what you get at this stage.

Walk along the edges of these blanks with a file so that they become even. Smaller details, such as handles, lid opening elements, need to be processed in the same way. Cut these items out of a tin, for example, from a can of condensed milk or stew.

Solder them in place, look what a wonderful playset turned out.

You can make it from other materials with your child, for example, from plasticine.

- To do this, you need to knead the plasticine. To make a saucer, roll the mass into a ball, flatten it, slightly lift the edges up.
- Show your child how to make a cup. To do this, you also need to first roll the ball, then press it in the center with your finger, give it the shape of a cup.
- To make a handle for it, roll a thin sausage out of plasticine, bend it slightly and attach it to the side.
- You can also make a coffee pot out of plasticine. To do this, you first need to roll a pear-like figure out of this material. This is a corps. To make a handle, roll up a plasticine sausage, bend it and attach it to the side. The spout of the coffee pot is also made from a curved sausage, and its lid is made from a flatbread-like figure.

Look how openwork and beautiful it will turn out.

A set of dishes can also be built from natural materials. Just now acorns have already ripened, you can stock up on them to make crafts throughout the winter.

To make such a set, you will need:
- acorns with caps;
- twigs;
- twigs;
- small hacksaw;
- glue gun.

Saw off a thin circle from the branch, which will become a saucer. Place a cup on it, you need to turn an acorn cap into it. Glue a curved rod as a handle. Make another same cup and saucer, and you can start puppet tea drinking.
From an acorn cap, you can make a wide vase, glue cones to the bottom of the flake, decorating this item.

Make children's play even more exciting by making not only dishes for dolls, but also food for them. Of course, the kids are not averse to using the real one, but this one will quickly deteriorate, it is short-lived. You show them how to make food for their charges so that they can play it for a long time.
How to make food for dolls?

Look how wonderful this lemon cake looks. Its great advantage is not only in its beautiful appearance, but also in the fact that you can play with it for a long time. After all, this dessert is made of polymer clay, which is quite durable.
Do not give such items to play with young children, it is difficult for them to explain that this is not a real cake and cannot be tasted by mouth.
Before you make food for dolls of this kind, you need to take:
- polymer clay of the required colors;
- toothpicks;
- stationery knife;
- rolling pin
Now take light yellow clay and cut this piece with a clerical knife into 6 identical parts. Roll each into a sausage.

Next, use white clay, which you need to knead in your hands and roll into a thin layer. Put the first yellow sausage on it, roll this roll.

In this way, decorate all the yellow sausages, give the shape of a drop with a knife. Now roll a tourniquet from white polymer clay, it will become a central element. Attach the decorated six slices to it.

It is necessary to wrap the resulting beauty first in white, and then in a yellow layer of polymer clay.

It's time to make your own cakes. To do this, roll out a circle of white, brown and yellow polymer clay. Roll out thick cakes from them, place one on top of the other.

To make the cake for dolls further, you need to deal with lemon shavings. To do this, you need to chop a hard piece of clay into shavings with a sharp knife, then roll the sides of the cake in it, attaching this decoration with your fingers.

Roll the white plastic into thin sausages, roll them up with a tourniquet and bend them in the form of roses, decorating the cake with this impromptu cream.

To cut the lemon well, put it in the freezer for half an hour. Then it will be easy to chop this sausage into thin slices, which you will do.
Place them on the surface of the cake, decorate with shavings of brown clay, admire with your child what a wonderful food for the dolls turned out.

Put this masterpiece in the freezer for 30 minutes, then it will be easy to cut into slices.

To show how fluffy the dough is, carefully poke a few holes on one side of the piece, and then on the other. Leave this culinary masterpiece to air dry or bake in the oven following the polymer clay instructions.
And here is how food for dolls is made from another pliable material.
From salt dough

To make these baked goods, you will need:
- salty dough;
- molds and bottle caps;
- pastel;
- stained glass paints;
- stationery knife;
- rolling pin;

Cut out cookies from the rolled out salt dough with molds; the remnants of this material will make beautiful closed pies.

- And here's how to make food for dolls so that it looks like bagels. Roll out the salt dough cake into a thin circle, cut it first in half, each half into three more parts.
- In each of these triangles you need to wrap a small sausage from the dough, then form a bagel. To do this, this triangle must be rolled up, starting from the edge, towards the corner.
- Use yellow or light brown pastels to add color to the bagels by coloring them. Dip each in coarse salt as if it were sugar.

You can cut a few pies into pieces, then bake all this richness in the oven so that the dough dries.

To make the open pies more realistic, coat the gaps between the flagella with dark red stained glass paints. Mix white acrylic and acrylic varnish, paint the cookies on top with this “icing”.

You can decorate the cookies with multi-colored beads, then you need to put the pastries in a box and decorate the table for the dolls with it. Salt dough fruits can also be found here. Create them from the remnants of this material.
Blind apples and bananas with the children, paint them with gouache of the desired color, then varnish.

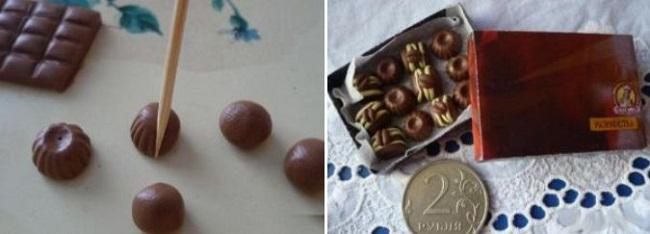
A chocolate bar will also come in handy. To make it, take:
- brown and white polymer clay;
- stationery knife;
- toothpicks.

To make chocolates for dolls, you need to mold small balls of brown plastic and use a toothpick to draw a pattern on them. It remains to put the sweets in a box and you can put them on the kitchen table.
Food for dolls can be made from a variety of materials, such as fabric. The main thing is to know how.
If you like the topic, we suggest you look at how to make food for dolls that will be like from McDonald's.
Perhaps the child wants to “feed” his wards with healthy food? Then see how to make borscht for them.
And how to make dishes for dolls: forks, spoons, a ladle and other items, the third master class will teach.
New life for lids and caps
I prepared this master class for the "Applied Fantasy" section of the St. Petersburg puppet magazine "ProKukly".
"There are a lot of small nondescript things around us, which are often perceived as unnecessary garbage: caps, buttons, spools of thread, beads ... But if you look closely at them, you will find an amazing variety of shapes, textures and sizes. All of them can be transformed in hands artist and become a new accessory for a doll or dollhouse, the main thing is to apply imagination! Therefore, our section is called "Applied Fantasy". Today, the object of our attention will be caps, corks and caps, which are supplied to us in a variety of food, cosmetic and other industries and which we usually throw away without seeing their potential and without giving them a chance to become something more interesting.
First of all, we need to learn to see the shape of our unsightly object (cylinder, cone, cube, pancake) in order to use it profitably. To help yourself, you can find different pictures that illustrate the object that we want to create, study it, note its characteristic features and compare it with a suitable cap or cap, or rely on your memory. Then you need to "feel" the texture of the object (vendace, ribs, pimples) and also try to use it for your own purposes. Be sure to take into account its color (aerosol or acrylic paints can be used to paint any surface, but sometimes this is not necessary) and material (to know what and how to glue it to it, how to saw it through and drill it if necessary). And then you need to give free rein to your imagination and, by attaching some suitable details to the cap, painting it and placing it in the right environment, we will get a wonderful accessory of our own making, and the one we need, at no cost and in a single copy!"
You can see what a variety of caps and corks you can get in any house, just looking around (fortunately, wonderful iron caps for beer or vodka are not in every house, but they are lying in large numbers on the street)
It is very important that our cap does not remain alone, there should always be accessories made of other materials next to it, then its primitive essence will not be so obvious.
Even the simplest toothpaste cap can be turned into a cute vase. Sometimes the simpler the better!
And here is an illustration of how harmoniously the color of the cap can be combined with additional details (the blue color of the cap from the water bottle and the blue elongated bead that we took for the handset). It is also clearly seen here that in order to imitate an object, it is not necessary to repeat it exactly. The main thing is that there should be all those details that make a phone - a phone (handset, disk, wire
Of course, due to the fact that most of the lids are cylindrical, they are especially successful in making various kitchen utensils: pots, teapots, bowls. The main thing to remember is that when you make a kitchen, then all the dishes should not be made from caps! There must be other accessories nearby that will bring new shapes and textures to our kitchen still life.
The cylindrical shape of the lids is also convenient to use as a basis for, for example, hats.
The paint bucket is made from an ordinary mayonnaise cap, and the TV is made from an especially rare cubic cap.
Well, and what wonderful teapots, coffee pots and cups are obtained from ribbed caps from different creams! You have to start doing it and never stop. Handles can be made from simple wire by sticking them into the side of the cap, and the spout and caps can be molded from baked plastic and glued with glue.
Good luck in creativity!
Alisa Bazhenkova
One roof for the pan is also made of cork (beer), I just cut off the lace skirt. And the second is made of aluminum (it can be obtained from cheap tubes of cream or toothpaste, they are made of aluminum).