How to do a French manicure at home. How to do a French manicure at home
Classical French manicure is a coating of the surface of the nail with a pink tint and a neatly drawn smile line at the tip. If you don't use a camouflage tone, then be prepared that after three or four days the nail will begin to grow back and the crescent moon will move.

Although this simple masterpiece was called French, its origins, oddly enough, have American roots. Nail design with a smile appeared in 1976 in Hollywood. And it’s not surprising, because actors change their images in one day, and manicure rarely harmonizes with the overall look. appearance. That's why we decided to create a universal design called French.
How to do a French manicure at home
With the help of simple manipulations fashionable manicure easy to make at home. Let's talk about each method in more detail.
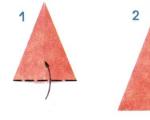
To ensure an even smile even on your left hand, cut the bristles on your brush into a crescent shape; similar tools have already appeared in stores. When drawing a French jacket, do not worry about straight lines. With a brush and nail polish remover, imperfections can be easily erased.
Tools:
- Base coat ( Matt lacquer pastel shade);
- Nail tip color (white);
- Topcoat - finishing colorless varnish;
- Special stripes - stickers.
Step-by-step instruction:
Step 1: First of all, prepare your nails. This stage includes light procedures that are familiar to every girl. Using a file or homemade equipment, work out the shape of your nails, steam your hands in a 20-minute warm bath for gentle cuticle removal.
Step 2: Now is the time to apply the base coat, wait until it dries completely. Now we paste special strips of stickers to create a uniform French manicure. Paint the tip of the nail; if necessary, apply the polish a second time.
Step 3: Wait until completely dry, remove the strips. French manicure at home is ready.


Types of French manicure
If you are not afraid of bold decisions, we recommend trying a red jacket, the fiery shades of which can accentuate your fatal beauty. By the way, it wouldn’t hurt to combine such a chic trend with a formal suit and red lipstick. But remember, red art must be done very carefully. Pay attention to the samples presented in the photographs.


French manicure ideas with a pattern
Have you decided to make an unusual drawing of a house? Keep in mind, no additional skills are required, required condition— availability of auxiliary tools. After all beautiful manicure it will work even with a minimum of effort. For example, stick a sticker and draw a smile, and use a stencil to add a picture.
Even classic home option manicure looks irresistible. Therefore, be sure to pamper yourself and complement your look with a fashionable nail design in a French style. Fortunately, new ideas are replenished from season to season on an ongoing basis.
If you think the classics are too boring, learn how to do a colored French manicure with a pattern. But keep in mind that you will have to carefully draw the desired images, although it is not forbidden to use ready-made stencils, stickers and other auxiliary equipment (for example, Konad will make this task easier).
Every girl simply must master French manicure at home; at first it is better to use ready-made stickers or decor. And then move on to difficult options, painting with acrylic paints.
The decor on the French coat using acrylic-based paint is done after positioning the smile on the camouflage coating. Required preliminary preparation palettes, water for washing brushes. You need to start with painting, peas, butterflies or simple patterns.
See the photo gallery where the latest fashion designs are presented. By the same principle, use varnishes instead of paint.


Another trend is to apply black or dark camouflage, a smile in color. And then crystals, stones or sparkles are glued into the roots, which changes the final look.
An unusual French manicure with rhinestones, boutonnieres and sequins is easy to implement using an already drawn French manicure. Apply first matte shade plus a stripe at the tip, but in addition decorate the smile area with sequin decor. Don't forget to pin the design. To make the process easier, use varnishes with massive glitter.
We suggest trying a multi-colored French manicure for short nails. 
Step-by-step photo of French manicure for short nails: 
Every year the French is replenished with new ones design ideas. In addition to the usual option, there is also the opposite, for example, white hole, not a smile. In this case, the nail can be either long or short. It is as popular as the classic one. This design can be worn in winter, spring and summer, when playing with contrasts is most appropriate. To make a colored French manicure for yourself at home, you will need the same amount of time as you would spend on creating a classic one.
The execution options are very different, it all depends on your own preferences. You can use color only for a smile, and leave the rest of the surface transparent - matte tone, but you can choose more bright colors varnish Step by step wizard The class will make it much easier for beginners to learn the information.


Looking for something new? Meet sideway French - stylish manicure. It is very easy to make at home, even for beginners, you just need to choose the most compatible colors. This design differs from classic version only the location of the strip. The so-called smile is on the side nail plate.
Step-by-step instruction:
- Start by applying the base. You can skip this step.
- Then draw from the side in the direction from the cuticle to the tip of the nail thin line. Wait for it to dry.
- Fill the remaining space with another shade.
- Finish the trendy French manicure with a top coat.


Step by step video
French manicure without stripes
Of course, if you think you can do without auxiliary equipment, try doing a manicure without stripes. But this path requires certain skills and the ability to perform sharp lines. We will need the same set as in the previous paragraph (or any colors of your choice), but we will exclude the stickers.
- After the nails are covered with the base coat, wait until everything dries thoroughly.
- Carefully with a thin brush draw a smile on the tip of the nail. Or first, place a line along the edge, and cover the border, for example, with gold decor.
- You can go the other way and apply a crescent moon and then touch it up with a brush dipped in nail polish remover. These manipulations are also easy to do with gel, which means the design will last up to two weeks.
- Secure your beautiful manicure with a top coat.

French is a universal nail design. It is used even by managers whose companies have a strict dress code. Moreover, it goes well with any style of clothing and colors of outfits. Previously, French manicure was done only by brides for a special event, and it was exclusively white, and now it is chosen as an everyday design and is performed in various options. The French manicure can be of any color, diluted with drawings, rhinestones, stickers and other manicure “tricks”.
The main rule of the classic French manicure: a transparent base and white color at the tips of the nails. If we talk about other variations of French manicure, then the camouflage can be any pink shade. It is better to make a choice based on the girl’s skin color. In winter it is better to choose cool shades, and in summer period- warm.
Manicurists advise doing French gel polishes. It takes longer, but your nails look more impressive.
 Remember that this will require additional attributes:
- Lamp.
- Primer.
- Base and top coat.
- Colored varnishes.
- Degreaser.
Additionally, a woman who does a manicure at home may have in her arsenal: rhinestones, foil, stickers and paint brushes.
Classic French manicure
For a classic French jacket you will need:
- Base. Take matte varnish coating pastel shades.
- White polish to decorate the tip of the nail.
- Finish coating.
- French stripes.
- Degreaser.
 You can do without stripes if you are confident that you can apply the white border accurately.
Step-by-step algorithm:
- Nail preparation: filing, shaping and trimming cuticles.
- Before applying the base, the nail plates are degreased, then a thin layer is applied and dried.
- We glue strips to make an even jacket.
- Cover the ends with white varnish. If the texture is loose, apply a second layer.
- After white varnish Once dry, remove the strips and cover with the finishing layer.
You need to dry it very carefully. If any layer is not dried well, the manicure will very soon begin to peel off.
French manicure ideas with a pattern
Drawings allow you to make quickly Beautiful design nails, but only if you have drawing skills. Without special tools, it will be difficult to make a neat drawing. Remember that the strips used to create a French jacket may not be straight, but grooved. White varnish is very capricious, so if you use stencils, wait until it dries completely.
You can paste a sticker or draw a small picture with a brush. Many girls prefer patterns instead of colors. Flowers look organic only on long nails and then on 2-3 fingers, no more. To get better at it, it’s better to use stencils and stickers at first, and make small curls or dotted patterns.
 Experts advise using acrylic paints for designing a French jacket. They can do interesting design. If each tip of the nail is painted in different colors, then it will look at least interesting. For beauty, you can decorate the French border with rhinestones. This is very important if the lines are uneven.
Nowadays, red and black French manicures are in fashion, as well as reverse variations of French manicure. Pin any design better with varnishes with glitter, they will make your manicure stronger. You can make a side French or wide one. Rhinestones can be attached to the side or along the edge of the varnish. Vertical lines are ideal for short nails; they will visually elongate the nails. An oblique French jacket will produce the same effect. Abstraction is also in fashion now. Decorate 1-2 nails with this style, and it will become an interesting bright accent.
Ideal colored jacket

Nail design in french style counts simple design, but if you use your imagination, you can find unexpected decisions. The main rule is a competent selection of shades. Nowadays it is fashionable to combine two colors.
The most successful combinations:
- Saturated Orange color with dark blue or green.
- Combine soft colors: pastels and pinks.
- Metallic shimmers will pair perfectly with rich shades.
- Malachite and coral shades look bright and appropriate.
- Red with silver, and black with gold will make the jacket visually richer.
It is better for teenagers to give preference to delicate shades, for young people it is better to choose bright and provocative colors, and for women of advanced age It is recommended to give preference to classics and rich, noble and deep colors.
French manicure with shellac
Shellac is a lightweight version of manicure that lasts long time. Despite this, preliminary preparation is also necessary. Be sure to soak your fingers in a bath of solution, file them and remove the cuticles. File the nail plate so that the surface is smooth. To decide on color scheme, you can apply several shades to paper and compare combination options. Degrease the nail and proceed to the main steps:
- After treating your nails, apply the base and dry it under the lamp for 3 minutes.
- Apply the selected French color to the edge of the nail and dry again for 2 minutes.
- Decorate to your liking and top it off.
Dry the topcoat a little longer. This will make the manicure stronger. After the procedure is completed, avoid contact with hot water and try to put off household chores.
How to do a reverse French manicure

Reverse French is in trend now. The registration process is not very different from the standard scheme. But there are some nuances. Step-by-step algorithm:
- The nails are pre-treated, degreased and painted with base varnish. It can be a colorless coating or a provocative bright shade.
- After the base layer has dried, a template or stencil is attached to the base of the nail and covered with the selected color.
- Once the first strip has dried, remove the template and attach a new one above to create another line. The main thing is to maintain distance and dry well. At the end we cover it with a finishing layer and carry out final drying.
This design can only be achieved by those girls who have been doing manicures at home for a long time. The fact is that reverse French cannot be done in stripes, and most often the lines are drawn by hand. The lines can be multi-colored, but they must contrast with each other. If the shades are similar, the lines will merge.
Tips for French express manicure
With the help of tips, you can quickly create a French manicure and make it any length to your liking. Regular tips are not suitable for a quick manicure, but express tips are fine. They are already equipped with “smile” lines for the French jacket, a holder and do not require filing, because they already have the required length. You can limit yourself to gel polishes, which will greatly simplify the work.
Step-by-step algorithm:

The main thing in this process is not to rush. If you do not wait until the tips are completely glued, then one or more may fall off at the most crucial moment, and correction will require additional time.
Little secrets
U experienced craftsmen There are a lot of secrets that will help you make your manicure better and more beautiful. Most masters are sure that main enemy Everyone who does a manicure at home is in a hurry.
- Stencils are a tricky thing. It only seems from the outside what they can do beautiful drawing even a beginner. It is better to practice on tips or on a separate nail.
- You can make the stencil yourself. For this Scotch tape will do or insulating tape.
- If the French line is not very neat, you can hide it with rhinestones.
- If a French manicure is done by hand, then you should use varnish with a thin brush.
- Instead of simple lines, you can use a thin brush to create feathers, which, after top-quality design, will look original.
You can remove uneven lines using wooden stick and nail polish removers. If the unevenness is more serious, then you can cover your nails with a translucent varnish, the color of which is close to the shade that was used for the French manicure, and you will get a manicure with a transitional color.
On a note! Manicure specialists advise cutting the brush at an angle after purchasing polish. This trick will allow you to design your jacket more accurately.
French manicure is timeless classic. It looks elegant on nails regardless of their length, is relevant for any occasion and will suit almost every outfit: from tracksuit before evening dress ..
What you need for a French manicure
Today there are kits on sale (price from 500 rubles) specifically designed for French manicure. The kit usually includes: white pencil, paper sticker stencils, white polish to create a smile line and a base coat in a neutral shade, e.g. Ivory and/or soft pink tone.
Having everything in your arsenal necessary funds to create a French jacket, you can create it yourself, and after training, you will do it quite professionally.
How to do a French manicure at home
Stage 1: make a nail bath
Wipe your nails cotton pad, soaked in nail polish remover to degrease their surface. Before proceeding directly to the process, it is advisable to do hand care treatments and nails.
Make a chamomile bath: it will perfectly soothe the skin, soften the cuticles, and also strengthen your nails. Instead of chamomile, you can add a few drops of any essential oil. After the procedure, dry your hands with a clean towel.
Stage 2: treating the nails
Start working on your nails. At home, it is optimal to use the method unedged manicure because it is less traumatic.
- Apply to cuticle special liquid, which will soften excess skin around the nail plate.
- After 5 minutes, carefully move the cuticle with an orange stick with an oblique cut.
- Use tweezers with triangular tips to remove burrs . Be sure to disinfect instruments in an alcohol solution before use.
- At the end of the procedure, give your nails the required form using a nail file and cover with a protective base, thanks to which the varnish will last longer.
Stage 3: glue the stencil strips
Now it’s time to use stencil strips, which must be glued to the nail so that the tip of the nail remains free. Please note that it should not be wider than 5 mm.
Although instead of stickers you can use ordinary electrical tape or adhesive tape. By the way, if you have steady hand and the drawing was “excellent”; you can easily draw a “smile” line with a thin brush, without using any improvised means.
Stage 4: apply white coating
Cover the edge of the nail up to the stencil line with two layers of white polish. Apply one coat first, let it dry, and after 7-10 minutes, apply a second coat. Do this carefully so that the varnish coating does not get under the paper sticker.
After nail polish When completely dry, carefully, so as not to smear the paint, remove the stencil strips. For optimal result paint over free edge nail with inside with a special white pencil.
Stage 5: coat your nails with varnish
The final touch in French manicure: nail polish natural shade. Choose enamel based on your skin color. For example, a pale pink polish would be ideal for those with skin of approximately the same shade. Do you have a peachy skin tone? Then choose beige enamel.
When the varnish dries, fix the result with a special “fixer”, which will also give your manicure additional “glossy” shine. If the polish accidentally goes beyond the “acceptable” limits, simply erase the mistake with a cosmetic stick dipped in nail polish remover.
French manicure at home
Stage 6: complete the manicure with a shiny “smile”
If you want to give your French manicure a formal look, cover your “smile” with a myriad of glitter. Without waiting for the varnish coating on the “smile” to dry, apply glitter on top of it with a brush. The tip of the nail, shimmering with silver sequins, looks festive and is ideal for going out.
You can not limit your flight of fancy and use sparkles as a decorative element for a jacket various shades: From hot pink to blue or golden. Try making one like this manicure for the New Year – and you are guaranteed everyone’s attention!
Watch a video tutorial on French manicure, the author of which shares with us his secrets of performing a French manicure.
French manicure, or French, is a universal nail design and is suitable for any woman. Despite its name, this manicure has nothing to do with France.
It was invented by American designers, and called French for advertising purposes, since France has always been considered the trendsetter of world fashion. To make it at home, just a little skill is enough.
French manicure has nothing to do with France.
How to do a French manicure correctly
French manicure is painting the edge of the nail in a different color. A classic French manicure is when the tips of the nails are white.
Depending on the color of the nail tip there are different types French:
- fan-french,
- millennium,
- stained glass and others.
In order to understand how to properly do a French manicure at home, you need to become familiar with the terminology and the right technology.
Nail smile line
The smile line is the border between the flesh and white color of the nail. The larger the “smile”, the higher the corners of the white part of the French manicure are raised - the so-called mustache. Their height is determined by the two top points. The height of the white part of the jacket is determined by the lowest point in the center.
Every person has their own nail smile line. This is the line after which the free edge of the nail grows, and up to the line itself it is attached to the nail bed. To make it clearer, we note that we can trim our nails “to zero” along our natural smile line.
To make a French look not along the natural line of the smile, but otherwise, for example, below, you must first cover it with flesh-colored varnish - “camouflage”. Then this bodily part up to the new smile line will be called nail bed extension. Basically, this term is used when doing French on artificial nails, because the nail bed with this method it is lengthened with gel or acrylic.
How to do your own French manicure at home
In order to do a French manicure at home, you need to remember the main requirement: the height of the white tips and tendrils should be the same on all nails.
How to make an even French manicure? At home, you can use two methods:
- using adhesive strips for French jackets,
- manually.
The disadvantage of adhesive strips is that they often stick strongly to the nail and can ruin the nude polish. In addition, doing French with them takes much longer. But the main disadvantage of this method is that it is not very stylish and “smiling” - there is no smooth transition - just one half of the nail in white.
How to do a French manicure without stripes at home
The best way to french is to paint by hand. To do a French manicure at home without stripes, you will need white, nude and clear polishes, plus the thinnest brush with natural bristles.
French manicure sequence:
- Get your nails in order: file them and make them all the same shape.
- Apply nude polish twice.
- With a thin brush, mark 3 points on all nails: the height of the white part of the French manicure, the other two should show where the antennae will reach.
- Draw a smile. Try to draw the line slowly.
- Pinch the side ridges of the nail and then paint the tip of the nail with white polish using a nail polish brush. Try to paint from one and the other antennae to the middle.
- Wait a minute and cover your nails with clear polish.
If you are doing French for the first time, the process itself may seem very complicated. But everything comes with experience: after several times, mastery will appear, and you will do French only by hand, abandoning adhesive strips.
How to do a French manicure on short nails
Currently, French manicure is on short nails is becoming more and more popular because everything natural is fashionable. This manicure looks great on square and oval nails. To add some piquancy, you can safely add different designs and patterns.
Drawings and patterns will add spice to your manicure.
French on short nails is done in the same way as on long nails. But it is worth paying attention to some features:
- The edging of the nail with white varnish should not be wide: otherwise the nails will visually become too short. Make a neat and thin line.
- For visual lengthening nails are decorated on them. But just don't overdo it. Everything must be done very skillfully.
- To urgently tidy up your nails, use a special convenient pencil or chalk for a French coat. In addition, they are convenient for painting the nail plate from the inside; it will not take much time and effort. Remember that such products cannot be used for peeling nails.
How to do a French manicure with Shellac gel polishes
The main question in the French technique: how to carefully create a beautiful French manicure. The most in a quality way is covering nails with Shellac gel polish, which is the first hybrid of polish and gel. It is interesting that from the gel he adopted the absence of odor, strength and durability, and from the varnish - bright shine, ease of removal and application.
Shellac gel polish is a unique development of the American corporation CND. Its advantages include the fact that it perfectly treats nails and does not cause allergies.
The cost of applying a French manicure with Shellac varnish is not cheap, but one must make allowance for the fact that it is the most modern development.
Buying Shellac gel polish online for home use will cost much less than in beauty salons.
 French manicure design can be complemented decorative elements, for example, drawings. As a rule, it is better to choose designs in white, adding a little pink. Most often, drawings are made on the thumb or ring finger.
She took off her gloves, and thin, graceful fingers with long polished nails were revealed to his gaze. “What splendor,” he thought, taking her hand and bringing it to his lips. And indeed, there was something to marvel at. The nail plates were flawless. Their soft pink color with a lighter tip in the shape of a smile, it was so natural that no one would doubt its naturalness. But it was all about the manicure. Do you know which one? Of course, in a French manicure or, in other words, a French manicure! And now we're going to an amusing trip and learn how to do French manicure at home with your own hands, and also get acquainted with its history and rules.
History of French manicure
People began painting their nails in different colors back in time. For the ancient Egyptians, for example, this was a sign of nobility and wealth. The darker the shade, the higher the title and the tighter the wallet. In times closer to us, when cinema and Hollywood appeared, manicure became an integral attribute actors. But the varnish of that time was so aggressive that it had to be washed off in the evening and reapplied in the morning. This took a lot of time, and each image needed its own color. A way out of the situation was found. One of the producers turned to his friend, young entrepreneur Jeff Pink, the same one who is known as the founder of the ORLY company. This is how the so-called classic French manicure appeared in the late seventies of the twentieth century. The name was born because of a fashion show held in France, where this method of covering nails was presented for the first time.
Basic rules of French manicure

Since French manicure was done only by specialists for the first time after its inception, there were uniform rules for its implementation. Firstly, mandatory distinctive feature The so-called “smile” has become a classic French manicure. That is, a lighter stripe along the outer edge of the nail compared to the rest of the nail plate. Secondly, for this type of hand decoration only very close to natural color nail shades. Later, these rules began to deviate. For example, the “smile” was made darker than the rest of the nail, patterns were drawn on it, glitter was added, and experimented with different colors. But the basis always remained the same.
Original French manicure at home
Nowadays you can successfully do a French manicure at home with your own hands. Fortunately, they already exist for this purpose. ready-made kits from varnishes and various stencils to depict a smile. However, the best of them are invariably considered to be the sets from ORLY, the original creator of this original look manicure And despite the variety of interpretations, the technique remains unchanged to this day. Here's how to do a classic French manicure:
- Take nail polish remover and rub it on your nails. This is necessary to remove remnants of the previous manicure and degrease the nail plates.
- The next step is to apply the base coat. It will even out the texture of the nail and serve as an additional adhesion for the varnish, and will also protect the nails from yellowing, which appears when using bright colorful varnishes.
- Draw a “smile”. To do this, glue a stencil onto the free edge of the nail and apply 2 layers of varnish to the tip. This way it will last longer. This needs to be done with a special thin brush included in the French french kits.
- Now cover the entire nail with pink or reddish varnish in 3 layers. French polishes have a translucent texture, which creates a natural effect.
And the final touch - top coating. It will serve as an additional fixative and give the manicure a finished look.  A " wet effect", inherent in everyone quality coatings for a French manicure, it will give your nails a chic natural shine.
Knowing how to properly do a classic French manicure, you can easily diversify it. For example, swap the colors of the “smile” and the rest of the nail area, or choose shades to suit your Evening Dress, add sparkles or create an intricate pattern. And if you change the position of gluing the stencil or take several of them, you can get an exquisite original French manicure with a corner. In a word, don’t be afraid to fantasize, and the result will exceed your wildest expectations.