How to make a deer costume for the new year. Getting ready for the New Year's masquerade: deer costume
Hello friends! With today's post, I decided to replenish the piggy bank of ideas about what New Year's costumes 2020 can be! An interesting and outstanding option for boys and girls of younger and middle age is a deer costume for the New Year.
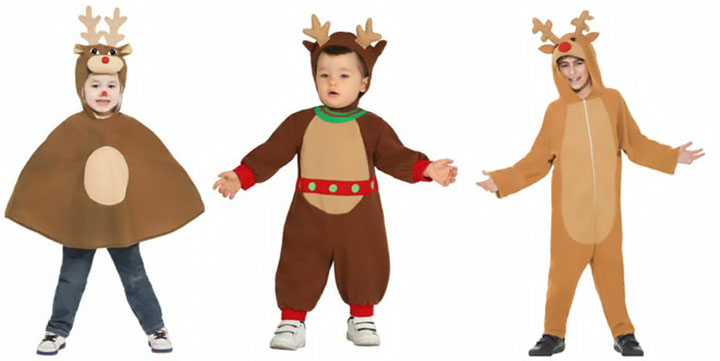
Deer costume for the New Year: variations for everyone
The simple instructions below will help you make a cool outfit in 1 day without special skills and talents.
Ideas for the little ones
Tiny pot-bellied deer, who have barely mastered walking, look touching and cute. Costumes for kids are simple and comfortable, and most importantly - safe, not restricting movements. I propose to choose the option with a one-piece jumpsuit or bodysuit. If there is no ready-made outfit, for example, homemade cinnamon fleece pajamas, you will need to try to sew it. Any soft brown fabric will do. It can be faux fur, wool, fleece, felt, velvet and others. You can combine several options for materials, the main thing is that in the end the costume should look like a natural deer skin.
Considering that it is cool in the halls at matinees in winter, you should think about a hood. First, it's warm. Secondly, it is easier to sew ears and horns to the hood. The simplest version of the horns for a toddler costume is gloves tightly stuffed with cotton wool or padding polyester. On the feet of the baby, it is worth putting on soft slippers with a sewn-in toe of the “hoof” type.

Separate outfit for schoolchildren
The jumpsuit or bodysuit option is not quite suitable for older guys. In such a suit, they will be embarrassed and uncomfortable. Therefore, I propose to replace the piecework outfit with a more acceptable one of shorts and vests, sweaters or T-shirts. Again, the main thing here is the material. The fabric should be brown, soft enough, imitating the skin of an animal. If almost every kid has shorts in the house, then it is easy to sew a vest made of fur or velvet according to the plan:
- For a sample, take a T-shirt that you don’t mind cutting.
- Break it down into details. Sleeves are not needed. On the front, remove the core up to 3 cm wide.
- Attach the cut particles to the prepared fabric and circle with a piece of soap or chalk with a small margin of up to a centimeter.
- Cut and sew the pieces.
The vest is ready! It remains only to choose a turtleneck to match (yellow, gray or white is suitable), tights or leggings, soft slippers, converted to hooves according to the principle described above. A tiny fur tail can be sewn to the shorts for persuasiveness. The main attribute of the outfit is horns. If gloves filled with rags are enough for a baby, then it is better for older children to make full-fledged horns on a hoop made of felt and wire. Such horns are naturalistic, light and comfortable.
If a little princess decided to dress up as a deer under the impression of a cartoon about the brave Bambi, just replace the shorts or panties with a fluffy plush skirt or sundress. Girls can wear warm fur boots on their feet.
An excellent addition to the deer costume in the male and female version is a cape. Sewing it is easy. Measure the circumference of the child's head and the length from the back of the head to the knee. Choose a suitable brown fabric and make a pattern similar to the one that is being prepared for the sun skirt. To make the cape neat and not crumble, process the edges on a typewriter or manually. For a festive look, add some rain or sparkles to match the color around the edges, make holes for the hands. To make the deer costume look as realistic as possible, glue or sew an oval of white fabric in the front part in the center. This will be the breast of the animal.
Do you need makeup
Makeup on the face of a baby dressed as a deer looks funny and festive. Most importantly, if you decide to paint the face of the crumbs, choose safe face painting paints. Traditionally, the deer is painted in the area of the eyes - they are circled with a white strip up to a centimeter wide with a black outline. The forehead can be painted over with brown, the tip of the nose with black. Under the eyes of the deer are large white spots.
Lite version for adults
Adults can try on a deer costume in a simplified version. Overalls and vests with trousers for girls can be replaced with plush mini-dresses and skirts, or leggings and turtlenecks in the actual color. For guys, it can be trousers and turtlenecks. In an adult outfit, the main thing is ears and horns. They will be enough to become recognizable.
Doing both of them is not difficult with your own hands. Start with the horns:
- Build a frame from a plastic hoop and pipe cleaners. Try to twist the latter, intertwining with each other so that you get horns.
- Cut the paper bag into thin strips. In a container, dilute the glue with water in a percentage ratio of 50/50.
- Dip the paper strips in the adhesive solution and trim the prepared frame.
- Dry the finished product with a hairdryer and paint it brown.

Ears are even easier to make:
- From faux fur or felt, cut out two ears, use contrasting fabrics for the inside and outside.
- Prepare a wire frame.
- Glue the ears to the frame.
- Attach the finished product to the hoop.
The image will be finished with a cool make-up, similar to the one described above for the guys and a great New Year's mood.
Friends, that's all. As you can see, a deer costume for both children and adults is not difficult to make. If you don’t even want to mess around with horns and ears, but your soul asks for a holiday, dress up in a traditional winter thick sweater with Scandinavian patterns, buy ready-made glowing horns and enjoy the effect! I end here, I will be grateful for the repost.
Sincerely, Anastasia Skoreva
New Year is a truly magical holiday. This day of the year is especially long-awaited for kids: sweets, gifts, fun. They are looking forward to the onset of a fairy tale, because you can turn into a super-hero, an astronaut, a princess or a charming deer. How to make a deer costume with your own hands, learn from the article.
Jumpsuit for the little ones
New Year's masquerade is always very exciting. Creating an image, searching for clothes, finishing touches in the form of accessories and makeup - preparing for a festive event brings a lot of fun, especially for moms, because it is they who first of all ask themselves how to make a costume on their own? So, if you want your baby to appear in the form of a deer on New Year's Eve, read the instructions for creating a costume.
jumpsuit suit
In general, a deer costume can be created from a ready-made jumpsuit. The main thing is that it has a brownish tint, the fabric is plain and soft (plush, woolen, fur) - in general, it should resemble a deer skin as much as possible. You should also pay attention that the overalls have a hood that will fit snugly to the head.
Tip: Dress your baby in a diaper to prevent embarrassing situations.
We sew a suit of shorts and vests
This technique does not require serious skills in sewing. Just take your baby's old T-shirt, carefully rip off the sleeves, and cut a three-centimeter strip in the middle of the chest area.
After attaching the details to the fabric from which you plan to make the costume, circle them with a piece of chalk or soap. Cut out the pieces, leaving an allowance of a few centimeters. Now just sew the pieces.
Actually, the algorithm for sewing shorts is absolutely similar. By the way, as a "basis" for shorts, you can use the child's old panties. That's all - the deer costume is ready! This costume can also be transformed into a girl, replacing the shorts with a flared skirt.
deer in coat
A deer costume can be made from a universal cape - this option is suitable for those who either do not have sufficient sewing experience, or simply do not have too much time. First, measure the circumference of the baby's head and the distance from the neck to the knee or below (the main thing is to find the measure, otherwise the cape will show all its inconvenience while walking).

Take a large piece of fabric and cut out the product, just as you usually cut out a sun skirt. Do not forget that the bottom of the product should be stitched - so it will look neater. By the way, the hem can be decorated with a “snowball” of golden color.
In order to make the deer costume look as realistic as possible, you can cut an oval out of beige fabric and place it on the abdomen.
Homemade accessories
What is a deer costume without good old antlers?
Do not forget to warm the baby by wearing white tights and a turtleneck underneath. You can add a finishing touch to the image by attaching horns made from two white cotton-filled gloves to the hood. The fur tail will be a charming addition to the costume.
Horns can also be made from a wide head hoop. On them, using a hard wire, twist and then wrap them with a material such as cotton wool or twine.

The deer costume will be complemented by competent makeup. You can find video tutorials on how to create an image of a deer on various video hosting sites or experiment on your own with this task. The main thing is to use a special face painting for drawing, that is, water-based paints, since the use of the wrong “resources” can adversely affect the health of the baby. OK it's all over Now! Properly combining these elements, you can get a costume that everyone around will envy.
In order to make a deer costume, the main thing is to build antlers. You can make horns using a bezel and wire

The deer costume is especially relevant for the New Year. After all, the reindeer is the right hand of Santa Claus.
The costume can be the simplest - in beige, brown-gray tones. For a child, you can pick up gray sweatpants, a brown sweater or tunic, and a red scarf.
The main thing is the horns. And they will have to work hard.


The main element in the deer costume is the antlers. They can be made from gloves, sewn from fabric and filled with padding polyester, cut from thick paper, felt, and even made from tinsel. You can attach the horns to the headband (option for a girl), to a hat or hood. The costume itself can be sewn from brown pile fabric or you can choose the right one in the wardrobe. If there is a fleece suit, it can be turned inside out.


If you don’t know how to sew, then the easiest way out is to take the child’s existing things - pants, shirt or sweater, but preferably brown or black. a piece of white fabric can be sewn onto the breast to make a white reindeer breast. And the horns can be copied from a book or taken from the Internet and, cut out of paper, make a rim with horns.
But if you can sew, it is better to buy faux fur with short pile, plush, velvet. Sew a jumpsuit according to this pattern.

From below, the legs can be made with an elastic band or simply tucked up. By the way, the suit can be made a little larger to use next year).
The cap can be sewn separately, or as a hood to a jumpsuit.

Horns can be made according to this fabric pattern. But you can just use brown paper on the rim, as I wrote above.

Here is something similar you should get.
The deer costume is very good in terms of manufacturing. He made horns on his head and immediately everyone knew who it was.
As the basis of the costume, I will propose to make a cape-cloak.
It is made according to the principle of sun-klshquot ;. Under such a cape, it is enough to wear elegant clothes.
In addition to the cape around the neck, you can make a frill shirt-front. With her, the costume will look more elegant.


On the head, you can make such a deer mask from fur, felt or paper as in the photo below.


Not standard masks on the topic.
These are the ideas of a deer costume for a holiday that can be easily implemented from wardrobe items, altered a little and giving them a fabulous look with the help of appliqués and decorative elements. Only water for whom - for a child, or for an adult ..?
Here it is, with a belt-jacket sheathed with bells -

You can depict such an elegant outfit -

And even such a deer converted from a deer toy into a deer belt -

If the costume is made, then it will not turn out as realistic as we would like.
Therefore, I would sew the base in the form of a jumpsuit according to the simplest pattern. You don’t even have to build it, because existing things will be used. It can be a set - a T-shirt / shorts, a jacket / pajama pants. The pattern will be like this:

I would sew from brown velor, and the abdomen would be made from white velor or a white T-shirt, which is no longer needed.
If, nevertheless, there is nothing to sew from, then you can take brown things. Let it be even sweatpants, but only from brown fleece, knitwear and so on.
Longsleeve or turtleneck should also be brown.
You can give any shape to the horns.
Sew the ears from pieces of fabric - just cut out ovals, slightly elongated towards the top. Between them, you can lay a thin layer of synthetic winterizer or wire.
And, of course, do not forget that you can make a drawing on the face. Aquagrim will help you.
By the way, they can only make a spout, as in the photo above.
You can pick up brown sandals / ballet flats / sneakers on your child’s feet. It is better for an adult to choose ugg boots or sew fabric hooves).
The simplest and most original version deer costume shown in the photo below. You need a ready-made overall with a brown hood or a suit and a hat made of knitwear. Deer ragas are made of beige gloves - they were simply filled with padding polyester and sewn to the hood - that's it.

Overalls as the main component deer costume suitable for both adults and children.
A do-it-yourself New Year's deer is something that can be done for decoration during the main winter holiday. Such a craft will definitely not go unnoticed, because a home-made deer always looks creative and beautiful.

Below will be described step by step how to create various New Year's crafts and decorate the holiday with them. The deer stencil is made of cardboard, but if it is not there, then you can use plain paper. The paper will make a large Christmas deer, which can be hung next to the garlands.
So, the scheme of work is as follows:
- In creating any stencil, it is important to draw the correct pattern. For those who are doing this for the first time, it is recommended to choose a simple drawing, since elements such as, say, the head or horns of a beast will be quite difficult to draw. So, after the sketch of the future craft is selected, you can start creating the stencil itself.
- When drawing, it is recommended to use a pencil, as it can be erased at any time. When a person is satisfied with his graphic drawing, he can use a marker to trace its outline. Alternatively, you can use a ready-made template by printing it from the Internet. Or another way: you can take a stamp from a seal. However, you need to take into account the fact that usually such seals are small, so if you want to create a large stencil, it is better to draw the outline yourself.
- Now you need to decide what kind of paper stencil will be, single-layer or multi-layer. If the future craft is black and white, then it is recommended to make one layer. At the toy factory, stencils are made multi-layered, because this way the craft will be stronger. You can also get creative and create such crafts from foam.
- The drawn and painted image on paper (cardboard) must be copied onto thin tracing paper. It is important to ensure that all its details are well reflected on the tracing paper. Now you need to draw the outline of the drawing again. Copy paper can be used instead of tracing paper.
- At the last stage, you need to use a penknife in order to cut out the stencil. This should be done strictly along the contour.
Tip: Stencil Christmas decorations are made of plastic. A hole is made at their top through which the thread is threaded. The toy can be hung on a Christmas tree.
Gallery: do-it-yourself Christmas deer (25 photos)


New Year's deer: ideas (video)
Do-it-yourself paper deer head: how to make?
A large paper deer will certainly decorate the New Year!
You need to do it like this:
- First you need to collect everything you need: colored and white paper, scissors, a ruler, a sharp device, such as scissors or a knitting needle, adhesive tape and glue.
- To create such a craft, you will need about 15 sheets of paper.
- The work begins with the selection of beautiful drawings. It must be drawn on paper and cut out. Now all the images need to be bent, then to be glued together.
- To push the groove, use a ruler. It must be applied to the bend line and drawn along it with a sharp object.
- Glue the parts carefully so that the glue does not stain the paper.
- In the place of the neck of the animal, you need to fix the thread or rope. You can do this with a small piece of tape.

How to make a wire deer: diagram
To get a beautiful Christmas wire toy, you need to show creativity and sophistication.
So the action plan is:
- First, it is important to decide what size the deer will be and what it is for. If there is a desire to make a New Year's toy, it is enough to take one sheet of A4 paper to create a layout. But you can also make a large deer out of wire, which you can put on the street and decorate with a garland. It will look great! The choice remains with the creator, especially since the scheme of work is the same.
- When the size has been chosen, you can start creating the layout. On a sheet of paper, you need to draw the profile of the animal, the horns are drawn on a separate sheet. This is necessary for wire modeling.
- Now the wire needs to be accurately modeled according to the drawing. You can apply it to paper to prevent deviations. The wire must be twisted. Two identical wire simulations should be made.
- Now both simulations should be fastened together. It is recommended to do this in the tail area by twisting the wire. As for other sections of the deer, to fasten them, you need to cut off a small piece of wire and use it as a hook for two parts. Thus, there will be a distance between two wire models and the toy will not be flat.
- The horns of the animal are wrapped with wire to the head, after which the whole deer must be wrapped with it. It is recommended to make gentle circular movements with this material.
- If you want to give the craft an LED effect, you can attach a garland to it. You will get a beautiful glowing wire deer.
Christmas reindeer made of cardboard: how to make?
- First you need to draw a layout of the future deer on cardboard. The head of this beast made of this material looks very nice, so the method of its creation will be described below.
- It is recommended to print the templates on the printer first. In every detail, it is important to make a strip in the center - this is the future incision for fastening.
- Each piece of paper must be attached to the cardboard with double-sided tape. It is not recommended to use glue for this.
- Then each detail should be carefully cut with scissors along the contour.
- After that, you can make cuts in them. For convenience, it is better to use a knife.

When the slots are ready, you can start assembling the deer. Details are attached one to one.
Deer costume: simple pattern
In needlework, you can follow fashion trends, or you can be creative and create a toy that no one else has! New Year's deer is, of course, great. However, even it can be brought to perfection by decorating it with improvised materials. Below we will talk about how to make a festive costume for this New Year's toy.
As “clothing” for a deer toy, you can use cotton wool, packages from lollipops, Christmas tree rain, knitting yarn, and so on. There are many ideas - there would be a desire!
- To do this, you need glue, cotton wool and a multi-colored Christmas tree rain. You can also use glitter.
- First you need to tear the cotton wool into small pieces so that it resembles snow. Then, using glue, you need to fasten it with sparkles and rain. Do not pour too much glue, as it will leave ugly marks when it dries.
- The sticky "mixture" should be mixed well and applied to the toy. It turns out a very beautiful piece!
 If there is a desire to make a deer costume for a child, then ordinary gloves will do as horns.
 And if you want to make such a costume for a small child, then you can go in the simplest way. A brown jumpsuit will serve as the body of a deer, but the horns can be made from gloves into which you need to put cotton wool. Gloves are attached to the hat with thread or a stapler.
How to make a New Year's deer with your own hands from foam?
Styrofoam makes a very beautiful winter deer! Another advantage of this way of creating a toy is its simplicity.
Here is the plan to follow:
- The foam to create a deer must be clean, otherwise the toy will look ugly.
- Before proceeding with the craft itself, you need to outline an approximate work plan: the size of the craft, its thickness, and so on. Then you need to take several pieces of thin foam and draw a model of the future toy on each of them.
- After that, the layout is cut with a knife and the two parts are glued together.
- To make the toy beautiful, it must be decorated with sequins and cotton wool.
- With the help of red knitting yarn, you can make a scarf and a hat for a deer.

Also, as an alternative, you can mold a deer from plasticine, chop the foam and sprinkle it on the animal. It is necessary to use white plasticine, because by the new year you need to make winter deer. So the toy will turn out even more beautiful! If you make a small craft, then you can put it on a stick right in the Olivier. This will give the festive table an atmosphere of creativity.
How to make a deer from cotton wool?
- First you need to decide on the size of the future toy. For those who have never done such crafts, it is better to start with the simplest way. So, it is necessary to make a "skeleton" of the future toy. It is made from wire.
- After that, you need to deal with the main raw material for crafts - cotton wool. It should be torn into small pieces and crumpled into round balls. Each ball of cotton should be attached to the wire with tape. It should be cut into small strips so that it does not catch the eye.
- For the horns, you need to make separate small balls. So the craft will look beautiful and neat. To make the toy colorful, several cotton balls can be painted red and hooked onto deer antlers, alternating with white balls.
Origami: deer (video)
People say that the New Year is a magical celebration of the fulfillment of the most cherished desires. So why not give it magic that you can create with your own hands? A do-it-yourself New Year's deer is a great way to prove your love to your family, so it must become one of the main attributes of this celebration.
© laurenconradTo fix the pre-holiday mood, we suggest you make a simple but very effective New Year's costume. Rather, a Christmas decoration that will make the festive evening much more fun. Such deer antlers will come in handy for a children's matinee. And adults do not have to dress in a deer costume from head to toe. It is enough to dilute your festive look with such a headdress to create a spectacular and cheerful look.
READ ALSO:
What you will need:
- plastic hoop,
- pipe cleaners,
- brown paper bag cut into pieces
- scissors,
- glue,
- paint (color optional)
- wire,
- faux fur in two contrasting colors,
- hot glue gun.
Horns:
- Create a frame for the horns by attaching the pipe cleaners to the plastic hoop. Twist them together, hooking one pipe cleaner after one, thus creating branches on the horns. They can be made in any size and height.
- Cut the paper bag into strips. Mix the glue with water in a 1:1 ratio in a bowl to make it easier to dip the strips into the glue. Dip paper strips in glue and wrap them around pipe cleaners. To dry the horns faster, you can dry them with a hair dryer. But if you are not in a hurry, it is better to leave them overnight so that they dry completely.
- Once the antlers are dry, you can start painting them. In this case, black and white paint was used to create a gray color.
- Leave the horns to dry and start creating the ears (instructions below).
Ears:
- From dark brown fur cut out two large ears, and from light fur - the inside of the ears (it should be smaller in size). Using a hot glue gun, attach the wrong side of the light side of the ears to the dark side.
- Bend the wire so that it follows the contour of the lugs, while leaving some spare wire at the bottom.
- Bend the dark lugs so that they completely cover the wire and glue them, applying good pressure to secure the result.
- Using the spare wire that was left on the ears, attach the ears to the hoop below the horns.
Deer antlers are ready!
See all the latest news on the main page of the women's portal tochka.net.
Subscribe to our telegram and be aware of all the most interesting and relevant news!