Light postcard for February 23rd. For work you will need
Etc.)
If earlier the postcard was mandatory attribute upon delivery of more than worthy gift, then now postcard self made may well act as the main gift. Cardmaking (the art of making cards) is very popular these days. Many needlewomen take up the creation of postcards with interest, because the materials and tools are available to almost everyone, and ideas and step-by-step master classes help even beginners make beautiful cards.
Postcards for February 23 using cutting technique
For travel lovers or men who served in the navy, you can make this interesting postcard:

Instead of the usual decorative paper The map is used very well here! You can find a fragment of a map that shows your man’s place of service or simply a country or city that is significant to him.
The following quilling elements are used here: “eye” - for the sails and base of the ship, “triangle” - for the flag.

Postcards for “non-military”
Postcards in the form men's shirts and jackets are no longer surprising; this idea has become too widespread, although it is, of course, interesting. And if you like it, then most likely you will appreciate this version of the postcard:

It is done very simply: in fact, you just need to select the paper in uniform style and cut out rectangles from it, and then stick it on the base for the card. The "tie" is tied from satin ribbon, the tip is melted over a candle so that the tape does not fall off.
But such a postcard with a pocket is ideal if, in addition to the postcard, you plan to give a man a certificate in the form of a plastic card. In this case, it fits perfectly into the pocket.

Funny cards for February 23
And finally, 4 postcards for lovers of humor) They are really very funny, see for yourself))


There are a lot of ideas for postcards, so there will be enough for all your family, friends and closest representatives of the opposite sex) Good luck in your creativity!
For the holiday of Defenders of the Fatherland Day, kindergartens and schools begin to prepare in advance: educators and teachers need to come up with what their students will give to their beloved fathers and grandfathers, and children need to bring all these ideas to life under the strict guidance of adults.
We offer to congratulate a man on Defenders of the Fatherland Day in the most an expensive gift- a postcard or drawing made by a child. What can kids do for their dads and grandfathers? Read in the article material.
How to draw a card for February 23 with a pencil and paints for children?
IN kindergarten children learn to draw their first schematic drawings. Step-by-step lessons will help educators prepare gifts for fathers and grandfathers on February 23, because it is in preschool that children learn about the holiday and its meaning, and why men are congratulated on this day.
Let's start with the drawing. We will need:
- protractor (we will use it to draw a star)
- a compass or other device that can be used to draw a circle
Let's move on to drawing:
- Draw a circle and draw two lines in it that will divide it into 4 equal sections.
- We measure 72 degrees on a protractor and draw a line inside along two opposite sections.

 We measure 72 degrees on a protractor and draw a line
 - Again we measure 72 degrees from the already drawn line and draw a second straight line, and then a third.

 We repeat
 - In order not to get confused, we mark with dots what we are measuring and from what. How to draw the lines correctly can be seen in the photo.


- We should have 10 identical sections. Let's draw a dash in the middle of each line (through one straight line). Draw a star and slightly round the corners.
- Wipe the circle with an eraser and additional lines inside a star. Draw an outline around the star.

 Draw a line along the entire contour
 - Now let's depict St. George's ribbon with edges curved down. Let's continue the edges of the ribbon on both sides of the star.

 Drawing a ribbon
 - We draw three parallel black lines on each part of the tape. We turn the schematic drawing into a postcard by decorating the star and ribbon, and adding the inscription “Happy Defender of the Fatherland Day.”

 We bring the ends of the tape to the edges of the sheet
 Drawing stripes on tape
 Video: Simple drawings. Soldier
An excellent drawing on the theme of Defender of the Fatherland Day - a valiant soldier at his post. Such a drawing will decorate both a postcard and school wall newspaper prepared for the holiday.
For the drawing you will need:
- blank sheet of paper
- simple pencil
- colour pencils
- ruler


- Divide the sheet into two halves by drawing a vertical line down the center. Left-hand side should be slightly narrower to the right. Draw an oval in the upper third. This will be the head. Below it we draw the outline of the future collar.
- Focusing on the preliminary markings, we draw in detail the soldier’s head, which is wearing a hat with earflaps. Add the neck and shoulders. The soldier will be wearing a pea coat, so let's outline his outline.


- We draw a face and hands. Finishing the drawing small parts clothes.
- Don't forget to draw our defender the machine gun he is holding in his hands. First we’ll sketch out the lines, and then we’ll draw in more detail. The photo shows what needs to be depicted.


- Now you need to draw the protective colors of the uniform and the outline of the banner in the background.


- We write on the left side of the sheet the inscription “Happy Defender of the Fatherland Day” and specify the background.
- After that, all that remains is to decorate the drawing.


If the previous drawing is difficult to draw, then with the schematic image of the tank presented in step by step lesson below, the child can cope without the help of adults.
- For the drawing you will need pencils and a sheet of paper. Better to use notebook sheet in the box. This will make it easier for the child to navigate and draw all the lines correctly.
- Let's draw the barrel of the tank: in the center of the sheet we will draw a line 4-5 cm long, and above it, at a distance of about 1 cm, another parallel one.

- Let's connect the lines on the left side, and draw the beginning of the barrel with an oval on the right side.
- Let's start drawing the tank turret. To do this, step back down 1 cm and at a distance of about 1/3 from the length of the barrel, draw an elongated rectangle 10-12 cm long. Step back from the edge of the base by about 0.5 cm, put dots and connect them in a semicircle.

- Below we draw the base of the tank caterpillar. How to do this is shown in the photo. Inside the base we draw 5 circles and sketch them with a black pencil.

 Drawing a tank caterpillar track
 Paint the 5 circles at the base of the tracks with black.
 - Let's draw a star in the center of the tower and a flying flag on a long pole. Decorating the tank green, an asterisk in red and add an inscription.


Video: Simple drawings. Children's tank
Video: Postcard to Dad for February 23, Military Airplane
The student can easily cope with the drawing “Warship”, which will become a good gift dad or grandfather, if tanks and planes have already been given to the heroes of the holiday.

Since Defender of the Fatherland Day once had the name “Soviet Army Day” and Navy", then all military personnel celebrate it: both on land and at sea.
This is what we will draw:


First, let's prepare everything you need:
- blank sheet of paper
- a simple pencil and a black felt-tip pen
- colored pencils or available paints


- Divide the sheet into two halves by drawing horizontal line. Do not forget that we draw all the preliminary contours without pressing the pencil, so that later there will be no trace of the erased lines.
- We will draw the ship in the lower half. First, let's draw a wavy line that will represent the surface of the water. Let's draw the stern with all the necessary protrusions.
- On the left side of the stern we will draw a cannon. In the central part of the stern we will add the following elements: captain's cabin and radar. They are not difficult to draw if you exactly repeat all the lines, as in the photo.


- At the bottom of the captain's cabin we will draw a battery of torpedoes and add a row of portholes.


- We draw a flying flag and, to make the picture more realistic, add a couple of birds flying in the distance.
- You can stop here and move on to coloring. But this is not enough for a greeting card: you will also have to add an inscription.
- You need to color the picture like this: a warship - gray-blue, water - blue, draw a red stripe at the bottom of the ship and pick up required colors to depict the national flag.


Video: How to draw a cool picture for February 23rd?
Ideas and templates of cards for February 23rd in kindergarten
- The issue of preparation for the holiday on February 23 is beginning to worry kindergarten teachers and school teachers long before its onset. It only at first glance seems that there is nothing difficult in choosing suitable option for a present.
- But this is not at all true, since the process of creating a craft or a postcard with your own hands, which the children will then give to the most dear people- to fathers and grandfathers, should captivate them, and therefore complex elements or multi-tiered paper structures should be immediately abandoned.
- A simple but original postcard or craft will appeal much more to both the little “creators” of the masterpiece and adults. What gifts can you prepare for the holiday on February 23 with children in kindergarten - see the photo selection below.


 Cover for postcard


Ideas and templates for postcards for February 23rd to school
Children at school already know a lot, and therefore a simple image of a tank or an airplane will not bring as much pleasure as creating with my own hands cards with a surprise, retractable details, special appliqué, etc.
See the photo selection below of gifts for the holiday on February 23rd, made by schoolchildren, and get inspired!


- Cut out a star from red colored paper. To make it voluminous, you need to bend the “ears” that will be glued to the postcard. The star is bent along the lines with the outer edges outward and the inner edges inward.
- Glue a star on wrong side postcards (spread).


- We will decorate with strips cut from colored paper golden color. Let's also make the little star golden.
- Glue 3 golden stripes vertically and horizontally onto the front side of the card, as shown in the photo. Glue a gold star next to it. To ensure that the strips stick evenly, it is better to first mark with a dotted line the places where they should be.


 How to fold a star correctly
 - A voluminous card can also be made using the quilling technique. To make a postcard, in addition to paper (colored and white), you will need toothpicks, glue and scissors.
- Fold the sheet so that one part is slightly longer. We write large numbers of the holiday date on it. The deuce should be on front side postcards. After the two is drawn, we add a three on the second page of the postcard. Cut out the numbers along the outer edge.
- We prepare “curls” from strips of colored paper. To make them, you need to “stick” a strip of colored paper onto a toothpick and twist it. You can see in the photo how to paste the resulting curls onto a postcard.
- We apply each spiral with the glued side to the numbers, trying not to leave large gaps between the curls. Add an asterisk between the numbers and sign the card.
- Draw a boat or print it out ready-made template on double-sided cardboard.
- Cut out some areas in the picture.
- Fold the card along the fold line.
- Using a felt-tip pen, draw a dotted line along the edges of the postcard and the image of the boat.
What card should I make for my brother for February 23?
You can surprise your brother with an original “Ship” postcard.

 Postcard "Ship"
 This beauty can be made in half an hour. So let's get started!


For a brother who has not yet served in the army, you can make a shirt card.
Video: DO IT YOURSELF / Postcard - SHIRT / Gift for FEBRUARY 23
In anticipation Defender of the Fatherland Day the relevance of the issue increases significantly. The most valuable gift for men will be something made from pure heart, with your own hands. In this article we will tell you How to make your own postcard for February 23rd.
The main thing in the article
Postcards for February 23rd for kindergarten made of paper: photo ideas and instructions for implementation
In kindergarten, children are just beginning to develop creative skills. Homemade cards for the holiday for dads, grandfathers or brothers can be for kids. Depending on the age of the children, we can offer the following gift cards that children can make themselves.
For the little ones
The little ones can give their dads a painted card. These could be brush strokes different colors or finger painting. Postcards with a baby's palm are popular. The main thing is that the teacher or mother signs children's creativity, and the baby will be happy to present a hand-made gift to dad.
For middle group
Children from the middle group not only draw, but can also handle glue, so they can be offered to make an applique as a gift for February 23rd. If the kids have already learned how to use scissors, then let them cut out the details for the future card themselves. If they do not yet have such skills, then prepare the necessary preparations for the composition in advance. The applique can be folded into the shape of a rocket, ship, tank or car. 
For senior group
Children from the older group can prepare for February 23 different postcards. The following options will look great:
- Drawn postcard.

- Application.

- Creativity using semolina, which is glued on and painted in different shades.

- One of the new directions is compositions from napkins.

Any of the options will look great and will discreetly please the defender of the fatherland, who will receive such a homemade postcard as a gift.
Postcards for Defender of the Fatherland Day to school: photo instructions
We offer schoolchildren primary classes make postcards in the form of medals. They can be simple or complex using many elements.
Simple gift medal
We prepare the following tools and necessary materials:
- medal template;
- decorative parts;
- colored pencils or paints;
- scissors;
- lanyard or ribbon for medal.


Medal for February 23rd using origami technique
To make such a gift you need:
- colored cardboard;
- green colored paper in two shades;
- scissors;
- glue (preferably in a pencil);
- lace or ribbon.

How to make a postcard for dad with your own hands: templates and photos
You can make a postcard for your beloved dad with. The idea is original and not difficult to implement, so even a child can cope with making such a gift.  To work you need to have:
- colored cardboard;
- paper (blue, red, white);
- scissors;
- ruler;
- glue, for children it is better to take it in a pencil.
Now you need to make the following preparations:

How to make a three-dimensional postcard for February 23?

There is nothing complicated about gluing a three-dimensional postcard. Let us describe its step-by-step production. The main element of the postcard will be the boat. For a three-dimensional boat, you should prepare blue colored cardboard. This will be the basis. Next, fold a sheet of white paper in half and make a boat using the template. 
Line designation:
________ - lines for cutting;
_ _ _ _ _ _ - lines for folding.
For decoration you can use the following templates. 
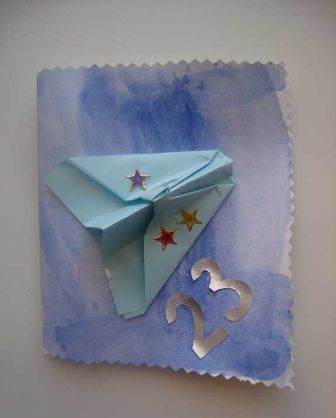
Now all that remains is to decorate the resulting card by gluing the prepared decor.  A gift card can have any three-dimensional element. So, for example, you can make an interesting option with an airplane.
Applique postcards for February 23: manufacturing instructions
For an appliqué postcard you need to prepare the following:
- colored cardboard, which will be the basis of the postcard;
- colored paper;
- glue;
- scissors.
Now to the work process:

You can also make another applique with a boat.

Postcard-shirt for February 23: how to make it yourself?
There are many options for folding a card-shirt. Its production is not limited to color. The photo below shows two ways to fold such a unusual postcard like a paper shirt. 

Funny cards for February 23: photo ideas


Postcards with congratulations for Defender of the Fatherland Day


Children's cards for February 23
A child can give his dad or grandfather a hand-made congratulations card. A postcard with a tank is perfect for children. To make it you will need:
- cardboard base;
- colored paper;
- scissors;
- glue stick.
Initially, you need to print stencils for the tank. 
Transfer the details (elements) onto colored paper according to the template. Let the child cut them out. The parts of the tank need to be glued onto pre-prepared cardboard. The postcard is ready! You can also use felt or any other suitable material. 
How to make a video card for February 23?
Today, even a schoolchild can make a video card for February 23rd. All you need is a phone with a camera.
A video postcard can be:
- in the form of changing pictures or photographs accompanied by a song;
- just a recorded video with congratulations.
After such a postcard is completed, it can be recorded on a flash drive, which can be presented to the defender of the fatherland, or it is quite possible to send such a congratulation through social networks.
Making beautiful cards for men for Defender of the Fatherland Day: video
Good afternoon dear readers! On the eve of Defender of the Fatherland Day, we have prepared original and not complex ideas, today we offer interesting options greeting cards. They perfectly express love and respect for to a loved one. After all, the postcard is made with your own hands, it’s much more better than any another purchased in a store.
The child can make some of them on his own. To create others you will need your mother's help. But still, this is a very exciting and interesting activity.
DIY paper card for dad for February 23
This simple postcard can be made from colored paper in just a few minutes.

We will need:
- scissors;
- a simple pencil;
- glue;
- felt-tip pens (red and black);
- a sheet of white A4 paper;
- a sheet of double-sided black A4 paper;
- a small rectangle of pink paper (for the bow);
- some green paper (for buttons).
Stages of work:
1. Adjust black paper to white. Align and bend in half.

2. Unfold and bend again. But now, we bring each edge only to the middle. This is where the first bend is located.

3. And fold it again. This way we get a sheet folded in four.

4. With a simple pencil draw half a heart. Next, cut along our drawn line. As a result, we get a heart card. It is black on the outside and white on the inside.

You can write a holiday wish on a white background.
5. Fold the front black side of the heart (top). It turns out to be the collar of a black jacket.


7. All we have to do is decorate the card. Cut out two buttons from green paper. Their diameter is 1-2 cm. We draw holes on them with a black felt-tip pen. And glue it on the right side of the jacket.
8. Next, cut out a small rectangle Pink colour. Fold it in half and cut out a bow. The edges will be slightly wider than the middle. Unfold and glue the bow to one of the front sides of the white shirt.
9. The postcard is ready. All that remains is to write your wish inside.

You can also make a card and give dad a small gift

How do you like this card? I think it’s very original, and on the back you can write a wish for dad, he will be very pleased.

How do you like this postcard, with a real silk butterfly:

Here's a great idea with ties:

These gifts for dad from daughter:

And in this version you can write a message to dad:


In this card we draw a shirt and glue a bow from pasta, which we first paint with paints

And here is another example, here you need to cut out numbers and stars from paper, color them with felt-tip pens and tie a bow from fabric, then glue all these elements onto colored paper.

Greeting card for kindergarten and primary school
This card can be made with children who have already learned to use scissors.

We will need:
- cardboard: white, green and red;
- colored paper: black and orange;
- a simple pencil;
- scissors;
- ruler;
- glue stick;
- multi-colored pens or markers.
Stages of work:
- We bend green cardboard in half.

2. Unfold and glue a sheet of white cardboard to it.

3. If cardboard sheets different sizes, trim the edges of the card with scissors.

4. Draw a star at the top of the card. Carefully cut out.

5. Draw a star on cardboard (red). It will be slightly smaller in size than on the postcard. The red star will be voluminous, so the template is presented below.

6. Cut it out and bend it along the dotted lines, and also fold the gray ears. As a result, we get such a voluminous star.

7. Glue the red star to the inner one right side postcards.

8. Now you need to cut out three strips of black and two strips of orange colored paper. Each is about 5 mm. width. Next, glue them to the bottom of the card, in a checkerboard pattern. We cut off the excess edges.

We suggest cutting out numbers from red cardboard and gluing them to the card.
This is the greeting card we got. If you wish, you can write a beautiful poem inside it.
Here are more options for a postcard with a three-dimensional star:


How do you like this performance?

Here's another interesting examples pictures for younger children:

Airplane made of colored cardboard:

Tank - this postcard is not difficult to make, and dad or grandfather will be very pleased to receive it as a gift

This craft made from matches is also very beautiful:

In fact, making this card is very simple, but it turns out very cool. For this you need matches, cardboard base, glue, scissors and regular postcards(or print on a printer) with the theme of February 23.
- Now we need to draw a square measuring 14*14 cm on paper and then divide it into 9 equal squares and glue matches on them, as shown in the picture. When the workpiece is dry, you can coat it with varnish. The base requires approximately 3 boxes of matches.

2. Then glue stickers or postcards

This is how beautiful it turns out:

An interesting idea in kindergarten for children 3-4 years old
This card is suitable for small children. It's not difficult to do. The only thing the teacher needs to do is prepare all the details of the application in advance.

We will need:
- blue colored cardboard;
- brown rectangle (for the rocket body);
- one red star;
- two red rectangles;
- three yellow circles;
- glue stick.

Stages of work:
Glue the brown rectangle to the blue background.

Place a green triangle above it. This will be the top part of the rocket. Now our future rocket resembles tall house. Next, glue red triangles on both sides of the rocket. In the middle we will place two yellow illuminated windows.

And finally, let's decorate our rocket with a red star.
The postcard is ready!
Here are some more examples with applications:

The basis of this card is disposable plate painted with paints, but such a circle can also be cut out of plain paper, also painted with paints, glued on the sun and the ship.

But here’s an idea just for the little ones in the younger group:

A beautiful applique made of felt, of course, here you need the help of an adult to cut out the parts, and the child needs to carefully glue everything together.

An original gift in the form of a shirt and tie for dad and grandfather
An unusual, although very common, postcard-shirt using the origami technique. If you haven't made such a postcard yet. We recommend you try it.

We will need:
- colored paper (yellow and blue);
- double-sided tape or glue;
- ruler;
- blue cardboard.
Stages of work:
We bend a sheet of blue paper in half (along the longer side). Unfold and re-fold each edge towards the middle, as we did in the first version of the heart card. Next, we bend the two edges in the form of a collar.

We turn it over to the other side and the sleeves of the shirt come out.

On the opposite side we bend the edge by about 5 mm.

Turn it over to the other side and bend the corner with the tip towards the middle. We also do the same with the second corner.

Fold the card in half. We get this little blue shirt.

Now we glue all the parts with glue or tape.
Let's start making the tie. Cut out a yellow square 7 by 7 cm. Place the square on the table in the shape of a diamond. We draw a vertical line in the middle. We bend the upper corners towards the middle.

Turn the tie and bend it top corner, about 1 cm. Now we lift the small corner up again.

We turn it over again and make a clasp like this, bending the top of the tie a little. Let's fold the vertical halves. We glue everything well.

Now we decorate the shirt with a tie using tape or glue. The top of the tie should extend slightly under the collar.

Fold the blue cardboard in half. Glue the shirt to the front of the card.
Our holiday card-shirt is ready.
We write it inside holiday greetings. This card is suitable not only for February 23, but also for the birthday of your dad, brother or grandfather.
Here's a visual diagram:

And this is what the tie looks like on paper:

Shirt pattern:

Now let’s repeat it on paper:


And now I want to show you what beautiful variations you can do:


Here it all depends on the availability of colored paper and your imagination; you can make thousands of variations of this card, from the brightest and most cheerful to the official business ones, look here:


But what kind of tuxedo can you make with wishes on the shirt?

Here are examples of ties:

This beauty is not at all difficult to make - it’s fun for kids and fun for dads!
Detailed master class on beautiful design using quilling technique for schoolchildren
Quilling is very interesting and exciting activity for those who love to make all kinds of crafts from paper. It is popularly known as paper rolling. And this is justified, because all crafts (using this technique) are made from twisted strips of paper.
Compositions made using the quilling technique can be voluminous or flat. This is not a very difficult activity that can be done with children. But to achieve beauty in crafts, you need to show a lot of patience and perseverance.

Let's start making a postcard for Defender of the Fatherland Day.
We will need:
- quilling paper in two shades;
- a sheet of green cardboard;
- special tool for quilling;
- small die-cut pictures (for wishes);
- PVA glue and glue stick;
- brush (for applying glue);
- yellow colored paper;
- scissors.

Stages of work:
Fold a sheet of green cardboard in half. Glue half inside yellow leaf colored paper.

Now let’s start decorating the postcard using the quilling technique. stripe yellow paper insert it into the hole of the quilling tool rod and carefully wrap the paper around it.

Be careful not to let the paper roll fall off the stem.
In this way we wind the strip until it is completely on the rod. Now carefully remove it and shape it into a leaf. Glue the end of the strip with a glue stick so that the roll does not unwind back.

As a result, we should have nine yellow leaves. Next we make one brown, flatter one. We roll six circles from burgundy paper. We arrange all this in the form of a tank.

We make a cannon from yellow, burgundy and brown stripes.
Now let's move on to the number 23. We slightly fold the yellow strip and bend it in the form of a two. Don't forget to wrap its lower tip. We also make number 3.

All we have to do is make curls to decorate the holiday card. Here it is worth showing your imagination. For example, if you bend half of the strip in one direction, and the other half in the opposite direction. You will get such a beautiful decorative element.

Using a brush and transparent glue, attach all the parts to the main card. We paste cut-out pictures onto the yellow background and write wishes.
The postcard using the quilling technique is ready!
How to make a three-dimensional 3D boat postcard with your own hands + templates and diagrams

We will need:
- White list A4 paper;
- a simple pencil;
- red colored paper;
- scissors;
- blue felt-tip pen;
- sheet of blue cardboard;
- glue stick.
Stages of work:
We bend the white sheet in half and draw a steamboat, clouds and seagulls.

We bend the internal protrusions of the steamer.

We fold the cardboard in half. We straighten the steamer and paint it. Glue the most top part and the sides to the middle of the card. Using a pencil, bend the middle of the steamer outward.


We decorate the clouds with a blue felt-tip pen. The ship postcard is ready.
What do you think of the idea of a ship with waves?

I really liked this card, isn’t it great?

The ship with sails is also very beautiful:

Together with your child, choose the option that you like best and create to the delight of your men!
Below you will find a variety of templates. They can be used to decorate and decorate your works dedicated to February 23:

Here is a template for an airplane postcard with a pilot:


Step-by-step video on how to make a gift using scrapbooking technique
Handmade postcards using this technique are simply amazing. They are so beautiful, unusual and original! And they can even serve as an interior decoration and fit harmoniously into the design of the apartment; such a gift will definitely not gather dust on a shelf; it will have a place of honor.
Therefore, I suggest you watch the MK video, where the author demonstrates the creation of such a super postcard step by step.
I wish you success in creating holiday cards for Defender of the Fatherland Day!
This is where my article comes to an end, I hope that you liked the cards and you will take note of the ideas and create your own for your men, and in order not to lose the article, do not forget to bookmark it and press the social network buttons!
Take care of your defenders!
Until new publications!
Very soon our country will celebrate the holiday, dedicated to the day Defender of the Fatherland. But few people know for sure that in 1995 February 23 was called the Day of the Red Army's victory over the Kaiser's troops of Germany in 1918 - Defender of the Fatherland Day.
This is the complex name this holiday had. And only in 2002 they decided to shorten it and leave only the last few words. And so it happened that February 23 is called Defender of the Fatherland Day.
By the way, on this holiday it is necessary to honor not only men, but also women. After all, representatives of the fairer sex also serve, risking their lives.
This was just a small part of the background, and now we return to the preparation of this event.
It just so happens that on any holiday, including February 23, children prepare gifts and congratulations to their fathers, grandfathers and other relatives. They create crafts and cards with their own hands. Adults accept them with pleasure, and some even keep them. A paper postcard for dad on February 23rd is the kindest and most sincere gift.
Today I just want to help the kids cope with this task. Today I will tell you how to make postcards for February 23rd with a description.
DIY postcard for dad on February 23rd
First of all, I'll show you how to do it Airborne Forces postcard. Why did I choose paratroopers and not pilots and sailors? Because our dad served in airborne troops, and we are proud of it.
Every year we dress in vests with the whole family and go to the city procession with the flag, honor the memory of those who died and then get down to celebrating.
Last year we were even able to attend international events, and there were a lot of impressions.
So for February 23, we decided to give dad a gift, and to include a postcard with the gift.
In order to make an Airborne Forces greeting card, you will need:
- Colored paper;
- Glue;
- Scissors;
- Sheet of cardboard;
- Pencil.
We need cardboard for the base of the card; it is better to use a pencil for glue, because the parts are not large and it will be easier to use. You will need a pencil to draw clouds and a parachute, and scissors to cut out these details.
Let's get to work and start making an Airborne Forces greeting card.
The first step is to fold a sheet of cardboard in half, this will be the base of the postcard. You choose the color yourself.
To simplify the task, I can suggest this template. It can be printed if you have a printer.

In exactly the same way, you can either draw a parachute or print it. Here's another template for you.

It doesn't matter if you drew it all or printed it out, now you just need to cut it out.
We bend the resulting clouds and parachute exactly in the center. Lubricate one half of the parachute with glue and connect it to the half of the other parachute. Look, I made them different colors, in combination they will resemble a paratrooper's vest. As soon as our parachute is ready, we grease its edges and glue it to the cardboard in the place you like.

You can draw the slings, you can make them using threads, or you can cut them out from the template that I offered you just above. I used the last option.
Now we need to make the clouds. We deal with them in exactly the same way. Just remember to be careful, because the postcard should not be stained with glue. In the end I got something like this greeting card Airborne Forces

In my opinion, such original postcards It’s not at all difficult to do on February 23rd with children.
Postcard for 23rd
Master class postcard for dad with numbers 23
In this work I will not provide templates, so you need to rely only on yourself.
To make a card for dad with the numbers 23, you will need:
- White cardboard;
- Golden cardboard;
- Colored paper;
- Scissors
- Glue;
- Pencil.
When we have all this, prepare the surface and get to work. The first thing you need to do is bend a piece of white cardboard like this.

From blue and red paper, cut strips 2 centimeters wide and as long as cardboard. We glue the strips as shown in the photo. It turns out to be a wonderful tricolor. Glue a green rectangle into the middle of the card.

Now we take golden-colored cardboard and draw on back side a twig with leaves and cut it out. It needs to be glued on top.
You can also use colored paper, but it will quickly wrinkle, because we only glue the twig in the middle.
In conclusion, you need to cut out two numbers from cardboard or colored paper. I decided to take the scarlet color. Draw the numbers with a pencil and cut them out. Glue one on one side of the card, the other on the other.