Do-it-yourself Lyalka-motanka: scheme, master class. Master class "Motanka doll
Creation of a motanka doll. To date, a large number of ritual dolls have come down to us, which were an integral part of the life of our ancestors. Each lyalka performed its important function, protecting the house and everyone who lived in it.
In the article:
How to make a motanka doll - rules
In order to, prepare the necessary attributes:
- four pieces of white linen;
- colored rectangles (you can take chintz);
- multi-colored threads, beads, braid.
The first step is to prepare the head for the future coastline. To do this, take a long strip of thick linen fabric and wind it so that you get a barrel.
From above, cover the finished head with a large piece of white cloth (square shape). Next, you need to form the neck of the doll. To do this, use the thread and make an accent, thereby securing the head. After that, you can make a pattern on the face.
Since it is impossible to draw eyes, nose or mouth, our ancestors decorated the doll's face with threads. Most often it was a cross. It was an important carpentry symbol for our ancestors. You need to wrap the threads around your face very carefully.
Make sure that they lie side by side, do not get mixed up, the pattern should be beautiful. If the first time you didn’t manage to make a beautiful cross, dissolve the threads and repeat this action again.
The decoration on the face can be of various colors. It is best to use gold, blue, red colors, they will symbolize prosperity, harmony, love. Remember, you can wind the thread only according to the movement of the sun, the number of skeins must be odd.

After everything is ready, take a coarse white thread and make a clear emphasis on the neck of the doll. Now you need two pieces of white dense rectangular fabric. One piece should be larger than the other.
From that flap, which is larger, the torso is twisted. In order for it not to bloom, you can wrap it with a coarse light thread along its entire length. The arms are twisted from the smaller patch. At the ends they are fixed with a thread.
Hands are attached to the body with a thread, it must be wrapped crosswise. A barrel head should be wound on top of the body.
Take the multi-colored patches that were prepared for the dress. You can create clothes for the future coastline yourself. Remember, the main thing is the presence of a long skirt and an apron.
You can put a scarf on the doll’s head, hang beads around the neck, decorate the belt with braid. Clothes can be pre-decorated with embroidery. But remember, this must be done before you start making the doll itself (so that it does not turn out to be chipped).
How to speak amulet
Quite often, people speak ready-made amulets on their own or do it in the process of work. From what you say when creating a lyalka, it will depend on what properties it will have.
If you can’t find the right words, use ready-made conspiracies. Often amulets are created so that she protects the family from illness and adversity. Therefore, for a standard motanka doll, the following plot is suitable:
Zarya-Zaryanitsa, the red maiden, the mother herself and the queen. The moon is bright, the stars are clear - take from me insomnia, sleeplessness, midnight. Dawn-Zarenitsa, in the middle of the night, come to me even as a red maiden, even as a queen mother, and lay down (name) from me and take away the accursed power from me, all the ailments of adversity. Now and forever, and from circle to circle! Taco be, taco be, taco be!
If you use this conspiracy, then making a motanka doll will turn from a simple fun into a real ritual, and you will be able to fill the future amulet with the necessary magical properties. Remember that everything you put into your bank will come back.

Often, in order to direct the energy of the guardian in the right direction, our ancestors allocated her a special corner in the house and put things there that would symbolize their desires.
So, for example, if you want to make a profit, you can put a coin to the coast, if a child, then tie a baby doll to the handles (you also need to do it yourself) or make a very long apron, which was a symbol of fertility. Each hostess can independently modify the doll and fill it with new magical properties.
Motanka amulet dolls are increasingly found in our homes - not so long ago, these colorful little things came into fashion again. Many people treat them simply as cute souvenirs, reminiscent of folk traditions and decorating the interior.
However, not everyone knows about the sacred meaning of the motanka doll - its ability to be a talisman for the house and a happy talisman for the people living in it. Interestingly, children love to play with motanks even more than with expensive modern toys. In addition, such a doll is a great way to entertain a child with creativity, and also a wonderful gift for relatives, friends and acquaintances.
The history and meaning of the amulet - motanka dolls

Motanka doll is an old amulet, popular among many Slavic (and not only) peoples. This funny toy is deeply symbolic – it personifies the Great Goddess, who gives protection, prosperity, fertility and other blessings.
In the manufacture of the amulet, ancient magical symbols are used: for example, a twisted roller, denoting infinity and development, or a cross on the doll's face, symbolizing solar energy. The colors and ornaments used for the doll also have their own symbolism.
So, red ribbons denote female beauty, and blue ones denote male power. Green color is used to attract health and longevity, yellow - for material well-being. The doll is made faceless, due to which it is attached to the image of the Goddess, and not to any specific person. In addition, our ancestors believed that through a faceless doll, no ill-wishers could have a negative impact on them. These cute "lyalki" are actually a well-thought-out magical talisman that can bring only good things into our lives.
What are motanki

There are many types of motanok amulets, but here we will name only the most famous:
- Swaddle - protects the newborn from diseases, the evil eye and other troubles (and before the birth of the child, the swaddle protects the pregnant woman);
- The bride - a motanka, made in a wedding dress, attracts a happy marriage and healthy offspring;
- Lovebirds are two dolls connected with one hand; they symbolize the inseparability of marital ties and the common fate of a married man and woman;
- Classic motanka Bereginya - provides protection for the home and households, bestows health and well-being;
- Easter - a protective amulet and a talisman of well-being, and in addition, this motanka is considered a symbol of the family and strengthens relations between relatives;
- Wishlist - helps to fulfill desires, and as a reward for her help, she is supposed to give and sew on ribbons and jewelry;
- Domovushka - keeps order in the house, helps to keep harmony in the family, avoid quarrels and conflicts;
- Shestiruchka - helps in women's work, gives energy and turns work into pleasure;
- Zernovushka - a charm of prosperity, creating material well-being in the house;
- Insomnia - a charm for children's sleep, helping the child to sleep peacefully while real insomnia "amuses itself with a doll";
- Cleansing - this doll is taken out of a secluded place only after any family troubles (to eliminate the remaining negative energy).
How to make a motanka with your own hands - basic rules

If you just want to have an interesting souvenir at home, you can buy a motanka in any gift shop - their choice today is large and varied. But if you need a really powerful amulet - take the time and make it yourself. You can involve children in the process - you will definitely enjoy creativity and joint communication. Moreover, there is nothing complicated in the manufacture of motanka.
The first thing to take care of is the right attitude. When making a charm, think only about the good, and when working on the head of the motanka, try to clearly articulate the purpose of creating the doll - how to “put” this intention into her head. You can prepare materials in stages, but the process of creating a talisman should not be interrupted. Once you get to work, you should not be distracted until you tie the last knot.
In the process of work, you can not touch the doll with a needle or scissors, otherwise she will be offended. If you want to embroider or sheathe the details of the costume, just do it in advance, at the preparatory stage. For winding, you can use only natural fabrics and threads. As for knots, some of our ancestors tried not to make them, only one final one was considered an exception - at the navel. However, there are also motankas with knots (for example, tied on the hands of pupae).
Step-by-step algorithm - how to make a motanka with your own hands

For the manufacture of the torso, we need a natural fabric close to the skin tone. Bright patches will be needed for a skirt, apron and shirt. If you have ornamental braid and bright ribbons, they can also be used. You will also need threads of different colors and natural “stuffing” for the head (from fleece or dried herbs). If desired, instead of a fleece, a cylindrical roller twisted from a strip of coarse fabric can be put into the head.
We put a fabric roller or stuffing in the center of a light flap, wrap it with fabric and form a head. We clasp the neck with a colored thread several times, after which we wrap a cross on the head of the doll - this will give it additional decorative and magical properties. When creating a charm with your own hands, try to take into account traditional recommendations - wind in the direction of the sun, make an odd number of skeins.
Now you need to make two rollers - for the torso and arms. Hands are attached to the body, and then the head. You can first cut out the vest and now put it on the doll with the “open” side back. Tie the sleeves with thin ribbons, and wrap the shirt around the waist with threads.
Now we put on a skirt, or maybe two - the bottom one is longer than the top one. You can also wear an embroidered apron. We fix it all with a bright belt of braid, thread or ribbon, wound around the waist and tied in a bow. We put a scarf on the head of the doll, and bright beads made of beads around the neck.
Motanka doll, or nodular doll, got its name due to a specific manufacturing technique. In the creation of such a talisman, a needle is not used, and all parts are wound together with a thread.
Another feature of this chrysalis is the absence of eyes, mouth, nose. On the face is a sacred cross. In order for a do-it-yourself motanka doll to be real, it is important to provide it with all the necessary elements. Each such element is endowed with a certain meaning and must be present in the finished doll. So, the skirt is a connection with the earth. The shirt symbolizes the connection of the past, present and future. The headdress denotes a connection with heaven and god. All kinds of decorations are welcome - they symbolize fertility and prosperity in the family.
It is believed that a motanka doll in the house is a talisman that protects the family from unclean forces, as well as bringing good luck and prosperity. Our master class describes how to make a simple motanka doll.
To make a motanka doll, you will need the following materials:
a piece of white chintz fabric;
green linen;
lurex scarf;
embroidered ribbon;
thin ribbons (white, yellow, cherry, green);
white threads;

Do-it-yourself motanka doll: master class
We take a piece of white fabric measuring 25-25 cm. Put cotton wool in the middle of a piece of fabric and form a ball out of it - this will be the doll's head. We collect the fabric around the cotton ball and fasten it with a thread, wrapping it tightly around the fabric.


We make a cross on the face. To do this, you need thin ribbons of white and cherry flowers. We first take a white ribbon, grab our head horizontally, then draw it vertically and tie it at the back of the head. We also tie a cherry on top of a white ribbon. It makes sense to take a cherry ribbon somewhat narrower than the width of the white one.
As you can see in the photo, the ends of the tapes go into the winding of the head - you can thread the tape under the existing winding, or you can wind the tapes with another piece of thread.


Here is such a beautiful face turned out in our motanka. This design method is called the sacral cross.
We make doll handles. To do this, cut out two flaps of 15x15 cm in size from the same white fabric.

We twist each flap into a non-tight roller and fix it with a thread, wrapping around the edges, top and bottom, stepping back a little from the edge of the roller.


We form the base of the doll. You will need a piece of fabric measuring 30x60 cm. We lay a strip of cotton wool on it and fold the flap into a roller.

We wrap the roller tightly with thread along the entire length of the roller.

We straighten the flap of fabric below the head, insert the base column inside and wrap it tightly around the base. It turns out the body with the head.

Then we wrap both handles with a thread around the neck.

Cut out the skirt. For it you will need a piece of linen fabric measuring 30x50 cm.
We place the fabric wrong side up in the "waist" area so that the skirt covers the face. With our hands we gather the edge into an accordion around the “waist” and wrap it with threads, as shown in the photo below.


We lower the skirt down - it is ready.


We make a shirt. For her, cut off a strip 6 cm wide, wrap it around the back of the neck and crosswise in front. We remove the remnants of the strips under the arms, laying the edge inward. We fix with a thread, wrapping it around the doll.


To visually separate the skirt and shirt, we tie a colorful ribbon around the waist.

For a scarf, cut off a triangular piece, and tie it on the head, around the neck.
We fix at the back with a knot. 


We decorate the motanka doll: wrap spikelets and sugar viburnum with teip tape, tie a bow of yellow and green ribbon on top. And we fix our bouquet with a thread in the handles of the coast.


A do-it-yourself motanka doll made according to our master class is ready. Now your home and family will be under reliable protection.


Irina Usovich specially for the site
Recently, I noticed such a strange thing: sometimes expensive toys for children are not as cute as unpretentious tiny kinders, fluffies donated by someone or an ordinary doll that my mother wound up in 5-10 minutes from the remnants of fabric. That's how it happened to us. Quite by chance, I got to a mini master class on making traditional rag dolls. She brought the result of her labors home and - lo and behold! The kids are busy all evening! I was surprised and decided to make three more dolls.
What did you need for the doll?
Rectangular fabrics, ribbons, threads, synthetic winterizer, cotton wool or gauze.
How to make a motanka doll?
I’ll make a reservation right away that I did not follow the tradition and cut the fabric with scissors, although I was told that the fabric for the winder should be torn by hand.
1. Prepare 5 rectangles of fabric and 1 square. You can cut out the necessary patches in the course of work on the doll.
2. The first rectangle should be a neutral color. It will be dolls. In its center we put a synthetic winterizer, cotton wool (in my case - gauze).

From this rectangle we will make the head and body of the doll
Fold the fabric in half and gather it around the filler to make a ball for the head.

3. We wind the threads well at the base of the head, make a knot.

4. We take a new rectangular piece of fabric and twist it into a roller. These will be the hands of our motanka doll.

5. When the roller is ready, we tightly tie its edges with threads.

It should turn out like this:

6. We take the body of our pupa and put our hands between two layers of fabric.

7. Grab the fabric under the handles and start winding.

8. We make a beautiful blouse for the doll. To do this, take the ribbon and wrap it several times crosswise around the arms and waist.

We tie the ribbon into a knot and lower the edges down. There will be a skirt on top.

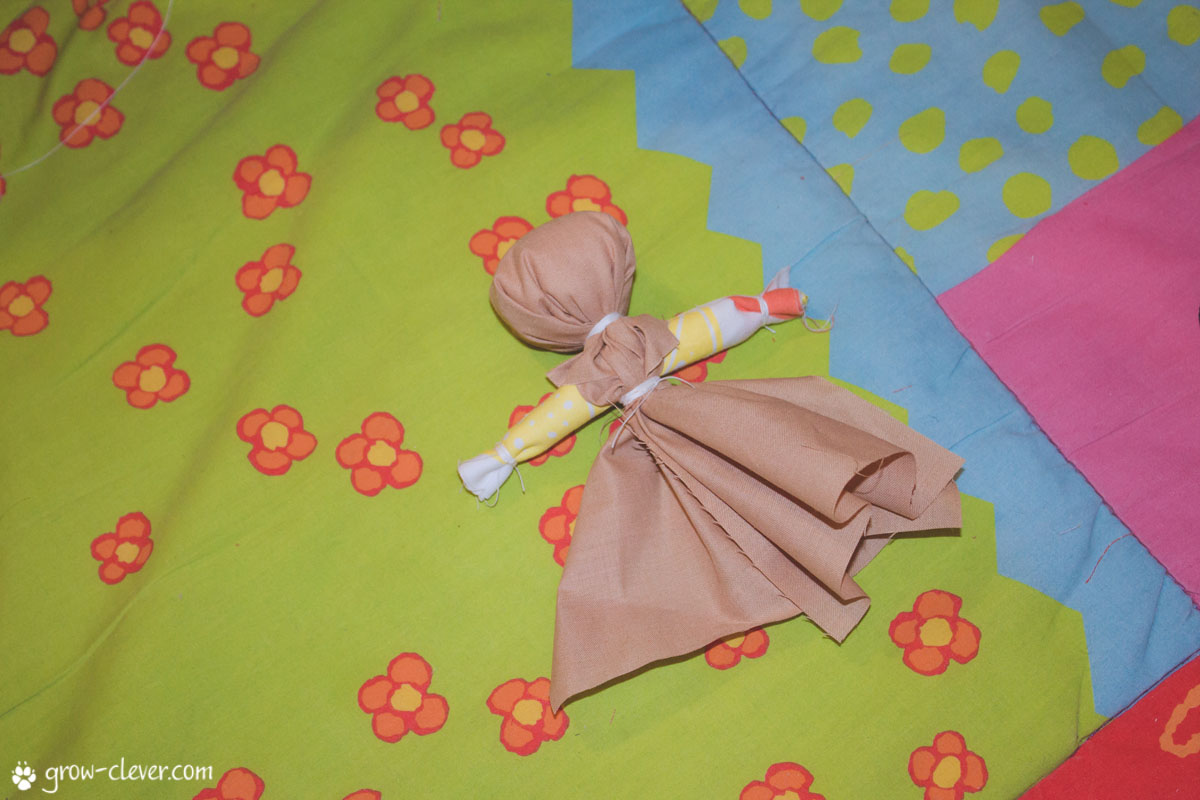
9. Take another rectangle of fabric and fold it in half right side out. We put the doll on top, as shown in the photo below.

Raise one layer of fabric and wrap your hand around the doll's waist.

We begin to tightly wind the thread, at the end we make a knot.
10. You can make a lot of such layers of a skirt. I had 3 layers. Only now the second one should be applied not to the back of the doll, but to the tummy. Then Lyalya will come out smart and no bodily tissue will be visible.

11. I made a handkerchief for a doll from a triangle, but you can make it from a square folded in half. Everything is simple here - we tie the head of the doll in the same way as ourselves, only behind it is worth tying the ponytails into a knot.

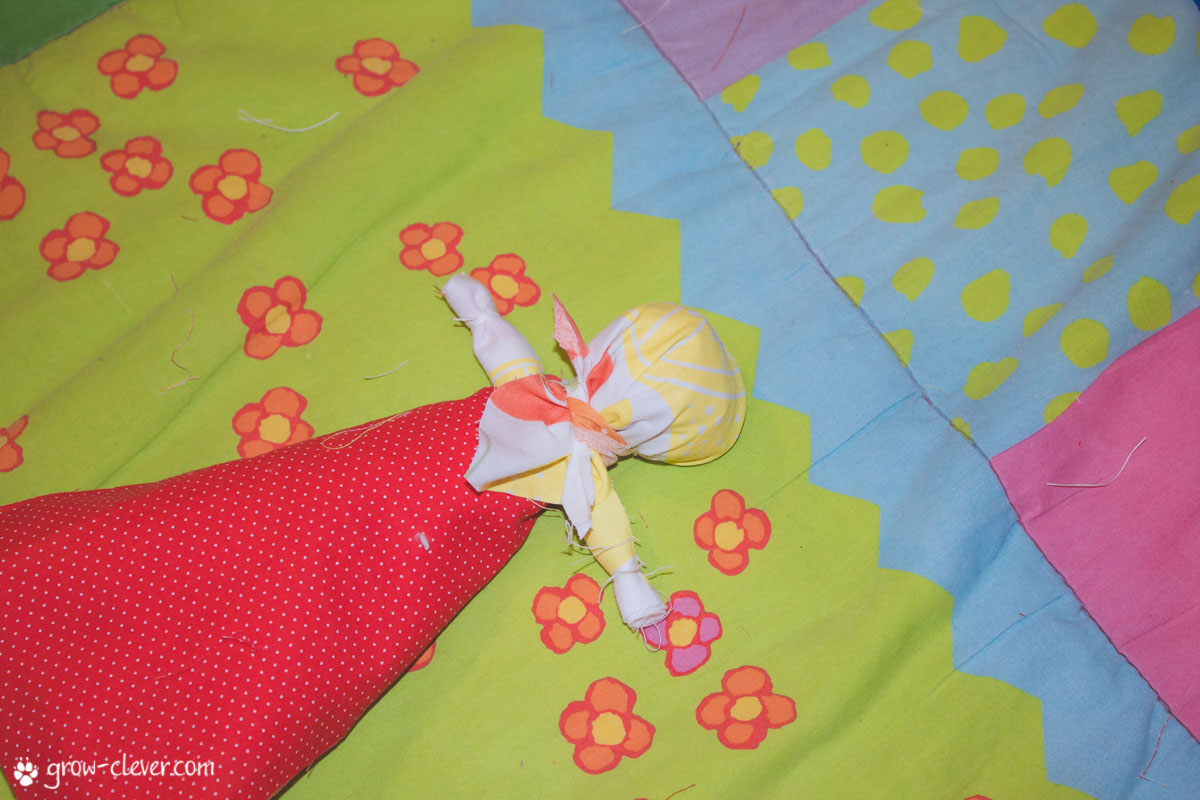
12. So our traditional motanka doll is ready, you can start the game!
Honestly, I was pleasantly surprised how the children, spoiled with beautiful toys, reacted to simple rag dolls. Ksyusha went with the doll to the kindergarten, Sima took her to classes in the children's club, and then asked to take the doll with her to the store. And for several days they slept with motanks in an embrace, it’s a pity there was no photo left.
If you liked this simple rag doll, share the master class with your friends on social networks. Maybe they will also want to make a pleasant surprise for the kids with their own hands;)
Do you want to always get fresh ideas, materials and a variety of coloring pages for activities with toddlers? Then feel free to “Grow smart”!
We wish you more sweet children's smiles!
dolls- these are not just toys that little girls love to play with! Dolls are magical objects, falling in love with them once in a lifetime, you become their slaves for life!
Since ancient times, voodoo shamans have performed their terrible magical acts with dolls, actors made the audience cry and laugh in their theatrical performances, they protected their homes with dolls - amulets in Russia!
Now various rituals are coming into fashion again - amulets, the main character of which is a doll - a motanka, a herbalist and many others ...

Modern designers have also put their hand in this direction - thanks to their efforts, the Dolls have become a necessary accessory in some interiors, a piece of furniture. Consider several options for them, which, with great desire and perseverance, you can do yourself at home.

From ancient times, the mysterious and omnipotent Motanka doll came to us. With the help of amulet dolls, our ancestors protected themselves from evil spirits and called happiness, prosperity, a good harvest, health and longevity to their homes for each family member. A very important role in the creation of this doll was played by the color of the clothes and threads with which this amulet was made. To protect the home, blue and light blue colors were used, and to attract fertility (children, harvest ...) Motanka was performed in red tones.
The main condition for creating a Motanka doll is not to use piercing and cutting objects in its manufacture, such as ... a needle, scissors and not to draw a face on the Doll - the ancients believed that this could attract evil spirits to the dwelling!

Here are some options:
To make a doll, we take HAY. We choose two bundles. We bend one bundle in the middle, twist the upper part and tie it tightly with threads, this is the head of the Doll.
We tie the second bundle, smaller at both ends, with threads (separate the palms), thread through the first bundle of straw in the area of \u200b\u200bthe torso - hands are obtained.
At the waist line, we again tightly tie it with threads - the amulet is almost ready!
Now she needs to dress up! To do this, they tied the head of the Doll with bright threads or braid crosswise, tied a scarf on top, put on a shirt made of linen and an apron.


To do this, you need to take a small patch and roll it tightly into a tube, then fold the resulting tube several times.

Put the resulting rectangle into a white cloth - this is the head and wrap it with threads below.
Now you need to complete the first elements of the amulet. Take threads of different colors (blue, red, yellow) and, in turn, wind crosses over the entire head with each thread (one next to the other ...), first in one color, then in another and, finally, in the third.

We bend the tube longer in half and wrap the top tightly with woolen thread.

We insert the hands prepared in the same way into the hole formed and wind the thread very tightly along the entire length of the body so that the hands do not go up and down.
The next task is to put the head on the body with the help of shreds. To do this, we wind a thread tightly at the bottom of the head - this is the neck, and with the help of shreds and thread we wind the head with the neck to the body.

It remains to put on the made amulet in a shirt, a wide skirt, tie an apron, decorate with beaded beads. In order to decorate the doll's head, simply tie a scarf to her, another option is to weave braids from linen or woolen threads and tie them around the head.

Following these instructions, you can create a variety of doll amulets and give them to your friends for a wedding, birthday, Christmas and other holidays.

Some of the most beautiful dolls that you can actually make with your own hands are frame dolls. In the manufacture of these "toys" for adults (and not only), both the latest and conventional techniques are used, such as papier-mâché.

Having decided on the manufacture of such a beauty. You must carefully consider her image in your head, down to the smallest detail. Your assistant in this will be a sheet of paper and a pencil! Take and draw various images, dream up and choose the one you like the most.
To work on the frame doll, you will need the following materials:
- Steel wire;
- Pliers;
- Scissors;
- Plasticine;
- Newsprint;
- PVA glue;
- Toilet paper;
- Paste;
- Stacks and board for modeling;
- Batting, synthetic winterizer or cotton wool;
- Acrylic paints;
- Fine sandpaper;
- Nail polishes;
- Satin ribbons;
- Fabric for covering the body (knitwear, coarse calico and other soft fabrics);
- Beautiful shreds of fabric for clothes.

Getting to work on the product, first of all, we will pay attention to the frame of the doll. It is better to take a steel wire, as it is particularly durable and will allow our toy "Madame" to take various poses.
Twist the pieces of wire so that the neck, torso, arms and legs are outlined. Be sure to leave an extra wire on the neck 8 cm long, and 5 cm for each arm (up to the hands);
Mark the location of the knees and elbows on the finished frame;

Now you have to use the papier-mâché technique to turn the plasticine blank into a future doll head. For this purpose, glue the plasticine head with newspaper scraps in several layers (6-8). Each layer should dry well. When the head hardens, carefully sand it with fine sandpaper. When the head becomes smooth and pleasant to the touch, cut it and remove the plasticine that is no longer needed. Paste the head again along the seam with newspapers and let the paper dry;

To make legs up to the knee and arms up to the elbow, use the same papier-mâché technique and sand the dried legs with sandpaper. This technique is used when you want to give hardness and smoothness to exposed parts of the doll. If your puppet beauty will be “dressed” in a long closed dress, then another option for making hands will do.

Take a copper wire 0.7-1.5 mm thick, cut it into pieces that would be enough to make fingers and a palm with a small wire stock. Now you need to sheathe each wire with a thin cloth and with the help of threads, collect everything in your palm. Remember, we left 5 cm of stock on each hand? Now it will be very useful to us - with its help we will fasten the palms to the frame of the future hand. Which option suits you best - decide for yourself;
Now let's get to sculpting! The turn has come to thoroughly deal with the head of our “lady”, we need to complete the work and express small features of the face with the help of a paste and toilet paper - showing her individuality. Having kneaded a certain mass from paste and toilet paper, similar in structure to a tight dough, using stacks, we sculpt the final relief of the face. After the mass has hardened, we again resort to the help of PVA glue and newspaper - we glue new places with newspaper, let it dry and grind again;
The turn finally came to the formation of the body of the pupa. A suitable material for this purpose can be a synthetic winterizer, batting, or even ordinary cotton wool. We wrap the selected material around the wire frame, where necessary - compacting, where necessary expanding the body of the doll. To keep the seal in the position that we gave it, wrap it with tight threads;

The doll has been shaped. The next task is to further fix the shape of the body and smooth its relief with the help of fabric. To do this, take a knitted fabric and sheathe the hands, legs to the knees and the torso of the doll with pieces of it;
The turn has come to start priming the face and legs of the pupa with acrylic paints. When the face is dry, it will be possible to start painting it;
We take the same fabric with which we made the palms of the doll and sheathe the thighs and soft legs with pieces of it. This fabric will act as the "skin". From it, complete the neck, shoulders and arms of our "lady";

Let's make a dress for our beauty. Various shreds of the most beautiful fabrics are suitable for him. Use pieces of fur, beads, various laces and ribbons! Create a unique image for your creation. Dresses may or may not be removable. You will need to make a removable one separately, and then put your beauty in it, but the whole one is simply sewn onto the doll in separate pieces;
Our “lady” is dressed, but her face has not yet been drawn!!! Disorder! The turn has come to finally put the doll's face in order and carefully draw lips and eyes with acrylic paints or tempera. If you wish, you can “apply” decorative makeup to your beauty. To make the paints waterproof - add a little matte varnish to them. This will give your creation resistance to moisture and mechanical damage. Painting your lips and eyes with clear nail polish will add extra shine to those parts of your face. Eyelashes for our fashionista can be sold in the store, just buy and stick them;

Take care of the legs - the same technique as for the face. Acrylic, varnish…;
Every woman is adorned with hair. Our beauty is no exception and needs a chic hairstyle. We can create it from satin ribbons of the desired color. We cut the ribbons of the same length, dissolve each ribbon, do not reach 0.5 cm to the end. We glue the ribbons in strict rows to the head with the remaining edges - the hair is ready. Put them in your hair;

Our lady is dressed, with a haircut… What else does she lack to complete the image? She needs sandals! And on heels! L. Gurchenko said: “... What kind of beauty can do without studs?”, Now we will sculpt the chic sandals of our krale. Pieces of leather, exotic fabrics, laces and polyurethane heels can serve as material for shoes. Show perseverance and imagination, sandals will come out - the highest class.

Such a framed doll will fit into any interior and become its highlight, with all this, you can change its poses every day, rearrange it to new places! It's original, beautiful, unusual! You made it YOURSELF!
A characteristic feature of this particular doll is a soft cloth body, a bright blush on the face and small dot eyes. Tilda appeared in 1999, thanks to the Norwegian designer Tone Finnanger. This toy was so simple and unusual that it was thanks to these qualities that doll lovers fell in love with it.

Tilda is not difficult to make with your own hands. You just need to stock up on all the necessary materials and patience. Now, using the example of the Tilda "Vintage Angel" doll, we will analyze all the stages of creating this simple masterpiece.
So get ready:
Cotton or linen fabric;
Colorful fabric for dress;
Thin and light fabric for the wings of our Vintage Angel;
Ribbons, lace, ribbons - to decorate the doll's clothes;
Sintipon, cotton wool or any other filler for our product;

1. Using paper patterns, we will cut out the details of the pupa from the fabric. For the body - lay and sew the linen fabric with the fabric from which the Angel's dress will be made so that you get a rectangle. Fold the resulting rectangle in half and, overlaying the patterns of body parts with the head, cut them out.

2. Cut out four pieces of linen legs and handles. Do not forget to leave allowances for seams when cutting out;
3. We start stitching the received parts. To do this, fold in pairs all the details with the front side inward. Sew them, but leave the bottom of each part unsewn - through this hole we can turn the blank on the face and fill it with synthetic winterizer filler;
4. When all the details of the body are sewn, turned inside out and stuffed with synthetic winterizer, you can begin to form a silhouette. To do this, carefully sew the arms and legs to Tilda's body;
5. It's the turn to do the doll's head. Let's start with the hair. Wool thread works well for this purpose. Beautifully place the “hair” thread in a circle around the entire head and secure it with a thread and a needle. Insert pins on both sides of the head and wind a woolen thread around them, forming curls. We flash everything again and fix it;

6. Face - distinguishes Tilda from other textile dolls. The eyes are made using a special French knot, but if you are not familiar with this technique, sew on a regular bead - the eyes are ready! Tilda's obligatory sign is also the bright cheeks of this doll, draw them with blush or lipstick !;
7. The textile doll is ready, let's start her clothes! To do this, we again turn our shooting to the pattern of the dress. We cut out the details of the yoke and sleeves, in the right places we pick up the sleeve on a thread and sew it to the yoke. All seams are done on the wrong side of the dress. After that, we proceed to the skirt of the dress - folding the fabric in half. We apply the bottom pattern, cut it out and we get a piece of fabric twice as large as the pattern. That's how it should be! Now we pull together on a thread (pick up) the upper part of the fabric and sew it to the yoke. We trim the bottom of the dress with lace and sew the ties to the yoke - our dress is ready and we can safely dress our “fashionista” in it!;
8. But our "fashionista" is called an Angel, which means that it's time to take care of the wings! For the wings, take a light fabric and cut out four details of the wings. We sew them inside out in pairs, turn them inside out and stuff them with synthetic winterizer. Now carefully quilt the wings with a needle, highlighting the feathers, sew to Tilda's back right through the dress! If necessary, sew on a loop of braid - suddenly your Tilda - Angel wants to "fly" somewhere under the ceiling or on the wall!
Having familiarized yourself with the manufacture of such a variety of dolls, you will surely want your relatives and friends to have such hand-made “masterpieces”!