How to make from plastic spoons. Crafts from plastic spoons: how to make DIY jewelry (78 photos)
Creativity is a delicate matter. And recently, people's creativity has been developing at a rapid pace, and as a result, things are used to create various crafts that they simply would not have thought of using in this context before. But everything is subject to development, and creative activities, including with children, are no exception.
Many different master classes can be found on the Internet. Below we will talk about some interesting methods for making crafts.
Disposable spoons in the creative process
So, we will talk about what kind of craft can be made from disposable spoons. It is such a simple and versatile tool that it can come in handy for many different creative ideas.
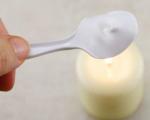
Do you still have plastic spoons from the last outing? Do not throw them away, but use them to create beautiful and original things that can decorate your home interior and create an atmosphere of beauty and order.
So, let's consider the master class "How to make crafts from disposable spoons"". In this case, it will be beautiful tulips.
You will need:
- disposable spoons of red or white, painted red on their own;
- green napkins;
- transparent or green tape.
How to make tulips from disposable spoons
Let's get to work.
Tulip is a very simple and at the same time cute craft made from disposable spoons. You can make a bouquet of several flowers and decorate an empty vase on the table.
rose materials
With the help of spoons, you can make almost any flower. Here is an example of a rose. True, for this you have to work with fire. Therefore, this method is not suitable for small children. But for everyone else, it's easy.
To make a beautiful rose - a craft made from disposable spoons, stock up on the following tools and materials.
- 13 plastic spoons of the color you want the rose to be. You can take white ones and paint them, but only at the end, when the rose is formed.
- Pliers or wide tongs.
- Scissors.
- Candle or lighter.
- Glue gun.
Let's make a rose together
Now you can start. Work in a ventilated area.

Your rose is ready. You can paint it any color you like or leave it white.
Materials for the pineapple lamp
It is very easy to decorate the interior of the house using bright and beautiful crafts from disposable spoons. Making something attractive with your own hands is not a problem. The following is an example of how to make a pineapple-shaped lamp.
You will need:
- small lamp;
- wide bottle;
- disposable spoons (125 pieces);
- yellow paint;
- green cardboard;
- glue gun;
Making a pineapple lamp together
By the way, these crafts for children are also suitable. From disposable spoons, it will be interesting for them to make the shape of an exotic fruit.

The pineapple lamp is ready. This is how it turned out crafts from disposable spoons. You can refer to the photo as you work. The work will not take you much time, and the result will pleasantly surprise you. After all, such a lamp is a unique and inimitable craft.
Spoon peacock
So, your attention is presented to the master class "Craft from disposable spoons - peacock"".
In order for us to get a beautiful and bright bird, we need to prepare the following materials in advance:
- disposable spoons (from 10 to 15);
- cotton swabs for ears;
- paints;
- scissors;
- cardboard;
- glue gun;
- rhinestones.
Let's make a peacock together
You can start.

The peacock is ready. As you can see, everything is very simple and interesting. You can make such a peacock with children, they will love to color all the components of this spectacular bird.
Spoons can be used in many crafts. Rely on your imagination and immerse yourself in the world of creativity and bright colors.
Crafts from disposable spoons always turn out beautiful and unusual, there are no standards and general requirements - just take it and do it.
Spring gives us white tulips. Making flowers from plastic spoons with your own hands. Master class with step by step photos
Teacher of additional education Novichkova Tamara Alexandrovna MBOU DOD Lesnovsky House of children's creativity.Work description: I bring to your attention a master class on making tulips from plastic spoons. Making tulips is not a difficult process, it will not take much time, but it will give you a lot of pleasure. Get down to business and you will make a gift for the holiday with your own hands. The master class is designed for school children, teachers, educators, parents and just creative people. For all those who love to surprise and delight their friends and loved ones.
Purpose: Tulips can be a wonderful gift for a birthday, March 8, other holidays and decorate the interior of a room.
Target: Formation of skills in working with waste material.
Tasks:
- to interest and involve in the work of making tulips from disposable spoons;
- to teach technologies for working with waste material (plastic spoons);
- improve the skills of working with a thermal gun;
- develop children's creative abilities, initiative;
- educate diligence, accuracy in work.
Spring has arrived in our area. Summer is not far off. Exciting hikes, trips to the country, picnics are waiting for us. What remains of our vacation are disposable plastic utensils: plates, forks, spoons, bottles and other waste material. But do not rush to throw it all away. Before you lies fertile material for the manufacture of crafts. There will be something to occupy the children with at their leisure and to engage in creativity themselves.
I offer you a master class on making white tulips from plastic spoons.
Tulips. They have always stood out for their grace among other colors, because they have something aristocratic and at the same time simple.
There are so many flowers on earth
But tulips are dear to my heart ...
Absorbed all the beauty in yourself,
They cannot be comprehended with the mind, with the eyes.
They are like angels from heaven
Came down to us on our land,
So that our mortal light does not disappear
And life triumphed over death.
Materials and tools needed for work:
- plastic spoons;
- yellow pieces of a plastic bottle;
- artificial leaves or green corrugated paper;
- satin ribbon, vase;
- scissors;
- thermal gun;

Tulip step by step
To make one tulip, you need 5 spoons. Can be made from four. They will look like buds. Decide how many tulips you will make. So many leave whole spoons. Cut off the handles from the rest.


Take the yellow plastic bottle. Cut it and from the middle part, make stamens. You can use stamens from old artificial flowers.

Cut the yellow plastic rectangle into narrow strips, twist with a tube.

Take a spoon and use hot glue to glue the stamens.

Now glue the cut spoons in a circle.


Cut out the sepals from artificial leaves. Glue.


Cut a narrow strip of crepe paper and wrap around the stem of the flower. You can use floral tape, thread. Everything that is in your magic chest.

Attach a sheet. The first white tulip is ready!


Using the same technology, make the rest of the tulips. If you want the tulips to have long stems, glue on the cut handles. Grow the stem.


These are the white tulips we made with our own hands.


Arrange tulips in a bouquet. Tie a pretty bow. You can go to visit and congratulate your dear person. The child will be happy if you appreciate his work, diligence.


White tulips -
Gives me spring!
White tulips-
The glare of the moon is hazy,
What administers its distant
The path through the darkness of the night.
White tulips-
A modest sign of attention
Wishing you happiness
I'll take it to my heart.
White tulips-
In a crystal vase
With slight admiration
I put it on the window!
White tulips-
On women's day in spring
You for congratulations -
The best flowers! G. Bondarenko
Arrange tulips in a wicker basket or place them in a vase.


You can arrange a composition for the bright holiday of Easter. Put colored eggs in the basket or, as in our case, knitted ones.
See for yourself how modest and delicate flowers are, ready to give only joy and positive mood.


Tulips white heads,
Opening the petals in bliss,
How they catch with their mouths - sequins of the sun,
On a wonderful flower bed - by the river!
And if you have red, yellow or other color spoons, make a tulip and plant it in a beautiful pot. Such a tulip can be presented to mother, grandmother on March 8, to a veteran on Victory Day. I'm sure they'll love the gift.

How beautiful he is - that fiery flower!
On a long stem, proud and lonely.
The petals of a closed bud are beautiful.
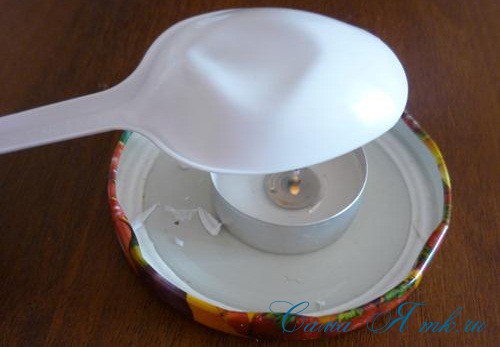
Take 5 red spoons, cut off the handles from them. I want to give advice. Colored spoons are more durable, glossy. They are difficult to cut off. Use a candle. Heat the handle a little over the fire and the plastic will be easily cut off. The edge will be smooth. Just do not keep the spoon close to the fire, it will turn black. Prepare all five spoons for assembling the tulip.


Glue the stamens to the tulip stem using hot glue.


Start gluing the petals to the stem in a circle. Here's what we got.


Cut out two leaves from a plastic green bottle (at your discretion). There are many options.


Wrap the stem with floral tape. Or use what you have. I took the green tape. Attach the leaves to the stem.
The red tulip is ready.


Let's plant our tulip. I took a peat pot, a sleeve from an old velvet dress, a green sponge and a piece of Styrofoam. Here is such a velvet, elegant pot turned out.
You can create beautiful and original products from almost any material. The main thing for this is the desire to create beauty with your own hands.
Ordinary plastic spoons are perfect for home creativity. From standard and unremarkable items of disposable tableware, you can make bright, interesting, creative compositions.

This exciting activity will appeal to both adults and children.
What can be made from spoons
We invite everyone who wants to please themselves and their loved ones with the results of their creativity to the master class "Crafts from spoons".

You will see step by step the whole process of forming crafts from plastic spoons.

tulips
In order to make a charming bouquet of tulips, we need:
- spoons (5 pieces for each flower);
- colored corrugated paper;
- glue with a brush;
- scissors;
- green tape.

Cut out squares from red paper. We wrap spoons in each square and glue it.

Then we collect the tulip. To do this, we fasten 2 spoons, add 3 more to them and fix the resulting flower with electrical tape. Cut out leaves from green paper, attach to the stem and tie with ribbon.

We make a bouquet and put it in a beautiful vase.

Water lily
To create a plastic water lily, you need to prepare:
- spoons of different sizes
- glue gun;
- ordinary glue;
- paints;
- scissors;
- green plastic bottle.
After cutting off the handles of the spoons, fasten the future petals with a glue gun. You should end up with an inner layer of petals.

Make the outer layer of the flower in the same way. Cut a 12x3 cm strip from the bottle and make a fringe along one of its edges. Roll up the strip and fix it with glue.

Dye the fringe yellow and let it dry.
Make leaves from the bottle, as shown in the photo.

Attach the dried strip to the petals from the inside - this will be the middle of the flower. Gorgeous snow-white water lily is ready!

flower garland
A bright flower garland will look very impressive, for the manufacture of which you will need:
- 18 multi-colored spoons;
- scissors;
- glue;
- thick thread;
- dye;
- pompoms;
- thick cardboard.

Cut out 3 triangles of the same size from cardboard and color them.
Note!


Cut off the handles of the spoons. Mark the middle in the triangles and stick petals around it (6 pieces per flower). Place a pom-pom in the center of each flower.

Make 2 holes in each triangle and thread a thread through them, thus connecting the flowers into a garland.

flower vase
Making a pretty vase for flowers will require you to have:
- spoons;
- tin cans;
- scissors;
- glue;
- paints.
Paint the jar in your favorite color. Cut off the handles of the spoons. Paint the rounded parts of the spoons in the desired colors.

Glue the spoons to the jar, placing them in even rows.

Note!

ladybugs
You can make a cute ladybug out of spoons using:
- spoons;
- glue;
- large voluminous buttons;
- paints;
- scissors.

After cutting off the handles of the spoons, paint the oval part of each of them. Glue the wings together. Attach a head button at the top.

Candlestick
To create a sterile original candlestick, you only need the spoons themselves and glue.

By gluing the spoons as shown in the photo and attaching a candle to the top of the structure, you will get a stylish decor element that will decorate any holiday.

decorative frame
You can also use disposable spoons to create original frames that decorate various interior items.

Note!

For this you will need:
- spoons in large quantities;
- scissors;
- glue;
- polystyrene or thick cardboard;
- a watch, a small round mirror, a photograph, or another item of value to you.

After measuring the diameter of the desired object, cut out a circle of the appropriate size in cardboard or foam.

Place a clock, photo or mirror in the resulting frame and secure it. Cut off the handles of the spoons. Glue the rounded parts of the spoons to the frame in rows in a circle, from the edge to the center.

Color the finished fruit of your creativity the way you want.
Christmas tree
Among crafts from disposable spoons, picturesque Christmas trees are very popular, for the manufacture of which you will need:
- paper cone;
- glue;
- scissors;
- dye.

We cut, as usual, spoons into 2 parts;
We glue the oval part of the spoons to the cone in a checkerboard pattern.

We paint the resulting Christmas tree in any color or leave it white and admire our creation.

Maracas (musical instrument)
Creating this unusual tool will take you quite a bit of time, but is guaranteed to delight your children.

Prepare the following materials for this:
- 2 spoons;
- plastic egg;
- scotch;

Place a small amount of rice in the egg and seal.
Pinch the sides of the egg with spoons.

Tape the resulting model with tape.

Pumpkin
To make a large bright pumpkin out of spoons, you need to cook:
- spoons of yellow or orange in large quantities;
- foam ball.

Cut off the handles from the spoons.
Attach the rounded part of the spoons to the ball in a checkerboard pattern from the bottom up.

The top of the resulting pumpkin can be decorated with a small branch.

The process of creating all the described compositions is reflected in the photo of crafts from spoons. We talked about the most popular and beautiful products made from this material and shared secrets on how to make crafts from spoons with your own hands.

We hope that our master class has been useful and aesthetically pleasing to you.

Photo of crafts from spoons

What is not made from disposable tableware. From the simplest plastic spoons, crafts are really interesting. Flowers look very beautiful, the finished product is almost indistinguishable from porcelain.
On the Internet, of course, there are many master classes on roses from plastic spoons, I tried to explain everything intelligibly, once again adding my zest. 🙂
For this master class, I made a red rose with leaves from disposable spoons. The process of making a rose is not complicated, but it requires a lot of attention, patience and accuracy.
For work you will need:
- 24-26 plastic spoons
- candle,
- matches or lighter
- thin wire,
- electrical tape, teip tape or green corrugated paper,
- red paint can,
- green acrylic paint
- brush,
- scissors,
- round nose pliers (optional)
- hot glue gun,
- knife, thick needle or thin scissors.
Light a candle and start...
Step 1: Rose petals from disposable spoons.
Petals for a bud:
Keep the spoon some distance from the flame and prevent the plastic from blackening.
We first warm up one side edge of the spoon, twist it a little.


And then do the same with the other edge.

Now we need to heat the tip and slightly bend it in the opposite direction.


We do the second petal for the bud in the same way, only we bend the edges of the spoon a little less. 
Petals of the second row ...
We bend the edges even less. We heat the edge of the spoon and symmetrically from the center, bend the spoon from one and the second edge in the opposite direction, twisting it a little.


This is how it should turn out...


We need 2-4 of these petals.
On all petals, except for the first, we cut off the handles. We heat the junction, cut it off with scissors.


Large petals:
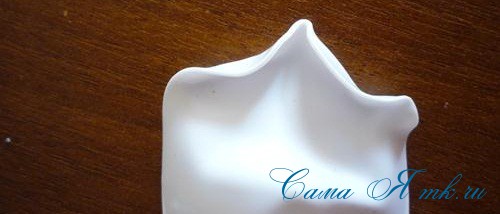
We warm the spoon a little inside to slightly straighten it.

Turn over and heat the tip of the spoon over the candle. When the tip began to deform, quickly twist the tip of the spoon with scissors or round-nose pliers on both sides symmetrically from the center in the opposite direction, giving the shape of a rose petal.

Here we should get such a petal ...
Front side…

And reverse...
We need 10-11 of these petals.
We form a rose flower.

We take a spoon with a handle, apply glue to the petal and firmly press the other petal to it. It turned out a bud on a leg.

Around the bud, carefully glue the petals of the second row. And then all the other petals. Apply hot glue to each petal. We go in a circle, adding one petal after another.
It turns out here is such a white rose.
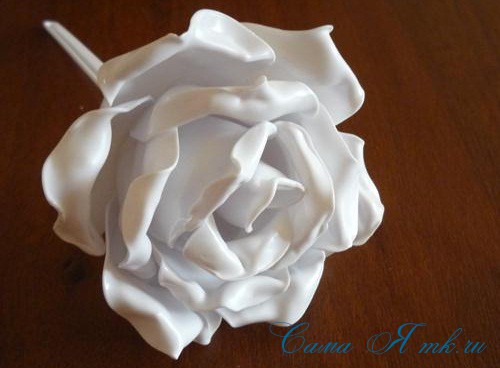

Here is such a "butt" of a flower ....

Not very pretty, but we'll fix it. 🙂
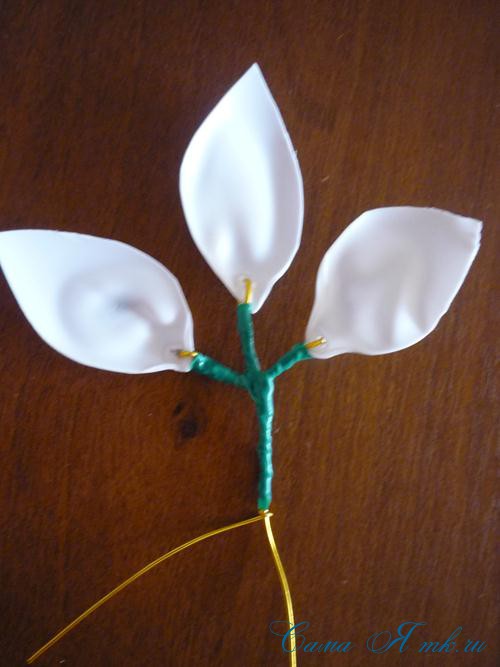
Step 2: Rose petals and sepals from plastic spoons.
We warm the spoon from the inside so that it begins to straighten up a little and cut out the leaf with ordinary scissors.


Now we heat the tip a little and make a hole for the wire with something sharp.
Like this…

For the rose, I made 6 of these leaves. We connect them in 3 pieces on a thin wire.

To make sepals for our rose, we also warm the spoon from the inside and cut it out with scissors.

We will hide the wire with electrical tape, teip tape or corrugated paper.
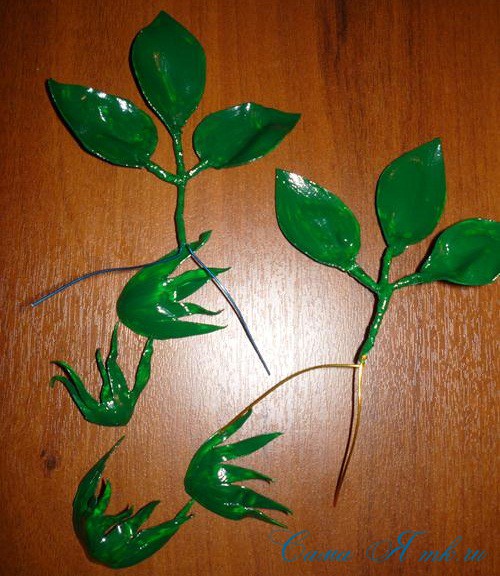
Step 3: Coloring.
It is more convenient to paint a flower with spray paint. If you only have acrylic paint, then first paint the petals, and then assemble the rosette together.


We paint the leaves and sepals with green acrylic paint.
Step 4: Assemble the flower.
When the paint is completely dry, fix the sepals with hot glue. We fix the leaves with the remaining tails of the wire.
Yes ... To make the stem long, we will attach the cut handles with hot glue.


For strength and to make the stem even and neat, wrap it with green electrical tape.
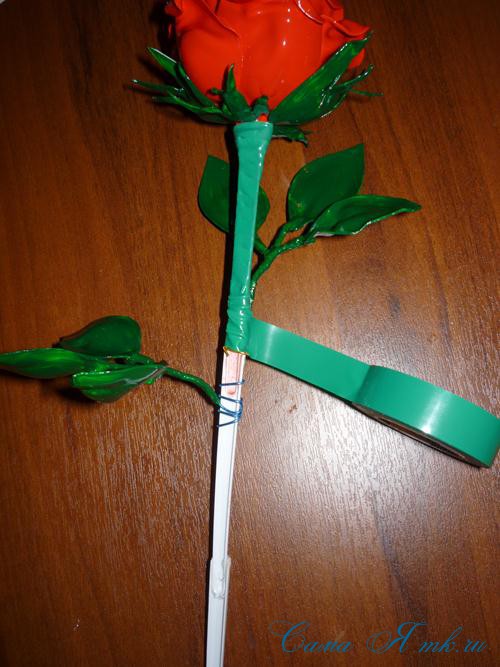

And color it in the tone of the leaves.
Here we have such a rose!


And from every angle...


Flowers made of plastic spoons, of course, are a little inferior in their beauty to living ones, but they have an undeniable advantage: they will delight you for many, many years.
It is not necessary to make a flower on a stem. Fantasize! Roses can be used as a hair ornament by attaching them to a headband, hair clip, or the like. Topiaries with roses made of plastic spoons look interesting, and the color of the flowers can be any, it all depends on your desire and imagination!!!
I was glad to help!
Desperate housewives are trying to invent various toys and handmade crafts to surprise everyone. Plastic is widely used nowadays. It's no secret that from plastic bottles you can do anything your heart desires, it would be a fantasy. But not many people know that you can make a lot of interesting gizmos with your own hands from plastic spoons. Let's see what crafts from plastic spoons mankind has already come up with.
In this article, we will show a variety of photos of plastic spoon crafts so that you can choose the appropriate option and put it into practice.
This collection contains crafts (in order from left to right):
- A pineapple
- Rooster
- Flower (type 1)
- Flower (type 2)
- Cone
- Floral card
- fish
- Swans (type 1)
- flower panel
- Swans (type 2)
- Decoration for a summer cottage
- Outlandish fruit (type 1)
- Herringbone
- Outlandish fruit (type 2)
- Flower - a water lily from plastic spoons
- Frog
- orchids
- Swan (type 3)
- Flower (type 3)
- Flower (type 4)
- ladybugs
- lilies of the valley


These craft options are designed to spark your imagination and allow you to make something of your own. Look at the photo, fantasize and create your own options. The material is very simple and with its help you can make a wide variety of crafts. The main thing is to start with something simple to hone your skills in using the material, and only then move on to making complex products. Each of the presented crafts can be found in separate diagrams with a detailed description. In this article, we present video - materials for the manufacture of some of the presented crafts. See.
1) Video - a lesson on making pineapple
2) Video - a lesson on making water lilies
3) Video - a lesson on making a swan from plastic spoons and tires
In general, fantasize, experiment and try. Plastic spoons are not a material to be protected and handled with care. In which case it is not expensive. But, the more you experiment, even if the first products are not beautiful, the more likely you will be able to make something of your own, individual. For plastic spoons and to business!