Do-it-yourself wreath of autumn leaves - a selection of master classes. Crafts from maple leaves and helicopter seeds on the theme of autumn for kindergarten and school
In autumn, you really want to bring a bunch of fallen leaves home, but what to do with them later? We offer you an article with master classes on how to make a wreath of autumn leaves with your own hands.
Easy option
We will need:
- twigs;
- autumn leaves;
- wire;
- ribbon.
We form a circle from twigs, fasten with wire. Then we begin to wind the leaves in a circle, they should overlap.
To hang a wreath, make a loop of ribbon.

royal flower
Let's make a rose from the leaves. To do this, they must be slightly damp.
When a certain number of flowers are ready, we prepare the base from a thick wire, folding it into a ring.

Now we can connect the roses in threes and start attaching these blanks to the base with a thread or thinner wire.

This is the wreath we end up with. Also use ribbons for hanging.

craft with children
Most often, we go with children to the forest or park to admire the fall of the leaves. We offer you a master class on how easy it is to make a beautiful wreath by introducing a child to the creative process.
It all starts with the collection. Choose colorful leaves: red, yellow, green. Different types: maple, mountain ash, birch, etc.
From a disposable plate, cut out the base, how to do it, shown below in the photo.


Now it's the turn of the child's hands and his imagination. Let the kid apply glue and place the leaves on the base in the order that his imagination tells him.


If the branches stick out, they must be cut.

If you and your child have collected not only leaves, but also various cones, then make the next wreath.

For it, you can also use the base of a disposable plate, or you can cut it out of cardboard. The leaves must be glued in several rows and in a checkerboard pattern. For convenience, you can draw several circles.

When you get to the inner circle, start gluing the rest of the decor. To begin with, let it be large acorns, and between them small cones (for example, alder).

On top, let the small acorns into the space between the large ones.

When all additional materials are glued or you are satisfied with the existing result, we will begin to make the loop. To do this, cut out two rectangles from cardboard, and a loop from woolen thread, string or ribbon. We place it between the cardboard boxes and glue it.


We glue the loop on the back of the wreath and that's it, it's ready.

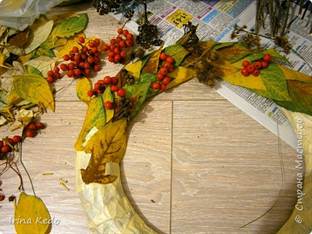
From the leaves and berries of rowan

To create it you will need:
- leaves, it is better to take birch or similar;
- rowan berries;
- dried flowers to choose from;
- thin branches;
- cardboard;
- newspapers;
- twine or ribbon;
- masking tape;
- glue.
Cut out a circle from cardboard and cover it with several layers of newspaper using masking tape. We impose so much paper until we get the desired thickness.

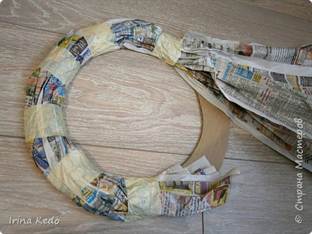
With the help of the same adhesive tape, we begin to cover the surface of the base with overlapping leaves. You can also use glue.


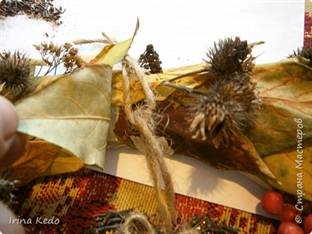
In principle, such a wreath looks beautiful on its own, but let's continue decorating it. To do this, we distribute branches with berries, branches of dried flowers throughout the wreath.


Now put the wreath aside and cut out four hearts from cardboard.
You can make them the same size, or you can make one of the pairs a little smaller than the others, as you decide.
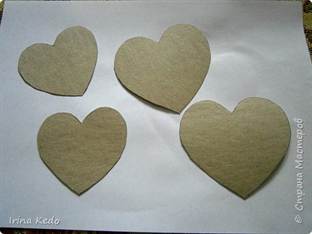
We glue in pairs, not forgetting to put a loop of twine (or ribbon) between them.

Now we close each side of the hearts with leaves. We cut off the excess.


We apply glue to the edges of the hearts and sprinkle these places with crumbs from twigs.

We decorate the central part with rowan berries.
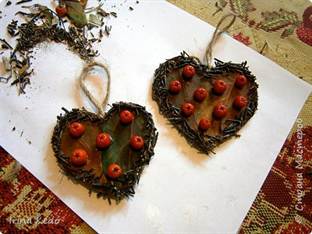
We attach the hearts to the wreath, hiding the loops under the leaves.

This wreath can decorate your home. And since it is made with your own hands and labor and warmth have been invested in it, it will become a kind of amulet for your family.
paper decoration
But what if, for example, the weather does not allow you to collect live leaves or you live far from the park? What now, to abandon the idea of \u200b\u200bcreating an autumn wreath? Do not despair, colored paper will come to your aid. Here you can also involve children, this will certainly develop not only fantasy, but also fine motor skills. After all, we will make leaves using the origami technique.

Prepare:
- colored paper;
- scissors and stationery knife;
- glue;
- cardboard, preferably thick;
- stapler.
From paper cut out squares with sides of 10 centimeters. We will have 10 pieces for each sheet. The number of leaves will depend on the size of the base.

Take six squares and fold them diagonally. Next, fold both corners to the fold line. We have formed corners at the bottom, we also bend them to the center. For the other three squares, we perform only the first stage of adding the right and left corners. But the tenth will serve as a cutting for the leaves.


When we prepare all the details, we begin to glue them in threes, as shown below.

Then we connect all the triplets together. We place them side by side.


We paste the tenth square on the reverse side, cut it along the edge of the sheet, but not the end. We fold this protruding part into a stalk.


Now we cut out the base from the cardboard and begin to place our leaves. We impose one on the other with an overlap with cuttings inside.

Our autumn wreath is ready. Here are a variety of wreaths that can decorate your home in the fall.
Video on the topic of the article
6 tips for creating a beautiful DIY fall wreath
Autumn has always fascinated real romantics with its bright colors and pleasant aromas of fallen leaves. This beautiful time of the year is also the favorite time of most decorators and designers. And it is not at all surprising, because autumn gives others not only excellent inspiration, but also a large number of gifts of nature that can refresh any interior. So why not take advantage of these riches and make something special and beautiful? In this article, you will learn how to make an autumn wreath with your own hands, which will become an original decoration for your home.
Wreaths are ideal for interior decor in the autumn period, because they are not only hung on walls or doors, but also decorate main compositions, dining tables and vases with them. The word "wreath" itself is of Slavic origin, meaning "gift". This beautiful wicker decoration made of natural materials in the shape of a ring is not only a decorative element, but also a talisman for the home.
Where to begin?
Making an original wreath with your own hands is easy. First you need to make a frame. For it, you can use foam, wire, or ordinary wooden branches that bend easily. You just need to give the material a rounded shape. Next, you need to determine what materials will be used for design. For example, wreaths with autumn fruits look quite bright and interesting, which will go well with large golden leaves. But this is just one decor option out of many that exist.
How to do?
Here is one way to create a beautiful fall wreath. It is so light that even a child can make it, but it is better, of course, under your strict guidance.
How to apply?
As for the original design of the wreath, then your imagination should already be used. But we have selected for you the most interesting and beautiful ways of decor.
We offer you 6 simple tips for decorating and designing an autumn amulet:
1. Don't be afraid to use colorful bird feathers
Such a wreath will look very original. You can use pheasant feathers and supplement them with cones, acorns, spikelets and dry twigs. If all the elements are used in moderation, you will get a very unusual and stylish wreath. And to complete the look, we recommend attaching a satin bow.
2. Decorate the wreath with colorful fall leaves
This design option is the most win-win. Although it is quite simple, it is still successful, because bright leaves can effectively decorate interior decor. Especially if you plan to add warm colors to the room or garden. And, of course, the leaves can easily be found on the street or in the park. Try to collect leaves in a variety of shades to create an interesting sunny palette gradient on your wreath. Also, do not forget to add some cones, chestnuts or mountain ash to the composition.
3. Add beautiful spikelets to the composition
Golden spikelets of wheat are a symbol of a rich harvest and fertility. Therefore, it is ideal for a charm that can be hung on the front door of the house. In addition to wheat, field spikelets can also be used. If it seems to you that such a wreath looks too simple, then you can add a bow or ribbon with the words "welcome". Thus, the composition will look cute and welcoming.
4. Use small autumn fruits
Ripe fragrant fruits are ideal for decorating a wreath. For example, small apples with reddish barrels, pears or dried orange slices are most often used. Small and light elements are best attached to the frame of the wreath using a heat gun or double-sided tape. And for attaching larger elements, use wire or toothpicks if the wreath frame is made of soft material.
Bright orange pumpkins always evoke autumn associations. They have also always been the main element of garden or terrace decor. For a wreath, it is best to buy artificial mini pumpkins, as real ones are rather short-lived. Decorative pumpkins weigh much less, and in appearance they do not differ at all from genuine ones.
6. Add a beautiful big bow to the wreath
If your autumn wreath has only a few basic elements, then a large chic bow will definitely not interfere with it. It is best to use warm-colored velvet fabric or natural linen.
With the advent of autumn, yellow-red carpets made of fallen leaves and flowers are spread in city parks, squares and in the forest. The leaves collected in the park are an excellent material for creating various compositions, fakes and paintings that can serve as an excellent gift or become an element of decor in any room. Bright autumn leaves pair well with dry flowers, cones, dried berries and fruits, acorns, twigs and other decorative details, allowing you to make unique design decorations.
Decorative wreaths made from autumn leaves are a bright and spectacular design element that is usually placed on walls, doors, near vases and candlesticks. Such wreaths are made both from leaves of the same type and color, and from different leaves - a combined method. Wreaths look especially good, on which there are as many different elements as possible: cones, wheat spikelets, acorns, many small leaves and branches, and at the end red clusters of mountain ash and decorative pumpkins or apples are attached.
To create an autumn wreath of leaves on the door, you must first prepare the following materials: twigs from bushes, trees or a vine, dry yellow and red leaves, viburnum clusters, dried physalis, glue gun, scissors, twine, gold threads and decorative birds for decor. In handicraft stores, you can often find ready-made bases for creating decorative wreaths, but everyone can easily find everything they need in the nearest park without spending extra money;
After all the materials are selected, you should proceed to the creation of the wreath itself. The first step is to twist a wreath from the prepared branches. The process is quite simple: the branches are collected in an armful and gradually tied with twine, trying to form a circle or an oval. Small sticking branches can be left, this will give the finished wreath a natural look;

When the shape of the wreath is fully formed, you can start decorating the wreath. At this stage, you should decide what the wreath will be like: with one face or two-sided. Here the process of making a one-sided wreath will be shown. We wrap the wreath several times with gold thread;

Let's start gluing the leaves: apply hot glue to the leaf and place it on a suitable branch;

We do the same with the other half of the wreath, but we already paste a little less leaves. The result should be a slightly asymmetrical wreath, as shown in the picture:

We make a small bouquet from several rowan berries and leaves and glue it on the right side of the wreath;

We connect two physalis buds together. Glue the flowers at the base of the wreath;
I really love autumn for its bright colors, abundance of vegetables and fruits, warm scarves and berets, and, of course, for the comfort and special atmosphere. And I also really like to create interesting and beautiful home decor from natural materials.
In autumn, nature is generous with colors, and the whole world around us is a riot of color. I constantly want to collect something, make bouquets, and also weave autumn wreaths of leaves, cones and other gifts of autumn. And then leave all this beauty in your memory for a long time, because ahead is the winter time, buying up paints.
DIY autumn wreath
The word "wreath" comes from an old Slavic word meaning "gift". This wicker decoration made of natural materials in the form of a ring is designed not only to decorate, but also to protect warmth and peace in the house.
Editorial "So simple!" prepared for you 21 delicious autumn wreath idea which are so easy to create with your own hands. Here it is - a symbol of the harvest, creating comfort.
- This wreath used a large number of different herbs and fruits of reddish hues. Such decor will become a fashionable and bright addition to your interior or house facade.
- The natural colors of autumn leaf wreaths are familiar to the human eye, they soothe, relax and harmonize.
Fresh and dry leaves are very beautiful and only once again confirm that the best artist is nature. So why not fill the space at home with her wonderful works, creating a special atmosphere of comfort.


- And this decoration is for lovers of everything unusual. If you think round wreaths are too boring, try weaving a wreath in the shape of a heart. It looks very stylish and original.


- This season, according to the Pantone Color Institute, red is in special favor. And this is a good reason to create a monochrome solution for your interior in red tones.


- All lavender lovers will appreciate this fragrant decor. Weave a lavender wreath and decorate the door with it, and happiness will definitely not pass by!


- Old newspapers can also be used to make very pretty wreaths that are great to hang on the wall or use as table decorations.


- To create such a decor, you will need cones, hot glue, pruners for cutting cones, a wreath hoop (can be twisted from branches or newspapers), burlap or linen.
Using a pruner, you need to trim the bumps, cutting off the tops. Work on such a wreath is laborious and with an abundance of garbage, but the result is worth it.


- In the simplest, but at the same time effective way decorate a wreath on the door decoration will be collected on the street or in the park with autumn leaves. A wreath looks beautiful both from leaves of the same type, and combined. For a decorative wreath, oak, maple and other leaves are suitable, the color is your choice.
Dry artichoke, pine cones, chestnuts, acorns and rowan can be added to the leaves.


- And this is a wonderful autumn wreath using physalis fruits. How do you like this stylish front door decoration?


- This wreath can be used as table decor. Stylish and beautiful, isn't it?


- Maple leaf wreaths are especially popular, which can be woven in the usual way or come up with something more interesting.
For example, you can take birch, maple or other tree branches and intertwine them together. And then decorate the branches with leaves, ribbons, acorns or cones.


In autumn, you can also see a lot of orange physalis fruits, which stand out brightly from other plants. Due to its natural ability to survive for a long time without water, physalis is an excellent basis for decoration. So I suggest you get inspired by another couple of physalis.
Autumn wreaths made from natural materials can be hung on a wall or a door, placed around a candlestick, a vase and other decor items, and they will create an atmosphere of comfort, warmth and harmony in the house.
Let your imagination fly! And may your autumn wreath be bright and sunny. To create it, you can use both natural and artificial materials. So on the way home, do not forget to collect a bunch of maple leaves, cones, mountain ash and get to work soon.

In addition, to create such decorative wreaths children can be involved. They will be able to select leaves, cones and acorns that match in color, as well as weave them into a wreath on their own.
Nastya practices yoga and loves traveling. Fashion, architecture and everything beautiful - that's what a girl's heart aspires to! Anastasia is engaged in interior design, and also makes unique decorations with a floral theme. Dreams of living in France, learning the language and keenly interested in the culture of this country. He believes that a person needs to learn something new all his life. Anastasia's favorite book is Eat Pray Love by Elizabeth Gilbert.
With the onset of autumn, kindergartens and schools hold holidays dedicated to this time of year. We have collected maple leaf craft ideas and are happy to share them with you.
Important: Autumn nature is rich in materials from which you can make real masterpieces.
It would seem that maple leaves ... Is it possible to make an interesting craft from this uncomplicated raw material? It turns out you can.
Here's what you can do with maple leaves:
Herbarium. Beautiful multi-colored maple leaves will look good in tandem with other leaves. bizarre shapes form a beautiful picture.
Herbarium of autumn leaves
Bouquet of flowers. Leaves folded using a special technology can turn into an original bouquet of flowers. Clusters of viburnum or mountain ash, dried flowers will add color to your bouquet.
 Bouquet of autumn leaves
 Applications. Stick a maple leaf on a white or colored sheet of paper and make a muzzle from improvised materials. You can also make an application in the form of a still life or landscape.
 Maple leaf appliqués
 Crafts from maple parachutes for children: photo
Important: Creative fantasy is limitless. In the process of creating crafts, not only maple leaves are used, but also parachutes, or earrings, they call them differently.
Craft "Dragonfly"
A very simple craft that even the smallest can handle (with the help of mom, of course).

 Dragonfly from maple parachutes
 For manufacturing you will need:
- Maple parachutes
- Paints
- Brush
- small twig
Paint the parachutes with paints, then let the paint dry. Then glue the parachutes onto the twig. The craft is ready!
You can make a whole collection of colorful butterflies, dragonflies and other insects in this way.

 Maple lionfish insects
 Crafts from maple parachutes
 Maple seed applications
It's easy to make a hedgehog from maple seeds. Draw a hedgehog on a piece of paper, you can also print the finished picture. Instead of needles there will be maple parachutes.
 maple seed hedgehog
 In addition to the hedgehog, you can make any other application. For example, owl.

 Maple Seed Owl
 How to save maple leaves for crafts, how to process?
Important: Autumn foliage is a short-lived material, the leaves quickly darken, curl. Therefore, many are wondering - how to save the leaves? It turns out there are several ways.
Method 1. Dry the leaves in a book under pressure.
Method 2. Iron the leaves with an iron between two sheets of paper. Down you need to lay a solid foundation.
 How to Save Maple Leaves for Crafts
 Method 3. Dip the leaves in melted paraffin. The temperature of the melted paraffin should be medium so that the sheet does not turn black. This is done as follows:
- Melt the paraffin in a wide bowl
- Dip a leaf in warm paraffin
- Place the maple leaf on a piece of paper to dry.
Method 4. Soak the leaves for several days in a solution of glycerin with water. The solution should be in this proportion: 1 part glycerin, 2 parts water.
Video: How to save leaves for crafts?
Cones are a common material for children's crafts. If you combine cones with maple leaves, you can get an interesting little thing.
For example, such a cute owlet can be made from a cone, its wings will be dried maple leaves.
 Crafts from cones and maple leaves
 Craft: a bouquet of maple leaves
Important: Maple leaves can turn into a luxurious bouquet if you work hard.
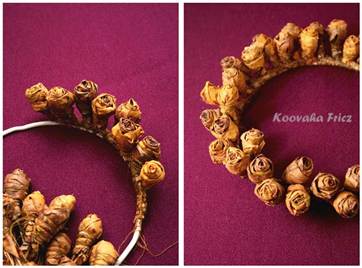
First you need to learn how to twist a rose.

 How to make a maple leaf rose step by step
 And here are the bouquets that can turn out in the end.

 Bouquet of maple leaves
 maple leaf craft
  Maple leaf roses
 Video: Maple leaf roses
Craft: Maple Leaf Wreath
A wreath made of autumn leaves can become a spectacular element of decor.
You can combine a maple leaf wreath with many other natural materials:
- Clusters of rowan
- cones
- spruce branches

 autumn wreath
  Wreath of autumn materials
 Maple leaf wreath
 To create such a wreath, you will need time and perseverance, as well as improvised materials:
- Willow rods, wire or any other improvised base for the frame
- Tape or thread
How to make a maple leaf wreath:
- First make a round base with willow twigs or hard wire
- After that, twist each maple leaf with a tail onto the base.
- To keep the leaves, secure them with thin wire or thread
- Add decorations while weaving a wreath

 How to make a maple leaf wreath step by step
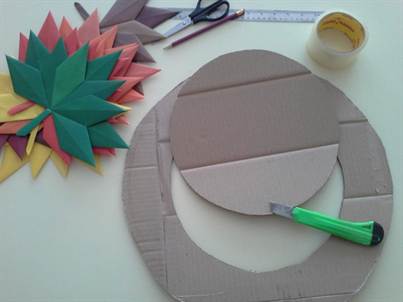
 Another option bases for a wreath - cardboard:
- Cut a ring out of cardboard
- Gently wrap the circle with knitting thread
- After that, you can start decorating the wreath with leaves, fixing them with PVA glue


Video: Decorative leaf wreath
Maple Leaf Crafts: Vase
In order to make a vase from maple leaves, you have to tinker.

 Maple leaf vase
 You will need:
- PVA glue
- Brush
- Balloon
- maple leaves
Preparation method:
- Blow up the balloon. Please note that the vase will take the shape of your ball in the end.
- Dilute PVA glue with water in a ratio of 1: 1. Coat the ball with glue.
- Glue the leaves in any pattern.
- Leave the ball to dry. When the glue dries, you can pierce the ball with a needle and remove it from the vase.
Craft: maple leaf plate
As mentioned above, the leaves take the form of a balloon, if you stick them on it. In this way, you can make narrow vases or flat plates, as you wish.

 How to make a maple leaf plate
 The plate is made in the same way as a vase. First, inflate the balloon, then spread it with glue, glue the leaves and voila - the plate is ready.
 maple leaf plate
 DIY maple leaf crown
Important: If your daughter will perform at the autumn festival in kindergarten or school, and you don’t know how to decorate her themed outfit, make a crown from maple leaves.

 leaf crown
 - Collect smooth beautiful maple leaves
- Trim the tails of each sheet with scissors.
- Pull the tail of one leaf through the other, as if making a stitch

Fold the leaves in this way until the chain reaches the desired length. At the end, fasten the sheet in front.

 How to make a leaf crown step by step
 The crown on the matinee can be replaced with a wreath of leaves. Decorate it with bright clusters of rowan to make the wreath shine with colors.

 Maple leaf wreath
 Craft: Maple Leaf Hedgehog
We have already talked about how to make a hedgehog from maple leaves above. Here are a few more options for the Maple Leaf Hedgehog craft.
A maple leaf hedgehog is a simple craft that will take you very little time. Such an activity will captivate the baby for a long time.
 Leaf applique: hedgehog
  maple leaf hedgehog
 Children's crafts: hedgehog
 Craft from maple and oak leaves
Important: Oak leaves can also be used for crafts. If you combine oak and maple leaves, you get an interesting combination of colors and shapes.
Oak leaves are suitable for applications.
 oak leaf craft
 As an example, we can take the following interesting idea. Leaves can be glued to any, including oak and maple.

 Craft from oak and maple leaves
 More options for applications from various leaves:

 Crafts for kindergarten and school: leaf applications
 Leaf applique: squirrel
 Leaf applique: cat
 Craft: maple leaf tree
The original tree can be made if you show imagination. For the Maple Leaf Tree craft, you will need the smallest leaves so that they can fit on a small piece of paper.
 craft tree
  craft maple tree
 Crafts from chestnuts and maple leaves
Important: Chestnuts grow in many cities, towns, villages. Finding a chestnut for crafts and finding a use for it is not a problem, there are a lot of ideas.
By the way, you can use not only chestnuts, but also the prickly peel from them. See what cute hedgehogs in the clearing turned out from the dried chestnut peel.
 Craft from maple leaves and chestnuts
 You can make a whole autumn composition using chestnuts, maple leaves and other materials.

 Composition of autumn natural materials
 Maple leaf sun: crafts
Making a sun out of maple leaves is an easy task.
You will need:
- A4 sheet of paper
- Paints
- felt-tip pens
- yellow maple leaves
Draw a circle on a piece of paper. Color it with yellow paint, when the paint dries, draw eyes, a mouth and a nose with a felt-tip pen. Or stick on colored paper. Maple leaves will be rays, so it is better to choose bright yellow leaves.

 Maple leaf sunshine
 Craft the sun
 crafts with children
Important: Red rowan goes well with leaves. The color scheme is bright, juicy.
Rowan can be added to bouquets.

 Combination of rowan and maple leaves
 And again a hedgehog. Only on his back is a bright bunch of mountain ash.
 Crafts from rowan and maple leaves
 Rowan looks gorgeous in bouquets.

 Autumn wreath with rowan and leaves
 Autumn is not the time to be sad and mope because of rainy weather. Do not forget that autumn also gives us the time when you can fully admire the beauties of the many-sided nature.
Video: Children's autumn leaf crafts