Rocket from a bottle to the kindergarten. Crafts on the theme of space in kindergarten and school
How to make crafts for Cosmonautics Day in kindergarten? Consider what planets are in the solar system! Let's create an amazing rocket, brave astronauts and funny aliens!
Children are happy to listen to stories about events that happened on this day many years ago, and are easily included in the process of preparing for the holiday. Considering that it is not recognized as a day off, most often children get acquainted with this holiday within the walls of a kindergarten.
Crafts for Cosmonautics Day in kindergarten can be of a very different nature, depicting both real attributes of space and fantastic images. Thinking about space, children often give free rein to their imagination, as in any case when it comes to objects that go beyond the reality around them.
There is no need to prevent this, because, by fantasizing, the child is trying to create his own idea of \u200b\u200bthe distant and unknown. However, it is still necessary to strive to expand the boundaries of his knowledge.
First of all, you need to tell why Cosmonautics Day is so important: a person has long been trying to find out what is beyond the clouds. He saw the light of the stars and the moon, but he could not rise high enough. Until the rocket was invented.
Do-it-yourself postcard for Cosmonautics Day
The postcard is a universal gift for any holiday, including Cosmonautics Day. Volumetric postcards with steps on the fold look very impressive. This effect is achieved very simply - on the fold of the postcard, two cuts are made at a short distance.

We bend the card in such a way that in the places of the incision the protrusion curves in the other direction.

We glue a rocket out of paper.

We decorate the bottom and back surface of the card with the sun, moon and stars. Postcard for Cosmonautics Day - ready!

A postcard with a rocket and stars can be made in a classic style on paper folded in half.

You can make a round postcard with a rocket taking off and the moon.

Salt dough rocket craft for Cosmonautics Day
The image of a rocket can be created in a variety of ways. A charming rocket with stars for Cosmonautics Day can be molded from salt dough. We dry the craft in the oven or on the battery (at least 12 hours).

We paint the dried craft with bright colors.

We take a sheet of paper or cardboard and paint it in a rich purple color. When the paint dries, make white splashes on a sheet of paper. We get a beautiful starry sky.

We color the rocket and glue it to a dense base.

To make Cosmonautics Day in kindergarten memorable for all kids, it is necessary to create an appropriate atmosphere. And crafts made by children's hands will do the best job with this task.
Plasticine painting for Cosmonautics Day in kindergarten
On Cosmonautics Day, you can make a real picture from a picture of plasticine. Smear dark purple plasticine on the surface of the sheet.

We decorate it with blue "cosmic whirlwinds" and yellow "stars".

Background with "swirls" and "stars"
We mix together blue, green and yellow plasticine.

We sculpt a flat Earth from colored plasticine and glue it to the base.

We supplement the craft with figures of a rocket and an astronaut. It remains to place the craft in a frame. A three-dimensional picture for Cosmonautics Day is ready!

Plasticine rocket for Cosmonautics Day
Crafts from plasticine for the day of astronautics can be made voluminous. We roll up a sausage from brown plasticine and give it the shape of a rocket body.

The back of the rocket is attached to the body with a match.

We make the fire bright red and fix it on the other side of the match. From yellow plasticine we make portholes and side parts of the rocket.

Watch how to make a beautiful rocket for Cosmonautics Day in the video:
Rockets from different materials for Cosmonautics Day
A very effective rocket can be made from corrugated cardboard folded into a tube.

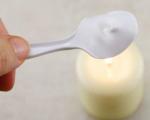
Volumetric model from a plastic bottle. We paint the bottle from the inside by pouring a little white paint into it and shaking it well until the paint covers all the walls. In the lower part we make two vertical slots, into which we insert wings made of thick cardboard painted in white or metallic color. We decorate the body and wings with ready-made stickers in the form of stars or circles.

The original application "Rocket in space" is obtained from a cardboard roll from toilet paper. To create a starry sky, apply transparent adhesives to the background and sprinkle it with semolina.

Application "rocket in space" in kindergarten
Application - a rocket for Cosmonautics Day (video):
Kids will love the applique "rocket", with their own photo!

A very beautiful rocket can be made from a foam egg, which can be easily found in the "everything for needlework" store. We plant the egg blank on a wooden stick. We color the egg and glue paper parts to it (porthole, wings and tail). A foam rocket does not require much effort and effort, and the result will be very bright and beautiful.

Origami rocket (video)
Craft for Cosmonautics Day using quilling technique on a disk
A very effective craft for Cosmonautics Day can be done using the quilling technique (paper rolling).

We twist a circle from brown paper, which we make flat on both sides - this is the rocket body. From thin strips of yellow paper we twist three curls - rolls. We place them inside the rocket - we will get windows.

From red paper we twist the roll, which we make flat on one side. This is a flame.

From white paper we twist the rolls, which we give the shape of stars. Craft for Cosmonautics Day using quilling technique is ready!

Very spectacular rockets for Cosmonautics Day are made from cardboard and toilet paper rolls.

From plastic bottles you can build a funny rocket pack.

Craft astronaut in kindergarten
Pupils of the younger and middle groups of the kindergarten can be invited to make their own astronaut. And not just an astronaut, but the first cosmonaut - Yuri Gagarin.

We invite the children to create their astronauts using the application technique for this. We distribute ready-made spacesuit templates, which we propose to stick on a sheet of purple or dark blue cardboard. And we cut out the astronaut's face from a photograph of a child - let the most courageous children imagine what they will look like if they decide to conquer outer space after they grow up.

Application "Soviet cosmonaut"
A funny astronaut can be made using the application technique from pieces of colored paper. You can also stick a photo of the child - this will make the craft unique.

Application "cosmonaut"
Beautiful porthole windows are obtained from a disposable plate.

This application suggests a lot of interesting topics for the lesson on the topic "Space": the flight of the astronaut dogs Belka and Strelka, the first manned flight into space, the first landing on the moon, the existence of aliens.

Application on the theme "Space"
Planets for Cosmonautics Day
Now we have smoothly moved on to what the astronauts could see, having risen beyond the limits of the earth's orbit. At this moment, we are directing the conversation in a scientific direction, telling the children about the planets. Along the way, you can make a model of the galaxy in the form of an application. We prepare in advance several circles of different colors and sizes and distribute them on a sheet of paper in the way that planets can be distributed in space. The planets look very beautiful on a huge black drawing paper - we get a real outer space.

A very interesting idea for Cosmonautics Day is to make a model of the solar system from ordinary cardboard. We draw schemes of the movement of the planets with shiny glue. The planets themselves can be made from plasticine, papier-mâché, buttons, or colored pompoms.

Crafts for Cosmonautics Day in a box
A very original space craft can be made in a cardboard box. To do this, it will be necessary to glue it inside with foil and glue strings with various attributes of space - the sun, a rocket, an astronaut and stars on the upper part.

At the top of the box, you can make the inscription "space". We will have a wonderful exhibit that is suitable for a space exhibition.

Watch how to make another very effective craft out of the box in the video:
Aliens in kindergarten on Cosmonautics Day
And, of course, every child will be happy to dream up what kind of inhabitants could expect astronauts on the planets. Alien appliqué can be decorated with stickers with stars.

Application "alien life"
And as the basis of the picture, you can use not only a sheet of paper, but also a disposable plate wrapped around the edges with foil.

Kids will love this homemade flying saucer.


A flying saucer made of plastic utensils will not require large expenses, but in beauty and originality it will surpass all other space-themed crafts.

Crafts for Cosmonautics Day in kindergarten on video:
Look at the video, what a wonderful craft you can do on Cosmonautics Day:
Drawing for Cosmonautics Day in kindergarten

Drawing "Space" with crayons and paints

Watercolor drawing "Rocket and astronaut"

Watercolor drawing using salt "Cosmonaut and rocket"
From each group of crafts we form a thematic exhibition, and on a holiday, each child will be able to tell what exactly he remembered about the events that happened many years ago.
Museums of astronautics for children (photos of our readers)

Patterns for cutting for Cosmonautics Day

Cosmonautics Day cutout template "rocket, moon, spaceship and planet"

Cosmonautics Day clipping template "planets, star and comet"

Space cutting template
Children are the flowers of life. But these "flowers" are sometimes so unbearable, especially in outdoor games. Sometimes there is a desire to sit in a quiet environment, without screaming, noise and running. And there is a great activity that will help your children focus on creating something new - the Rocket craft. There are several ways to create this kind of instance. This article will consider two options for creating a rocket.
Tube rocket.
For work you will need:
cling film tube
scissors,
paper of different shades and colors,
PVA glue (the set is minimal, this craft is suitable for any family budget).
Having chosen the color of paper you like, cut out one fourth of the circle. Having determined the diameter of the tube, we glue the cone from the resulting cut out part. At the ends, you need to make small cuts, after which we glue this part to the tube from under the cling film (you first need to cut the tube of the length that is required). The cylinder (tube) itself is glued with colored paper. The next step is to cut out the trapezoid, they will serve as the wings of our rocket. We glue the trapezoid in half, leaving an allowance in order to glue it to the rocket. We decorate the rocket with different "inversions".


All is ready!
colored paper rocket
This type of work is perfect for children over three years old. First you need to prepare at least four different colors of corrugated paper. The work is not so difficult, but warn your baby that you should be patient.
We take corrugated paper and carefully cut strips 1.5 and 2 centimeters wide.
To create a rocket body, we need ten stripes of the same color. We twist the strips into one roll, alternately gluing one strip to the other. You need to try to twist as tightly as possible. After all ten strips are wound, we push the middle of the “roll” up. The result should be a neat cone. We repeat once again, as a result there should be two such cones (it is advisable to make them of the same color, it will look prettier).


We cut out two strips 4 centimeters wide, and twist a circle out of them, identical in diameter to the cones. We get the "cabin" of the rocket. From 1.5 centimeter strips we wind six "rolls" consisting of five strips. From the three rolls obtained, we make cones, and glue the remaining three as a base to each resulting cone. It remains only to collect the rocket. We “put” all the details in place with the help of superglue.
The rocket is ready to launch!
Your baby will like these toys, because he will create them himself, and it is very interesting to play with them.
All children, as they grow up, understand that saving money is great. Therefore, I want to offer you an idea on how to make a piggy bank from a plastic bottle. This is a very fun and exciting activity. Let's Make a Piggy Bank Rocket!
We will need:
- plastic bottle;
- stationery knife;
- blue cardboard;
- permanent marker;
- glue.

Cut out four circles from cardboard: three are identical small ones, and the fourth is twice as large. Three - glue the bottles on the body - these will be the portholes. Cut the fourth in half, then in half again. Make wings out of quarters.

Circle the portholes with a marker. Draw some details on the body of the rocket. Use a scalpel or clerical knife to cut a hole - a coin acceptor.

That's all! Piggy bank rocket is ready!
Rocket modeling is an activity that captivates not only children, but also quite mature and successful people, as you can see from the composition of the teams of athletes at the World Championship in rocket modeling sports, which will be held in Lviv on August 23-28. Even NASA employees will come to compete on it. With rockets assembled by myself. In order to make the simplest working model of a rocket with your own hands, special knowledge and skills are not needed - there are a large number of detailed instructions on the Internet. Using them, you can make your own rocket even from paper, even from parts purchased at a hardware store. In this article, we will take a closer look at what rockets are, what they are made of, and how to make a rocket with your own hands. So, in anticipation of the Championship, you can get your own model and even fly it. Who knows, maybe by August you will decide to take part in an extra-class competition in launching rockets with a payload "Save Space Eggs" (to be held as part of the Championship) and compete for a prize fund of 4,000 euros.
What is a rocket made of?
Any rocket model, regardless of class, necessarily consists of the following parts:
- Frame. The rest of the elements are attached to it, and the engine and the rescue system are installed inside.
- Stabilizers. They are attached to the bottom of the rocket body and give it stability in flight.
- Rescue system. Needed to slow down the free fall of a rocket. It can be in the form of a parachute or a brake band.
- Head fairing. This is the cone-shaped head of the rocket, which gives it an aerodynamic shape.
- Guide rings. They are attached to the body on the same axis, they are needed in order to fix the rocket on the launcher.
- Engine. Responsible for the takeoff of the rocket and is even in the simplest models. They are divided into groups according to the total thrust impulse. You can buy a model engine at a tech store or build your own. But in this article we will focus on the fact that you already have a finished engine.
Not part of a rocket, but a must-have launcher. It can be purchased ready-made or assembled independently from a metal rod on which the rocket is attached and a trigger mechanism. But we will also focus on what launcher you have.
Classes of missiles and their differences
In this section, we will consider the classes of rockets that can be seen with our own eyes at the World Championship in rocket modeling in Lviv. There are nine of them, eight of them are approved by the International Aviation Federation as official for the World Championship, and one - S2 / P - is open not only to athletes, but to everyone who wants to compete.
Rockets for competition or just for yourself can be made from different materials. Paper, plastic, wood, foam, metal. A mandatory requirement is that the materials are not explosive. Those who take rocket modeling seriously use specific materials that have the best performance for rocket purposes, but can be quite expensive or exotic.

The S1 class rocket in the competition must demonstrate the best flight altitude. These are one of the simplest and smallest rockets that take part in competitions. S1, like other missiles, are divided into several subclasses, which are indicated by letters. The closer to the beginning of the alphabet, the lower the total thrust of the engine that is used to launch the rocket.
 S2 rockets are designed to carry payloads, according to the FAI, a "payload" can be something compact and fragile, with a diameter of 45 millimeters and a weight of 65 grams. For example, a raw chicken egg. A rocket may have one or more parachutes that will bring the payload and rocket back to earth unharmed. Missiles of class S2 cannot have more than one stage and they must not lose a single part in flight. The athlete needs to launch the model to a height of 300 meters and at the same time land it in 60 seconds. But if the cargo is damaged, then the result will not be counted at all. So it's important to strike a balance. The weight of the model with the engine must not exceed 1500 grams, and the weight of the fuel components in the engine must not exceed 200 grams.
 S3 class rockets may look exactly like S1 class rockets to the uninitiated, but their mission in competition is different. S3 are rockets for the duration of the descent using a parachute. The specifics of the competition in this class is that the athlete needs to carry out three rocket launches, using only two models of rockets. Accordingly, at least one of the models still needs to be found after launch, and they often land several kilometers from the launch zone.
For models of this class, parachute diameters usually reach a diameter of 90-100 centimeters. Common materials are fiberglass, balsa wood, cardboard, the nose is made of lightweight plastic. The fins are made from lightweight cork wood and can be covered in fabric or fiberglass.
The S4 class is represented by gliders, which must be in flight for as long as possible. These are "winged" devices, whose appearance is quite different from what you would expect from a rocket. They rise into the sky with the help of an engine. But in gliders it is forbidden to use anything that will give them acceleration or somehow affect soaring, in the sky the device must be kept solely due to its aerodynamic characteristics. The materials for such rockets are usually balsa wood, the wings are made of fiberglass or foam, and balsa wood too, that is, everything that weighs almost nothing.

 Class S5 rockets are copy rockets, the purpose of their flight is altitude. The competition takes into account not only the quality of the flight, but also how accurately the participant managed to repeat the body of a real rocket. These are basically two-stage models with a massive launch vehicle and a very narrow nose. They usually go very fast towards the sky.
S6 class rockets are very similar to S3 class rockets, but they eject a brake band (streamer) in flight. In fact, it performs the function of a rescue system. Since rockets of this class also need to stay in the air for as long as possible, the task of the competitor is to create the lightest and yet strong body possible. Models are made of parchment or fiberglass. The nose is made of vacuum plastic, fiberglass, paper, and the stabilizers are made of lightweight balsa wood, which is coated with fiberglass for durability. Ribbons for such missiles are usually made of aluminized lavsna. The tape should intensively "flap" in the wind, resisting falling. Its dimensions usually range from 10x100 centimeters to 13x230 centimeters.

Models of the S7 class require very painstaking work. Like the S5, these models are multi-stage copies of real rockets, but unlike the S5, they are evaluated in flight, among other things, by how plausibly they repeat the launch and flight of a real rocket. Even the colors of the rocket must match the "original". That is, this is the most spectacular and difficult class, do not miss it at the World Championship in rocket modeling! Both juniors and seniors will compete in this class on August 28th. The most popular rocket prototypes are Saturn, Ariane, Zenit 3, and Soyuz. Copies of other missiles also take part in the competition, but as practice shows, they usually show worse results.
 The S8 is a cruise gliding radio-controlled rocket. This is one of the most diverse classes, there are significantly different designs and types of materials used. The rocket must take off, make a gliding flight within a certain time. Then it must be planted in the center of a circle with a diameter of 20 meters. The closer the rocket lands to the center, the more bonus points the participant will receive.
The S9 class are rotorcraft and they also compete against each other in the time spent in flight. These are lightweight models made of fiberglass, vacuum plastic and balsa wood. Without an engine, they often weigh about 15 grams. The most intricate part of this class of rockets is the blades, which are usually made from balsa and must be aerodynamically correct. These rockets do not have a rescue system, this effect is achieved due to the autorotation of the blades.
In competitions, rockets of this class, as well as classes S3, S6 and S9, must be at least 40 millimeters in diameter and at least 500 in height. The higher the subclass of the rocket, the larger its dimensions must be. In the case of the most compact S1 rockets, the body diameter should not be less than 18 millimeters, and the length should not be less than 75% of the length of the rocket. These are the most compact models. In general, there are limitations for each class. They are set out in the FAI (Federation Aviation Internationale) code. And before the flight, each model is checked for compliance with the requirements of its class.

Of all the missiles taking part in the current Championship, only models of the S4, S8 and S9 classes are required that none of their parts separate during flight, even on the rescue system. For the rest it is acceptable.
How to make a simple and working rocket model from scrap materials
The easiest rockets to make at home are the S1 class, and the S6 class is also considered relatively simple. But in this section, we will still talk about the first. If you have children, you can make a rocket model together or let them build it themselves.
To make a model you will need:
- two sheets of A4 paper (it is better to choose multi-colored ones so that the rocket looks brighter, the thickness of the paper is about 0.16-0.18 millimeters);
- glue;
- polystyrene foam (instead of it, you can use thick cardboard from which the boxes are made);
- a piece of thin polyethylene, at least 60 cm in diameter;
- ordinary sewing threads;
- stationery gum (as for money);
- a rolling pin or other object of a similar shape, the main thing is to have a smooth surface and a diameter of about 13-14 centimeters;
- a pencil, pen or other object of similar shape with a diameter of 1 centimeter and another with a diameter of 0.8 centimeters;
- ruler;
- compass;
- engine and launcher if you plan to use the rocket for its intended purpose.
On the drawings, which are very numerous on the Internet, you can find rockets with different ratios of the length and width of the body, the "sharpness" of the head fairing and the size of the stabilizers. The text below gives the dimensions of the parts, but if you want, you can use other proportions, as in one of the drawings in the gallery below. The procedure still remains the same. Look at these drawings (especially the last one) if you decide to assemble the model according to the instructions.


Frame

Take one of the saved sheets of paper, measure with a ruler 14 centimeters from the edge (if you don’t get the same volume as ours, just add a couple more millimeters to your figure, they will be needed in order to glue the sheet). Cut off.

Twist the resulting piece of paper around the rolling pin (or whatever you have). The paper must fit perfectly on the object. Glue the sheet directly on the rolling pin so that you get a cylinder. Let the glue dry, in the meantime, take on the manufacture of the head fairing and tail of the rocket.

The head and tail of the rocket
Take the second piece of paper and the compass. Measure 14.5 centimeters with a compass, draw from two diagonally located corners of the circle.
Take a ruler, attach it to the edge of the sheet near the beginning of the circle and measure a point on the circle at a distance of 15 centimeters. Draw a line from the corner to this point and cut out this section. Do the same with the second circle.


Glue the cones from both pieces of paper. At one of the cones, cut off the top by about 3 centimeters. This will be the tail section.

To glue it to the base, make cuts on the bottom of the cone about every centimeter and a depth of 0.5 centimeter. Bend them outward and apply glue to the inside. Then glue it to the rocket body.
To attach the head fairing, you need to make a "ring", thanks to which it will be attached to the base. Take a sheet of the same color you used for the base and cut out a 3x14cm rectangle. Roll it into a cylinder and glue it. The diameter of the ring should be slightly smaller than the diameter of the base of the rocket so that it fits perfectly into it. Glue the ring to the head of the rocket in the same way as you glued the base (just don't cut anything off the cone this time). Insert the second side of the ring into the base of the rocket to check if you have guessed with the diameter.


Let's get back to the tail section. The rocket needs to be stabilized and an engine compartment made. To do this, you need to take the paper again, from which you made the base of the rocket, cut out a 4x10 cm rectangle, find an oblong and round object about 1 cm in diameter and wrap a piece of paper around it, after lubricating it with glue over the entire area so that you end up with a dense multilayer cylinder . On one side of the cylinder, make cuts of 4 millimeters, bend them, apply glue to the inside and glue to the tail.

At the bottom of the rocket should be stabilizers. They can be made from thin sheet foam or, if not available, thick cardboard. You need to cut out four rectangles with sides of 5x6 centimeters. From these rectangles - cut out the clamps. You can choose any shape you like.
 Please note that the head fairing, tail cone and engine compartment must be set exactly along the longitudinal axis of the hull (they must not be tilted away from the hull).
rescue system
In order for the rocket to smoothly return to the ground, it needs a rescue system. In this model we are talking about a parachute. Ordinary thin polyethylene can act as a parachute. You can take, for example, a 120-liter package. For our rocket, you need to cut a circle with a diameter of 60 centimeters in it and fix it on the body with slings (about 1 meter long). There should be 16 of them. Strong threads are suitable for the role of slings. Attach the lines to the parachute with adhesive tape at an equal distance from each other.

Fold the parachute in half, then in half again, then squeeze.
To secure the parachute, take another thread, the length of which should be twice the length of the body. Glue it to the engine compartment between the two stabilizers. Tie an elastic band to the thread in two places, so that if you pull the thread, the elastic stretches, and the thread is a stretch limit (recommendations: tie the elastic band to the thread at a distance of 5 centimeters from the upper edge of the body).

Before putting the parachute into the rocket, you need to place a wad. For example, a piece of cotton wool (or soft paper, napkins) can act as a wad. Make a ball out of the material you like and insert it inside the rocket. If you have talcum powder, then sprinkle it with talcum powder to prevent possible ignition due to the charge being triggered. The wad should not be tight, but the amount of cotton wool should be sufficient to push the rescue system out.
Insert it inside the rocket, then put the parachute and lines. Gently, with rings so that they do not get confused.
A streamer can also act as a rescue system, and if you want to make an S6 class rocket, then you can see how to lay and tie it in these photos.


Mounting to the launcher and launch
Cut out two 1.5x3 cm rectangles. Roll them into a cylinder with a diameter of approximately 0.8 centimeters so that the launcher mount passes freely through these cylinders. Glue to the base of the rocket on the same axis at a distance of a few centimeters from the top and bottom of the base.
Install the engine in the engine bay. Ready to launch!
To start, you need a metal rod with a length of at least a meter and a diameter of 4-5 millimeters. It must be strictly vertical to the ground. Regardless of any conditions, the end of the rod must be at least 1.5 meters from the ground to avoid injury to the eyes.
Never try to launch a rocket at home! Even such a seemingly innocent device can cause a lot of trouble indoors. There must be at least 500 meters from the launch site to the nearest houses.
After igniting the engine, move away from the rocket at least 3-5 meters. Spectators, if any, should be at a distance of 10-15 meters. If you plan to entrust the launch to a child under the age of 16, be sure to be near him.
P.S.
Despite the fact that it is not difficult to make the simplest paper rocket, rocket modeling is a serious and interesting sport that requires a lot of work and a lot of time. And also very spectacular. Against the backdrop of growing interest on the part of private companies in space exploration, the popularization of this topic among the population, especially children, is extremely promising. After all, those who have been attracted to space since childhood are more likely to choose it as a field of activity in adulthood. If the topic of space had not been so popular with children in Ukraine several decades ago, then there would hardly be people and companies like us in our country who invest in such a promising industry as space. An event of the level of the Rocket Modeling World Championship could not have taken place - because there would not have been strong teams and a great desire to stir up interest in the industry among the next generations. We have already written about how interesting the Championship promises to be. There, by the way, it will be possible to assemble the rocket yourself from ready-made parts. Come to Lviv, see everything with your own eyes. Detailed information about the event can be found on its website.
Noticed an error? Select it and click Ctrl+Enter to let us know.
Craft "Rocket" will be an ideal gift for a holiday such as Defender of the Fatherland Day, or April 12th. Photos of various rocket crafts can be viewed on the Internet. Familiarization with several options for this type of craft will allow you to turn on your imagination and create a real masterpiece.
paper rocket
In case you do not know what a rocket can be made of, it is recommended to turn your attention to paper. The composition of paper is different in that even children over the age of five can make it. The presented product can act as a gift to relatives.

Try to make a rocket together with the children, developing the eye, visual memory, and generally getting closer to the kids.

The process of creating a paper rocket includes the following manipulations:
First of all, you need to carefully fold the paper sheet, getting a rectangle. One half of the rectangle is folded to form a cylinder.


Do not forget that the edges will need to be carefully trimmed in a circle, this is done so that in the end the design is more stable.

Taking three squares and using scissors, you need to make a porthole. If children create crafts, then you need to remind them that you need to carefully use cutting tools.

All that remains is to glue the resulting porthole to the existing cylinder. Next, you need to move on to assembling the rocket. When the bow is fixed, you can proceed to decorate the "tail" of the product.

Such a simple master class on making a rocket will allow you to personally verify that there is nothing difficult in creating such a composition.

This leads to the fact that, if desired and with the proper approach, you can always create a spaceship with your own hands, and your children will be happy to help you.


Origami rocket - beautiful and original
Such a composition really looks unusual, if you want to create it, you need to make a minimum of effort, spending a little time, not forgetting to turn on your imagination, showing your exquisite taste. We make a rocket with our own hands step by step so as not to miss a single detail.

Such a composition can be a great solution for such a holiday as Cosmonautics Day, for example, it is quite possible to perform it using the modular origami technique. Older children will be able to independently realize the presented idea.


The creation of crafts is carried out according to the following plan:
At the very beginning, you will need to prepare paper squares, each of their sides should be ten centimeters. The square is folded so that the result is two rectangles and four squares.

It is important to note here that the four corners must be carefully bent to the center, after which the figure is turned over, the corners are bent strictly to the middle. As a result of such elementary manipulations, it is possible to create a “star in a square”.

Next, you need to insert the already created modules into each other, carefully gluing them together. At the moment when you glue the bottom row, you can stick three more rows on top, connecting the body as a whole. Do not forget that any manipulations must be carried out carefully, only then it will be possible to achieve the same composition as a result.


But you can’t imagine a rocket without a nose, so proceed to create it, there is nothing complicated here. All you need to do is roll the paper cone, it's easy and simple.

If necessary, or if desired, you can always make legs that are glued to the base of the module. By doing such simple manipulations, you can enjoy the fact that in the end you will have an original rocket.

Now you are familiar with the instructions on how to make a rocket with your own hands, and you could see for yourself that there is nothing complicated here. Therefore, helping your children, together you will be able to create a real masterpiece that can be presented to relatives, relatives, friends.

plasticine rocket
You can always make a spaceship out of plasticine. It should be noted that this option is famous for developing the baby's fine motor skills, this activity is useful both for attention and perseverance, which will definitely need to be taken into account. But in general, such an activity will definitely be able to attract children to love for creative activity.

The kids themselves must choose the block of plasticine that they like the most, rolling it on a gloss and creating a small oval. Next, the oval is transformed into a long sausage, it needs to be divided into 4 parts, since these will be the legs. To create a door, an oval is rolled up, attached to the bottom of the "homemade".


What do you need to know?
Making a rocket from improvised materials is an interesting and useful activity that children love. The main task of parents is to provide them with this opportunity, so you should treat this issue comprehensively and responsibly.

Photo crafts rockets