Cold porcelain bell. Master Class
Below is detailed photo master class on making a bell from cold porcelain.
Cold porcelain bell step by step:
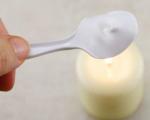
Make a boat bell in a 3cm x 3cm pattern (Pic 1). Roll the clay very thin until transparent, which is beautiful but quite difficult. Draw even strips along the petals using a sharp stack (photo 2). Turn over and pinch the strips with your fingers, creating ribs (Pic 3). Turn over again and make grooves between our pinched strips with a stack with a ball (photo 4).

Turn over and get a blank, as in photo 5. Next, put the bell on the handle for easy gluing. After gluing, grease the seam with water and a brush (photo 6). Pin the top with your fingers in the form of a cross (photo 7). Inside will be as in photo 8.

Make a pistil with stamens, and the stamens themselves from strings (photo 9). Pass a wire with a pestle through the bell, and see the result in photo 10.

Tone with oil (the brush should be almost dry) first along the “ribs” and rub from the top, trying to leave the ends lighter. Then glue the green "antennae", well, roll the leg itself with clay (photo 11). Also can be dyed oil paints- lilac + blue (without white).
The bell symbolizes the beginning of a new year - academic or calendar, as well as the end of studies, the entry into a new, student life. Therefore, a souvenir in the form of a bell will be relevant for many moments in the life of a child and even an adult, and if you make it yourself, you will get an interesting and original surprise gift.
Since making a bell with your own hands is a simple task, even children can cope with it.
There are many options for making souvenir bells. One of the most interesting ways how to make a bell with your own hands - use for this a ready-made small souvenir bell and a beautiful tea cup with a handle.

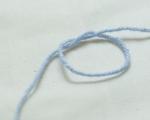
We tie a thin cord to the bell.

Glue its tip to the bottom of the cup from the inside.

On the outside, we glue a tighter cord to the bottom, for which the bowl will be hung.

We tie the lace on the outside with a bright wide satin ribbon.


Such a bell will do a good job of giving the first bell in the school year.
The simplest and spectacular way making a bell plastic cup. Using sharp scissors, make two holes in the glass.

Using a can, cover the cup with red paint. When the paint is dry, color the glass with a golden marker.

We will need a small bell with a hole, which can be bought at "everything for needlework" stores. We insert a rigid wire into the hole and twist it several times.

We insert the bell on the wire into the holes. The bell should hang low enough in the cup. To fix the bell, twist the wire at the top of the cup.

Apply to the top and lower part cups of glue and sprinkle with glitter.

We decorate our craft with a ribbon tied with a bow. Our bell is ready!

paper bells
Some may seem interesting idea with paper bell. We glue a small iron bell and colored ribbons to it. Such a bell can be used to decorate the class.

Very graceful bells are obtained from folded disposable plate. We cover the plate golden paint and fold in two, as shown in the photo. The craft should be decorated with a red bow.

Watch the video on how to make beautiful paper bells:
Egg carton bells
For graduates, bells are needed that can be hung around the neck. So how to make a bell on last call it will be necessary for each graduate, for its manufacture it is better to use ready-made template forms - for example, cardboard egg packaging cells.
Carefully cut out each cell. We use the cardboard remaining from the packaging to cut out decorative oval leaflets, pointed on the sides, in shape.


We color the cells and leaves, give time to dry.

We string several leaves on a thin cord, then thread a cell (bell) and a large bead into it.


Again we pull the end of the lace out, string a few more leaves, tie the ends.

A gift for a graduate is ready!


And here is another quilling bell in the article ""
Clay bell
Bells can be so different, symbolizing the beginning of a new period in a person's life.
Amazing comfort is created in the house various little things, useless, but giving joy. For example, such paper clay bells will not only decorate the interior, but also drive away negative energy. They are made of paper clay - a mixture of clay and paper. This material is perfectly molded, dries in the air and is well painted.
So, to make bells you will need:
- paper clay Paperclay;
- twine;
- rolling pin;
- cutter;
- disposable plastic glasses with a detachable base;
- awl or wooden skewer;
- sandpaper.
Step 1. Knead the clay. If necessary, add water if the clay is dry. We roll the clay into a layer with a rolling pin. To prevent clay from sticking to the rolling pin, roll through the film.

Step 2. Using the glass as a template, cut out some circles with a cutter.

Step 3. Cut holes in the center of the circles with the stem of the glass.

Step 4. Put the workpiece on an inverted glass. In principle, it is not necessary to look for such glasses. Any suitable shape fit.

Step 5. Smooth the blank, giving it the shape of a cup.

Step 6. Wetting your fingers with water, smooth the surface of the workpiece. Leave to dry.

Step 7. Roll the balls according to the number of bells. The diameter should cover the hole in the workpiece.

Step 8. Pierce each ball with an awl or wooden skewer. Leave to dry.

Step 9 Sand the completely dried blanks with fine-grained sandpaper.


Step 10 Assemble the bells. First we thread the thread through the ball, tie a knot at the end. We put a bell on top, which "sits on the ball." By the same principle, we collect the entire garland. As you understand, the bells will not ring, since the balls serve to fix the cup.


You can leave the bells unpainted, although paper clay is beautifully painted with acrylics.


Elena Podyakova
Lesson on OO " Artistic creativity» (sculpting) in senior group « ringing bells»
Tasks. Teach children voluminous hollow crafts.
Improve visual technique - learn to sculpt bell from the ball by indentation and shape modeling.
Show different tricks decoration of stucco figures - laying out an ornament from peas, rice and buckwheat, stamping (printing) decor with caps of felt-tip pens.
Develop a sense of form, proportion; cultivate accuracy; learn to synchronize the work of both hands.
Materials, tools, equipment. Plasticine, stacks, caps of felt-tip pens for decorative prints; narrow braid for eyelets, cut into pieces 10-15 cm long or ribbons.
Ancient origins of custom.
The tradition of decorating the Christmas tree came to us from Germany. And it appeared long before the rise of Christianity. The ancient Germanic tribes endowed nature with divine powers. They believed in the existence of forest spirits. It was also considered that coniferous trees supernatural creatures live that can send blizzards, cause frost, confuse hunters. And these spirits become especially strong in long and dark winter nights. Therefore, in order to propitiate the forest creatures and ask them for help, people tried to appease them. Spruce trees, where spirits supposedly lived, were decorated with fruits and various delicacies, the priests said special conspiracies and performed rituals. For some tribes, spruce was a symbol of life, beneficent forces of nature so that these customs were designed to ensure people's health and prosperity.
Christmas tree and Martin Luther
Many years have passed, Christianity has long been accepted everywhere in Europe. But people, as in pagan times, still went to the forest on Christmas night to decorate the fir-trees with colored shreds and fruits. All this worried the priest and reformer Martin Luther. There is a legend that once on Christmas Eve he was walking through a snowy forest, grieving at this behavior of his flock. And then he saw a tall fluffy spruce, on the branches of which frost sparkled like stars in the night sky. And the brightest frosty star adorned the top, like Star of Bethlehem that led the Magi to the baby Jesus. Luther liked this analogy - he found a solution to the problem. The Christmas tree was delivered to the priest's house, and he decorated it with candles so that their lights resembled the twinkling of stars. And so this tradition was born.
Christmas trees in Europe and Russia
In fact, it is impossible to say exactly where the tradition of decorating the Christmas tree came from. Although the legend attributes it to Martin Luther, the first written mention of Christmas trees dates back to 1605. In those days, they were decorated with roses made of colored paper, apples, nuts and other similar things. And only at the beginning of the 19th century this custom spread throughout all European countries. And in America, decorated fir trees became a ubiquitous attribute of Christmas by the middle of the 19th century.
Where did this tradition come from in Russia?
Although Peter I ordered to celebrate New Year and putting decorations of spruce, pine and juniper branches in front of the gates as early as 1700, the custom of decorating homemade spruce really spread everywhere only in the late 1830s. Tsar Nicholas I was the first to order to decorate the Christmas tree, and then all the nobility followed his example. At that time, the German romantic literature and this contributed to the spread of the tradition. It is curious that at the same time, Swiss and German confectioners in St. Petersburg began to offer their customers ready-made trees decorated with sweets.
Christmas tree in the Soviet Union
In 1936, the Christmas tree became an attribute new year holidays. It was decorated with colored paper garlands, flags with Soviet symbols, and bright balloons.
Today on lesson we will sculpt a decoration for the New Year tree, and what we will sculpt today, you will find out when you solve the puzzle!
Right on today lesson we will sculpt bells! Sit down at the tables!
The teacher shows the technique modeling and comment on their actions. Reminds that it is better to sculpt in a sculptural way - from one piece.
I roll out a piece of plasticine into a ball - in a circular motion of the palms. Then I put the ball on thumb left hand and make a recess. I expand the recess so that the walls bell turned out to be the same thickness, - I turn the shape with my fingers, as if my the bell started to dance. If turned upside down, it looks like a glass or a vase. Like our bell will it hang on the tree?
I'll make an ear with a hole - pinch it with my fingers, and pierce it with a stack. You need to thread a ribbon or rope into the hole.
Now, stand next to your desks. We'll take a break and get to work.
Fizminutka "In winter".
We warm up a little, Rub our shoulders
We clap our hands, we clap our hands
We stomp our feet, we stomp in place
And pat ourselves. We slap on the knees
In the yard frost and wind, Walking on the spot.
children are walking in the yard.
Handles, handles warm, We rub hand in hand.
pens, rubbing pens.
So that our legs do not get cold, We stomp our legs.
we sink a little:
that-top-top.
We are not afraid of frost, We dance.
this is how we dance now.
Take your seats. Let's get to work.
And now you try to mold your ear bells with pendants.
Children sculpt on their own.
Decorate your bells. You can draw a pattern with a stack, you can lay out a pattern of buckwheat, rice or peas.
Children decorate their bells, the teacher helps to tie loops from a ribbon or braid.
At the end lessons children post their bells for an exhibition. Looking at each other's crafts.
Video: DIY clay products. Products from polymer clay
Casting bells with your own hands. How to make a bell. If the castings of large bells were unique, i.e. with the help of special templates, a one-time mold for casting a bell was made, which was then completely destroyed, then the casting of arched bells was replicated thanks to a specially made accurate sample (model) of a bell, from which one-time molds for casting were repeatedly molded. To obtain the first batch, models were used, carved from wood or cast from low-melting alloys based on tin and lead.
Inflatable bell. Plant A.M. Troshin. Russia. Bronze, silver. End of the 19th century
To obtain the form, two flasks were used, which are through cylindrical or square steel shells with side lugs designed to center the flasks with pins. The molds themselves were made from a sand-clay mixture containing about 20% clay. For plasticity, the mixture was introduced rye flour and other additives that were in the arsenal of every master. In the manufacture of molds, two mixtures were used: facing and main - filling. The facing mixture is the main mixture carefully sifted through a fine sieve, using which a clearer imprint is obtained in the working mold cavity.
Video: DIY jewelry. Master classes on modeling from polymer clay
Initially, a lower flask was installed on the smooth horizontal surface of a wooden under-model slab, in the center of which a bell model was placed, previously rubbed with coal dust to prevent sand from sticking to it. The model was sprinkled with a facing mixture, the main molding mixture was poured into the flask to the upper edge, and everything covered was tightly compacted. The filling mixture was added and again tamped until the flask was completely and tightly packed, after which the molded was leveled along top edges the flasks and the flask were turned over.
Video: OREO DIY silicone molds POLYMER CLAY MASTER CLASS ANNAORIONA
Then the upper flask was installed on it and centering pins were passed through the corresponding pairs of flask ears. The future joint between the flasks was sprinkled with coal dust, a facing mixture was poured into the lower part of the upper flask, a model of the pouring sprue (or riser) was installed, and everything was finally filled up with the main molding sand. Then the upper flask, just like the lower one, was tightly stuffed.
After the molding was completed, the flasks were taken apart, and the models of the bell and the sprue were removed from them.
Both halves of molds were dried from the working surfaces for 5–10 min in a flame specially made for this fire. At the same time, the form was significantly strengthened, heated and covered with a thin layer of soot, which, in aggregate, reduced the rejection of castings due to blockages and contributed to a more accurate reproduction of the shaped print by the metal.
The dried half-molds were immediately assembled together (exactly in their original positions) using centering pins. At the same time, a clay rod was installed in the lower half of the mold in order to obtain a hole in the ear of the bell. The assembled mold was poured with a metal melt from a crucible.
After a short cooling of the poured metal, the molds were knocked out, the sprues were cut off from the castings, and the bells were transferred to the final machining, for which lathes were used, usually driven by a foot drive.