Original flowers made from ribbons with your own hands. Master class: How to make a flower from a ribbon (a lot)
0 262229
Photo gallery: DIY flowers made from satin ribbons
Making flowers from satin ribbons with your own hands is quite simple. The result is exclusive items that can be used as decoration. Even novice craftswomen can make flowers from satin ribbons if they use a master class with step-by-step instructions.
Master class on creating beautiful flowers from satin ribbons
Known different ways collecting flowers from satin ribbons. To make them, you need to be patient, and you will also need a lot of perseverance. If you try to do the job efficiently, the result will exceed all expectations. It is advisable to start with simple master class, and only then make complex flowers from satin ribbons with your own hands.
Master class 1: beautiful flower made of satin ribbon
To make a flower, you will need to use satin ribbon, felt or burlap, pencil, needle, thread, scissors.

Step-by-step instructions for making flowers from satin ribbons.

Master class 2: simple flowers from ribbons
The next master class will help you make a simple flower from satin ribbons, as in the photo. You will need a satin ribbon, matches, scissors, glue gun, thread, needle, and also a simple pencil.

To do this, just follow the following step-by-step instructions.

Master class 3: roses from satin ribbons
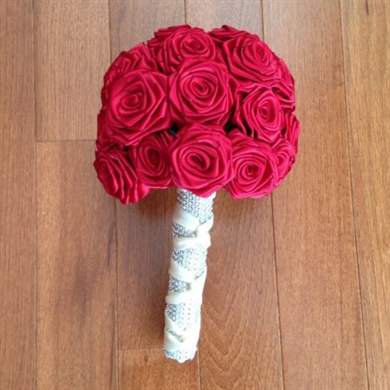
Having made beautiful roses Using satin ribbons with your own hands, you can create a whole composition by combining them into a bouquet.

To do this, you need to prepare green felt, chintz, satin ribbon, thin wire (better if it is floral), thread with a needle, glue gun, and pen.
Step-by-step instructions for making a rose are presented below.

The rose is ready. If you make several of these flowers, you can put them together into a bouquet.
Master class 4: flowers made of satin ribbons or organza

IN Lately It became popular to make kanzashi. These are hairpins or pins decorated with flowers made of satin or silk.
To make kanzashi flowers, you should prepare a satin ribbon or organza, thread and needle, a candle (you can use a lighter), matches, a pencil, a pin, scissors, cardboard, and beads for decoration.
The process of making kanzashi flowers from ribbons consists of several steps.


Master class 5: bright flower made of satin ribbon

To make a beautiful flower for kanzashi, you will need to use a satin ribbon of green (10 cm long and 5 cm wide) and another color (100 cm long), thread, needle, scissors, a candle or matches, a hair clip, paper (needed for the pattern ), felt.

You can also use a glue gun, beads and a small piece of felt.


Master class 6: satin ribbon kanzashi
To make simple flowers for kanzashi, you will have to prepare two types of thin satin ribbons (about 1 cm wide). Shades can be different, at the discretion of the craftswoman. The main thing is that they harmonize well with each other. In addition, you will need a needle and thread, a hair clip and a bead.
You can make a flower for kanzashi in just a few steps.
- Both ends of each ribbon must be folded in the form of rings so that they touch, and then sewn together. You should get a figure eight from the tape, as in the photo.
- The resulting parts are fastened together in the form of a kanzashi flower. Since two types of tapes are used, it will be possible to make two different flowers, each has 6 petals.
- You need to sew a bead in the center of the kanzashi, and glue a hairpin to the back.

The flower using the kanzashi technique is ready. It can be done quickly and easily. If you use more ribbons, you will be able to make more petals. Thus, the flower for kanzashi will become more magnificent and attractive.
Video tutorials: how to make flowers from satin ribbons with your own hands
By folding the ribbons in a certain way, you can create petals, which can later be used to make beautiful and original decorations.
In that step by step lesson clearly shows how to make simple flowers from satin ribbons for beginning craftswomen. From finished products you can get hair clips or elastic bands, decor for clothes or bags. You can take as a basis various colors, we offer a delicate white and pink color scheme that is relevant for any season.
Materials and tools for creativity
To work you will need:
- satin pink ribbon (5 cm wide);
- white tape (2.5 cm);
- glue gun;
- lighter;
- scissors;
- tweezers;
- ruler;
- a circle of felt;
- decorative element for the center of the flower.

The kanzashi technique was used to create the decoration. If you are encountering this type of needlework for the first time and do not quite understand the meaning of the described actions, get acquainted with the basic techniques and terms.
Pay attention to safety precautions when working with flame! Do not leave children unattended. You can use a candle instead of a lighter.
Making elements and assembling a flower
The petals will be pink and white flowers. From pink ribbon cut 6 elements 5 cm long; from the white one you will also need to cut 6 pieces of 5 cm each.

Start forming white flower petals from satin ribbons. To do this, first fold the satin ribbon lengthwise.

Then make a slight inward fold on the same side.

Use a lighter to burn the edge. This is necessary to prevent the material from shedding.


Repeat the same from the other end of the white strip. This is what the petal blank looks like.

Fold it in half and carefully melt the edge again.

White petal in finished form should look like this.

Make five more of these parts for the flower from satin ribbon.

Now move on to creating the pink petals. To do this, fold the square blank diagonally.

Fold the edges of the resulting triangle down.

Fold the workpiece in half.

Melt the edge, then grab the petal by bottom part(at an angle).

Cut off this part and carefully singe the bottom of the pink element again.

This is what a petal looks like.

Make five more of these elements.

Start forming the flower. To do this, use a hot gun to first connect the white petals by applying glue to their tips.

Connect all six pieces in series.

Now you need to secure the pink parts between them. This can also be done using a glue gun.

Fix all six petals.

Glue a circle of felt (about 3 cm in diameter) to the back of the flower.

Decorate the middle with a decorative element.

A simple but very beautiful white and pink flower using the kanzashi technique is ready.

It can be a wonderful decoration for your hair (if it has back side fasten with an elastic band or hairpin), brooch or decor for children's clothing.
Using the same technique you can create beautiful headbands for hair, check out our master classes - and with autumn colors.
Bright flowers made from ribbons can decorate a gift, hairpin, or brooch. You can even make a whole bouquet out of them. They will not cause allergies and will not lose their appearance even after a whole day of wear. Therefore, wedding accessories are often decorated with such flowers. Making your own decoration is very easy. Even an inexperienced needlewoman will spend no more than twenty minutes on one flower. Read the article on how to make flowers from ribbons. The master class in each section is designed for beginners and does not require special skills or tools. And the presence of a photo will make the procedure even more clear.
Solid ribbon rose
The most popular flower made from satin ribbons is the rose. There are many different types: twisted, in bud, with separate petals. The easiest way to make a flower with your own hands is from a single piece of ribbon. Here are two simple and beautiful options.
For the first, you will need a piece of tape 2 cm wide and at least half a meter long.
Instructions:
The flower is ready. From several of these decorations you can make a whole bouquet. Place it in a vase or use it as a stand-in for your wedding. 
The second option - a twisted rose - is very similar to the first. They have the same manufacturing principle, but the tape needs to be folded slightly differently.
The longer the piece of ribbon, the more magnificent the flower will be. Experiment with different colors, and you will definitely get the most unusual decoration.
Video instruction:
Rose from individual petals
To make it, you will need a tape five centimeters wide and at least one and a half meters long. The more petals, the more magnificent flower. We'll tell you step by step how to make a rose.

Solid ribbon aster
The easiest flower to make.

Kanzashi flower made from ribbons
Kanzashi - ancient japanese art making fabric jewelry. Today, this technique has been successfully mastered by craftswomen around the world. Ancient recipes have been supplemented, and we can only successfully use ready-made instructions. We will describe one of them below. It will be a flower of sharp petals.
For production you will need:
- Satin ribbons in orange and white colors:
Orange ribbon 5 cm wide - 1 m.
White ribbon 5 cm wide – 80 cm.
Orange ribbon 2.5 cm wide - 30 cm;
- Bead to decorate the middle;
- Cardboard mugs with a diameter of 3.5 cm and 2.5 cm;
- Fabric glue: hot glue or moment crystal;
- Candle or lighter;
- Barrette.
Progress:

It is customary to decorate interiors and clothing with crafts made from ribbons. Manufacturing technology has been improving for many centuries. Nowadays, techniques such as kanzashi and quilling are popular. Creating ribbon flowers - interesting activity for girls and women. Some do it professionally, making videos with master classes. Using advice experienced craftsmen, you can create a small masterpiece for your room or a gift to a loved one. With the help of handicrafts you can not only pass the time, but also improve your appearance apartments, as well as learn something new and bring your ideas to life. All work is done in several stages. The first of these is tape preparation and processing. Then the main part of the flower is created. The next stage is the formation of the base and securing the petals to it. After this, the finished composition is decorated.
Advantages and disadvantages of making flowers from ribbons with your own hands
There are many more benefits. Firstly, creating flowers from ribbons helps preserve wildlife. The crafts look like real ones - this is the main plus. Making flowers from ribbons is a simple and low-cost way to decorate your interior. They will not wither and will last as long as necessary. Ribbon flowers will a great gift on the Eighth of March or Valentine's Day. The products are designed in any colors - this is another advantage over living plants. Both adult women and little girls will be interested in experimenting with the shape of flowers and the appearance of the finished composition. Craftsmen have the opportunity to use any decorations at their discretion, create interesting ones, no matter what. similar shapes. Products made from tapes have some disadvantages. Beginners need to spend a lot of time to make a bouquet of a large number of flowers. The lack of its own smell is also a disadvantage. Fresh flowers create a special atmosphere due to their aroma, while artificial ones lack such qualities.
Solid ribbon rose
You can use a narrow one and a half centimeter ribbon, then the product will turn out to be small in height and with a dense texture, with a lot of bends. But best option involves the use of a relatively wide 4-centimeter tape. First, the protruding threads are torn off from it, and one of the edges is melted with a lighter. The main part of the work begins on this side. The end is folded in half, creating a diagonal fold. The corner is bent downwards, and the process of twisting the core of the rose begins around it. When the diagonal bend is practically no longer visible, you need to turn the ribbon upside down. The folded part is pasted over, after which the strip is turned over again. Then you need to continue to “collect” the flower, repeating these steps after each full revolution. Towards the end of the ribbon, the lower part of the flower begins to form. The tail is pasted over and curled. The product is fastened with thread.

You should not put too much tension, otherwise the craft will not be as fluffy.

The simplest manufacturing method involves using scissors, a thread needle, nylon thread, nylon fabric. The rosette is folded starting from the core. The central part is formed by bending one of the ends of the tape and wrapping it with the opposite, free edge. The resulting layers are pierced with a needle. The remaining free segment is wrapped around the center. With each turn, three folds are made outward. Each of them will form a separate petal. To fix the product, the flower must be treated with thread. There is also a more complex implementation option, for which you will additionally need a sponge, acrylic paints, padding polyester, oval or round shapes, several pieces of wire. The pieces of wire will be the bases of the individual petals. The molds are wrapped, and fragments of nylon fabric are stretched on top. They are attached with thread. The center is made of colored padding polyester. All that remains is to attach the stem.

Kanzashi (kanzashi) is a type of Japanese jewelry, mainly for women, as well as the name of the technology for their production. Finished goods usually consist of flowers and leaves, but other plant-related variants are also found. In total, there are about 5-10 main subtypes of this technique, including tsumami-kanzashi, birakan, mimikaki kanzashi. Not all of them look like a typical modern kanzashi. This method involves the use of a fire source to give the petals and leaves a characteristic shape. Satin is used as a material for products, and, less often, fabrics with similar parameters are used. In the process of work, you will need such devices as scissors, a glue gun, elastic bands, hairpins, stamens, pins, tweezers. Temperature effects are necessary for manipulating the edges of the molds, as well as for joining them. From satin material fragments are cut out short length, most often rectangles. Their corners are connected or trimmed (smooth or rounded).

Simple cinquefoil flower
Since the product will consist only of a cup with petals, it is better to make several pieces. Squares 5x5 or 6x6 cm are cut out of satin material. They are folded diagonally. Then, by bending the corners, a square is made from the triangle. Then it is folded into a triangle again, and from the side with the largest number A strip 2-3 mm wide is cut off from the free edges. The processed side is grabbed with tweezers, and the workpiece is brought to the candle. The cut edge is melted. Immediately after this it needs to be flattened. You need to wait about ten seconds and begin to give the mold a convex appearance. Then the base is made: an elastic band is installed on the round blank. You need to make cuts and secure it with glue and another circle. Petals are attached to the flat part of the structure, also using glue.
It is better to make flowers in different colors:
- orange;
- pink;
- yellow;
- blue;
- red

Bell
In addition to the main component - the satin ribbon, you will need:
- candle;
- wire;
- stamens;
- sewing equipment;
- suitable glue;
- ruler;
- glass;
- burner.
A 2.5 cm wide ribbon is cut into fragments of 5 cm each. Two pieces are applied to each other wrong side. Next they are placed on the glass. Use a ruler to highlight a diagonal line. All fragments are cut with a hot knife. After this, they are soldered along the cut line. The short edges are first stitched separately with thread and then joined together. After that front side The sharp part of the connected petals is melted with a candle. Do not allow deformation from temperature influence. Next, the end is quickly twisted so that it bends outward. It is necessary to make five such elements to create one flower. Then you need to work with the stamens: they are bent in half, covered with wire and twisted. The tops of the stamens are smeared with glue and five petals are attached to them.

Aster
You will need: thread and needle, several beads, lighter, scissors, green mesh, satin ribbon, thick cardboard, glue gun. You don't have to choose natural tones to create a flower, any bright shades. First of all, the tape is cut into a large number of segments: from thirty and more. Its width should be 2.5-3 cm, the length of the fragments should be 6-7 cm. Each piece is folded in half - into narrow strip. Then a small fragment is cut off from one end with scissors. This should be done at an angle of 45°. The cut edge is melted with a lighter and glued together. Two opposite corners are folded inward and melted by fire. And so 30 petals. Then a small circle is cut out of cardboard. It is covered with satin material. Two rows of petals are glued to this base. Some add variety and create another row in the middle, in a different color. The finished composition is decorated with beads.

Peony
You will need: a base for a brooch, a ribbon, a large bead, a needle, beaded or monofilament, scissors, tweezers, a candle, matches. Circles of different sizes are cut out of the tape. The splendor of the final product depends on their quantity. All elements are melted by candle fire. It is necessary to achieve a wavy outline along the entire perimeter of the future petal. After this, they form a bottom. To do this, make a small cut so that approximately 1/5 of the circle is a straight line. The next step is to sew several petals into groups. The circles are combined in sequence from largest to smallest. Next, the central part of the flower is created using a thread: a large bead is attached to the base under the brooch. After this, petals are attached to the product. Now it can be used as a brooch or hairpin, or made into an elastic band.

Hibiscus
You will need:
- Scissors;
- Candle;
- Super glue;
- Template with side 6 cm;
- Thin floral wire and two satin ribbons different colors- one will imitate a flower (it’s better to choose pink), and the other will imitate a stem.

You will also need stamens to match the color of the pink ribbon. First of all, cut out a 6-centimeter rectangle from green tape. On one side, it needs to be given the appearance of a leaf: two corners are cut off with scissors. One such element is enough. You need to make five petals from the pink one. Using a template, the required number of pieces is measured and cut. Molds resembling a drop are cut out of the fragments. One of the edges is rounded. Ideal shape It is difficult to cut, so you need to put all the pieces together or use another template in the form of the desired petal. Next, the flat side of the leaf is melted. The petals are treated with fire along the entire perimeter, the rounded part is then stretched by hand. Then all the fragments are put together and fastened. The stem is decorated with green ribbon. A leaf of the same color is attached to it - the product is ready.

Flower made from wave braid and zigzag braid
From wavy braid they create very original products. You will need a needle and thread, scissors, one wave braid 50 cm long or two 30 cm long (preferable). First of all, the two sections are intertwined, like curls in a braid. This blank is sewn on a machine. Then a bud is made: the braid is rolled up and secured with glue in several places, preferably once for each turn. The end is tucked in and also fixed with glue. In this form, the product will imitate a peony, and if you turn out the petals, it will resemble a rose. A very original non-standard product will be made from zigzag braid. A segment with 20 bends is required. The ends of the fragment are sewn together. For this, an allowance is left in advance. Then, using a thread, you need to sew 10 elements (one at a time). Then this ring is assembled into a compact circle and secured. Then it is made flat, and as a result all the petals will be directed clockwise or counterclockwise.

You will need a fastener (elastic band, hoop or hairpin), thread to match the color of the lace, a fleece circle of the same color, 2 meters of lace. The first step is to prepare the material and fastening. Then on level ground decorative edge The lace is sewn with a double thread needle. A “forward needle” stitch is used. The thread stretches and the lace fabric tightens. The folds are distributed evenly along the entire length of the tape. There is no need to separate the needle and thread. They are attached to the end of the lace for a while. Next, you will need a second needle and thread: it is sewn to the fleece circle in a spiral. It is necessary to ensure that the lace “looks” face up. The core of the flower is decorated to your taste: with buttons or beads. From the remaining lace fabric you can make a mini-bud and sew it to the central part of the product. The first thread is now secured and cut - the job is complete. It is worth special mentioning the appearance of the products. Flowers made from a thick lace ribbon with decorations with ornamental stones look very original.

Many remember them from childhood: birthdays, New Year and the Feast of St. Nicholas was rarely done without these decorations. They are easy to do. On paper sheet 9 strips 1.5 cm wide are drawn. They are cut out and then reduced to required sizes. You need 3 pieces with a length of 25 cm and the same number of 22 cm, two of 19 cm and one strip 9 cm long. The shortest one is bent into a ring and fixed with a stapler. All the rest are twisted in a figure eight and also secured. The fragments are stacked on top of each other. There will be small “eights” inside the bud. A ring is placed in the very center. Pieces of double-sided tape can be used both before starting to create a bud to create an adhesive surface on the fragments, and after, for reliable fastening. The paper itself can be different: simply colored or decorative with various stripes.

To create such a product yourself, you will need to use:
- paper;
- scissors;
- ruler;
- pencil;
- stapler;
- Double-sided tape.

You will need eight ribbons, four blue and the same number of purple. Each should be 15 cm long and 0.6 cm wide. First, the purple strip is folded in half, and the top of the folded end is smeared with glue and attached to a soft round base, exactly in the center. Then the remaining purple ribbons are glued on. This is done in such a way that there is an equal distance between the ends of all strips. After this, 8 drops of glue are applied to the central parts of these “rays”. The end of one protruding strip is attached to the center of the adjacent one and so on throughout the circle. This part of the work must be done very slowly, otherwise the petals will not be the same. Next you need to work on the blue stripes. They are attached on top of the purple ones, and then their edges are drawn through the loops. Then the blue ends are twisted in the same way as the purple ones.

Packing tape for making flowers
To create this craft, you will need a needle, floss, tailor's pins, a round metal template with protruding knitting needles, and the packaging tape itself (you can choose simple transparent tape). First, a template is taken and a ribbon is gradually wound around it. The stitches should be placed on the opposite edge of the needle. When the tape is completely wound, the center is highlighted. To do this, you need to connect the petals in the middle using a needle and thread. The center is darned in a circle. Free edge the tape is cut to fit the central part. The petal is removed from the needles - all that remains is to decorate the flower. The craft should be decorated decorative elements. You can spray paint it. A monotonous color will look best, but it’s worth trying to use different molds and color the flower in an original way, for example “polka dots”. There are also a variety of colored packaging tapes on sale - regular and festive.
Worth a try complex craft using tapes different widths and thickness and with different weaves.

Rep ribbon flower
Such products can be found on children's clothing: sundresses, dresses. Creating a craft from grosgrain ribbon will be easy even for a beginner. You will need thread, scissors, pencil, glue gun, candle, grosgrain ribbon. First, 5 strips of the same length are cut out (approximately 5-6 cm). The edges are processed over fire. Then the fragments are shaped into a bow by gluing the opposite edges in the middle. All bows are folded in half. After this, they are stitched with thread on the flat side and gathered into a circle of five petals. The bud they create is fastened and decorated with a button. The petals are given volume. There are even more simple techniques. The tape can be applied several times, creating a thickening in the center. Then you need to fasten everything with threads and decorate the product with a button. Another interesting way consists of creating petals from several turns of different sizes.

Making flowers from polypropylene tape
Both small flowers and large ones with a diameter of more than half a meter are created from this material. The latter are created from foamiran (isolon) - polypropylene fiber. Will need big ones round sheets with a density of 30, paint, glue gun, hair dryer. You can cut the blanks yourself from a large canvas. Thanks to the pliability of the material, this will not be difficult. First, two rounded petals with a long side of about 30 cm are cut out. The core will be made from them. All other fragments should be larger: 35, 40, 45 cm, etc. The lower parts of all elements are cut noticeably narrower. During the work process, these segments are pasted over with a gun and bent. If on the first petal the bottom is twisted and secured, then on the next petals it wraps around the already created structure. Hands attached desired shape and after each change it is fixed with a hairdryer. When all the petals are ready, you will need to make a core from a spool of thread. Then the flower is painted.
It is necessary that the air from the hairdryer be as hot as possible, otherwise the flower may begin to quickly lose shape or may not turn out at all.

Application of ready-made colors
Such crafts decorate everyday and festive hairstyles. To do this, flowers are attached to elastic bands, headbands, hairpins and decorated with beads, brooches, and various small elements. Ribbon flowers with pins are used to decorate wardrobe items. They decorate lapels; put in pockets, attached to hats. Ribbon flowers will become bright gifts By different cases- for birthdays, New Years, Religious holidays, Day Angel. These crafts are used to decorate various homemade compositions, topiaries, gift boxes. Decorated handmade rooms - perfect place for decorating with bouquets and photo frames with flowers made from ribbons. You can also trim floor lamps and tulle. Recently, boutonnieres and duplicate bouquets made of satin material have become popular. They are bought not only for special occasions.

Conclusion
Flowers made from ribbons are sometimes difficult to distinguish from real ones. Beautiful composition can be created from a simple paper or lace ribbon, or using the kanzashi technique from a satin one. Ribbon flowers are mainly intended for decorating hair - they can be given to women and girls. To create a flower, you need to go through several simple steps. First, the ribbons are prepared for processing. Excess threads are torn off from them, and uneven edges are trimmed if necessary. Next, the process of twisting or stitching begins. This is done in different ways, depending on the technique of execution. The resulting shape is usually held together with threads, glue or wire. Flowers are decorated with brooches, beads or left untouched to imitate real flowers. The color is selected at the discretion of the master. The result is a “self-sufficient” decoration that can also be used as a decorative element.
In this material we presented 6 step-by-step master classes for beginners, following which you can make flowers from ribbons for making/decorating with your own hands:
- Artificial flowers (interior);
- Wall panels;
- Topiaryev;
- Decorative and wedding bouquets;
- Costume jewelry (rings, brooches, necklaces, bracelets);
- Hair accessories (headbands, headbands, barrettes, elastic bands);
- Boutonniere;
- Gift packaging;
- Decorative pillows;
- Caskets for jewelry and other little things;
- Albums and notebooks;
- Applications for clothes, bags and shoes;
- ...and much more! This selection of photos shows only a small part of the crafts that you can make once you have mastered various techniques making flowers from ribbons:

In addition to step-by-step instructions, you will find 30 photo ideas for inspiration, as well as a useful selection of videos.
Master class 1. Twisted rose from a solid ribbon
Let's start, perhaps, with the simplest and most fast way making roses from ribbons with your own hands. Once you master the technique of rolling roses from ribbon, you can make them while sitting in front of the TV. Depending on the width and length of the ribbon used, you can twist both small and lush buds. You can use a ribbon made of any material - organza, satin, cotton and even strips of linen fabric.

What you will need:
- Any ribbon - the longer and wider it is, the larger the bud will be. For a medium-sized rose, a 2.5 cm wide ribbon is enough.
- Thread and needle or hot glue gun.
- Scissors.
How to twist a rose from a ribbon:
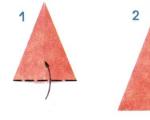
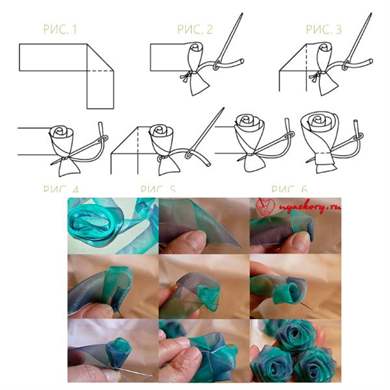
Step 1. Straighten and place the tape in front of you, then bend one of the ends of the tape (either) along the bias, as shown in Fig. 1.

Step 2. Wrap the tip of the ribbon into a roll in two or three turns to form the core of the rose, fix its lower part with glue or simply sew it (see Fig. 2).
Step 3. Now we begin to form the rose petals. To do this, bend the tape again obliquely to the outer side (see Fig. 3) and wrap it around the core of the rose, holding (and, if desired, fixing with thread/glue) the entire workpiece from below (see Fig. 4).
Step 4. Next, continue to “build up” the layers of “petals” according to the scheme: bend the ribbon outward - wrap the bud - bend the ribbon outward - wrap the bud, etc. (see Fig. 5). Periodically fix the layers of tape at the base of the bud with glue or thread and a needle. Remember that the most important thing is to not let the ribbon unravel.
- Experienced decorators can twist a rose by fixing the layers of tape only a couple of times (at the beginning and at the end), but for beginners it is easier to stitch/glue the “petals” of a rose much more often.
- It is more convenient to roll a rose by holding the base of the bud between your index and middle fingers, so that the flower seems to be lying in your palm.
Step 5. When the rose reaches the desired size, press the end of the ribbon to the base and tie/glue (Fig. 6).
- Practice curling roses from ribbons of different widths and lengths, experiment with the angle of the ribbon, the number of folds per layer, or the tightness of the twist to achieve the effect you like best. So, for example, a rose twisted from a ribbon can be very multi-layered or, conversely, softer, have more sharp corners or, conversely, rounded.
If you have any questions, we suggest watching a video on how to make a flower from a satin ribbon with your own hands using this technique.
Master class 2. Realistic flowers from ribbons (peonies, roses or ranunculus)
Now we suggest you familiarize yourself with the technique, following which you can achieve the most realistic and elegant look of petals, which is only possible for flowers made by yourself. Take a look at this selection of photos and see for yourself.

Despite all the beauty and apparent complexity, even a beginner can make such flowers from ribbons with his own hands.
You will need:
- Candle or lighter.
- Ribbon 5 cm wide (for a medium peony) made of 100% polyester (it can be either rayon/satin or organza). Please note that the tapes are made from natural materials won't fit. If you want to make a large and lush peony, then you can use either more petals and/or a ribbon 7-8 cm wide.
- Scissors.
- Needle and thread to match the ribbon.
How to make a peony with your own hands:
Step 1: Cut the ribbon into squares following sizes and number:
- 5×7 cm (6-10 pcs);
- 4×6 cm (6-10 pcs);
- 3×5 cm (6-10 pcs);
- 2×4 cm (6-10 pcs).
As a result, you should have a minimum of 24 and a maximum of 40 squares. The more petals you make, the more magnificent and larger the bud will be.
Step 2: Now arrange the groups of squares into piles. Then cut out petals from each stack (the shape is shown in the picture below). Keep in mind that accuracy is not important here, everything can be done by eye, without measurements and without using templates. The main thing is that you get petals different sizes: very large – large – medium – small.

Step 3. It's time for the fun part - giving shape and volume to our petals. To do this, light a candle or lighter and, holding the edges of the petal at a distance of about 2 cm from the fire, melt them (but do not scorch them!). Rotate the petal smoothly but quickly. This way you need to process all your workpieces.
- If you want the petal to become more rounded, hold it over the fire a little longer, but do not reduce the distance from the fire. However, sometimes petals slightly blackened by fire look quite organic.


Step 4. Take one of the smallest petals, roll it into a roll and make a couple of stitches in its lower part to secure it. You now have the core of your flower.

Step 5. Attach the second small petal and secure it with a couple of stitches. Continue attaching the petals one after another, maintaining a checkerboard pattern. When you are done with the small petals, start attaching the middle petals, then the larger ones, and finally the largest ones.


Flowers made from ribbons in two shades

Flowers made from ribbons of the same shade
Well, that's all, the peony is ready!


Using the same principle, but by changing the number, shape, size and color of the petals, as well as adding stamens from beads or floss threads, you can create roses, tulips, poppies or ranunculus.

Following our master class, you can make flowers not only from satin ribbons, but also from organza. Why not use old ribbons for baby bows?
Master class 3. Simple flowers from ribbons in 5 minutes
If you need to make flowers from ribbons with your own hands as quickly as possible, for example, for gift wrapping, then this step-by-step instruction will help you out.

What you will need:
- Any tape;
- Beads;
- Scissors;
- Hot glue gun.
How to make a flower from a ribbon:
Step 1. Cut out a small circle with a diameter of about 5 cm from cardboard or thick paper. This circle will become the base of your flower and will be hidden under the petals, so it does not need to be cut out carefully.
Step 2: Start sticking the tape on top edge circle, while forming pleating, as shown in the photo below.

Step 3: Continue applying the tape in a spiral pattern in 3 or more layers. When you reach the center, cut off the excess tape, fold the end under, and carefully glue it in place.

Step 4: Place a large dot of hot glue in the center of the flower and quickly fill it with beads.

Master class 4. Small textured flower made from wave braid
If you want to decorate a ring, headband, brooch or necklace with a flower, then a rose made from wave braid fits better Total. After all, it turns out so neat, strong, elegant and small.

What you will need:
- A wave braid of medium width and a length of 50-60 cm (for one rose) or two ribbons of different colors of the same width, 25-30 cm long (if you want to make a two-color rose). However, the length can be longer or shorter, it depends on what size you want to make the bud.
- Scissors.
- Sewing machine.
- Threads with a needle to match the braid.
Step 1. Take two wave braids of the same length and intertwine them together as shown in the photo. Before you start weaving, secure the two ribbons with some kind of clamp so that they do not unravel.

Step 2: Machine stitch along the edge of your piece to secure the weave.

If you don't have a machine, it doesn't matter. Just run large stitches along the entire length of the braid.

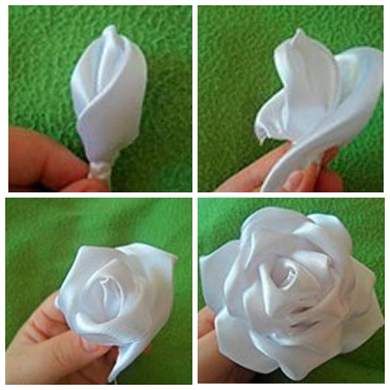
Step 3. To make the flower, simply start folding the ribbon at one end, securing the layers with hot glue in some places.

Step 4: When you're done, you should have a bud that looks something like this. Simply tuck the remaining end of the braid under the flower and secure it with glue.

Step 5. Glue a small circle of felt, cardboard or thick fabric to the base. In the future, you can glue anything to this base - from a hairpin to a ring.
Step 6. Have you noticed that all the petals of our flower are closed? In this form, it looks more like a peony or ranunculus. If you want the flower to become a rose, simply spread each petal outward one by one.

Master class 5. Poinsettia with leaves
It's time to tell you how to make poinsettias from ribbons, which can be used to decorate anything, for example, autumn wreath as in the photo below.

What you will need:
- Ribbon 4-6 cm wide in red, cream or any other desired shade;
- Green ribbon (for leaves) 2-3 cm wide;
- Scissors;
- Needle and thread to match the ribbon for the petals or thin copper wire(jewelry);
- Beads;
- Hot glue.
How to make a poinsettia from ribbons:
Step 1. Cut three pieces of equal length from the ribbon. How long should the segments be? It depends on what size flower you need. If you want to make a flower with a diameter of 12 cm, then the segments should be exactly this length.
Step 2. Give the resulting rectangles a diamond shape. You can do this in the following way: stack the pieces on top of each other, fold the stack in half, then give the resulting square a triangle shape by cutting off the excess on the sides. Voila, you've got diamonds!
Step 3. Pinch each diamond in the middle and tie the folds with thread (you can do a couple of stitches) or jewelry wire.
Step 4. Place all three pieces next to each other, then tie them with thread or jewelry wire to create a flower. Adjust the petals if necessary.

Step 5. Glue several stamen beads into the center of the flower.
Step 6. Now let's work on the leaves. Cut two lengths of 6-9 cm from the green ribbon (the length of the pieces should be approximately three times the width of your green ribbon). Place one of the rectangles on the table, wrong side up. Bend it right side down the bias so that the workpiece takes on an L-shape (see photo). Now fold your letter G in half to create a house-shaped piece with a roof. Gather the bottom of the “house” with a couple of stitches or glue.

Step 7. Now the leaves can be glued/sewn to the back of the poinsettia, to a felt round base (if you have one) or directly to a decorative object (headband, pillow, etc.).
Master class 6. Lace ribbon flower
And finally, we present another express method for making a simple, but beautiful flower with your own hands. The principle of operation in this technique is similar to that described in MK No. 3, but instead of glue, a thread with a needle is used to fix the craft, and instead of a satin ribbon, a lace ribbon is used. However, you can use any other one. Lace flowers make wonderful brooches and hair clips.


What you will need:
- Lace ribbon;
- Scissors;
- Needle and thread to match the ribbon;
- Beads;
- Hot glue.
How to make a lace flower:
Step 1: Baste the tape along the bottom edge using wide stitches.

Step 2. Once you are done sewing, gather the ribbon by pulling the thread and bring the two ends together to complete the circle and create the first layer of petals.


Step 3. Glue a small circle of felt or other fabric into the center on the wrong side of the flower. Sew the necessary accessories to it, for example, a pin, to make a brooch.
Step 4. Glue beads, rhinestones, stones or other decor to the center.

If you want to continue your acquaintance with the art of making flowers from ribbons with your own hands, we offer you to watch the following step-by-step video instructions.
In this video, you will learn how to make kanzashi flowers from 2.5 cm ribbon.
This video shows a method for making a rose from a satin ribbon, which differs from our master class No. 1.
Here is another master class on making roses in shabby chic style.