Do it yourself brownie. Do-it-yourself brownie - a positive amulet for the home
Brownies were at all times and among all peoples.
Even those who do not believe in them, anyway, just in case, keep a brownie doll at home to decorate the interior.
They are different forms and sizes.
There are different ages: small and mischievous in short pants and old with a beard and kind eyes.
From what material do brownies not make: cardboard, paper, wood, plastic, straw, textiles.
Your attention is invited to a master class for making a do-it-yourself brownie from textiles with synthetic filler.

In order to sew a wonderful brownie with your own hands, you will need the following materials:
Cotton fabric (for tailoring the body of a brownie);
calico fabric ( white color);
Cotton fabric (for sewing a shirt);
Cotton fabric (for sewing pants);
Synthetic filler;
Yarn (for making hair) white;
Sushi stick;
Thread twine;
Tailor's chalk;
Crayons are multi-colored;
Pencil, artistic brushes;
Fabric paints;
Scissors "zigzag";
Sewing machine, needle, matching thread.
Stage #1
Pattern is being prepared. You can print the pattern below on a printer. You can simply transfer it with a pencil to a piece of paper directly from the computer screen.

If desired, the pattern is prepared in a larger size. If you want to make one big brownie.
Stage #2
Cut out pieces of fabric. Allowances of 5 mm are taken into account. They must be marked with a pencil or a special disappearing marker.
It is recommended to fold when cutting double parts. double fabric. Everything is cut in the direction of the threads in the fabrics. Only the detail of the head is cut along the oblique direction of the threads in the fabric. The leg pieces are cut from cotton fabric white.
For ease of use, the parts are attached to each other on tailor's needles.

Stage #3

In each part, a hole is necessarily left for turning the fabric on the front side.
At the sewn head, notches are made on the outside above the seam, as in the figure.

The edges of the parts are processed special scissors"zigzag". Otherwise, the edges need to be processed like this regular scissors.
Stage 4
All parts are turned right side out with a sushi stick.
Legs, arms and torso are filled with synthetic filler. For convenience, you can push the filler with a sushi stick. Only the shape of the head and neck is stuffed very tightly. It is advisable to insert a toothpick into the neck. So the head will sit more firmly in its place.
Stage number 5
Sewing details. The legs and arms are pinned to the body on needles. At this stage, the future takes shape and a quality line is visible. You can still correct some visible errors.

After a thorough inspection, you can start stitching. This process is done manually. As the stitching progresses, the needles are removed.
Stage #6
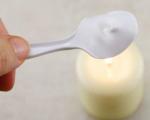
Nose embroidery. In the details of the nose, a line is manually laid along the edge. At the end, the thread is pulled together. It turns out a bag. It is stuffed with synthetic filler. After that, the spout is sewn to the head in the appropriate place.

Stage number 7
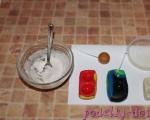
Face painting. The shapes of the eyes and mouth are drawn on the fabric with a pencil. The mouth is recommended to be drawn with a smile.

The resulting eyes are completely covered with white paint. After the paint has dried, an iris is made to the eyes. You can choose any color as you wish. The picture is blue. After it dries, a black pupil is drawn.
After the paint dries, the eyes need to be given realism. Why the upper blue part of the eye is slightly shaded with black paint. Exactly as in the picture. And the top of the white paint in front of the eyes is shaded with paint gray color.
The bottom of the iris, which of blue color, lightened with white paint. White highlights are drawn on the eyes. Thus, the look of the brownie turned out to be very lively.
paint Brown color contour is applied to the eyes. Eyelashes are made thin eyebrows. A smiling mouth circles. The paint is given time to dry.
With crayons of pastel shades, the area around the eye is tinted. Blush is applied to the cheeks. The nose also blushes.
The head is set aside for now.
Stage #8
Sewing shirts and pants. The detail of the shirt is cut. It is desirable to make allowances of 0.7 mm in size. No seam allowances are required along the bottom edge of the sleeves. After that, the fabric folded in half is fastened with tailor's needles. The detail is cut out.

Similar actions are performed with future panties. They don't need allowances.
On the sewing machine the shirt is sewn: shoulder lines, the edges of the sleeves with a hem of the fabric, the bottom of the shirt with a hem. For the neck, it is enough to leave a hole of three centimeters. At the end, a line is laid on the sides of the shirt.
The resulting shirt is turned inside out. If desired, a button is sewn on, as in the figure.

After the shirt on the sewing machine, panties are sewn into one piece. The fabric does not fold down.
Stage #9
Ready-to-wear dressed like a brownie. First, the panties are sewn to the body by hand. In the waist area, the fabric on the panties is tucked inward - no more than 1 cm. The bottom of the pants is manually stitched with a thread that is pulled together. Next, the fabric is wrapped inward by 1 cm and sewn to the legs.

A brownie puts on a shirt. It does not need to be sewn to the body.
Those craftswomen who are able to knit can make woolen bast shoes.

Stage 10
The process of creating hair. A ball of yarn is wound around any medium-sized book that comes across. After that, this skein is neatly laid out on a sheet of A4 paper. A line is sewn right in the middle on a sewing machine. For reliability, it is desirable to flash another 2-3 lines.

After that, one of the halves of the yarn is visually divided into two, where another line is sewn. It is fixed a couple of times with additional seams.
Two ends of the yarn are trimmed. Then you need to cut the yarn exactly as indicated in the figure to get three strips of future hair. Strips of short pile yarn are divided into two parts.
One short strand hair is sewn to the back of the head. The next three strands are sewn at a distance of 3 mm from each other. The most long strand sewn to the crown in a spiral. The process begins with a bang.
At the end of the brownie, you can comb and cut off all the extra protruding hairs.
It is advisable to give a wonderful brownie a spoon, a chest with a dowry or a bag.
Get at home such a cute little brownie who will protect your home from adversity and negative energy. A do-it-yourself brownie will become great gift relatives and friends. To make a brownie, you do not need any special skills, and scrap is used as a material, which can be found in almost any home: tape sleeves, nylon tights and fabric scraps.
How to make a brownie with your own hands step by step photo
To create this amulet we need:
- Bushings from adhesive tape, polypropylene tapes or something you can replace with. For example, a piece of pipe or a roll left over from linoleum.
- Disposable plastic spoons.
- Leg-split.
- Suit scraps
- Plumbing tow.
- Pencil, scissors.
- Burlap, such as old potato sacks, pre-washed.
- Needles (regular and gypsy), threads (regular and woolen) to match the color of the suit.
- Nylon tights.
- Sintepon or other filler
- Wire.
- Cardboard.
- Hot glue.
- Decor: buttons, ribbons, beads or beads.
- Plastic eyes and blush
For the body and head, we need three bushings from tape or tape. In the middle sleeve we make holes for the wire. We insert the wire - these will be the handles of the brownie. You determine the length of the handles yourself - if you want the brownie to scratch his heel and hold something in the handles - make them longer.

When the wire is in place, roll up small balls of synthetic winterizer, wrap them in nylon and attach to the wire on both sides, as in the photo. You should get such handbags.

We increase the fullness of the arms with the help of a synthetic winterizer and sew sleeves from fabric to match the color of the suit. We take a needle and thread and sew the fingers on the palm.

Now let's deal with the future head of the brownie. Take another sleeve, cover it with nylon, tie a knot at the bottom, and leave it open at the top, as shown in the photo.
We make blanks for the spout and cheeks from synthetic winterizer - roll up two identical balls for the cheeks and one larger one for the spout. Cover the ball for the spout with nylon, sew the edges of the nylon with a thread. Place the padding polyester balls under the capron on the sleeve, and sew or glue the spout on the outside. Tie a capron at the top. Glue on the eyes.
How to make a brownie with your own hands step by step photo
 We glue three bushings. On the this stage we dress a brownie in a suit

We make legs. Cut plastic spoons with a hot knife, glue them with burlap or any other fabric, glue them to the body.

From tow we make a bang, mustache or beard, glue it. Instead of tow, you can use leftover yarn or coarse burlap threads. From a square of burlap 22 by 22 cm we sew a cap. The size of the cap depends on the diameter of the coil.
We lay one corner of the square of burlap, this will front side- cap opening. We sew two sides of the square.

Try on the cap and figure out how to bend its tip, you can leave it sticking out, as you like!

In order for the brownie to become stable and not fall anywhere, we put the brownie on cardboard, circle and cut out the stand. Glue to the bottom and decorate with a pigtail of twine or braid, fabric.
It remains only to decorate our brownie and give him something in his hands. It turned out to be quite easy to make a brownie with your own hands - a little patience and time and here is the result! Here he is so cute!
Click "Like" and get only best posts on Facebook ↓

Needlework
An interesting idea for knitting a plaid from individual squares from Frankie Brown

Needlework
AT Slavic culture special role played amulets for the house. Such magical objects were made with their own hands and very often had the shape of a doll. That is why circumcision dolls were used by our ancestors not only for fun or home decoration, but also for protection from various negative impacts. Special magical crafts were the most powerful helpers of a person in everyday life, personal life, and even protected from various diseases.
As a rule, such objects were created with their own hands before any great holiday(both personal and folk) or, as a ritual symbol, to protect against a certain misfortune. Sometimes amulets were made for no reason, to attract love and prosperity, prosperity and good news, and so on. Amulets Brownies at all times were considered an excellent gift for loved one and a great defender own family and at home.
Slavic protective items for the home
Nowadays, some people inherit from their great-grandmothers ancient figurines and crafts, hand-embroidered tablecloths, towels and capes. But not every one of us knows that each individual pattern has its own meaning, and each craft has its own meaning.
Our ancestors, when laying a house, laid wax, grain, wool under the corners. All these items were considered reliable amulets of the home. Above front door most often they hung a horseshoe, and the red corner was decorated with towels with embroidered goddesses and ornaments. Amulets also include weathercocks, shutters and platbands.
As a rule, the weather vane was originally made of wood in the form of a rooster and was not an ornament, but a protection from adversity. Our ancestors believed that in every house there are places through which evil spirits can easily penetrate. And those places were windows. Therefore, they were decorated with platbands with national ornaments that served as protection against evil spirits.
Separately, it is worth mentioning the dolls that were used as amulets. Often, handmade dolls were placed in the most prominent place to distract guests who came with bad thoughts. The Eye of God doll was hung over the front door and was a guarantee that no one would enter the house. evil person or unclean. The Bird of Happiness was made of wood of certain species and hung on the threshold. Passing under such a talisman, a person got rid of negative thoughts and only positive energy entered the house.
In addition, spirits occupied a special place for the ancient Slavs, among which Brownie was especially popular. On holidays, sweets, drinks and goodies were brought to him from the table.
It was believed that if Domovichok is kind, then nothing in the house will be lost, and if it is lost, then it will be found very soon.
 Virtually nothing has changed these days. And if in large cities Domovyata are mentioned as a joke, then in the villages the Domovoy is still the one who helps the household and protects the home.
However, this creature should not be neglected, since an offended Brownie can make a person’s life not too comfortable.
Magic item for home
Presented in souvenir shops great amount various amulets called Brownie. However, if you wish to use this item for more than just decorative element, it is best to do it yourself. Brownie is traditionally depicted as an old man with a long blond beard.
Domovyata can hold symbolic things in their hands that will protect the household from various misfortunes and attract positive events. For example, a broom held by Domovoy will be a symbol not only of protection from evil spirits and bad people, but also an object that sweeps all the negative out of the house. Rice, peas, millet, barley, seeds will denote wealth, prosperity and health. A coin or banknote in the hands of a craft will become a symbol of financial well-being.
Brownie - a talisman, which is considered the ideal owner of the house. This mythical creature is an eternal troublemaker, sometimes grouchy, but kind and caring. Since ancient times, people have tried to maintain good relations with this creature, turning to it with kind word, left some food on the saucer and made small gifts.
It's believed that good relationship The brownie will appreciate and help maintain peace and tranquility in the house, save the household from troubles. From respectful and respectful attitude the well-being of the whole house could depend on it. And if the Domovyata were offended, then things were lost in the house, and everything went awry.
Domovyat's amulets are made from the most various materials. They can be made from fabric or from a mixture of water, flour and salt. Also, our ancestors created the Brownie amulet from straw or burlap.
Since ancient times, people have believed in the existence of a brownie. He carefully monitors the order, cares and takes care of the housework. So, the brownie will bring with his own hands family well-being, material wealth and harmony in the home. Such a charm can be easily made from improvised materials: burlap, nylon tights or salt dough.
 From time immemorial, in order for the housekeeper to feel good and bring happiness to the house, he was fed and given milk daily, and was also considered a full member of the family. Many cartoons were created in his honor and many poems and stories were written.
As a rule, he is portrayed as a cunning, but very capricious old man. His favorite place where it is very warm and cozy. Such was previously considered a corner behind the stove. In an apartment, he can hide in a closet, behind a stove or behind a sofa. But he categorically does not like the bathroom and does not even go there.
If the owners love their home, if they are hardworking and live healthy life, then the brownie will not remain in debt: he will be attentive to the residents, keep order and, in which case, he will definitely warn of the danger. However, if you live carelessly, rarely clean the house, constantly swear, then the brownie will not like it. There were cases when he even took revenge on bad owners: people got bruises, and incomprehensible knocks and even voices were heard in the house. And all because the brownie does not like mess.
Domovushka with their own hands will bring happiness, prosperity and comfort to the house. There are a lot of manufacturing options. To create it, you will not need special tools and materials. Everything you need is at hand for every hostess. A little advice will help you make the amulet correctly:

Such crafts serve not only as a good talisman and amulet, but also perfectly fit as a gift to relatives and friends. Especially if it was done from the heart.
Do-it-yourself talisman-brownie from improvised materials is done very quickly and does not require any special skills. It is best to make it with the whole family, so the amulet will be charged as much as possible positive energy. In addition, the amulet will protect the house from evil spirits, goblin and other evil spirits.
So, for its manufacture you will need:

 The first step is to cut the burlap into four parts: two big size 25 by 25 cm and two small ones - 15 by 15 cm. A ball is made from large pieces - this is the future head. To do this, a cotton ball is placed in the middle of the workpiece, and the edges are pulled with an elastic band. Excessive “tails” of burlap do not need to be cut off, they will be his hairstyle.
The second large blank is disassembled into threads. Of these, it is necessary to weave four neat pigtails. They will be the arms and legs of the brownie. With the help of pins, the resulting blanks are fixed to the toy. Now you need to make a beard and nose. To do this, burlap threads ten centimeters long are tied in the middle, then folded in half and tied again in the center. The beard is straightened and glued to the muzzle.
Shoes are made from small pieces of burlap. The toy is fixed with glue on a stable stand. To make eyes, glue the beads to white cardboard. The mouth is made with a red thread. A sunflower is cut out of colored cardboard. banknote and the sunflower needs to be glued or fixed with a pin in the handles of the brownie.
Such funny crafts you can make several pieces at once and place them in different rooms, except for the bathroom. Domovyata will protect the house and ask for happiness in the family.
Talisman from kapron
To make a brownie from nylon tights, you will need:
- Nylon tights and socks.
- Glue.
- Cotton wool or synthetic winterizer.
- Wool threads.
- Pieces of fabric.
- Beads and beads.
- Wire.
 The first step is to fill nylon sock filler. The edges are sewn together. A muzzle is formed with small stitches: the nose, mouth, place for the eyes and dimples on the cheeks are indicated. A beard and hair are made from yarn. The resulting blanks are fixed with glue on the brownie.
Beads are eyes, they should be sewn or glued to the toy. The red thread represents the mouth. A frame is made of wire, and on top it is wrapped with cotton wool. Now the workpiece can be smeared with a thin layer of glue, this is done so that the cotton wool does not fluff. When the glue dries, the body is wrapped with nylon.
The next step is to glue the head to the body.. The brownie is ready, it remains for him to make clothes. From various shreds of fabric, lace and other improvised materials, a shirt and panties are cut out, and then glued to the brownie.
In order for the amulet to bring happiness to the house, one should give him a sunflower cut out of colored paper in his hands. This craft would make a great gift strong amulet to the house.
Such crafts can be molded even with a child. A brownie made of salt dough will guard the well-being in the house, and will also become the keeper of the hearth.
For manufacturing you will need:
- Regular flour.
- Salt.
- Water.
- Plastic bottle and wide cap.
- Pieces of fabric for clothes.
- Paints.
- Clay Moment.
First you need to make a mass. To do this, 300 grams of flour and 500 grams of salt are poured into the container. Now water is poured in small portions. Care should be taken to ensure that the dough does not become liquid. For an ideal consistency, you need about 130 ml of water. Now you can knead the dough. Leftover dough is stored in a bag in the refrigerator.
 Now you can proceed to the main stage - sculpting. The neck is cut off from the bottle. Then the dough must be rolled out into a "pancake" about two centimeters thick. Now such a blank is superimposed on plastic bottle so that the edges of the salt dough are connected. The product is left room temperature for complete drying. This may take up to two weeks.
To make a hat, put a layer of dough about 1.5 cm thick on the lid and fasten it on the sides. By using sharp knife you need to form a neat brim at the hat. Complete drying of such a workpiece occurs in about a week.
A beard, nose, hair, legs and arms are also molded from the dough. When the torso and hat are dry, plastic parts carefully removed. All brownie blanks are glued together. With the help of paints, a muzzle is drawn, hair and clothes are painted. After the paints have dried, the brownie is varnished.
The talisman can be supplemented with decorative banknotes, a sunflower or a basket with berries and fruits.
Made - what could be better than a gift to yourself and friends? Moreover, this is not just a toy, but an ancient amulet.
Brownie as a talisman
For many centuries brownies were responsible for comfort and order in the house. They also protected him from all evil spirits.
The brownie has several names: the owner, the housekeeper, the housewife, the neighbor, and so on. He even has his own holiday - February 10th. On this day, it is customary to appease your brownie. For example, pour sugar into a saucer and put it in a secluded corner.
We bring to your attention several master classes that teach you how to make your own brownie from dough, burlap, thread and nylon.
List of tools and materials for making a burlap brownie
- Sackcloth.
- Rope.
- Stuffing material (cotton wool, synthetic winterizer or any grains).
- Glue.
- Rubber band.
- Pins.
- Two beads for the eyes.
- Red wool threads.
- Big beads.
Master class: brownie from burlap

Burlap houses are made as follows:
- Cut off a large piece of burlap with the same sides (for example, 20x20 centimeters). The size of the finished brownie depends on its size.
- Straighten the patch and put the selected stuffing (for example, cotton wool) in its center.
- Fold the corners of the burlap together, as if making a knot.
- Add more padding if required.
- Tie the corners tightly with an elastic band (picture 1). It turned out the body of a brownie.
- Crush the excess burlap, from which the tail turned out, and make a “hairstyle” out of it (picture 2).
- Cut another piece of burlap and disassemble it into threads.
- Weave four braids from several threads (picture 3). This will turn out the arms and legs of a brownie.
- Pin the arms and legs to the body (picture 4).
- Take the thread and fold it in half several times, so that in the end you get a piece about five centimeters in size.
- Tie the resulting accordion of threads in the middle.
- Cut the thread at both ends so that you end up with several threads tied together.
- Fold what came out, once again in half and bandage.
- Fluff up. You have a nose and a beard (picture 5).
- Glue a nose with a beard to the body (picture 6).
- Cut off two small pieces of burlap.
- Stuff them in the same way as the body.
- Place inside each piece free end legs and tie a knot.
- Embroider a nose with red thread and glue bead eyes.
- Glue large beads on bast shoes.

Burlap brownie is ready!
List of tools and materials for making a kapron brownie

A kapron brownie is made using the following tools and materials:
1) or socks;
2) stuffing material: synthetic winterizer, cotton wool and the like;
3) beads for the eye: two large white and two small black;
4) thick wire;
5) needle-pins;
6) thread with a needle;
7) shadows for make-up;
9) scissors;
10) elastic hairpiece.
Brownie from pantyhose: master class
If you've never done it before, don't worry. The proposed master class will give you detailed description photographic process.
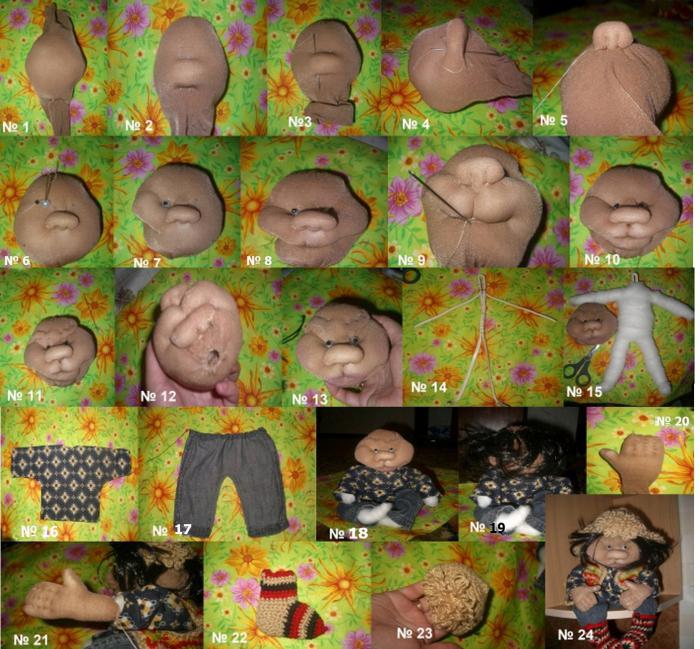
Domovyata do-it-yourself from kapron are made as follows:
- Cut off a piece of pantyhose. Let's make a head out of it.
- Fluff the stuffing material (synthetic winterizer or cotton wool), if necessary.
- Stuff the cut off piece of tights (picture 1).
- Pin up one side of the tights and attach it to the future nape of the brownie.
- Leave the other end unbound.
- Roll up a small ball of stuffing and place it under the nylon where the spout should be.
- Pierce the nose with two needle-pins from top to bottom (picture 2).
- Connect the resulting holes with a needle and thread in two - the top with the bottom (picture 3).
- Repeat step 8, passing the thread on the side of the spout and tightening it (picture 4).
- Make a small stitch in each of the lower holes, which is brought up (picture 5). Got nostrils.
- Pick up and stab lower part pantyhose.
- Mark the eyes with a marker.
- Mark the corners of the mouth with a marker.
- Make eyes. Insert a needle and thread into one of the points marked for the eyes, then string a white bead and a black one on top. Bring the thread back through the white bead (picture 6).
- Bring the needle to a point indicating the corner of the mouth.
- Tighten the thread and form a cheek (picture 7).
- Make another eye and cheek.
- Make a mouth. To do this, draw a stitch from one corner to another and tighten it (picture 8).
- Bring the needle out in the middle of the stitch just below the spout.
- Insert the needle in the middle of the mouth and tighten the thread (picture 9).
- Do lower lip. Step back a little from the corners of the top and sew a stitch, then tighten it (picture 10).
- Shape and outline the eyebrows (picture 11).
- Break off the end of the nylon that was at the crown. Cut off the excess and sew carefully.
- Peel off the nylon that was at the bottom and cut off the excess. Sew it, leaving a small hole (picture 12).
- Apply makeup with regular eye shadow. For example, paint lips and make blush (picture 13).
- Make the body frame. The head to body ratio is 1:3. Bend the wire as in picture 14.
- Wrap the frame of the body with synthetic winterizer (picture 15).
- Sew a shirt. Fold a piece of fabric in half front side inside. Cut and sew it as shown in picture 16. Make a small neckline so that the frame of the torso goes through.
- Sew your trousers. Take another piece of fabric or a piece from trousers. Sew it as in picture 17.
- Put on the body frame and sew on the head (picture 18).
- Take your hairband and cut it in half.
- Sew it in a circle to the crown (picture 19).
- Draw a palm on a piece of nylon, like a mitten. Cut it out and sew the edges, leaving one for stuffing. Hit her. Stitches make fingers (picture 20).
- Make another arm and sew both to the frame under the shirt sleeve (picture 21).
- Make a hat and socks (pictures 22 and 23).
- Sew on a hat and socks (picture 24).

Brownie from pantyhose is ready!
List of tools and materials for making a brownie from threads
- Two sheets of cardboard or two disks.
- Scissors.
- Wool threads.
- Glue.
- Beads.
- Colored paper.
- Big needle.
Master class: brownie from threads
Do-it-yourself do-it-yourself do-it-yourself threads are most often made using pom-pom technology. That is, to begin with, you make a pom-pom, after which you decorate it at your discretion so that you get a brownie.

Operating procedure:
- If there are no discs, cut out two circles from cardboard and make a hole in the middle of each.
- Put discs or circles together.
- Thread the needle.
- Wrap the circles tightly together, pulling the needle through the hole in the middle, as in the diagram above.
- Wind a few more rows of thread in the same way.
- Insert one blade of scissors between the circles and cut the thread.
- Spread the circles a little.
- Tie a knot on the threads between the circles.
- Remove circles. You have a pom-pom.
- Cut out eyes and a mouth from colored paper.
- Glue them on.
- Glue the pupil beads on top of the paper eyes.
- Roll up a small ball of thread.
- Glue it between the eyes and mouth. This will be the nose.

Thread brownie is ready!
List of tools and materials for making brownie dough
- Salty dough.
- Paints.
- Tassels.
An oven is also required.

Dough Ingredients:
- two glasses of flour;
- a glass of finely ground salt;
- 180 grams of water.
Master class: brownie from dough
cook salty dough. To do this, mix all the ingredients in a bowl and knead them thoroughly.
Now start sculpting from the dough. This is the same as sculpting from plasticine. Take a small board and place your work on it. You can make a brownie figurine both flat and voluminous.
Make each detail separately, gradually connecting them together, as the salt dough may have time to dry.
First, sculpt the head, make eyes, a nose and a mouth. Then form the body. After that, make a couple of arms and legs. Attach the limbs and head to the torso. Give the whole figure a shape. For example, highlight the cheeks and eyebrows on the face, fingers on the hands. Also do not forget to make a silhouette of clothes and hair on the head. In general, feel like a sculptor.
After you have molded the figure, it needs to dry. To do this, place it on a baking sheet and put it in the oven. Dry the figure for about an hour at a temperature of 80 degrees. Drying can also be arranged on a battery, but this process will take much longer.
When the figurine is thoroughly dry, let it cool. After that, proceed to decorate the brownie. Show your imagination here.

Dough brownie is ready!
Tip: for needlework, choose bright colors fabrics, threads, paints for dough and decorations. So the do-it-yourself homemade ones will turn out to be much more interesting.